What's new

1972 F-250 2wd to 4wd build

Can you add length to your t case?

I bought a 70s pathfinder 4wd van with a c6 and 205, looks like it has a longer adaptor, probably 2wd c6 length

or maybe you go 203 205 doubler?
 
No not really, as the cross member goes under the TC front output shaft.
can't really go up with TC, I already notched cab floor support to get it to fit.
Same for lowering the whole thing. Pan is tight to engine cross member. Everything is tight everywhere.

Engine/trans/TC angle is 5* which is OK and good for the rear shaft.

Feel your pain. I was ignoring my driveline angles on droop and it finally killed the joints, slip and bearings. From the picture you would have to dog leg the transfer case crossmember. Interested in what you figure out.
 
Can you add length to your t case?

I bought a 70s pathfinder 4wd van with a c6 and 205, looks like it has a longer adaptor, probably 2wd c6 length

or maybe you go 203 205 doubler?

It's possible but the resulting angle improvement is minimal. I already have the longer 78/79 bronco style TC->trans adapter.

Now, a doubler is a great idea. I've been avoiding that rat hole for simplicity and financial reasons. Again front drive line benefit would be minimal but more gears would be nice.

For my use a doubler with a less gear deduction would be cool. A 1.5:1 ratio could be used on street for equivalent rear gear of 6.15, and still do 55 mph. Then still have 2:1 low range and also 3:1 with both in low.
 
Feel your pain. I was ignoring my driveline angles on droop and it finally killed the joints, slip and bearings. From the picture you would have to dog leg the transfer case crossmember. Interested in what you figure out.

I re-did the math with a more accurate model of axle arc. Rotating pinion 12* up gets axle joint up 3.6" which is significant and more than all other possible options combined. I don't see another way.
Even doing this, the total droop/travel will still be limited by the driveshaft, so may explore the other options too. Can get 10.5" of travel out of 12 with rotating Cs. Probably lower ride by an inch or so and have 4.5" up 6" down
 
Got the rear driveshaft installed. 1350 joints and 3.5" tubing, 62" long.

I was finally forced to paint the gasket surfaces of the 205 before installing the drive flange and shaft.
ACtC-3e_T01qRrkqP_SZT5jxzM5IsH9zsXAv087_pVjXziB_7jSoNu90NNtEH_6DiBF4SWjlc_Z8f6_zu-5MLgrrbtSQklOGCEoScWCfxjrfp28YSc3ZIpXHW9TsTwA2zFAHRHjr-ODNx0U-PggBXyS0rEGu=w947-h710-no


I had already done the math and moved the spring perches to yield 1* down at pinion and an easy 7* at TC.
ACtC-3fHhteXj1lzypdVgnuDUgTnNFayC5_WX_nVuksJI0lrVpOgdWBD7E8Z6F5WemTr9CPnH7YGTfawhFLnl46brOyLoZgQfTSMx6TID5_3lYquqOis4WkGNOkQlCgeLT-a03JfkDU3TwzIdJ_esFc_izmN=w947-h710-no


Traction bar helps guard this long 62" shaft and keeps pinion angle constant.
ACtC-3ewFYPcEB5Bb2stKwa5YnabLRLai0ZBC8exllgsC5VcCBNY7kWXT8566nEcwJP0avi8J_1Vm9UXaEUKGGc0m74gxeWpWejnlygjI5a3KJ5Lob2lhCye3WvJ-_F3yoG2P7WP9axG2TWVTGNWm7HeMah2=w947-h710-no
 
Last edited:
Man that sucks about front DS. I hate to say it but the answer your trying hard to avoid is probably the cheapest, cut off the brackets and rotate the C's. You could then use all your existing parts (as long as brackets come off clean) instead of needing longer front shaft-shorter rear shaft-doubler kit etc. I mean if lowering it works and your happy with it on 37's thats not a bad option either.
 
I know you just dropped some coin on that nice 1350 front driveshaft and pinion yoke, but 1410 joints would give you more angle before they bind. Food for thought.
 
I feel your pain, I'm in the reverse spot, I have a SASed BGTL dodge I'm trying to lower, for a huge truck, it was built with correct geometry, and I need to "un cut and turn the knuckles"

I'm 90 minutes from you, I already pondered trading :laughing:
 
Man that sucks about front DS. I hate to say it but the answer your trying hard to avoid is probably the cheapest, cut off the brackets and rotate the C's. You could then use all your existing parts (as long as brackets come off clean) instead of needing longer front shaft-shorter rear shaft-doubler kit etc. I mean if lowering it works and your happy with it on 37's thats not a bad option either.

Cut and rotating the 'C's is the plan at this time. I think it's worth the $ to just buy new brackets instead of carefully removing the old. But that can wait until it can move by itself.
 
I know you just dropped some coin on that nice 1350 front driveshaft and pinion yoke, but 1410 joints would give you more angle before they bind. Food for thought.

Thanks for the idea. I think I need to address the root of the issue, the wacky pinion angle.
 
the fab work is nice, but I'm really admiring your clean shop :eek:

Thanks. I tend to put shit away and finish what I start. If only I could train my wife and kids to do the same in the house.... I've also got a 3 car attached that she dumps crap in.

I built another fab table from leftovers I had from my welding table and HF toolbox workbench. Can make one more pile now.

Hey, where did my pic go?

attachment.php
 
Last edited:
I bought a new fan clutch, a Hayden 2799. Turning shaft feels and sounds like a pepper grinder. Worse on about 1/4 of the rotation. This doesn't seem right. Is this just the fluid in the clutch and expected, or is it defective?
 
Man that doesnt sound right. Resistance sure but I would think it should be rather smooth and uniform.
 
Ok thanks guys returning for replacement. Lots of road blocks at this point.

Edit: I received the replacement, it's smooth so the other really was bad. Either full of gravel or a bearing pressed in too deep.
 
Last edited:
This build is awesome, but I'm also in the club of, "I can't get over how clean your shop is!"

What I want to know is...how organized is your tool chest? :grinpimp: I'll bet it's flawless. :smokin:
 
This build is awesome, but I'm also in the club of, "I can't get over how clean your shop is!"

What I want to know is...how organized is your tool chest? :grinpimp: I'll bet it's flawless. :smokin:

Thanks, I like a clean playground I guess. I actually just did some organization in the tool boxes. I dumped all my crap in them about 2 years ago and couldn't bring myself to make time to organize. After front driveshaft debacle I figure I should do something I can 't fuck up too bad.
I do have drawers dedicated to a single size of fasteners, 1/4, 5/16, 3/8 and so on.
 
Love the truck! Very nice metal working and love the attention to detail and OCD! 😎 Makes me wish I took my build slower and made it tidier and more thought out lol 😬
 
Love the truck! Very nice metal working and love the attention to detail and OCD! 😎 Makes me wish I took my build slower and made it tidier and more thought out lol 😬

Thanks. It's always a balance. I think you are doing a good job where it counts, you can come back and turd polish once it is moving on it's own.
 
Thanks. It's always a balance. I think you are doing a good job where it counts, you can come back and turd polish once it is moving on it's own.

This is true. Keep it up, looking forward to watching it come together!
 
Finished fuel fill fab for the 'burb tank with right side plumbing. I ended up abandoning the in-bed option, after I put the bed on the frame and realized I couldn't reach the fill location without a ladder. I wanted to install a door style fill, but to do it right is a lot of work and will delay the goal of run/drive so decided to go with a simple fill tube like factory. Step 1 was to cut a hole, I had my daughter help.
ACtC-3fyT2f17xElCl9Bj-GZL03xwovz1D55Y2RRVuihQJfEUcfB22FOFBM0xBzIP_yLRdbFcHQpmlST21R9KM0YaneLUkzwlhjDi6w987_KxIttax232flkpYDHOpBjzmSHxCIJgGsEiowEML3kXdQN1wkD=w511-h680-no

Next step was to cut out bed interior for fill tube clearance. I made it as small as possible.
ACtC-3cScdeXHF1EQrw8qIbBogwxnb2YIhrdVQrDJDalHEJQtmm8QPC-W1cKtT4EV9FTKIy-fpCpfYLqYAUkZbYO1itDdriMuoRBc2I4oYzz7Sukk4MGKnfED_yGU6pQIL611ik_cMTPRvwTey-t03NL9TcP=w511-h680-no


I ended up using the factory aux fuel tank fill tube for simplicity. Needed to adapted it from 2.25" to 1.75" and route to tank given constraints on underside of bed floor. Pressure tested and fixed pin holes so no fuel leaks.
ACtC-3fWa_PX9W_ZeDCxxm9d-Xw0wChrbGJSO746JkQm7M-xNqnN69-ktkbtKKHt8dknTx8jgkxeD6fKeS7nJGWSUBprG7ylYD3sVclpWAjg3hsnUpxATwooYCpcXJ20mFD4_zCNffXAYR1AM5iJkTjvZUQc=w907-h680-no


Instead of using factory cover from aux tank and filling hole (cut with torch from factory), I made a new piece from 18 ga. Bent in press and welded it in.
ACtC-3eOH_ClPOjJAQndY-Hk_vs3WgTEF_J703HJzKuU-AbXv4IAQdomCqPzVtqwBNs3oQQNFekTPzF8bH_PiOHIQpmvdiQ0a33uRmI8PAPflqytAHbsMkm9zkEOoRrdvHKWjX_1g8d-N6Wxq_-Nrv--aYpt=w511-h680-no


Came out OK with the parts I bought for the other method. One step closer to getting it running. Next step is get wiring run and pressure test fuel system.
ACtC-3eNTFTkpsDiI9xMTFwbX3wLKrIhxqJ3GBg4USCUSrKD93oGbjiQuuTVqQJ-PZrfgfBcZ4Ju1o8nFTKQp2_osD2x4hbsuRgYkg0qAY-JDqJhpiKvWNcTePCCMJzSxVt4gopAV6ozkDhgoWL7u0FvA2RF=w511-h680-no


Also got power steering cooler mounted. Not best location but need to move forward. From 'Yota taco.
ACtC-3cr9PJfteotS2JEEY8GuZuKvKLIul2ydvzR1cO0z0hq6S71aEjTwbFITwSzLbkv4vTQaNn0V3jBtNzySmvNuOlbrzVKPEl1oWfbgdu3mIHflScEuXlMKarTj4u4hEOuk4BA280fO7recb2NnFH6wIjT=w907-h680-no
 
Nice work!

Can you elaborate on the steering setup for the swap? Column, shaft, box, etc to go from 2wd to 4wd? What year is the rear axle?
 
Nice work!

Can you elaborate on the steering setup for the swap? Column, shaft, box, etc to go from 2wd to 4wd? What year is the rear axle?

stock 72 2wd auto column
Borgeson telescopic shaft & joints
80-97 Ford PS box
Ruff stuff TRE linkage kit, TRO
Axle are from 94 F350 so Sterling 10.25
 
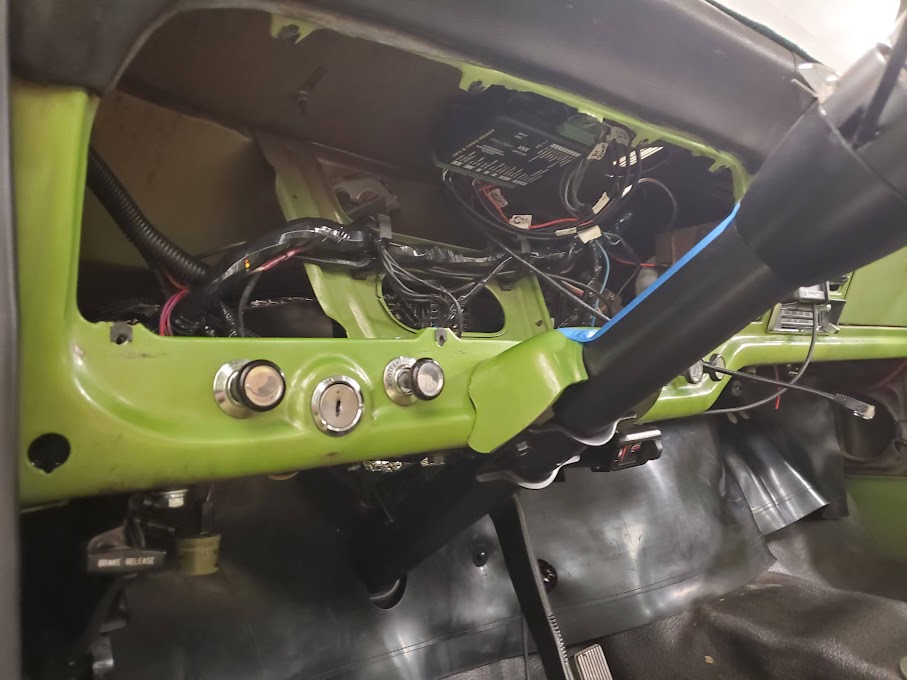
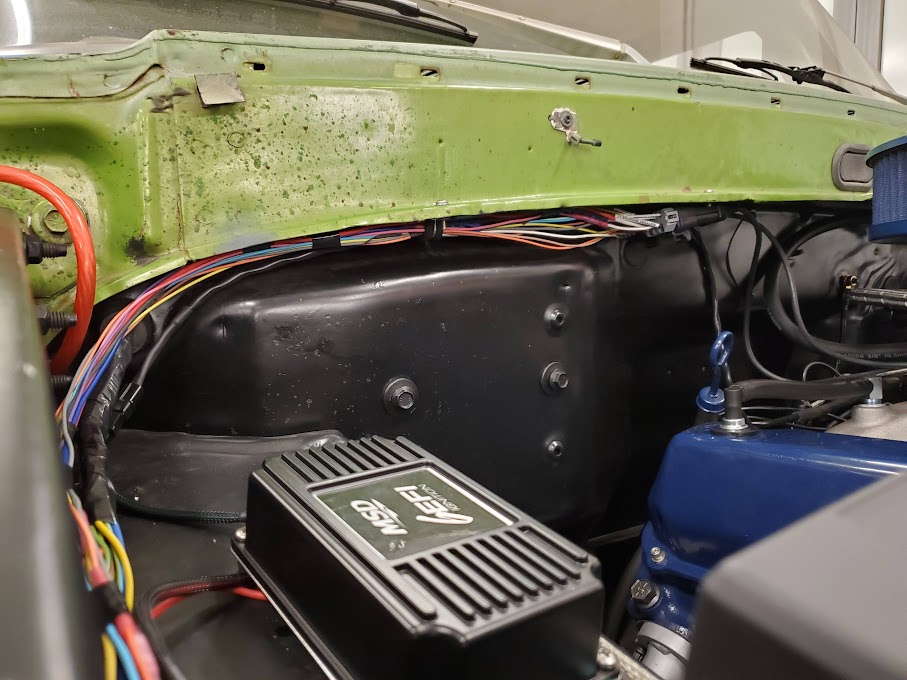
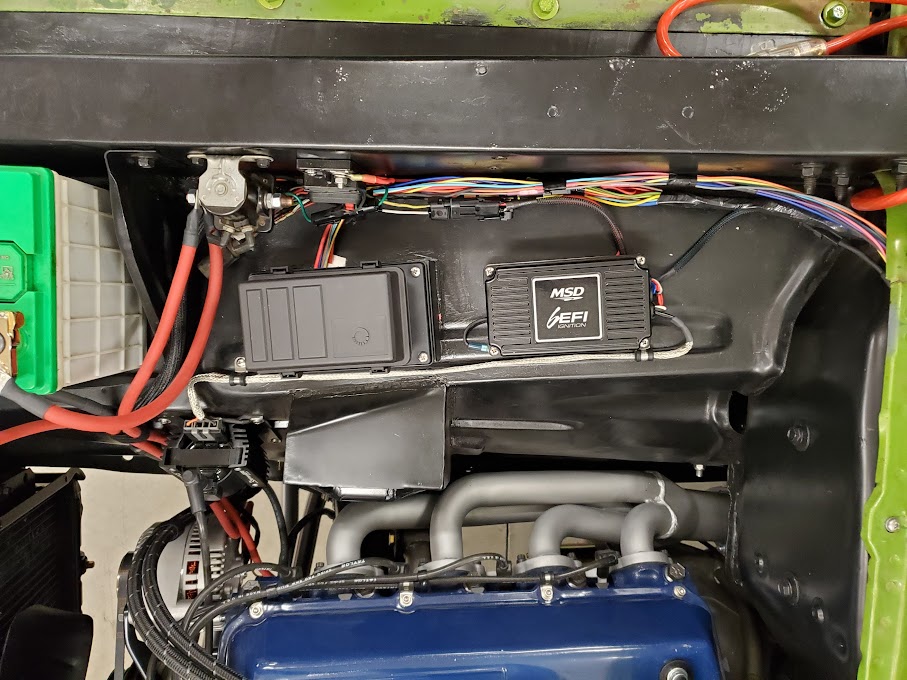
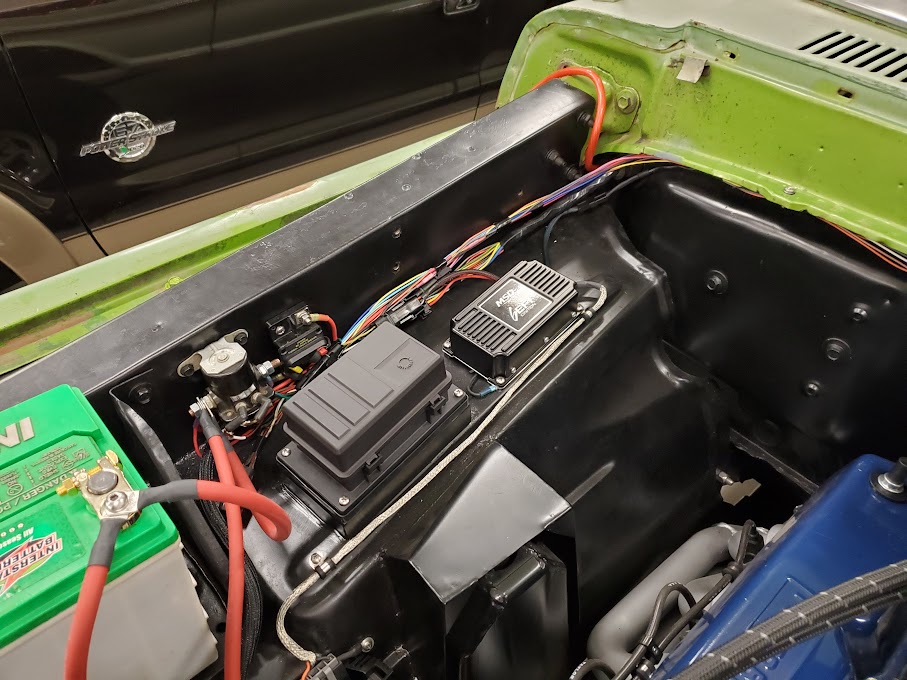
Completed the main wiring harness. I decided to not make a secondary harness for all the aftermarkets additions, and just wrap them into the main. Here is a list of the modifications I did;
-Repaired all 'tap' splices by cutting wire and repair with heat shrink butt connector (at least 25x)
-Repaired heater fuse thermal damage and reconnected factory wiring
-Added relay for switched power for all aftermarket devices on it's own circuit
-Integrated trailer brake controller.
-Added switched trailer charge circuit
-Integrated radio wiring
-Added 10ga wire to power heater/AC system in future (to bypass factory power)
-Added theft deterrent circuit to prevent under-hood and under-dash hot-wire.
-rewired non-fused brake warning circuit as a - input to new cluster (won't catch on fire)
-Added fuel pump circuit
-Integrated all wiring into factory firewall plugs so no wires on outside of firewall.
-Converted fuel level circuit to differential
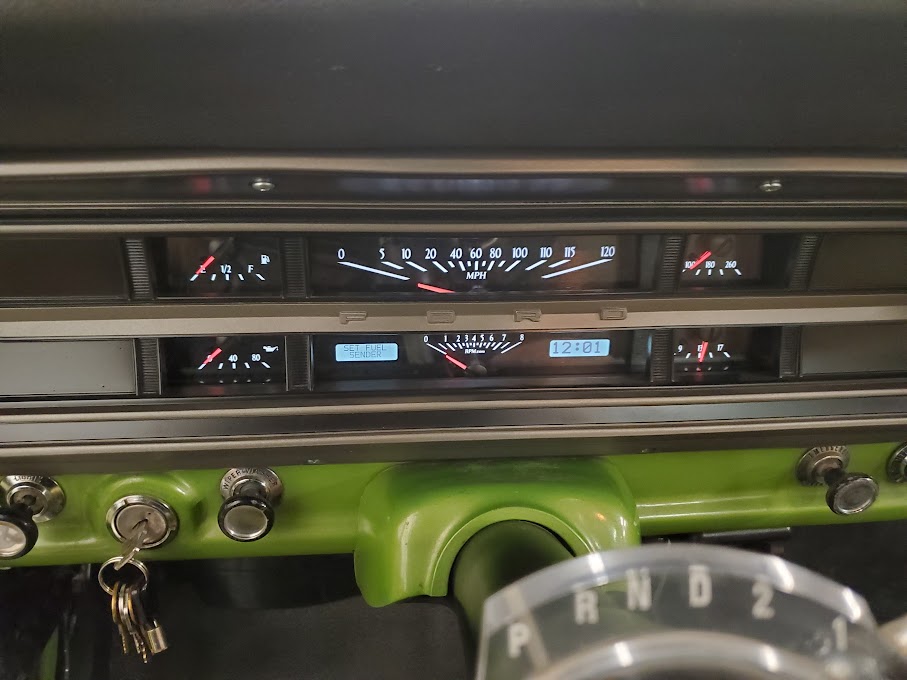
-Removed all unused wiring (old gauges and so on)
-Repurposed ammeter wires into tack and a/c controls
-Support for 3G alternator, EFI, MSD, etc.
-Provisions for adding more aftermarket equipment in future

I used all waterproof/heat shrink crimp connections, like factory, no solder. Wrap is non adhesive vinyl, like factory, removable/re-workable. New connectors are weather pack

I studied the factory schematic to consider the different power domains and fusing. Many functions do not have any fusing, for example;
Ignition
head, turn & park lights
charging
gauges
wipers
No fuse to ignition switch, light switch, or anything on crank/run. That is a lot of unprotected wiring going through firewall multiple times.

In today's vehicles, pretty much everything is protected including critical systems like ECU and ignition. I don't like the idea if a non-fused high current power entering passenger compartment with no way to shut off/isolate, so plan to add a 50A thermal breaker on the factory power wire. Other circuits will get fused in the box I added, except high power audio.

The MDS box will not get a fuse. Why? Because they said so without reason? No, because I researched until l understood and made my own decision. You can fuse and many have.
The reason is related to the 'captive discharge' topology. The main capacitor that stores all spark energy and drives coil is charged to 550V, it discharges through the main red power wire on shut down, as other side is common gnd. So 550V dead short into battery, very high current but for short time.

Got the harness installed. Only the high power main speaker wiring to doors is outside of main harness. It comes from audio amp behind seat so didn't make sense to integrate.

But instead of working on the rest of wiring to get it running, I focused on the most critical system, the stereo. Temporarily hooked up the amp power and the others to make it all work.

It occurred to me that this vehicle had lost it's soul (well, brain, heart, motor, everything) and had not had the key put into ignition for over a year. So it was a satisfying milestone to get audio system working. Tested with some AC/DC, it's brutally loud, as it should be.
I also made significant improvements to high current grounds including the cab, so the amp's power supply isn't collapsing on each bass note. Fiddled with tuning until I was half deaf and beer was empty. Made some motor noises behind the wheel dreaming of the day when it moves on it's own
:)

So if the new motor spins a bearing, flattens the cam or trans won't move, at least the stereo works.
ACtC-3e6tZZr1-rFfrXcMbSU7BsV3VafN6bY9T1zBnLR-h0n2cKLAgOvvRE6dm2cxSvCsPj8-BgZr3DQw58dcMFuwccG_dn27XdycIcmUrrj45_XhHekWDjImcIKoROl5QeWOLzPtXPjfScGSjhxbp2fXqSK=w907-h680-no
 
...40+ years of Bubba and Uncle Dad hacking away at it while making “repairs”, it just leaves you scratching your head wondering how everything managed to work without erupting into a ball of flames...
Yes we are all experts with a beer in one hand and rust pliers in the other.

The best is the hackage to the tail lights, for trailer wiring, early in the morning on the way out of town. Just enough to not get pulled over until sunrise.
 
Installed my fancy gauges and buttoned up dash wiring. The modified main harness looks like the original. Far cry from some of the the spaghetti incidents I have see.
The panel is quite thick so the gauge brain/controller would not fit behind. The factory instrument panel wiring was fairly short, didn't wan to extend all the wires a short distance so ended up mounting on bottom of dash using a strap to one of the pad studs. Easy to remove.
The windshield wiper linkage (aka wire-pincher) is right behind so have to use care to secure all wiring across the back of the dash. The stereo is tight and pushes it's wiring into linkage if not careful.
ACtC-3fY4IZJ4Ij72NCoLk35Oi96OVUysgdzpVkQb-SLbruMA5diQRUHhDmN1dNvJ8AqbSPlIUlb8n13YXwuYoOP1n15N9m_vt5bmPIT7PPNTZrdaS3iHcPEYb3ZcA1SqUirU8ShISnV6xep8QP31YENM4-x=w907-h680-no


I repurposed the engine harness' firewall plug for the instrument wiring bundle and hooked up all the wiring. At that point I had to see how it would look.
ACtC-3ca9Z7I5zO86uBheNvwQgfxP_-zApMz_7Mm1NyvtmRpHR4CdbB79I292-eYhoKy7u1cJ7kg8LXhez2zF1KlWa8xPZC6BAQkWIFqjWlC_v5mXP0R5jmUhT71qkPvpbeW6dDyGvqIDISM6Xxjk_uHl0wl=w907-h680-no
 
Spent a lot of hours on underhood wiring. Still have a way to go. Trying to make everything modular and serviceable, like well written code. No zip ties were harmed in this install. I want to be able to remove any harness or component (alt, starter, TB, etc) without cutting anything, like factory. PITA now but I know a project of this complexity WILL HAVE ISSUES and need trouble shooting & modifications. I'm trying to leave the harness unwrapped until it is running, but I think I know what will happen.

Wires are ugly and clutter the view of my 'Murican muscle, so I made a small bracket to hold the EFI wiring connector up under the cowl. I shaved the head down on some 6-32 screws to secure the connectors to the bracket, and it attached to the firewall with one screw.
ACtC-3fTiOvPSRwiTsuFFNIWt7klfR1GH0lxf4kwg7vhOnVUrcSS-66fwCxnb6PkBWV1_MM-uVP_77WrUlWvgvD2jpF1a04mtU3mUwzG-ONkR-QLSSOzLNBjmbqCyRd2pPaG3tyKSM9lwi9hty-XbAMyX3EJ=w907-h680-no

ACtC-3edI7OIpujkVpm7mKLpd4ZUvaCJpUtbE2MrZ4G4QL-tR81v2bvm2cI3UaWXAI7FQOdReOU_oy1VKiea0BocXgeO3D47wac-VkDovIKW0dQ2jU01B8WQqnUjDAz8ugeHhPshgUlovpo5vdMkDqKlFcQ1=w907-h680-no


Made good progress on right fender wiring. Still need to wire to fuse/relay box. Space is tight with hood hinge. I added 3 weather pack connector to main harness so it can be removed back through firewall hole. I also turd polished MSD wiring and added the one more connector needed. Alternator and starter have their own harness. The EFI harness disconnects from the main, but both have many wires that will go to the fuse/relay block. No plan to connector-ize it, all terminals can be removed separately if/when needed.
ACtC-3dn-UfiyTSSZUUz6MYCR8nKTCCeTaZMkzu2UMY2xlJS3GMll-0T39QV8tMgvhrPyEoYz_aVMDkuBDpiOWwPI9tFKGT6rMAlGE5wW8L4NVMmnvNYDi8nR6jPt9YQp59VyvVkddlP9XDGz6Yc5mzlIX0Y=w907-h680-no


I added a 50A breaker (real Buss/cooper not cheap crap) on the main harness power line. Plan to replace the Audio's AGU fuse holder with another breaker at 60A.
ACtC-3dADRS6CKwPml5JHSMHzrK05Z79HAXU-0OxOZiLv1kQROPQiZUWVg57lN0qvyn-y0aY-wvmTuTax1TwQDwJOIwDKfH0JZP3I3Wxt3TdbEZWB3p7wSGmUA5FtXoYe2vcjnr4r79tPCQU6g0KZM71_U8T=w907-h680-no
 
ooooh Those are fancy gauges! Nothing new to say man it looks great. I think we have all had at least 1 vehicle that we bought with a wiring nightmare.

For me was a 1979 GMC k10 short bed, PO had neon lights or a speaker in every nook and cranny in the cab. Solder or even butt connectors were not in this guys vocabulary, if you were lucky you got twist wire nuts but most of them were wires twisted together (some with tape over them). Also need a ground somewhere? why bother running a wire to a grounding bolt when you can just run a self tapper right through the middle of the wire 2" from light. I seriously had a shop trash can full of nothing but wires and those small 4-6" JCwhitney neons.
 
Top Back Refresh