What's new

The PAINT thread!

Post a pic of what you're dealing with!
for future generations

 
I crinkled up the front of my rig last weekend so now I'm sourcing panels and figuring out my approach to paint.

I'm working on the 1996 Ranger in my avatar. 26 years of UV damage, though it's in good enough shape that I still bother to wax it from time to time. Certainly some fade going on, but it's hardly noticeable since the whole truck is fading at once. Just trying to explain the current condition of what I'm trying to match.

I'm replacing / painting both front fenders, core support, and header panel. If I can't find a color matched donor in a couple days (in which case I won't paint), these pieces will be coming off of a tan truck (already sourced these parts).

I have zero experience with HVLP. I do have a nice shop with clean air. I am not married to any particular paint type or process and I don't plan to paint regularly after this. My goal is to match the color close enough that it's not noticeable to the lay-man walking by and make it durable enough to weather with the rest of the rig. If it lasts 10 years before going to complete shit that would be awesome. Minimizing cost is also a goal, otherwise I'd just take this stuff to a paint shop and trade them a bunch of money for their expertise.

I came across the 2k Spraymax aerosols tonight. Something like this would be great if it will meet my finish criteria. I've certainly spray bombed a lot of things. I realize this is single stage. I would be open to a 2 stage product it it's easier to apply or will make my life easier in some way.


Spray Max 2K Single Stage Aerosol Auto Spray Paint, SPM2K-MixedPaint


Considering my situation, experience, and goals, what would be your recommended paint type and process?
By the time you buy enough paint to spraybomb the cab top, fenders and whatnot, you could afford a cheapy spray gun and a gallon of single stage... AND prolly come out with a better looking result.

If you want to use the 2k spray paint though, it would work. It really depends on the desired end result. I haven't used any rattle can to date that lasted better than even the sub par stuff you can get from lots of vendors with the right prep work.

Red paint, from what it looks like your ranger has in the photo, is typically more expensive. Summit, TCP Global, Nason... lots of options. That and a lower end gun would put you in the 200-250/275 range.

Same price as 8 rattle cans.

A 2 stage is going to run maybe a 100 bucks more, but will more closely match the factory job. TONS of videos out there to watch for pointers. Nothing is more intimidating than your first time. I get it...

Nice thing about the 2 stage though is ease of correcting any mistakes you make BEFORE the clear coat gets laid down.

I say take the plunge and have some fun.
 
Bringing this back up with a question.

I'm preparing my jeep hood to attempt to pull a mold off to make a fiberglass hood.

I'm at the point of wet sanding now. Just finished working my way up to 1500grit.

Here's my question and it might be dumb.

Will you always see what appear to be tiny scratches? I assume the last grit sizeused leaves its own little scratches?

It's not like I have scratches that don't go away, or that you can even feel. What I can see moves around with each pass.

Guess I was figuring at some point I wouldn't see anything anymore?
 
Don't know if this will turn out

2022-03-07 14.58.04.jpg
 
You're supposed to step up grits, and as you do, you sand away the scratches from the previous grits. Looks like you stepped up too fast.
 
GT, what are you sanding? The tiny scratches I see in the pic is nothing that a decent primer wouldn't fill in.
 
You're supposed to step up grits, and as you do, you sand away the scratches from the previous grits. Looks like you stepped up too fast.

Ya I started with 320 then 400 dry. Then wet sanded 600, 800,1000, 1500 and ended with 2000. I did do a few extra passes with the 1500 & 2000 grit and by the time I was done it was looking pretty good.

I most certainly could have been stepping up too fast.


GT, what are you sanding? The tiny scratches I see in the pic is nothing that a decent primer wouldn't fill in.


Duratec 707-002 Surfacing primer. Catalyst is MEKP. It's made for doing composites. In short, my hood is a plug to pull a mold off of. The next thing it will get is 6 coats of Partall parting wax buffed on it.

So no primer going on it, it is the final surface.

More pictures after all the sanding was done. I know they don't really show shit.


IMG_20220307_155924.jpg


IMG_20220307_160031.jpg


IMG_20220307_160116.jpg


IMG_20220307_160520.jpg


IMG_20220307_160604.jpg


IMG_20220307_160818.jpg
 
From that list you're not stepping up grits too quickly, but you may be moving from one grit to the next too fast. General rule of thumb is you sand till the scratches from the previous grit are gone. If you have scratches left when you get to the 1000+ grits, you weren't done on the lower grits.
 
From that list you're not stepping up grits too quickly, but you may be moving from one grit to the next too fast. General rule of thumb is you sand till the scratches from the previous grit are gone. If you have scratches left when you get to the 1000+ grits, you weren't done on the lower grits.

That's what I thought you were talking about.......moving from one grit to the next too fast. I definitely could have been doing that.

Towards the end I was really trying to make sure I changed out the sandpaper often to avoid just rubbing worn out sandpaper around.

I can't feel anything on the hood right now. It feels like glass. If I look real close, I can see marks from the 2k grit.

I guess because I've never done anything like this before, I don't know what "good" looks like.
 
After 2000 grit you should be able to do a polish on it like you would topcoat, and get a good shine that's got zero scratches in it. If there are scratches left over, they're more than likely lower grits left over. Can't see anything in the pics though, so looks good from here.

You can keep sanding it out with the high grits but you'll wear through them quick. I tend to start wet sanding at the same point you do, so you're on the right track if not already there.
 
Stupid questions warning

I'm sanding in prep to use Omni MP170 epoxy primer. Pdf states 120 - 180 grit on bare metal 220 - 320 grit on old finishes, body filler.

What if I have bare steel with body filler on it? The grits don't overlap

Also, before I read the pdf I sanded this new fender with 320. . . to bare metal in places. Lots of places. Should I just 120 or 180 the whole thing bare? I just feel like that's going backwards and making scratches I don't want to deal with. And what about the places where I have spot putty?

I know I'm overthinking this but WTF?

IMG_20220403_131054566.jpg


I wasn't planning on using MP282, but now I think the plan is to 180 everything, then MP170, then MP182, then go to 320, then topcoat.
Paint store says he can only make single stage in the color I want.

.
 
You're over thinking it. On metal there is no chemical bond like old finish coating. The epoxy primer needs a base to adhere to with a tooth on it. Thet's why they recommend a more aggressive abrasive like 150 or so. Not a biggie.

I typically DA bare metal with a 150 grit or so before a dtm or epoxy primer. The primer will fill in any scratches you think you may see... trust me. Then the primer gets sanded with a finer grit.

As for the body filler, that grit is fine also. If there are any scratches visible just use a bit of glazing putty and feather down AFTER the epoxy primer is down.
 
Keep in mind also, most epoxy's can be top coated WITHOUT sanding after a flash time of 30-45 minutes or so... it creates a chemical bond with the top coat. I'm not sure if you are going that route or not. If you are planning on hitting it a few days later or longer then you need a scuff with some 320 grit prior to top coat.

What's your process? Epoxy prime, sand, sealer then topcoat or what?

Or just prime, flash and shoot?

What's your plan?
 
Right now, the plan is two coats of MP170 and then two coats of MP182 within the window of no sanding. Sanding blows. Single stage top coat won't be for a while yet so I'll need to scuff the 182 at that time. I thought I'd start with some of the small parts and see how it goes before I go ahead and do the cab.
 
Right now, the plan is two coats of MP170 and then two coats of MP182 within the window of no sanding. Sanding blows. Single stage top coat won't be for a while yet so I'll need to scuff the 182 at that time. I thought I'd start with some of the small parts and see how it goes before I go ahead and do the cab.
This is the typical plan...and a good one.

Hit the bare metal with 150 - 180 grit. Shoot the epoxy primer, let it flash and cure. Correct any runs or imperfections, shoot your mp 182 (this is actually your surfacer primer, prolly a high build for sanding down). Then scuff it all down with 320 grit (NO MORE THAN THAT GRIT for a single stage paint, the SS needs a good bite also and 320 fits the bill nicely), and apply 2-3 coats of your single stage paint in medium wet coats.

Are you using Omni (PPG) products? What Single stage are you going with?
 
"Sealer" is not something I understand yet.

.
Sealer is a primer that is applied prior to topcoat to help the topcoat adhere better. The sealer is supposed to create a stronger chemical bond, as opposed to a topcoat laid over a prepped primer surfacer. I have used it and think it's bs to be honest... A properly primered surface (320 - 400 scuffed surface or maybe a tad higher pending on paint system requirements) is just fine, and in my opinion "sealer" is a waste of money on a single stage paint job (Any acrylic enamel OR Acrylic urethane based product worth it's salt is going to adhere to a surfacer primer VERY well).

Just my experience... the process you have going is perfect for a single stage paint system.
 
I'm getting all of my supplies at the sorta local to me CarQuest because they will mix the 1968 Harbor Blue for the F250. They said they can only do Harbor Blue in single stage. So it is what it is. I have no idea brand. I assume it's compatible with the Omni stuff they have been selling me. Other than that. . . yes only Omni to cut down on variables.
 
I'm getting all of my supplies at the sorta local to me CarQuest because they will mix the 1968 Harbor Blue for the F250. They said they can only do Harbor Blue in single stage. So it is what it is. I have no idea brand. I assume it's compatible with the Omni stuff they have been selling me. Other than that. . . yes only Omni to cut down on variables.
It'll prolly be a Nason or even a PPG direct ss paint. MAKE SURE they supply the tech/ Data sheets with it. :beer:
 
While I have you here. my spray gun is a Harbor Freight LVLP Sprayit Sp-33000. I haven't used it yet. Should I throw it in the trash and get the HVLP from page 1? I assume I can use the same tip sizes recommended for HVLP in the LVLP and just expect to go slower. Is that wrong?

 
While I have you here. my spray gun is a Harbor Freight LVLP Sprayit Sp-33000. I haven't used it yet. Should I throw it in the trash and get the HVLP from page 1? I assume I can use the same tip sizes recommended for HVLP in the LVLP and just expect to go slower. Is that wrong?
You'll be fine. People painted stuff successfully for 100yr before HVLP took over.
 
While I have you here. my spray gun is a Harbor Freight LVLP Sprayit Sp-33000. I haven't used it yet. Should I throw it in the trash and get the HVLP from page 1? I assume I can use the same tip sizes recommended for HVLP in the LVLP and just expect to go slower. Is that wrong?

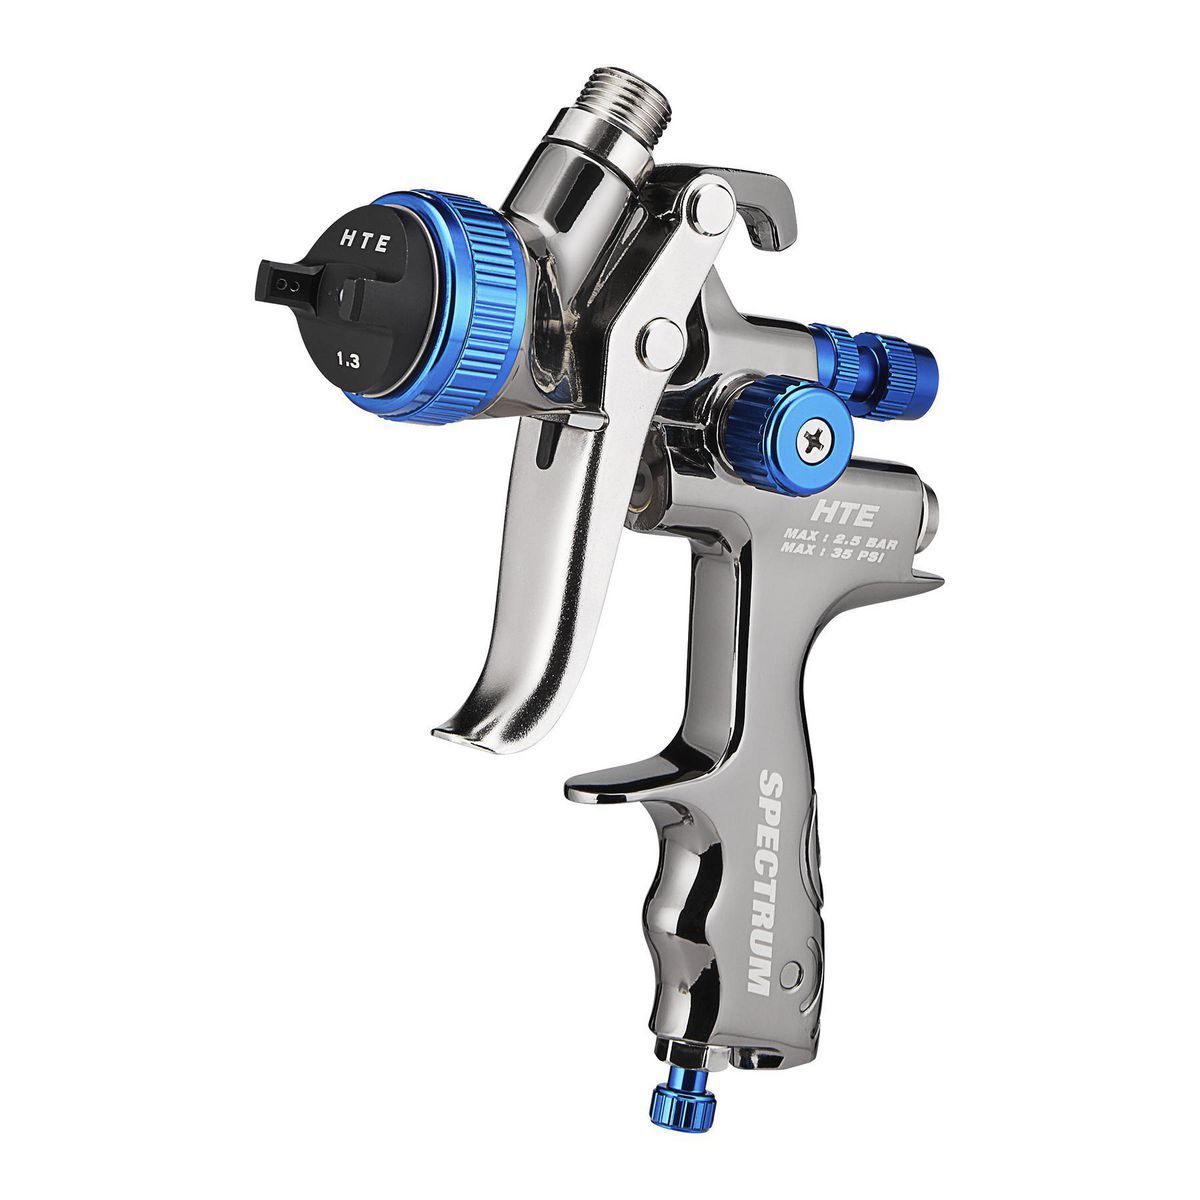
I will say this... for a single stage, I REALLY like the HF Spectrum HTE gun. The tip is a wee small, but you can use a splash (SMALL) amount of medium reducer- like a half an ounce to make it flow really well through that gun. I would definitely practice FIRST with the LVLP gun prior to using it on your truck. I'm not a fan of low volume low pressure for auto painting.

If you are going to play in the future with auto painting just take the low dollar plunge and snag this:


I choose it over all my other guns anymore. Comes with a 1.3 or 1.4 tip. Runs VERY well and doesn't blow a lot of paint into the wind so to speak.

And you do realize that the primer will need a different tip too, right? A 1.8 tip is what the primer should call for. Primer is thicker than your single stage. What tip is on your HD LVLP gun? If you aren't sure, take a look. Heck I will ship you my eastwood concourse with a 1.8mm tip if ya pay shipping, clean it and send it back man.:beer:
 
Heres a simple breakdown for ya man...

Clean, repair, prep surface (this has been covered).

Prime with a hvlp gun with a 1.8 - 2.0 tip

Prep surface, repair any defects, WIPE DOWN WITH a wax and grease remover TWICE! Wipe down with a solvent (even isopropyl will work). Tac it off with a quality tac rag (even the HD hdx ones work fine).

CLEAN AND CLEAN!

Then shoot with either the gun above or a decent hvlp with a 1.3 -1.5mm tip!

Go slow and be methodical with your technique.

Watch Kevin Tetz videos, he's a good resource on paint technique.

:grinpimp:

AND have FUN! It should never be stressful. All the stressful crap should have already happened. LOL.
 
I will say this... for a single stage, I REALLY like the HF Spectrum HTE gun. The tip is a wee small, but you can use a splash (SMALL) amount of medium reducer- like a half an ounce to make it flow really well through that gun. I would definitely practice FIRST with the LVLP gun prior to using it on your truck. I'm not a fan of low volume low pressure for auto painting.

If you are going to play in the future with auto painting just take the low dollar plunge and snag this:


I choose it over all my other guns anymore. Comes with a 1.3 or 1.4 tip. Runs VERY well and doesn't blow a lot of paint into the wind so to speak.

And you do realize that the primer will need a different tip too, right? A 1.8 tip is what the primer should call for. Primer is thicker than your single stage. What tip is on your HD LVLP gun? If you aren't sure, take a look. Heck I will ship you my eastwood concourse with a 1.8mm tip if ya pay shipping, clean it and send it back man.:beer:
The LVLP came with 1.3, 1.5 and 1.7

I'm going to go ahead and get the gun you mentioned. Then I can play with both. . . . And I ordered a shit ton of 150 discs. Thanks man! :beer:

I have to go to HF anyway to bring back half a dozen jack stands. :lmao:

.
 
Last edited:
Well this weekend was fun. I didn't go to HF because the jack stands I have to bring back are holding the F250 up. :laughing: . The DA my buddy gave me to hang onto while he's in the joint exploded with the first disk I was going to use. . . fucker. . . So. . . I have this
8.JPG

with a soft head and some 80 grit

and this
81w3XVGd7pL._AC_UL320_.jpg


with a bunch of 60 and 120

My wife did most of the sanding while I worked on some other shit. We're testing on the dust shield and pass side fender because the dust shield will be mostly buried and the fender is on what we call "Marlene's side" :lmao: Don will never see it. Sanding took forever with the 120 on the orbital. I did a piece of spare door skin with the 80. She used some 60 on the dust shield. Just messing around to see what works before doing the cab. I don't want to spend unnecessary time sanding on the cab when less will do.

Sunday I went out and played with the LVLP

Two coats of Epoxy primer 170 . 2:1 no reducer (1.5 tip and 18-20 PSI) I used about 15 oz and had what seemed like a lot of overspray. First coat looked very orange peel. Second was a lot less orange peel. (By the way, what makes my LVLP gun vibrate and squeal like a pig?)

That seemed to fill all of the scratches. Even the 80 grit on the scrap. Then I then I wrote "80" in the primer on the scrap with 80 grit again.

Two coats of MP282 4:1 no reducer (1.7 tip and maybe 16-18 PSI) Narrowed up the fan and tried to keep 30% overlap. I used all 15 oz of that. It all looked orange peel when I finished but was decent looking after 3 hours of dry time. These two coats finished up decent except where I scratched the 80 into the epoxy. There was a lot less overspray as well.

IMG_20220410_135428624.jpg
 
Couple questions
1. Can I epoxy primer over bare steel after wire wheel without sanding in between? IE door jambs. removing paint from the door jambs is a whole lot faster with a twisted wire wheel on a grinder than ripping sandpaper to shreds on the DA or orbital. I don't know if the wire wheel leaves enough 'tooth'

2: How long should the truck sit in my garage after single stage paint goes on? It must have a cure time. I might send it off for exhaust and brakes or just let it sit outside in the rain and shit while I do the box. I haven't bought the paint yet so I can't read it.
 
Top Back Refresh