What's new

The PAINT thread!

Thanks Flecker! This is what I have for my air drying. Out from the compressor the line goes to a transmission cooler, then to a water separator, and then into the tank. The line going into the tank stays at ambient temperature, and I have noticed when I open the drain valve on the tank the next morning, hardly any water comes out, where as before when I would crack the drain valve open in the morning, a whole bunch of water would blast out.

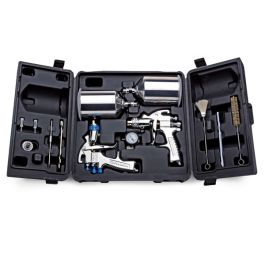
I also have a water separator and a regulator at my air hose reel about 40 feet away. I'll pick up some of those disposable filters, and that spectrum gun and give it a go :)

Any suggestions for primer and single stage paint that would provide good rust protection, and scratch resistance? Not body panels, but for stuff like car parts, roll cage, tool carts, and just general steel items? Doesn't need to have a high gloss look. Preferably not too expensive. Would something like tractor paint work? LOL

IMG-0801.jpg
That's a cool set up for the compressor! Mine is definitely less sophisticated. :grinpimp: It's always condensate that gets water in the compressors... I live where it's warm/ cold extremes and it tends to aid in the compressor's getting moisture in them.

As for primer's and paints... There's a ton of options. I like these primers for general use:


It's an easy to use, direct to metal (dtm) sandable high build... Keep in mind it really depends on the size of the job too. For little knicky knacky things like small parts I will just rattle can with a 1k (provided it's safe for various paints). For bigger jobs I may start with a self etch primer or epoxy primer (for jobs I know I am going to put filler over) on bare metal, then a 2k for final/ sealer, then paint. It really just depends on the project.

Of course high dollar primers aren't always necessary, nor do you need the volume of a gallon of it at all times. Thus the rattle cans when ya like.

As for durable top coats, again that depends too... for just a get er done single stage with hardener's/ urthane mix my go to is restoration shop or speedkote. The price for a quart is roughly 55-60 bucks and a gallon is probably 150-160. Enamels tend to be a bit cheaper, and just as durable but don't have the same uv protection that the urethane single stage would offer. BUT, they are easily cut and buffed and will literally last for 25 years or better if treated right. I still see a rig rolling around town I sold 20 years ago with a single stage enamel paint job on that looks just as good as the day I sold it. :grinpimp:

Of course there's cheaper options too for the small stuff, like the off the shelf quarts from o'reilly's. It's a dupont brand that has worked pretty good for me here and there... limited colors though.

And right on up from that is ppg, nason, eastwood (they actually have an great single stage). There's a lot of options... again it really just depends on the project. I wouldn't waste a ton of money on a 95 civic hatchback... or even an old sammy, but I might spend a few bucks for an older square body or mustang. The budget typically matches the project desired end results. :laughing:

And sure, tractor paint works great for some applications! To be honest I'm not a huge rustoleum fan... it's so brittle and fades/ chalks up super easy without constant attention. It works for a one and done deal, but I don't want to have to think about it when I am done. For the low budget, absolute quickie paint... THIS: is what I would grab.

 
I already made a suggestion that will work great. it did for me. but I don't know how well it will stick to smooth surface. and I gotta warn it go on THICK. I plan to get another can of marking paint and try dye it black, as lowes only sell white, yellow and i think blue.
Just a side note for surface prep... for most basic sprays, either primer or single stage enamels/ urethanes 320 grit is plenty to sand with and shoot.
 
flecker is the valspar stuff really that good? My experience with hardware store tractor paint is… not good. I’ve never used valspar though. I know van sickle blows, as well as rust oleum and most other house brands.
 
it must be good, since it can't be shipped to CA. lol
LOL... yup. My experience with it was good... It was more durable than the other types of tractor paints I have tried. For stuff like roll cages, wheels and the like it's pretty dang good.
flecker is the valspar stuff really that good? My experience with hardware store tractor paint is… not good. I’ve never used valspar though. I know van sickle blows, as well as rust oleum and most other house brands.
For the cost, it isn't much cheaper than a 2 part single stage. For a whole tractor, or other piece of ag equipment I think I would just opt for a gallon of single stage from speedkote, eastwood or tcp global and go to town. I've had great experiences with all of those.

I haven't tried van sickle... but if it's anything like rustoleum I'm not a big fan. It's sooooooo thin and just takes forever to dry. Even then it is just flakey, as in brittle and chips super easy. May as well just rattle can crap on. I much prefer to spend my time putting a lasting product down than have to go back time again to touch up, and fix. screweth that.
 
I have this gun set. It has worked exceptionally well for my projects.

I don't think you need a top of the line gun to get a good paint finish. Your compressor/filtration/paint/technique are far more important IMO.

 
Shot ol Limey with the Spectrum gun in a single stage enamel w/ wet look hardener.... came out decent enough.

Going to use it for the bed/ tailgate as well in he next few weeks. The Specrum HTE definitely uses the max air volume available, but the transfer rate is pretty dang incredible. There's always some paint loss, and as expensive as paint can be it's nice to have an option with a 75+% transfer rate. :grinpimp:
20211110_155712.jpg
 
Looks good!

Do any of you guys know if I could use this catalyst/hardener with alkyd enamel paints? I know it is listed for a 2k paint system, but it's still an isocyanate catalyst/hardener, and is much cheaper than the damn little cans of catalyst hardener!


upol hardener.jpg


And the stuff I was using was this stuff


majic.jpg


Shit has gotten to be around $25 for 8oz of it... Whereas that upol stuff is about $30 shipped for a liter of it.
When it comes to enamel, and especially alkyd enamels, I would not use a haredener designed for a 2k urethane system. I would opt for an enamel hardener, and maybe one specific to alkyd enamel. Alkyd enamel will take FOREVER to dry without a hardener. A week or better and sometimes longer. The urethane hardener may work, but I honestly don't know and haven't tried.

Most of the enamel hardeners you are going to see out there are for Acrylic Enamels... The "Majic" brand though I KNOW will work with Alkyd. I would just bite the bulet and use it... it's a garunteed "will work" hardener.
 
Air drier setups,

I have tried so many and they all have failed me on different levels at the worst possible times.

Give you this old timer tip.
Add a section of air line.
At the end of the first airline run it straight up into the rafters.
Attach second line to first and to paint gun.

the extra section of air line gives the air time to cool and moisture to condense. running it into the rafters, well the air flow is to low to carry the wait of the moisture up that high and it falls back out.

Also start painting with a cold and drained compressor if you can.
 
I used to hate painting, still do actually, but what I finally realized is, stop trying to adapt your style to the gun you are using.

You have a style, make the gun work for you. Get your paint thinned where you want it, set your spray pattern. Put it on.

I have HVLP guns, 2 of them. a detail gun and an old school pot gun. I don't even look at air pressure anymore. I set the gun to match my painting style and then focus on wet coats with no runs.
That has taken all of the stress and most of the failure out of my paint jobs.

You have to match catalyst and thinner to the paint. Don't mix brands.
 
I don't have a big enough compressor or a spray gun. So I'll be going with the zero budget approach.

Rolling on Rust-Oleum Professional.

Watched a few YT videos where it actually looked ok. All I'm after is ok from 5-10ft and that my pile is one color.
 
When it comes to enamel, and especially alkyd enamels, I would not use a haredener designed for a 2k urethane system. I would opt for an enamel hardener, and maybe one specific to alkyd enamel. Alkyd enamel will take FOREVER to dry without a hardener. A week or better and sometimes longer. The urethane hardener may work, but I honestly don't know and haven't tried.

Most of the enamel hardeners you are going to see out there are for Acrylic Enamels... The "Majic" brand though I KNOW will work with Alkyd. I would just bite the bulet and use it... it's a garunteed "will work" hardener.

Ended up finding a universal enamel catalyst hardener that was $37 for a pint, so that's still better than $25 for a half pint on the Majic stuff.

 
Ended up finding a universal enamel catalyst hardener that was $37 for a pint, so that's still better than $25 for a half pint on the Majic stuff.

I have 2 pints of that in my shop right now... I have only ever used it with Acrylic Enamels though. It's the same catalyst I used in the paint job I just posted up above. Hardened over night well enough, and enamel paint would easily be wet sandable in a few days. I always wait around a month though for enamels.
 
I will be using the hell out of this thread when I get to the primer/paint phase of 'old blue'. Right now i'm in the rust replacement, dent fixing, metal prep phase.
 
I will be using the hell out of this thread when I get to the primer/paint phase of 'old blue'. Right now i'm in the rust replacement, dent fixing, metal prep phase.
Should we start a body work thread?
 
Paint question (being as this seems to be the thread for that), I have a deckover trailer that I plan to rebuild over the winter (fix welds, repack bearings, new tires, new deck, add a toolbox, 2" receiver for winch mount, lights, etc).
I picked up a case of black spray paint a while back (cant remember the brand, might be Rustoleum Commercial? IIRC its a name brand, but a really basic label) and some black "rust converter" primer (might also be Rustolem, goes on clear and turns black when it hits rust).
Would I be better off trying to paint the trailer with the rattle cans, buying some basic black from Napa and spraying it with a gun, or brushing on some of the playground/marking paint that was linked to earlier?

Doesn't have to be pretty, just needs to be all one color, look passable from 20' and not flake off unless I beat it up.

Aaron Z
I can all but garuntee black rattle can will fade REALLY fast, and scratch up extremely well... It's something that sits outside and will be subject to work conditions no? I would get some tractor paint for it and go ahead and spray it. It will definitely hold up far better for a trailer. Rattle cans are good for somethings, but a trailer I think isn't one. I bet you'll save about 30 bucks too. AND be done in half the time with 2 really decent coats on it. It's something that is begging to be sprayed out doors. :grinpimp:

Just my .02

You can pick up black tractor paint by the gallon off Amazon.

Just an example:

And a cheap harbor freight purple gun. Done. PLUS, pending on the size of your trailer you should have plenty left over.
 
FWIW, my steel deck carhauler takes a beating so I just make it a point to repaint it ever few years. Wire cup brush on my 7" grinder to knock all the loose stuff off, then hit it with the pressure washer. Once it dries I just dump on black rustoleum out of the gallon can right on to the deck and spread it with a cheap roller. I'll hit everything I can with the roller and then use a couple rattle cans to fill in the hard to reach spots around the stake pockets and inside the tongue rails. It doesn't seem to fade that bad and it usually gets scratch up and beat to shit from dragging stuff across the deck before it flakes or peels.
 
I can all but garuntee black rattle can will fade REALLY fast, and scratch up extremely well... It's something that sits outside and will be subject to work conditions no? I would get some tractor paint for it and go ahead and spray it. It will definitely hold up far better for a trailer. Rattle cans are good for somethings, but a trailer I think isn't one. I bet you'll save about 30 bucks too. AND be done in half the time with 2 really decent coats on it. It's something that is begging to be sprayed out doors.
Excellent points, got the rattle cans cheap ($1/can), so its not a big deal to put them aside for another project.
Unfortunately, its getting too cold to paint outside now, but I also haven't gotten around to even taking then deck off yet, so it may be spring before this project goes anywhere.

FWIW, my steel deck carhauler takes a beating so I just make it a point to repaint it ever few years. Wire cup brush on my 7" grinder to knock all the loose stuff off, then hit it with the pressure washer. Once it dries I just dump on black rustoleum out of the gallon can right on to the deck and spread it with a cheap roller. I'll hit everything I can with the roller and then use a couple rattle cans to fill in the hard to reach spots around the stake pockets and inside the tongue rails. It doesn't seem to fade that bad and it usually gets scratch up and beat to shit from dragging stuff across the deck before it flakes or peels.
This one has a wood deck for the flat part and diamond plate for the dovetail, so there isn't much to paint compared to a steel deck one, but it will be a lot of over around under and through to get all the cross members painted.
I picked up a heavy 7" angle grinder a while back, just need to get more cup wheels for it as the one that is on it is pretty ragged.

Aaron Z
 
I pretty much never rattle can anymore. Seems like more of a waste of time than anything.

On trailers I have had really good luck with brushing on Rustoleum. Just a couple coats of black. Seems to hold up surprisningly well.
 
I pretty much never rattle can anymore. Seems like more of a waste of time than anything.

On trailers I have had really good luck with brushing on Rustoleum. Just a couple coats of black. Seems to hold up surprisningly well.
After the month it takes to get to full hardness. :laughing:

The spray cans harden up way faster but in my experience it's not as durable.
 
flecker It's my first real paint job. How do I decide if I want to do single stage or base coat / clearcoat? I heard it's easier to touch up/ repair the latter if you are a novice. Why do you single stage older restorations?
 
flecker It's my first real paint job. How do I decide if I want to do single stage or base coat / clearcoat? I heard it's easier to touch up/ repair the latter if you are a novice. Why do you single stage older restorations?
I am interested to hear that answer as well.

For me, depends on what I am doing. 2 stage is usually a little more durable. Like for bumpers that take a lot of abuse. Or if they live in the sun.
As far as touch up, I have put single stage over 2 stage doing panel repairs and depending on the color it will blend just fine.
Too me, 2 stage is easy, and lazy. Doesn't matter how bad you put on your base coat. Thin, dry, rough, The clear coat always gives it shine and makes it look good. I have a 1995 Ford F350 that is green and you can see how horrible the factory base coat was, drives me nuts. But not enough to repaint the whole truck.

Don't know what the standard is today, but it used to be on restorations you try to use what was OEM at the time. I am getting ready to do a 78 corvette and the forum I am on, the guys are going nuts that I am not using factory type materials on it. Which was lacquer at that time.
I haven't done lacquer in years but I always hated it. It is different to put on. Dries fast. Much harder to lay nice wet, smooth coats like you can with enamel, at least for me and my painting style I always end up with haze in the overlaps. If I use enamel I won't have to sand and buff it.
Same with base coat/ clear coat. Unless it is like Black color I can usually get it smooth enough I don't have to sand and buff.

Been using some single stage urethanes, Not hating it. Dang, sure seems to dry slow. Reminds me of acrylic enamel a lot in the way it goes on.
Current on truck hoods and bumpers. Kind of interested to see how they hold up.

I am still old school, been doing it the same way for 35 years and not keeping up with technology.
Lacquer, enamel, urethane, a million different primers. etching, filler primer, hi build, epoxy. . . Fuck me. Maybe asking questions is the wrong way for me to go about this. I will overanalyze the shit out of it. Just tell me what to do and I'll do it.
 
Epoxy primer does a better job of sealing the metal, and doesn't soak up water, is how I understand it. Can lay it on thick too and sand it a bit before you put on whatever.

My method was as follows:

Bare metal
Epoxy primer coat 1
Skim bondo or whatever body work (filler/sanding) you need to do
Epoxy primer coat 2
Scuff with scotch brite
Seam sealer
Single stage urethane topcoat (Nason full-thane for me)

Ive read that applying clear nice and smooth without runs or peel is difficult. Single stage is not super difficult, and you can build it up as thick as you want/need. Blending/feathering repairs later should be easier too, as you don't have to worry about putting color on top of clear.
 
It is tough, each item has their place. If the body work is done fairly decent you just need a standard primer, nothing fancy. Just make sure it is sandable primer.

I may have used it wrong, but when I have used self etching primer like I thought where I was supposed to, it didn't seem to do any better.

Epoxy primer, for me, the jury is still out on that one. Not sure it is worth it. Did a grille gaurd and rear bumper for my son, waiting to see how long it lasts, if any longer.
Had a guy here at work prime his corvette with Epoxy, all I could think was why? Kind of a waste of material considering it's proposed advantages would not help something that doesn't rust.

Funny, used a hi build primer when it first came out in 80's. This stuff was supposed to fill hail dents. We scuffed the car, primed it with this fancy new stuff. Blocked it, painted it. Quick and easy. Paint was beautiful, 67' Camaro. Then a few months later the high build primer shrunk and all the imperfections showed up. What a waste of time that was. Ditzler gave us all new materials, but sucks to do a job twice.

And that is another good point. these products shrink. Especially when you are using them at the end of their limits. Like too much body filler. In my experience, don't get in a hurry, rushing from body work, to blocking to paint.
Sure you can repair and paint a panel in one weekend, but don't. It will shrink in a week and reveal all your bodywork.
 
jeepyj These guys already answered most the questions really...:grinpimp:

It can be overwhelming looking at all the different types of products out there, but heres a REALLY simple way to boil it down.


For bare metal (I don't care what type either.... Aluminum, steel, galvanized) you will protect it with one of these:
Epoxy primer or a self etch primer. That is what those type of primers are made for. They offer the best metal protection, and will be referred to as a DTM (direct to metal). Epoxy has an advantage of self etch in that you can apply body filler right on top of it. Self etch isn't made for that, it demands that your body filler be applied first. Now there are other dtm primers in a hi build, or poly variety... and it's fine to use them too.

For shaping and sanding SMALL imperfections like scratch marks or tiny dents the body filler missed you use these types of products:
Hi build 2k primers and poly primers are made for that sand coat before paint or a sealer is applied, and the entire vehicle gets sprayed (OR just spopt primed if you are leaving some of the original paint). You have all your body work done and are going to prep for a single stage paint OR 2 stage paint... you want to spend a bit of time sanding with blocks to straighten everything before paint goes down. The 2 primers above will let you do just that. Also a glaze for imperfections the hi build primers used could be used, I like metal to metal glaze by everoat.

For a straight body/ surface that is pretty much in just in need of paint, and no body work is required? Depends. Is the old, original paint in good shape? No major body work to perform? If yes, then just clean it, scuff it to the right smoothness for the paint you like and paint it.

As for the system of paint, single vs. two stage? The window of correction on a 2 stage job defintiely has more advantages. So lets say you put down a couple/ few base coats and noticed a run or some areas that were rippled. No prob. Let it dry and just sand and fix, then apply your clear coat with a few wet coats. Get some issues in the clear coat? Again, no prob. Let it dry and you can correct with some razor blades, 600 to 2500 sand paper and bam. Problem solved, just needs a buff and shine. So long as you don't go through the clear coat and have to re-shoot. The UV protection with a urethane clear coat is top notch. AND there are typically more coats of protection in this type of paint job... it is more durable and gets a harder layer on it. The draw back is that when a clear fails and is done we all know exctly what that looks like, right? And theres no cut and buff to fix that. Touch up's are also more difficult. You get a scratch and it goes through the clear... Welp, chances are you are going to blend an entire panel, a much bigger job.

Now with single stage there is NO window for correction between coats. Once you pull the trigger you're commited to see it through no matter if you had a run some rough patches or whatever the case may be. It's game on. That doesn't mean you can't fix some things after it's cured though... and this happens ALL the time. It's where the phrase "color sand" comes from. Most vehicles from the mid sixties to the late 80's/ early 90's or so are a baked on enamel of one form or another. I restore quite a few vehicles in that era of paint so I typically try to match the og paint. Prior to the mid early 60's most paint was a laquer. You can still get some laquer paint without a prob, but I would only ever spray to match an existing scheme for a vehicle. Everything from the early to mid 90's to today will more than likely be a 2 stage base coat clear coat job. Because of EPA standards and requirements for better efficiency of paint this was a requirement of most auto manufacturers.

There's literally tons more, but lets make it super simple. Whatcha painting? Whatcha want? Build a plan for the ONE vehicle and paint it. Because at the end of the day every vehicle is unique and gets a plan built just for it's needs. :grinpimp: Don't get all caught up in the millions of avenues to go down. Post a pic of what you're dealing with!
 
Last edited by a moderator:
Top Back Refresh