spaceman
Well-known member
- Joined
- Jun 1, 2020
- Member Number
- 1721
- Messages
- 94
Wouldn't it be easier to have a folding map or a GPS unit???Made a couple with this site, was the only one at the time. Used for hunting.Terrain2STL
jthatch.com

Follow along with the video below to see how to install our site as a web app on your home screen.
Note: This feature may not be available in some browsers.
Wouldn't it be easier to have a folding map or a GPS unit???Made a couple with this site, was the only one at the time. Used for hunting.Terrain2STL
jthatch.com
Got those too. It stays at camp, highly useful for coordinating with the crew.Wouldn't it be easier to have a folding map or a GPS unit???


 www.elegoo.com
I um...managed to get in on the Kickstarter for the Elegoo OrangeStorm Giga.
OrangeStorm Giga
ELEGOO specializes in the research, development, and production of the most quality & affordable 3D printers, Arduino-based STEM & robotic kits, making technology easy-to-access for all the makers around the world.

I have a 500mm
I thought that thing was huge

Got fed up with bits paper and went with a dti instead

Any links to the process? I fitted some silicone blocks yesterday in place of the bed level springs to hopefully stiffen things up.You could put Klipper on that printer and let it help you level the bed using the ABL probe. I bought SonicPad for my Ender 3 and Inovato Quadra for two of my other printers. It’s easy to do and will help you tune the printer for way faster printing and control.
Those will definitely help with keeping it level. I really haven’t had to adjust mine since I put them on my Ender 3 and KP3S Pro back in the spring. Klipper, once configured, will move your bed probe over each bed adjusting screw, takes a measurement and then will tell you how many turns, clockwise or counterclockwise, to turn the bed screw to get the bed as level as possible.Any links to the process? I fitted some silicone blocks yesterday in place of the bed level springs to hopefully stiffen things up.
I appreciate the in depth reply. I'm a bit of aThose will definitely help with keeping it level. I really haven’t had to adjust mine since I put them on my Ender 3 and KP3S Pro back in the spring. Klipper, once configured, will move your bed probe over each bed adjusting screw, takes a measurement and then will tell you how many turns, clockwise or counterclockwise, to turn the bed screw to get the bed as level as possible.
First, I am by no means a pro at running or modifying Klipper, all my knowledge is from just trial and error, with the Quadra, but to me it’s worth it. Klipper is absolutely free and does more than the Marlin software that comes on the Ender 3. They do have a newer Ender 3 that has Klipper on it from the factory but I don’t have one so no clue how easy it is to use.
Cheapest way would to get into Klipper would be to go the T95 box route which can be bought off Amazon. I think I paid $35 for mine though I have not put Klipper on it for my third printer yet.
Use this guide: Tutorial: T95 Mini TV Box Klipper Install for the T95 box. Make sure to get the exact model it says to buy as there are two different versions evidently. Or on YouTube look up the channel PrintsLeo3D and he has a video on the Inovato Quadra box, which is the exact same thing as the T95 TV box, just repurposed as a mini pc for ham radio and other uses. They put a version of Linux onto it. I used his video to put Klipper on the Quadra box and then on my Kingroon KP3S Pro printer and it’s worked without any real issues since other than me just trying different Macros to make it even better. You can also use an old desktop or laptop. You install a version of Linux on the computer or laptop and go from there. I tried that route on a laptop but could never get the WiFi working on it in Linux so gave up. Either of these have enough computing power to run two printers at one time. Also if the laptop/pc reboots for some reason it will stop your print.
Easiest way would to be buy the Creality Sonic Pad but it’s around $160, or was when I bought it last year. (Just checked and it’s down to $111 right now on Amazon). Damn it! Anyways, it can control up to four printers at once and can be used as a standalone touchscreen controller or WiFi connect into it from your computer through a web interface. Which is nice as you can slice your print, send it to it over WiFi and print it all from your computer. Hell, I use my cellphone if I’m in another part of the house to see how the print is going. The Sonic Pad has Klipper profiles already loaded onto it and when setting it up you just select the printer you have from a list and it will create a file that you load onto the SD card for your printer and install it. Then the Pad controls the main board that’s built into your printer over a USB cord that you just leave hooked to the Pad. Also there’s a port on it for a webcam so you can watch your printer from another part of your house. There is also Obico service you can put on your phone and control your printer from anywhere. You have to pay monthly for that though.
The Marlin software on your printer works fine, I used it for a couple of months but got tired of loading a file onto the SD card, over to the printer, load it up bullshit. Though you can use a USB cable from your computer plugged into your printer and use OctoPrint and transfer files and control the printer that way. I used OctoPrint on my KP3S when I first got it but once you go to Klipper I don’t see any reason to go back to anything else. Sorry this is so long winded but I just want to pass on what I’ve tried and learned hoping it helps someone else.
when it comes to some of this.I am too honestly but I enjoy modifying stuff like most people on here probably do and once I found out about Klipper I had to try it.I appreciate the in depth reply. I'm a bit of a
A 12v thermistor fan might fit neatly on those end plates.

 markforged.com
Now I’m gonna have to watch stuff on this. How expensive is this thing, and are those materials/techniques exclusive to it?We're buying a markforged mark 2 at work. All I got to add. I'm sure I'll be spending quite a bit of time figuring it out, I have a LOT of uses for it. We have tons of fingers and grabbers and separators and whatnot that are begging for a custom fit for what we do
Carbon Fiber Composite 3D Printer: Markforged Mark Two
A leading way to make aluminum-strength parts on your desktop — the Mark Two carbon fiber composite 3D printer enables engineers to generate massive value…
$17,500Now I’m gonna have to watch stuff on this. How expensive is this thing, and are those materials/techniques exclusive to it?

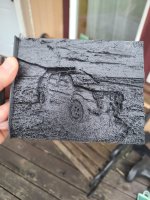
Tried my hand at printing a 3d picture. Need to work on the quality a bit for the next one since this one came out really stringy
Yeah, my Kobra 2 Max is 420x420x500.
That fucker is 800x800x1000.
I can enclose that thing and print large interior parts in ASA/ABS.
For the Kickstarter price I HAD to jump on it. Same price as the X1C with AMS.
As long as it runs as nice as my Kobra 2 Max I'll be absolutely happy with it. So glad that big bastard isn't a bed slinger.
I haven't got that far in Studio yet.
the bleed through in your final image looks like some sweet shadowing, call it a feature and rock onGot it sorted. Had to get blown apart in Blender.
I was going to say that too. I thought it looked great like that.the bleed through in your final image looks like some sweet shadowing, call it a feature and rock on
I was going to say that too. I thought it looked great like that.
but yeah, as you discovered it had to do with how the file was put together.
for complex paint jobs in Bambu studio, I’ve taken to using a graphics tablet with a screen and stylus. Zoom in and use the pen tool on the smallest setting with the stylus to outline the area I want to paint, then flood fill after the area is outlined.
Yeah not in that case. That sign was created by merging 2 STL files together from the looks of it which is why it was doing that. Bambus flood tool will paint the whole piece all the way down to its baseThere's nothing in Bambu Studio's paint tools that would've fixed it.