What's new

Project Glacier Cold Beer - a '67 Jeepster Commando

Tossed the driver fender and grill on to start the front.

20220225_144728.jpg


I spent way too much time fussing with the location of the firewall plates in the corner of the cowl, trying to work around things, then ultimately tossed them in the upper corners and ground off the stuff under the dash that was interfering with the backside.

20220226_124336.jpg


Trimmed the grill shell. Blue tape approximates the straight line around the curve for the headlight buckets.

20220226_135220.jpg
20220226_141005.jpg


Measuring, math, figuring, and holding tube for a few more hours...
20220226_143140.jpg


Cut the first piece that was supposed to do it all in one shot 4" short because in the end I forgot to add the distance between the two bends per side, so made this hoop in 2 pieces. Then I over bent the first side by a few degrees, and used a reciever hitch to yank on it and bend it back to where it needed to be. A 1.25x.120 sleeve and 3 passes with some 1/16 er70s-2 in the left hand and some grinder work, and we're back to one piece.

20220226_210535.jpg
 
Last edited:
Moving right along. This is going to be a sweet rig.

I think it's really cool having more than one Commando build going on here at the same time. I'm liking these things more and more as I follow along.
 
Moving right along. This is going to be a sweet rig.

I think it's really cool having more than one Commando build going on here at the same time. I'm liking these things more and more as I follow along.

Love the Commandos!
 
Wanted to make progress on something today, so trimmed the fenders to match the rockers, cut and folded to retain the look.

20220228_140705.jpg


20220228_140707.jpg


Also took care of fixing some cracks and the bolt flange on the fender.

20220228_112127.jpg


Built some basic 2x2 rockers. Trying to keep the external of the rig not to flashy and more like "it always could have been that way".

20220228_152343.jpg


Rocker tubes are spaced 1/2" down from the body, and sit ~5/8" proud of the body line to give a little buffer when pivoting on rocks. some 1.75x.120 to connect to the frame in 3 spots, two of which line up with the cage feet plates on the bottom side of the body and good to go. Was always the plan to armor under the modified body and have a gap so when things get pushed around there is still some room for "compliance" in the system.
 
Last edited:
Looks awesome! What are your plans with the front little wing window? I really want the option to be able to ditch the windshield if I think my dad is gonna be getting into glass breaking territory. I have another set of doors I was planning to pin and make into permanent halfs and ditch the window/s altogether for summer time. You're a little more savvy than I am when it comes to body and finish work so just curious on your thoughts?
 
Looks awesome! What are your plans with the front little wing window? I really want the option to be able to ditch the windshield if I think my dad is gonna be getting into glass breaking territory. I have another set of doors I was planning to pin and make into permanent halfs and ditch the window/s altogether for summer time. You're a little more savvy than I am when it comes to body and finish work so just curious on your thoughts?
Heat and AC are on the list for me, so I intend to run with the hard top most of the time and the windshield always, so the wings are staying on mine.

It should be fairly easy to make some permanent half doors by removing the wings and the big glass and making an 18ga filler piece, weld in (slowly- lots of tacks), grind smooth - the door structure there should be more forgiving for weld distortion than a flat floor but weld.

There is also a guy on "skorch" on jeepster commando club who makes tube doors for these. Mark Bertolucci is his name (Facebook). They don't work for the look I think I want with this one.

Yours looks very nice - I like the details and how you are capping and reinforcing things where you have to cut.
 
Today's edition of "that took way longer than I thought it should have" - seat mounts.

Spent way too much time trying to decide if the speed holes were to flashy (or if it needed ellipses, or should be solid) then decided to round the top corners with a .5" radius. Forming the perimeter bar took some time with some 1"×.188 tube in the vice with a hammer. And for some reason the bottom pieces ended up 2" short (it was the guy with the tape measure). And on the first run of the program to cut it all, a tip up caught the torch and moved the plate...

Anyway, done for now. (Was happy that I made two lefts and two rights - I was very careful to not add that mistake to the list!)

20220301_162430.jpg


12ga, holes on top spaced for the corbeau sliders. No holes in the bottom flanges yet, want to bolt them to the seats and slide around in the car a but. Factory location is pretty far forward, and puts my 34" inseam legs at a terribly unconfirmed angle - or puts my head above the roof.

20220301_181942.jpg
 
Last edited:
Ordered Radflo 2.5x14 coilovers in early October (10/8/21), they arrived Wednesday 3/2/22. Just under 5 months.

20220302_151007.jpg


Very well packed (I removed a bunch of packing before the above photo), cycle exactly 14", complete, and had the 90* fittings I requested. Pat @ Those Guys Rod and Customs took care of ordering and following up in them for me.

Anyway- time to get busy on the front suspension. just like the rear, cycling for days, temp mounts become better temp mounts, become cardboard then become steel.

20220302_170502.jpg
20220304_120130.jpg
20220304_135343.jpg
20220304_135605.jpg
 
With both the buggies I built, "half way" was when they were rollers with drivetrain mounts, so I'd guess I'm also about half way on this build.

20220304_162516.jpg


Which meant it was time to sweep, set the axles up high, and toss some tires on it to see how it looked...

20220304_162759.jpg
20220304_162811.jpg


Now is just all the other stuff... start going system by system and making hundreds of tabs for this and that.
 
Got a few minutes in today to finish the front shock mounts - plates top and bottom, so the end of the tab points on the tube aren't trying to tear it with the small moment arm -

20220305_134706.jpg


And cut and fit the plates to box the frame back in where I made room for the coilover at full flex. Some 3/16 there to help make up in strength for the reduction in section.

20220305_134712.jpg
 
Im sorry if I missed it. Are you gonna leave the body 'rustic' or is it getting painted later? I like the rusty, er 'rustic' look. Patina! That's it.

Cool rig. Im watching for ideas.
 
Thanks!

Few minutes of progress on Sunday - welded up the frame notch plates on both sides.


fit up, notched the tubes under the dash, removed them and fully welded them to the plates, then set them back in the car, tacked to the A-pillar.
You're doing better than I am. Most of my stuff is only partially welded or tacked in. My under dash stuff needs to be pulled out and welded. Kinda want to run a kicker from the firewall to the cage for still for more rigidity.
 
Im sorry if I missed it. Are you gonna leave the body 'rustic' or is it getting painted later? I like the rusty, er 'rustic' look. Patina! That's it.

Cool rig. Im watching for ideas.

Thanks! I plan to body work and paint the car, but will be keeping the body glacier white and the top blue. Probably add some blue stripe details to tie them together a little better. I don’t mind the patina, but the surface really rust bothers me, so it will all get painted. :smokin:


You're doing better than I am. Most of my stuff is only partially welded or tacked in. My under dash stuff needs to be pulled out and welded. Kinda want to run a kicker from the firewall to the cage for still for more rigidity.
We’ll see if fully welding things at this stage will bite me later! I’ve done some re-work a time or two already. :shaking:

I really like how yours is coming out. I’m jealous of your rear passenger foot and head room - the commando body and roof doesn’t leave a lot of room for full size people- so the back seat in mine will likely be just for kids and for really drunk adults just on pavement at the end of the day to get home from the bar. :lmao:
 
Thanks! I plan to body work and paint the car, but will be keeping the body glacier white and the top blue. Probably add some blue stripe details to tie them together a little better. I don’t mind the patina, but the surface really rust bothers me, so it will all get painted. :smokin:


We’ll see if fully welding things at this stage will bite me later! I’ve done some re-work a time or two already. :shaking:

I really like how yours is coming out. I’m jealous of your rear passenger foot and head room - the commando body and roof doesn’t leave a lot of room for full size people- so the back seat in mine will likely be just for kids and for really drunk adults just on pavement at the end of the day to get home from the bar. :lmao:
Definitely not a ton of head room In The back after raising the rear floor two inches. I was originally looking for a c101, but said to hell with it after finding only crazy overpriced projects. I love the old commandos (and the FC's).
 
Little pieces at a time... just to get some progress. Took quite a beating to get the bolts / king pins out of the uni-balls and get the knuckles apart. Pretty sure the bolts siezed to the uni-balls. Plenty of PB Blaster and drilling hammer action woth a drift. Almost more than i wanted. Not sure if I should replace the uniballs or not.

Anyway - plated the passenger knuckle out. One more small filler piece to finish up, then repeat for the driver side.

20220318_160646.jpg
20220319_134313.jpg
20220319_170835.jpg
20220319_170842.jpg
20220319_170911.jpg
 
Drivers side came apart much easier, though I sprayed it down with PB Blaster yesterday.
Reading the spidertrax instructions, seems like anti-sieze is used on assembly, so a good cleaning for all parts, and a healthy dose going back together is the plan.

Repeat plating. Upper bolt won't be used on the drivers side, but I do think that plate adds structure to the steering arm, so ill make a sleeve to go there. And they match. :grinpimp:

20220320_112107.jpg
20220320_112127.jpg
 
Holding the radiator in place, I determined I needed to cut the rest of the dog house out of the back of the grill shell. This meant loosing the center grill body mount, so that meant making some tabs to pick up the lower fender bolts. I intend to keep all the fender bolts, so knocked the welded factory nut out of the inside of the grill, cut some tabs, and welded them on.

20220326_105153.jpg


Then held the radiator in place for a while,trying to decide how to mount it, but still leave as much room to get the engine out, and saw these:

but ordering parts in takes time. And for 4 of those and shipping, its probably$55.
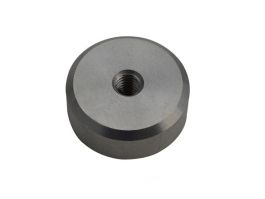
Had some left over 1.5 6061 from sleeving the front lower links, and decided to try my hand at making some. Hack machinist makes hole, hand taps using the headstock to hold the part and a drill bit in the tail stock to retain center, chamfers, and then uses the bandsaw to part it off. :lmao:

Yes I know that I sacrificed rigidity by working that far away from the chuck, but the through bore won't support a 1.5" part, and I needed the length to hold it well in the bandsaw, and this part has almost no requirement for any dimension, so, it is what it is. :flipoff2:

20220326_184919.jpg


Forgot how to GTAW aluminum for a little bit, but got em tacked on.

20220326_183149.jpg


Decided I liked that spot for the bottom two, and welded them on. Rembered how to glue aluminum by the end of the 2nd one... :smokin: with 3 trips to the grinder to fix the tungsten. :laughing:

20220326_184837.jpg


One step closer...
 
This thing is rad!

I was talking to the wife today about what I want to build next, once the body falls off the CJ5, and a Commando was top of the list.
 
Congrats!! I am 4 months into being a dad and can assure you that you will continue to stuggle with wanting to wrench and be with your baby and wife at the same time. Commando looks badass too!
 
Top Back Refresh