What's new

Project Glacier Cold Beer - a '67 Jeepster Commando

Congrats on the kiddo.

Mine are all grown and out of the house. I can can work on my pile whenever I want.:flipoff2:
Congrats!! I am 4 months into being a dad and can assure you that you will continue to stuggle with wanting to wrench and be with your baby and wife at the same time. Commando looks badass too!
Thanks guys! Little man is pretty cool, and finally getting that figured out a little bit.

We watched most of the MacMillan Racing YouTube coverage -
20220422_142954.jpg


Stole a few hours in the shop to work the fan shroud-
20220421_151418.jpg


The top and bottom needs another bend, opposite the first, don't have a finger break, so clamped a bunch of stuff and slowly hammered it over.

20220424_140056.jpg


For mounting the Derale 18217 (Derale 18217 17" High Output Radiator Fan,Black https://smile.amazon.com/dp/B004XOO15E/ref=cm_sw_r_apan_i_R35JYKR1J2RR4PEKZK4T?_encoding=UTF8&psc=1) the fan will stick part way through the shroud. I decided to turn some weld on mounting bosses to engage the shape of the fan mounts, and set the fan to the right offset of the shroud.

20220426_173211.jpg


These will weld to the shroud.

20220426_173950.jpg
 
Finished the other two shroud pucks today, bolted the shroud to the radiator, and tossed it in.

20220428_154407.jpg


20220428_154419.jpg


20220428_155856.jpg


Gonna be tight!

20220428_162803.jpg


But looks like it has a shot at working! Need to finish notching the OEM frame crossmember, plate that back in, then make the upper radiator mounts, then mount the AC condenser to the front of the rad, and cut off the inlet and outlets and align them better to fit the angle of the rad in the car...

One piece at a time...
 
20220428_162803.jpg


Need to finish notching the OEM frame crossmember, plate that back in, then make the upper radiator mounts, then mount the AC condenser to the front of the rad, and cut off the inlet and outlets and align them better to fit the angle of the rad in the car...

One piece at a time...

Finished notching the OEM crossmember, got most of the material to box it back in. got the A/C condenser mounted to the radiator. Also mounted the radiator.

20220829_210334.jpg
20220829_210341.jpg


Radiator pucks welded to radiator. McMaster provided some rubber isolators -
some tabs cut, doubled up around the hole, and welded to the chassis. The top mounts have some 1/2" long shock spacers between the rubber mount and the tab to make the tab fall better under the chassis tube.

got rusty on welding, and it shows!

Also sat Waylon in the buggy. He was uncertain.

20220826_135351.jpg
 
Last edited:
Today's edition of "that took way longer than I thought it should have" - seat mounts.

Spent way too much time trying to decide if the speed holes were to flashy (or if it needed ellipses, or should be solid) then decided to round the top corners with a .5" radius. Forming the perimeter bar took some time with some 1"×.188 tube in the vice with a hammer. And for some reason the bottom pieces ended up 2" short (it was the guy with the tape measure). And on the first run of the program to cut it all, a tip up caught the torch and moved the plate...

Anyway, done for now. (Was happy that I made two lefts and two rights - I was very careful to not add that mistake to the list!)

20220301_162430.jpg


12ga, holes on top spaced for the corbeau sliders. No holes in the bottom flanges yet, want to bolt them to the seats and slide around in the car a but. Factory location is pretty far forward, and puts my 34" inseam legs at a terribly unconfirmed angle - or puts my head above the roof.

20220301_181942.jpg

So these fixed seat mounts work great if you abandon the back seat and easy access. Factory C101 passenger seat brackets flip forward, and some argument if driver seats offered the same. Factory seats are also lowbacks. Adding the head rest of the seats I purchased, makes the flip forward pivot off the front of the seat slider a no-go - the head rest hits the hard top before you can get enough room to make a difference.

I sourced some TJ passenger seat brackets and reverse engineered that linkage. those brackets won't work as is - would make the seat way too high.

So, have to experiment - some scrap bin stuff, a few holes, and a working model exists.

20220830_134231.jpg


20220830_134245.jpg


Close enough- let's try bolting a seat to it and check roof / windshield clearance.

20220830_142846.jpg


20220830_143655.jpg
 
Well this thing is fucking awesome!

Love seeing all the little detail work. That's what separates a cool build from a piece of art.

Steering box on yet? :flipoff2:
Thanks. Hopefully function more than art, but functional testing is a ways out.

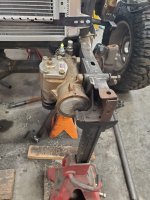
The 4 bolt big bore box is... well a 4 bolt big bore box. I had mocked everything up with a smoked early TJ saginaw 70mm box - which fit the frame mount someone else made for a 3 bolt 70mm box along the way (being a '67 this would have come with the Ross manual box located at the fire wall).

The 80mm bore box has (to no one's surprise) a bigger OD on the casting toaccommodate a bigger bore, which then needs more stand-off from the frame.

Combine that with a 4th bolt, and I'll probably be cutting everything that is there out to make something nicer, and plate the whole inner frame horn. A Napa replacement TJ box using the one I had as a core might have worked just fine, but YotaAtieToo had this one, and now has a parts AX-15 and a few dollars to take his wife out someplace nice. :grinpimp:

And I have a bit more work to do. A really trick fabricator would probably build the front bumper and winch mount at the same time to make sure all those parts up front play nice together. :homer:
 

Attachments

  • 20220910_161936.jpg
    20220910_161936.jpg
    1.5 MB · Views: 30
Thanks. Hopefully function more than art, but functional testing is a ways out.

The 4 bolt big bore box is... well a 4 bolt big bore box. I had mocked everything up with a smoked early TJ saginaw 70mm box - which fit the frame mount someone else made for a 3 bolt 70mm box along the way (being a '67 this would have come with the Ross manual box located at the fire wall).

The 80mm bore box has (to no one's surprise) a bigger OD on the casting toaccommodate a bigger bore, which then needs more stand-off from the frame.

Combine that with a 4th bolt, and I'll probably be cutting everything that is there out to make something nicer, and plate the whole inner frame horn. A Napa replacement TJ box using the one I had as a core might have worked just fine, but YotaAtieToo had this one, and now has a parts AX-15 and a few dollars to take his wife out someplace nice. :grinpimp:

And I have a bit more work to do. A really trick fabricator would probably build the front bumper and winch mount at the same time to make sure all those parts up front play nice together. :homer:

You're right, piece of art was a gay way to word it :laughing:

Either way, it's a really cool project. Reminds me of the og pirate builds.

Bummer on the box mount. Guess you have an excuse to cut that off and make a fancy one now.
 
Took 1 and a half hours and 6 cut off wheels, but the previous mount is removed.

Complaints aside, I'm glad I did this. I intend to stiffen the frame from the panhard mount to the front of the frame. There isn't a whole lot of structure there and think one integrated mount now will prevent cracks later.

So, thanks YotaAtieToo :flipoff2:
20220917_202900.jpg


20220917_204010.jpg
 
Last edited:
Continuing on in steering box land...

Picked up some 1" solid round and turned some sleeves for the 7/16" bolts (15/32 ID), and knocked the scale off for welding.

20220925_161903.jpg


Cut another notch in the frame for the 4th bolt, and set it in there. Looked at it for a beer or 7.

20220925_162304.jpg


With the box where it was, the fittings are really tight to the grill and one is forward of and the other aft of the grill. It would have worked, but I would have to buy an OEM hose with the right bends in it to make it low clearance enough and a few other things. This made me decide to try mounting the box further forward and about 1" higher.

20220930_101509.jpg


Happy with the fit, grabbed a pen and some cardboard, dimensioned out the outer frame plate, cut it on the plasma table, tossed it in the swag brake for the 20T press, some minor hole adjustment with the die grinder, and success!

20220930_104652.jpg


Cut the inner plate, and slapped it all on there.

20220930_115320.jpg


Need to bend the little leg on the bottom up, then start tack welding everything in. The frame is about 1.75"x3" at the smallest spot. This 3/16" plate makes the section 2-1/8"x4-1/4" at the smallest. It also will weld to the track bar mount on the outside and the OEM crossmember on the inside, stiffening this whole part of the frame quite a bit. The track bar locating the axle laterally and the box turning the tires really tends to try and flex this part of the frame a lot, so hopefully no problems now.

The welded on front bumper/winch mount will complete the stiffening.
 
Looks really good.
Thanks! Rigid was the requirement, and cool looking a side goal. I think I got both.


Never the progress I hope for, but one day at a time...

Played around a bit more with the location and fitup of the parts, and decided I liked it enough to make it really hard to change. :grinpimp:

20221002_205739.jpg


20221002_205730.jpg


A top cap and a filler piece for the inboard aft pocket that will tie into the trackbar mount, and that ought to be good.

Test fit with the box after welding worked too, so I must have tacked enough of the right things. :lmao:
 
Last edited:
Never the progress I hope for, but one day at a time...

Test fit with the box after welding worked too, so I must have tacked enough of the right things. :lmao:
Ha! Me either. Friday I was hoping to get more than 2 filler panels in my tunnel, and some grinding done. Same with Saturday. This custom crap just takes way too much time to do what you see in your head. Glad you got your steering box in. I still need to go back and put in an outer brace plate.
 
A few hours here and there. Front bumper / winch mount.

Basic 2x4 tube, 1" solid stock bored put for the lower bolts.

20221023_125000.jpg


Got worried about the structure from cutting the box out, plated it back in. Fully welded the insert together, then stuck it in there.

20221023_125004.jpg


20221023_155535.jpg


Got worried about the tube tearing on a hard pull if I only welded the back surface to the frame, so bought some D-ring mounts from Ruffstuff. With the corner cut off the box tube, I was able to weld the d-ring tabs to the inside of the 2x4 on 2 sides. D-ring mounts welded to the back of the 4" side too.

20221023_201959.jpg


20221023_202002.jpg
 
More...

20221023_212721.jpg


Bolted the winch on to locate the top holes.
20221121_194426.jpg


TIG welded all the joints that won't be ground flush, for practice mostly.

20221121_203222.jpg


The insert for the winch line is a 1.5" opening vice the fairlead 1.125" opening - hoping that the line doesn't deflect into the edge of the insert when it doesn't have enough wraps.

20221121_203311.jpg


Goal was period correct-ish, 2x4 box tube look, with a little visual interest... and don't tear off the frame on a hard pull.

Off to make a frame plate for the passenger frame horn...
 
20221126_212745.jpg


Plated the inside of the passenger frame rail with some scrap 12ga. Squared up the bumper the best I could, tacked it in, then went for it.
Cleaned up a bit, then worried that I should re-test fit everything. All fits!

20221126_214122.jpg


20221126_214210.jpg


Box in the top of the driver frame plates, and call the front bumper / steering box done.
 
More...

20221023_212721.jpg


Bolted the winch on to locate the top holes.
20221121_194426.jpg


TIG welded all the joints that won't be ground flush, for practice mostly.

20221121_203222.jpg


The insert for the winch line is a 1.5" opening vice the fairlead 1.125" opening - hoping that the line doesn't deflect into the edge of the insert when it doesn't have enough wraps.

20221121_203311.jpg


Goal was period correct-ish, 2x4 box tube look, with a little visual interest... and don't tear off the frame on a hard pull.

Off to make a frame plate for the passenger frame horn...
Period correct….sounds very “mello-ish” 😄

Looks awesome!!
 
So these fixed seat mounts work great if you abandon the back seat and easy access. Factory C101 passenger seat brackets flip forward, and some argument if driver seats offered the same. Factory seats are also lowbacks. Adding the head rest of the seats I purchased, makes the flip forward pivot off the front of the seat slider a no-go - the head rest hits the hard top before you can get enough room to make a difference.

I sourced some TJ passenger seat brackets and reverse engineered that linkage. those brackets won't work as is - would make the seat way too high.

So, have to experiment - some scrap bin stuff, a few holes, and a working model exists.

20220830_134231.jpg


20220830_134245.jpg
More refined versions...

20221217_133435.jpg


20221217_152044.jpg


20230102_111415.jpg


20230106_095817.jpg


20230106_111940.jpg


Some McMaster parts in the form of shoulder bolts and plastic bushings to help it all slide,but still be tight.

Picked up some slim door lock assemblies from speedway motors, intend to use one of them as the latch to hold the seat "down and back".

More figurin' to do. :beer:
 
Anything new?
:lmao: Not really.

Ordered parts. Rear sway bar from TK1Racing, fuel pump ring for the 20 gallon tank that was in it. They all showed up.

I went to Hawaii for 9 days and worked 5 of them. Visited the USS Missouri.

Resized_20230122_132426.jpeg


Tow rig didn't start when we got back. 10deg outside. 2004 Ram 2500. Batteries say "diamler Chrysler" on then, so I assume they are from 04. Spent today putting in new ones.

20230204_120148.jpg


Battery acid ate the hold down bolts, turned a 20 minute job into a 2.5 hour effort.


Maybe next weekend get a little time out there. :grinpimp:
 
Top Back Refresh