What's new

LORE Bronco restore

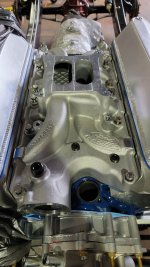
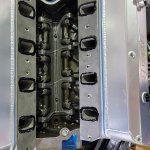
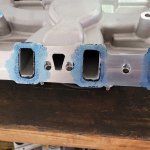
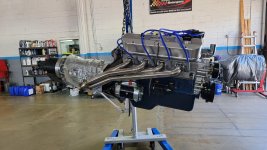
well- intake is back at the machine shop waiting on another pass to be taken off....
20210412_162855.jpg


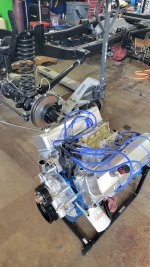
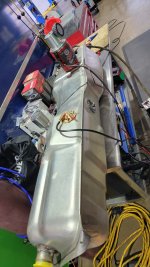
Need to sort out the front driveshaft-
It totally won't work with the angle.
I guess I need a "tall" yoke, and CV? IDK. will work on that when I get it all back together.
20210412_165539.jpg
20210412_165554.jpg


I threw a new set of shocks on the back of the jeep and couldnt help myself :D

IMG_20210415_193325_359.jpg
IMG_20210415_193325_332.jpg


Threw a wheel on to make sure we're all good to go in the clearance department.
20210415_135113.jpg


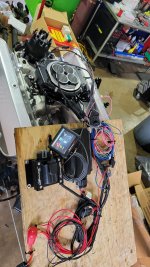
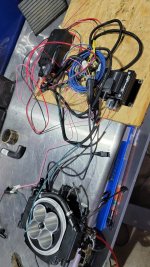
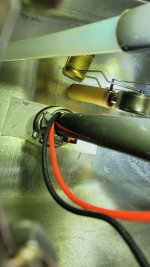
Messed with the brake setup.
Can't do much with it until i get the body on the truck so I can layout the prop valve and hose layout.
I need to find the pushrod between the booster and master though-
20210416_171209.jpg


20210416_175135.jpg
20210416_175215.jpg

Worked on the ole' war pig a little too.
Minty flooring covered up with 80 mil deadener, some jute and new vinyl.
Those "preformed vinyl floors" are anything but. I could have done the same with a roll.
my hands hurt from cutting and forming this stuff lol

threw some seat covers on, and found the original build sheet.
20210419_161522.jpg
 
Weekend update.
Got this thing back together, been driving it a bit. Came out alright.
4th time's a charm for the intake manifold to get it to fit- back at the machine shop again to get another .040 cut off of it.
The body is getting prepped to be sealed and guide coated before paint.

not sure why these photos look like a potato took them, or uploaded them. feking technology.
edited edit- reuploaded and now all is well
 

Attachments

  • 20210508_143748.jpg
    20210508_143748.jpg
    299.1 KB · Views: 67
  • 20210508_143715.jpg
    20210508_143715.jpg
    293.7 KB · Views: 67
  • 20210429_111833.jpg
    20210429_111833.jpg
    203.4 KB · Views: 66
  • 20210429_111823.jpg
    20210429_111823.jpg
    258.2 KB · Views: 63
  • 20210429_111815.jpg
    20210429_111815.jpg
    220.5 KB · Views: 67
After 5 cuts, I just couldn't get the original intake to work on the engine.
So, I bought a new intake and it dropped right on, no mods needed.
Very strange.
In any case, I still need to make impressions, and port match the intake to the heads- so I'm not able to fully assemble it yet- but I can certainly mock up the electronics and get that sorted out for the dyno.
 

Attachments

  • 20210525_133121.jpg
    20210525_133121.jpg
    1.4 MB · Views: 58
  • 20210525_120726.jpg
    20210525_120726.jpg
    1.3 MB · Views: 51
  • 20210525_111207.jpg
    20210525_111207.jpg
    1.4 MB · Views: 54
Which port is larger, manifold or head? if head, port match likely won't help.

The holley efi has only one baro sensor, so can only sense one side of a dual plane. Suggest a spacer that allows partial cross flow (Ex, Jomar PC), or an open one (with nitrous spray bars of course) if you run into tuning issues.
 
Not sure. need to put some .060 paper in there, prussian blue everything and get a stamp to see how its looking.
Port matching will be better than not port matching, regardless.
I agree with what you're saying- I'm thinking of either notching the dividing bar, or putting a phenolic spacer with a notch
 
So I've been daily driving the crew cab now for a month or 2, and smelled some gas occasionally....
A peek underneath and I noticed the sump of the midship tank was wet.....I wiped it off and it started POURING out 🤣 the rust was filling the pin hole,that turned into a 3/8" hole once I poked at it.
So, the tank came out.
Bummer- no one makes reproduction tanks, so you have to buy a midship tank for a regular/super cab truck, whack a hole in it, sweat the filler neck and breather out, cap it and move the filler to the back.
Figured now is the time to put a 100psi pump in the tank to an adjustable fuel pressure regulator on the upcoming coyote swap. Also put a new level sensor since it looked like mud inside there lol
Now to assemble, then smoke test it and make sure I have no leaks from my Hellen Keller welds 😁😁
 

Attachments

  • IMG_20210614_200035_335.jpg
    IMG_20210614_200035_335.jpg
    211.8 KB · Views: 52
  • IMG_20210614_200035_366.jpg
    IMG_20210614_200035_366.jpg
    217.9 KB · Views: 55
  • IMG_20210614_200035_390.jpg
    IMG_20210614_200035_390.jpg
    83.2 KB · Views: 53
  • IMG_20210614_195010_609.jpg
    IMG_20210614_195010_609.jpg
    150.9 KB · Views: 65
  • IMG_20210614_195010_644.jpg
    IMG_20210614_195010_644.jpg
    353.1 KB · Views: 54
  • IMG_20210614_195010_686.jpg
    IMG_20210614_195010_686.jpg
    178.3 KB · Views: 53
  • IMG_20210614_195010_704.jpg
    IMG_20210614_195010_704.jpg
    193.9 KB · Views: 54
Smoke tested- it passed! :D

Got the drivetrain pulled, almost ready for dyno.
Waiting on break in oil. prime system, goop the dizzy and stab it.
 

Attachments

  • 20210617_145506.jpg
    20210617_145506.jpg
    1.5 MB · Views: 52
  • 20210617_122431.jpg
    20210617_122431.jpg
    980.4 KB · Views: 48
  • 20210615_172704.jpg
    20210615_172704.jpg
    1,016 KB · Views: 51
  • 20210615_170552.jpg
    20210615_170552.jpg
    1.3 MB · Views: 54
347 dyno worked out pretty good so far. This is a 6K rpm pull
Made 433/458. May have a little more in it- but I lost crank signal in the distributor on the last attempt to start it.
Weird.
I checked the CDI box, its got an orange LED.
Tap the white wire to it, and the coil plug wire sparks off, so I know the CDI and coil is good.
Measured Ohm reading on the dual sync distributor and it shows 1.9mOhm- so essentially open.
It should be 500-700 ohms. So, its currently sitting on the dyno waiting on Holley tech support on what's going on.
Amazing that MSD/Holley didn't make this sensor serviceable (a hall sensor)
 
Nice numbers. sucks it's stuck on dyno. What cam are you running?

I built a TFS headed 347 for my 77 bronco long ago, it was fun to drive.
 
Nice numbers. sucks it's stuck on dyno. What cam are you running?

I built a TFS headed 347 for my 77 bronco long ago, it was fun to drive.
Check the specs on the yootoob vijeo.
Holley with a little sweet talking is next day airing me a MSD pro billet distributor that has cam sync and is a magnetic pickup vs hall sensor.
While it's not a black hyper spark, this is a definite upgrade (double the price).
I call that a win. Should have Wednesday
 
So now that it's back from dyno I wanted to sort out my internal clutch slave situation.
I originally bought a Wilwood external slave that would pull, so I was gonna make a little bracket off the tcase or trans, and drill a hole in the clutch fork to have it pull it back.
This brought a few issues of packaging and whatnot- nothing that couldn't be overcome- but Wilwood made the body of the unit move with the hydraulic hose- which I thought wasn't the smartest thing in the world. Now, you have a clutch hose thats moving every time you pushed in the clutch.
So, time to build a better mousetrap.
McLeod was the answer.
20210617_130741.jpg


This is a Luk Clutch pressure plate, and an 11" clutch disc to go on the nv3550 from Tom's Bronco parts.
I'm hoping this clutch will hold up to the power now.

20210617_130734.jpg


Initially I tried doing this with a tape measure, but it was ineffective at producing accurate enough results.
Yes, I know there isn't a clutch disc in these photos.
YOU HAVE TO HAVE THE CLUTCH DISC INSTALLED DURING MEASUREMENT! :D

20210617_130708.jpg
20210617_130639.jpg


I measured the input shaft of the NV3550 and went on McLeod Racing | Free Shipping From Selected Dealers! to go find something that may work.

20210617_131540.jpg
 
I used some of this to lubricate the orings. Big fan of this for oring lube in general.
20210617_131949.jpg

ploop
slid right one (after I scuffed the nose of the transmission and cleaned it)
20210617_132105.jpg
20210617_132109.jpg


So the object of the game is to get the TOB to be close to the PP. so you have to do some measuring
Again, using a tape measure was NOT accurate enough, I used a pair of calipers to do this, but holding calipers sucks trying to take a pic, so tape measure it is for you :D

20210617_132319.jpg


In my case, I had to use the ring that is supplied to space it away from the transmission.

20210617_135313.jpg


Messing with the ring, threading it out and the ring got me to within .100 of what I needed.
20210617_132958.jpg


So, A combo of flat measuring stick devices, along with careful tongue holding eventually got me an average between one side and the other from the block to the face of the pressure plate.

20210617_134250.jpg
 
Without the bellhousing on it.

20210723_150557.jpg


With the bellhousing on it, the hoses tight, and ziptied to keep it from moving around

20210723_151755.jpg

Thru a new clutch fork boot.

20210723_151800.jpg


I had to spin it "out" (closer to trans) to get the throw out bearing to spin with my finger, so i unbolted the trans, moved it back enough to push the hoses back in, and spun the whole thing one revolution inside the bellhousing. no biggie.

20210723_153948.jpg


But, tadaaa!
She's ready to be bled and off we go!

20210723_154159.jpg


Engine/trans/tcase are back in.
Waiting on Jess from Hi Angle to get me the rear output flange, and Wildhorses for a 32 spline output.
I should've done that before, but honestly didn't know the Dana 20 weakness, nor knew the actual power the engine was going to make.

IMG_20210723_175111_976.jpg
 
Today was "clean up the cluster" day. Looks pretty good. The ultrasonic machine took the paint right off (it was cracking and peeling)....The speed line gave me major anxiety trying to freehand that. I'm not too impressed with the voltage gauge conversion from Classy gauges. The needle doesn't match, it's too long (I cut it down to match #yolo), and it's a sticker over some other Voltage gauge.... No bueno.....AND it's not the proper background shape. Lame. I 3D printed a cup as a masking line for the ring if I was going to paint it...... In any case, I asked my pops if he wanted this black or left in its chrome-ish appearance- so its staying like this lol
20210824_175613.jpg
20210824_175631.jpg
20210824_175653.jpg
cluster.jpg
 
Got some boinger stoppers on there recently. Waiting on the body to get done from LineX now

IMG_20211022_211225_842.jpg
IMG_20211022_211225_868.jpg
IMG_20211022_211225_805.jpg
 
What material did you use for those shock mounts? Any concern about them twisting the frame there?
 
Those were welded on back in the day- I think James duff still sells them. They are 1/2" steel- and the abuse they took will survive its new life without issue. The biggest issue I had was going from ball joint style mount to a standard shock mount
 
This is a wicked build. Love the hydraulic clutch setup you have made up! If I ever swap the IH mill in my Scout to something else I plan on a trans swap too. So that's soe great tech advice to follow!
 
Top Back Refresh