What's new

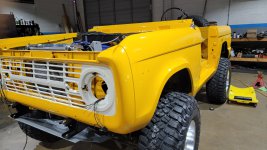
LORE Bronco restore

Wiring stuffs.

Everything was done in Raychem DR-25 and SCL. This stuff is the best heat shrink you'll ever use.
Ran out of 3/4 DR-25- waiting for more so I can finish it.
You can use the SCL as poor man boots.
You need a GOOD heat gun to melt the adhesive in the SCL, too.
give it a pinch and it seals the middle of the joint up, and the SCL gets very stiff/hard.

20211206_180121.jpg
20211208_160329.jpg
20211208_160337.jpg
20211221_144103.jpg
20211221_150421.jpg
20211222_175956.jpg
FB_IMG_1639707504488.jpg


aaaaand for the first time in forever- power has run through its veins again.....

20211217_162748.jpg


so, entire truck-
1. i put the hi/lo power wires to the blower switch backwards. Had no idea which one went where :D simple flip.
2. cigar lighter and element is junk, it insta-pops the fuse when you push it in- getting another one.
Other than that, everything worked as I expected it to.

brakes/steering/lines/linkage sorted out for the most part

20211116_175533.jpg
 
Gas tank, tire carrier and everything mocked up..... man its lookin good!
20211222_113814.jpg


She's alive.


oh, and I also drove around like this for a week back and forth to work- it was VERY entertaining
20211215_175839.jpg
FB_IMG_1640226778896.jpg


side mission is getting the crew cab up and on the new chassis that found it's way on my trailer a few weeks ago, too

20211222_180645.jpg
 
Love the attention to detail.

How do you like the battery terminals? The 'military style' ones I've bought never seem to stay tight. Or make a poor connection, some twisty action required.
 
Love the attention to detail.

How do you like the battery terminals? The 'military style' ones I've bought never seem to stay tight. Or make a poor connection, some twisty action required.
there are some absolutely SHIT ones- like this

These are absolutely not "military spec"
one was physically broken in the box.
so i ordered another, and it was broken too.

I've also had excellent luck with "good" ones.

These are "soft" sorta. they conform well and stay plenty tight
 
Today was very productive. I got the wiring harness done in the engine bay, almost everything's done on the body harness. Waiting on a few things from powder coat so I'm at a little bit of a stopping point. Hung the fenders and the grill so I can finish the headlights and turn signal wiring, and route the fog lights that I'm hoping to see from kchilites .... I'm going to have to put a gear reduction starter on it, the starter just can't get the engine to spin over at a speed that will fired off dependably. Waiting on parts for next week.
I think a gear reduction starter from a 90's F150 will work?
20211230_175951.jpg
20211230_175947.jpg
20211230_175943.jpg
 
Last edited:
Today was very productive. I got the wiring harness done in the engine bay, almost everything's done on the body harness. Waiting on a few things from powder coat so I'm at a little bit of a stopping point. Hung the fenders and the grill so I can finish the headlights and turn signal wiring, and route the fog lights that I'm hoping to see from kchilites .... I'm going to have to put a gear reduction starter on it, the starter just can't get the engine to spin over at a speed that will fired off dependably. Waiting on parts for next week.
I think a gear reduction starter from a 90's F150 will work?
20211230_175951.jpg
20211230_175947.jpg
20211230_175943.jpg

This is looking great!

The 90’s (96 I think) starter greatly helped my 84’ Bronco. It was worth doing and simple.
 
yea, that's what I've ordered- a permanent magnet gear reduction starter. have to mod my wiring a bit, remove the solenoid and remake the battery cables :/
 
Got the flares installed.


20220106_161401.jpg


Tach installed.
Dash cap installed.


20220105_174656.jpg


Figured out how to mount this thing finally.


20220105_161101.jpg


Illumination looks a little biased in the pic, but isn't as bad in person


20220104_180637.jpg


These on the other hand, are gonna have to be calmed down lol
these things are bright lol


20220104_175925.jpg


Duff roll pan lookin sweet!
Front bumper and skid plate installed- gets to come back off because I need to mount the p/s cooler lol fk.


20220104_174740.jpg
20220104_174733.jpg
20220104_174719.jpg
 
That's all you had to do, Tom's bronco parts......
All you had to do was just supply a small spacer to take the slack up on the bolt anchors, and it would be miles better than "this is what we supply, we've been doing that for years".
A 7/16 bolt in a .600 hole is not "ok", despite what you say you've been doing for years.
Safety is a priority, don't cop out with that excuse.
So, I made spacers to take the slack up, not have the belt ride directly on threads, and allow the bolt some chance of being centered upon an impact and not rip the head through the hole.
The back seat bolts are exposed-
so I used mustang bolts, cut their shoulder down as well so they wouldn't be so proud in the bed, and made spacers for them as well.
Do it once, do it right.

seatbelt.jpg
20220107_175905.jpg
20220107_175859.jpg
20220107_175456.jpg
20220107_175435.jpg


Got tired of staring at the parts house hose wall- so I made on instead.


Screenshot_20220107-104020_Instagram.jpg
20220107_095833.jpg


Made a -10 inlet for my p/s pump

20220106_170250.jpg
 

Attachments

  • 20211230_175951.jpg
    20211230_175951.jpg
    926.9 KB · Views: 17
No updates recently because I took some time off of social media and teh internetz- so time for updates :D
First, my turdbox. I got the coyote/6R80/BW4418 loaded up in the superduty frame, hacked up the crossmember, did some weldy extensions and whatnot to make it fit.
the 2015? frame I got didn't have a gas tank, and so after buying two tanks (a 47? gallon that came from a long bed that physically goes from pinion to tcase, and crossmembers won't let it fit, and a 36? from a 2019 that is OF COURSE shaped different and won't fit the crossmembers) I ended up just throwing the main tank out of the 79 in the bed since i had sumped it already, anticipating throwing it into the 79's frame..... and well- it works but its temporary till I find the right tank. I want to find a 6.2 gasser 2011-2016 tank- it should fit without mods.

then, getting the BW4418 CV style out of the situation- I found a dude who makes these adapters to get a 1310 double cardan setup working.

The bed needed tabs welded onto the frame on 6 of the 8 bolts (and dennis carpenter replacement bed bolts don't work, stock or otherwise, so don't buy them :rollseyes: )
and then I had to drill holes through the frame as well- which fully sucked because it was on a weld transition. I chopped up some hockey pucks to shim the bed in two sets front/rear of the 5th wheel hitch, and cut holes in the bed so I can use it down the road.

sumbish fits pretty damn good, and I'm excited to get the cab on it.
20220215_143001.jpg
20220215_142956.jpg
20220215_142951.jpg
20220215_142944.jpg
20220110_121900.jpg
20220110_121857.jpg
20220110_121853.jpg
20220110_121210.jpg
20220110_121204.jpg
20220110_101530.jpg
 
Taaadaaa!


I threw some shorty headers on it, and some leftover stainless exhaust from the bronco, mig welded up (stainless welds funny)
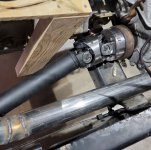
driveshaft tossed in there.
now to wait for a lift to open up from one of my techs so I can steal it to throw the cab on there.


things that I see an issue with and I'd love some help:

1. the steering shaft on the superduty is a "triangle" style shaft. I ordered one off ebay to go to a 3/4" DD steering shaft and the "^" of the triangle is too narrow on the adapter. its also a "through-bolt-that-goes-into-a-slot-on-the-shaft" and the adapter is a set screw. I need help figuring out wtf to use for that.
2. the fking brakes. I have searched high and low and here's the situation. The ABS unit I'd love to delete, but currently am using it as a passive distribution block. front circuit is m14x1.5 bubble, and rear is m12x1.5 IF...... I need to convert those to 3/16 lines to get them to go to the master cylinder which is 9/16" front and 1/2" rear both 3/16 line. Ideally, I'd love to have -4 AN fittings so I can use soft lines to the master, but no one makes anything for adapters in that goofy size and configuration. I think I'm going to chop the lines off and re-flare them with 3/8-24 double flare and go to "T"'s, then -4 AN to the master. I don't know how else to handle that, short of finding a 6.2 booster and master and grafting those guys into the 79's booster mount. Thoughts?
3. rear driveshaft- The BW4418 is a slip rear. I THINK the SD was a one piece slip rear too, right? I was thinking of making a 2 piece setup, that way the slip doesn't have a chance of falling out the Tcase.
 

Attachments

  • front shaft truck.JPG
    front shaft truck.JPG
    187.8 KB · Views: 7
Ok, now for bronco stuffs.

I got the cage installed fully, which let me put the Aux tank in. Lookin good.

Got the hood installed- it'll need some tweaks and adjustment. Also installed a gas setup to hold the hood up. I'll powdercoat the brackets so it'll hide better.

The truck just didn't want to start correctly still. slow to crank, even with the gear reduction starter, which led me to investigating what the hell was going on.
turns out the input shaft was juuuuuuuust to far to push the crank into the thrust. Thankfully it only ran for a total of about 15 seconds in this configuration, so I'm very sure the thrust bearing isn't hurt.
but- I'm glad I found the issue.
the Tcase and Trans came back out, I lopped a chunk of the input nose off, and re assembled it. Now, I have .008 in thrust on the crank (like when I set it up) so we're good to go. It also cranks over correctly now (go figure!) lol


while the tcase and trans was out, I got a HD output shaft from Wildhorses and a Toyota flange from Jess at Hi-angle. the flange didn't fit the seal- so a run down to the machine shop to huck it in the lathe, then on the crank grinder fixed that up.
Also decided to put a 1350 yoke on the pinion as well if we're gonna make the rear shaft handle the power/torque the engine can now produce.

20220216_161000.jpg
20220207_134734.jpg
20220207_121931.jpg
20220204_174633.jpg
20220202_173659.jpg
20220114_181526.jpg
20220111_180528.jpg
20220111_180203.jpg
 
I couldn't help myself. I had to crank it up uncorked :D


I was feeling real fabricate-ee, so I knocked out the rear exhaust from muffler to tips. Safe to say that I got my quad and glute workout 😂 up down up down up down up down LOL anyways, really happy how it turned out and will send it out to get ceramic coated. Ran it for a while today to bleed the cooling system and it sounds freaking awesome. Overall real happy with what I got done today.

Initially I put the exhaust even with the back of the body- but the pipes looked like an afterthought because they were so visible- so I moved them to turn underneath the spring hangers....and YAAAAAAAAASS that's the look I was going for. Now to pull them off to get ceramic coated and reinstalled for the last time.
20220217_172333.jpg
20220217_172226.jpg
20220217_144500.jpg
20220217_144403.jpg
20220217_140058.jpg
20220217_135343.jpg
20220217_135335.jpg
20220217_133814.jpg
20220217_133041.jpg
20220217_132817.jpg
 
Few more pics.

Waiting on a few odds and ends- I think its almost time to put seats in it.

one thing I noticed, is I can't get the p/s to make decent pressure and/or bleed well.
The pump is putting a little bit of flow out, but not enough for steering to be felt.
I'm thinking the 30? times I took the got dam thing apart after powdercoating the housing is one indication that something is off/wrong....
I may just buy another pump and transfer the AN fittings I made to it and say screw it-
But i'll pull the control valve out and see if there's something there thats causing the issue. if not, I'm just gonna replace the damn thing.
20220217_180445.jpg
20220217_172442.jpg
20220217_172423.jpg
20220217_172358.jpg
 
That exhaust is a work of art:beer:

It’s easy to see you spend all day working on bmw’s with how that turned out. Fancy champagne budget beemer drivers aren’t going to accept 2 cherry bombs stick welded to some fence post like the Busch latte drinkers will:flipoff2:
Funny, my dad had cherry bombs welded to the headers and out the sides under the doors 😁

I told him that wasn't gonna fly this go around lol
Thanks for the props, I have a fair amount of time and effort making that exhaust not suck.
That doesn't mean the driveshaft or diff won't hit it while driving...... we'll see 🙈
 
got the rear seat sorted out.
20220223_112433.jpg

This escalated quickly :D
I started at 2:30 and this is 6pm. not too shabby :)
Things to do (lol)....... plasma all the body mounts off, attach to the cab and level frame.... then weld mounts back on.
figure out wtf to do with the left side header and steering shaft. they finna get into a fight.
20220225_173213.jpg
20220225_154900.jpg


Whoo! what a week it's been.
so.
Day 1.
Threw some 37's on it.
figure out body mounts and what the hell I'm doing lol
Chop frame.
I realized my mistake mid-stroke on the frame chop and just had to roll with it.

20220228_085917.jpg
20220228_122916.jpg
20220228_121926.jpg
20220228_121855.jpg
20220228_121746.jpg
20220228_121734.jpg
20220225_173213.jpg


Day 2.
I welded in the frame mounts (re-used the super duty mounts and ran some poly mounts)
Welded in some frame horns to hold the front bumper and core support.


20220301_182322.jpg


Day 3.

Made exhaust and figured out how to make the rear tail pipe work with it.


20220302_182630.jpg
20220301_182303.jpg
 
Day 4.
Finalized the exhaust and installed a booster/master from a 6.2 F250.
Bled the brakes and it feels great!


20220303_175419.jpg
20220302_182637.jpg
20220303_175354.jpg


Day 5
mounted the pedal, worked on the wiring.

look.
MARS should be charged for war crimes on the wiring bullshit they sent.
They must've used 5-6 rolls of electrical tape to put this fucking thing together. Its ridiculous.
I have a ton of wiring re-do and clean up.
worked on the fuel system, got the 6.2 gas tank in the 6.7 frame, had to make a harness and replace the fuel pump.
You gonna paint up my radiator with your logo? better not suck ass at your business :D
20220303_175349.jpg
20220304_150527.jpg
20220302_182649.jpg


Day 6

Started it!


Welded up the fill neck to the size of the SD tank (like 1 3/8 vs 2").... found a fill neck hose, made a breather, ran -6 line to the fuel rail.
made a bracket to hold the Volvo power steering pump. Waiting on fittings.
made an emergency brake extension, need to make a little bracket to hold the anchor of the bowden cable onto the frame


20220304_182344.jpg
20220304_182336.jpg
 
Open barreled splices with Raychem SCL is the way things are done. This specific one is ignition on to the control side of the relays.
What splices are you using? Do they need a special crimper?
Need to join a bunch of #12 wires for some stuff on the tractor and that looks like it might be easier than the shrink insulation butt splices I am using now (and 2 #12s with insulation are almost impossible to jam into a yellow splice).

Thanks

Aaron Z
 
Open barrel splices require a specific crimper....you can get them for about 30 bucks for the cheapies- very similar to weather pack crimpers. They aren't easier to use, aren't user friendly like your typical heat shrink butt connector, the pliers, your fingers, the wires, and the splice the size of an eraser tip makes things interesting when your limited on space. You have to plan it out to not forget your heat shrink too!

If you have to join a bunch of wires (like more than 2-5?) Use a junction block. If not I have another solution that may work ( a comb style bus, terminals that use the same style crimper, and a cover) that comes from a BMW. They aren't weather proof though.
If you need weather proof, heat shrink and pinching each wire around quality heat shrink is one way.
Lots of ways to skin a cat depending on skill, budget, give a shit, location, etc
 
Heres a quick and dirty on how to use the crimp tool. The butt splices are awesome, and an open barrel splice is similar.

Note: this isn't the absolute CORRECT way of crimping, but it's better than most.
1. I twisted the wiring. Technically you're not supposed to twist the wiring. But I totally get why you have to twist them to make it go into a closed terminal crimp or join multiple wires. Technically you're supposed to lay them on top of each other for the best connection without resistance.
2. Your technically not supposed to use this crimp style to secure the insulation. Your supposed to use a "round" crimp, ala' weather pack style crimper.
3. the crimps you can get a kit off teh Amazon's for about 10 bucks. They are cheap and not as quality as the BMW style but aren't $1 each. I use BMW crimps on client cars because nothing but the best/I have to warranty my repair and the cheaper ones on my own stuff because
.....well.........it's my stuff.
 
Open barrel splices require a specific crimper....you can get them for about 30 bucks for the cheapies- very similar to weather pack crimpers. They aren't easier to use, aren't user friendly like your typical heat shrink butt connector, the pliers, your fingers, the wires, and the splice the size of an eraser tip makes things interesting when your limited on space. You have to plan it out to not forget your heat shrink too!

If you have to join a bunch of wires (like more than 2-5?) Use a junction block. If not I have another solution that may work ( a comb style bus, terminals that use the same style crimper, and a cover) that comes from a BMW. They aren't weather proof though.
If you need weather proof, heat shrink and pinching each wire around quality heat shrink is one way.
Lots of ways to skin a cat depending on skill, budget, give a shit, location, etc
Thanks for the info and the video, there's a half dozen switches around the instrument cluster on a tractor that I need to rewire the power feeding them, but the switches are wired with 12 gauge and it goes into a plug. Perhaps I'd be better off just getting replacement plugs (female spade connectors made to go into a plug) and unpin that wire off of each plug.

Aaron Z
 
Depends. 12g is big to feed just instrument panel gauges. 1 12g to feed everything is plenty. Context of why and what your trying to accomplish helps with questions like that 😉
 
Depends. 12g is big to feed just instrument panel gauges. 1 12g to feed everything is plenty. Context of why and what your trying to accomplish helps with questions like that 😉
It feeds switches around the cluster for headlights, tail lights, turn signals, strobe, fan, etc.

Aaron Z
 
I misread and thought instrument panel display gauges, And you're talking about the switches to run stuff. Different load on it then. 12g can handle 20 amps at 20 feet. Probably would be best to go to private message to not clutter up my thread anymore 😁😁
 
you know when you wanna do the very best, and you try/buy/build the very best to your ability..... then nothing goes to plan like you wanted it to?
Enter TBP front seat brackets, floor pan and seatbelts.
What a cluster fuck. Nothing fit. Nothing.
No holes lined up other thank 3 out of 9.
I'm pretty aggravated over the situation but they're in

20220317_083902.jpg
20220317_083854.jpg
20220317_083112.jpg
20220316_170126.jpg


got the exhaust in :D
Looks good!


20220316_134916.jpg
20220316_133612.jpg


in the mean time I'm swooning over my truck!
I can't figure out a transmission issue -that isn't the transmission's fault.
the vehicle speed signal at 40mph shows about 4-5mph.
The total mileage driven in the PCM flashes every 10 seconds for 3/4 of a second, the Vehicle speed signal (calculated) becomes accurate.... and then it'll shift to 4/5/6.
the mileage goes away and it shifts back to third.
I'm convinced its a PCM issue so I have another coming.


20220314_114249.jpg
 
Pushed the thing over to the alignment machine and straightened it all out.
For having the shit jumped out of it, it's most okayest in alignment lol!
We'll see what it does when I drive it.

20220401_165049.jpg


Changed the oil and made the power steering pump work :D
20220401_160634.jpg


Worked on the doors.
20220330_180700.jpg
20220330_174928.jpg
20220330_174917.jpg
20220330_174910.jpg
20220330_174842.jpg
20220328_170945.jpg


Goofed off with the Unimog :D
20220328_113656.jpg
 
Been busy working a deal to buy a new property/shop for my business so I've been a little pre-occupied.
But, I have been working on this little ditty-
This is the working prototype- now i need to work on the model a little bit more.
Overall I like it.
see it when you want, hide it when you don't .

Finished up the doors. they are tight with the new seals, so let's hope they relax a bit. sheesh!

Put another water temp sensor in, because it shows 120 on the dash, and my sniper shows 180......

So I need to find a legit temp sensor that hits the right ohm values.

Bled the brakes and clutch.....

Sorta waiting around for Jess at Hi angle to get the rear shaft to me.


20220415_171916.jpg
20220415_171910.jpg


pretty cool what my ultra sonic machine will do with old parts. This door latch looks freakin brand new!

20220408_094410.jpg
 
Top Back Refresh