What's new

Limey Bastard ~ 1974 F100 4x4 Resto

I spent the last few evenings running in the engine and doing the front brakes... I forgot how much drums suck. :laughing: Should provide adequate stopping now though.

I tuned the engine up after the initial start up, had to pull the dizzy out because I had it 180* out. Easy to do if you are a homer :homer: and don't bother to check if it's on the compression stroke.

Got the carb about as efficient as I think it could be... idle air mixture held a 14 hg vacuum off the manifold, given my elevation of 7500' I figure thats decent. Dialed in the dwell to 28*, which is spot on and have the timing set at 10*btdc. It's a bit advanced from the 6* the book calls for, but again my elevation plays a role in that. And the idle rpm is right at 650 in Park. Sounding pretty decent. :grinpimp:

Vacuum gauge at idle~
20210615_170349.jpg


Dwell is set at 28*~
20210615_164301.jpg


Rpm's are good at idle, also charging at a steady 13.8V~
20210615_164925.jpg


Couple of videos of it running~


And the front brakes... Woop de doo. I was actually going to replace both the u-joins on the axles, but they were super clean and functioning well. And there were two new seals on the backside of the hubs, so they were more than likely replaced in the last 10K or so I am guessing. I did repack both sides wheel bearings and replaced both brake cylinders, lines, shoes and hardware. Just need to clean up and paint the drums and I will be done...

Front brakes done~

20210617_184308-jpg.jpg


20210617_221748-jpg.jpg
 
Last edited by a moderator:
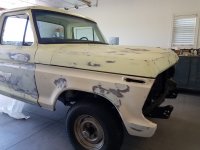
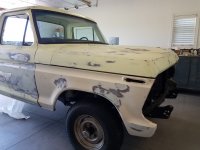
So I have been pretty bust the last couple of weeks, but I start to assemble the panels yesterday. Put the hood on to straighten it up and started marking up the fenders to begin the straightening process. There's a couple of problem areas on the cab and door that will require some studs and slide hammer at the least. The fenders aren't too terrible, so they will get some body hammering and a sand and primer treatment. The hood is going to take a bit of work too, but nothing to crazy.
The floor boards on the other hand will need to be cut out and new ones welded in place. The drivers side took the brunt of of it over the years...

I have a crap ton of other things going on, but will update as I make some progress.

Starting point:

20210701_183818.jpg

20210701_183830.jpg
20210701_183902.jpg

20210701_184012.jpg

20210701_184018.jpg

20210701_183925.jpg

20210701_183917.jpg


Definitely got my work cut out...
 
Just now got to start on the body work today... Pulling dents is just tons of fun. :laughing: About got the bulk of them ready to spread some filler over. I also managed to finally find some paint with the original pastel lime 4a paint code. Hopefully it's a close enough match to the OG... REALLY don't want to have to shoot the inside of the cab. Also have a ton of parts on order to get the thing back to original shape. After a bunch of back and forth I have decided to just keep it as original as possible. Would probably help resale value a ton when I decided to part with it.

Pics.
20210701_183902.jpg


20210719_171100.jpg


20210719_204043.jpg


I managed to salvage the door... Lots of massaging with a body hammer and a lot of tapping on the inside of the door skin. It should all skim out pretty good at this point.

:grinpimp:

Will probably have another full day tomorrow working dents, then another day of filler and sanding. May shoot some 2k epoxy primer this weekend to spot prime the cab and get it ready for sand and paint.
 
Please do something cool with the wheels:emb:

Maybe 15x10 poverty wheels, argent with 32x11.50 muds?

I couldn't find a ford pic, but I think something like this would look great on yours:smokin:

b59c1ff3d75f13f946139454006308f2.jpg
 
I have a set of 16" wagon wheels with some 32's on them. They have plenty of life left.... but they aren't plain jane stockers. :flipoff2:

I got a hair up my butt about maintaining the stock appeal for some reason. Already ordered some 235/ 75/15's to wrap around the original wheels. Found some og dog dish's too for hub caps.

I do really like the look of the stance on that one you posted above though.
 
On muscle cars, they call it "day 2"

Vintage torque thrusts, 4bbl and exhaust

Kinda the difference between your grandpa buying it, and your macho uncle wanting it souped up a bit

My 67 bronco had ford a.c., bumpers, warn winch, 2"lift and headers installed in 67, it was a timeless look IMO


After I pulled the yellow fog lights and big mirrors:laughing:
 
So I am still correcting some dents through today, and more tomorrow. The more I have started examining the old truck, the more dings I am finding.

I have put together a strategy though and will remain true to the era (for the most part)... paint tech has come a long ways since the 70's. :laughing:

Quick run down of the process

Dent repair~ The major ones were on body lines. This always sucks, aside of cutting and welding in patch pieces, ya got to pull them. And in this case getting to the inside was a no go on the cab. So stud weld and slide hammer. I also use washers cut in half and a different slide hammer with a hook. Then plug weld any holes that will happen with the mig, flap down and repeat as needed. Just about done with this step.

Smooth~ I'm kind of a crybaby when it comes to filler... I HATE BONDO. Evercoat or Upol are my go to brands. Evercoat Z-Grip is great for any base you know you will need a bit of filler on. Evercaot rage gold is great for that final pass. NO pinholes or bubbles when mixed right. And maybe a glaze for any areas that just need some touch-up. Saves a TON of time knocking crap down and sanding with those products.

Prime~ Because of trying to keep the thing fairly OG I decided to go with an enamel single stage paint on this one. I have painted with Acrylic Enamel before and when done right, comes out great, and it's true to the era. So the bare metals get a self etch primer (I'm going to leave intact as much of the original paint as possible) and then it gets sprayed with a 2k primer surfacer for build up.

Block sand~ I use an assortment of blocks and some home made stuff to wrap and sand with. At the end of the day, it's a truck... and NOT a show truck by any means. Just a cool weekend or even daily driver.

Paint~ I finally found a supplier to mix up the og pastel lime paint for me. I have used their stuff before and it lays down pretty decent for the price. AND fits the budget. Restoration Shops/ Custom Shop line of paint. For a gallon and a quart, plus reducers/ hardeners and primer it came to just under 600 bucks...

For now it's all prep work until I shoot. The painting takes about 2-1/2 hours from the time I start mixing until I put down the last coat (flash times and etc. add to that). The prep is literally 95% of the work. :homer:

So that's the plan for now.

I also ordered a TON of stuff for an interior makeover. Seat upholstery, door panels, dash, rubber flooring and etc. That will happen after paint more than likely. Also got a few exterior badges/ and new re-pop mirrors. Should be a cool old truck when done. Hopefully. :grinpimp:

Oh, and STILL NO bed! Can't just let it sit though. I do have a line on a bed, but it will cost me a .243 bolt action rifle. A decent one too... SO fangers crossed.
What kind (brand model) of .243 bolt?
 
If that has a wooden stock I’d have trouble giving it up. But, these truck beds are hard to find, so I get it.
Composite stock... I have had it for probably 12 years or so. Very little use, only hunted with it once and maybe 3 or 4 outings to sight it in and play with.
 
If your rifle trade doesn't work, I have another bed from that 74 I bought, it has the toolbox on passenger side. I'd probably trade it for that parts truck rolling chassis, I'll shoot some pics, pm me your # if interested and I'll get you pics
 
If your rifle trade doesn't work, I have another bed from that 74 I bought, it has the toolbox on passenger side. I'd probably trade it for that parts truck rolling chassis, I'll shoot some pics, pm me your # if interested and I'll get you pics

Three questions on it...

Does it have trim? Mine does not, not opposed to filling a bunch of trim holes though.
What configuration are the gas tank hole/s? Mine has just ONE tank in the typical rear of the frame.
How much work does it need? I realize any bed I get will need some work, and I expect it. Just curious as to what kind of time I am looking at.

:grinpimp:
It has upper trim, I think these have the little stud instead of holes

It has the toolbox on pass side, pass side is pretty straight

Drivers side has 2 fuel fillers, no doors, though I've put 90s doors on these before

Drivers side has a ton of dings above the trim line

I have no idea what's up with the paint on drivers side, it makes no rhyme or reason, I think somebody told a 12yo they could restore grandpa's truck and he got 2 rattle cans in before quitting :laughing:

I have no idea how bad your bed is, or if mine is even an upgrade to yours

If you're interested, I'll make sure there's no repairs under the paint, I'll pull the bed liner looking for rust, and could include the side tank and brackets if you'd rather add a tank than delete the hole
20210723_093750.jpg
20210723_093809.jpg
20210723_093856.jpg
20210723_093834.jpg
 
I will think on this one man... was really hoping to get the other, because it's local. If the guy doesn't get back with me soon, I will definitley look you up on this.
 
So I had a ton of stuff to do this week, and didn't get any more done till the weekend. Did make a dent though (or at least repaired several)...

Almost to the point where I can glaze it down, then hit it with a 2k primer and block sand my little butt off. :homer:

The passenger side required quite a bit of time getting straight... and because of where the dent in the cab was I am pushing the limits with the filler... 3/16" is about all I am comfortable with. Believe it or not the max in this pic is maybe an 1/8" of filler work at the most. Should block easy enough with some poly primer surfacer though.

20210801_173546.jpg

20210801_173531.jpg


Other side is basically a scuff and glaze job... Hood and roof were limited to only some small dings to fill...

20210801_110230.jpg
 
In case you aren't aware, that back window opening is identical 73-96, so finding a nicer piece of glass, or a slider, or a fresher gasket at the yard is cheap and easy
 
In case you aren't aware, that back window opening is identical 73-96, so finding a nicer piece of glass, or a slider, or a fresher gasket at the yard is cheap and easy
I didn't know that.... I did already get a new seal for the back window. I was going to either clean the og glass up and run it, OR there is a slider in the other pickup but it needs kind of a rehab I think. Good to know I have options though!

I was gonna go by the glass place today and order the front glass. Hoping it isn't crazy expensive.
 
I never have liked sliders, that's just my preference, but if you went with one from a newer truck it'd probably be tighter and possibly tinted

There may be different seals depending on the slider/ no slider, and then if there's a groove for trim


edit: glass should be the same $80-120 as pretty much everything else, if it's not, they are just screwing you:laughing:
 
I (sorry no pics on hand right now) replaced the front windshield and seal, as well as the back. For what it would have cost to get the windshield here and a seal, the local glass place was able to install it cheaper. They used a precision brand seal and it's nice! Super thick like the original.

The wife and I put the back glass seal in (the glass place quoted a hundred bucks). Was a workout, but worth the cost savings. I have a slider in the parts truck, but I wanted to retain the "original" build sheet standard for it. The back glass seal I ordered from Autokrafters, and lo and behold what did they send? A Dennis Carpenter seal. lol. Worked out fine... Happy with both qualities of seals. I do have some replacement felt for the doors too, but have yet to research that one.
 
Also managed to get the old rotted floor board sections cut out and got the new metal fit up and tacked in place. Luckily the cab mounts were still in decent shape! Should be welded in all the way round tomorrow or Thursday at the latest. I have some 3m seam sealer for the top and bottom side of the cab all the way round also. Plan on priming and painting the floors with plain old gray rattle can, and then some under coating spray... I am also going to coat the bottom of the cab with some undercoating to hopefully keep it rust free for a long while.

Also, floor boards and rust repair sucks. Just sayin'

20210814_154746.jpg

20210814_182642.jpg

20210817_184122.jpg


I know one thing... this was more floor rot than I had dealt with on the floors than any other rig I have had. I am used to a small hole here and there, but a half pan and almost a full one was rough. The quality of the pans I purchased was also pretty "meh" at best. Took lot's of persuading and massaging to get them rolled in right. I initially thought the drivers side was only going to need a small section, like the passenger side did... but when I dug in a bit more and saw the amount of pitting I was kind of committed and used the cheaper pan. Oh well, lesson learned. Next time it's just drop the coin for the DC or LMC pans. From what I have seen though, they are as much work also, but at least formed a bit better than these were.

At least now I can load up the gun with some dtm primer and get to spraying the inside and outside of the cab when I finish welding and sealing everything. :grinpimp:
 
So the pans are welded all the way around... one less thing. :grinpimp: Will prolly finish off with a grit pad on the grinder in the AM.
Couple of tiny patches left to put in, but won't take long...
Tomorrow I should be able to get it all prepped and sprayed... Then sealed up with some seam sealer. I typically only ever seal the top side but will be doing the bottom on this one also, then spraying with some rubberized coating.

20210818_170607.jpg

20210818_181818.jpg
 
What order did you do your welding and glass install?

My crew cab Fummins had a new tranny tunnel for the nv4500, and I had to weld bungs in to the C pillars for rear shoulder belts when I swapped in the 96 interior.

When i got it tinted a couple years later the tint guy pointed out that I had spatter on every piece of glass:laughing:
 
I welded the floors in first, then did the new seal for the back glass and had the guys from the glass place put in the new windshield.... was actually cheaper to have them do it than order the glass and a seal to do it myself. The back glass was pretty simple and I stuck with the full glass, no slider after all. It's what it came with.

pics:

20210827_225219.jpg

20210827_225208.jpg

20210827_225141.jpg

20210826_141934.jpg

20210827_225251.jpg

20210827_225510.jpg


I also spent a bunch of time cleaning up the dash/ og paint and undercoated the bottom to protect the new floor...

Cab will look great when I install new door panels, dash pad, reupholstered seat and new floor vinyl (stock black for the floor vinyl). Headliner is og and in great shape! Just needed a cleaning, as well as the sun visors.
 

Attachments

  • 20210827_225506.jpg
    20210827_225506.jpg
    3.8 MB · Views: 32
So some more progress, slow as it is...

I got the fenders straightened out and prepped. Drivers side needed some small patches and welding, but was workable. The passenger side was to crunched, so got replaced with a same year fender out of the junk yard. I always opt to replace with original metal, as opposed to re-pop stuff. They just tend to fit right without a ton of manipulating or tweaking. Also spent a few hours getting all the panels fit and lines straightened out... close enough to give a final scratch and prime. I'll be using a high build 2k primer surfacer on the entire cab so I at least have a shot at getting it block sanded fairly straight before I lay the paint. Will have today to mask off and prep. Prolly prime it tomorrow, hopefully... if not than Wednesday. Then I will have to take a break from it. Got some work piled up and promised a buddy we would paint his ride (little Toyota ex cab).


Filler applied and sanded down
20210903_215400.jpg


Treated the back sides of the panels with some primer and a coat of enamel based paint to protect them.
20210904_165545.jpg


Spent a good amount of time lining up the panels...
20210905_164834.jpg

20210905_164845.jpg

20210905_164902.jpg


:flipoff2:
 

Attachments

  • 20210905_113311.jpg
    20210905_113311.jpg
    2.2 MB · Views: 31
  • 20210905_113311.jpg
    20210905_113311.jpg
    2.2 MB · Views: 35
Last edited by a moderator:
Top Back Refresh