I actually ordered the mock up a couple days ago after going back and forth on it for a couple weeks. Nice to know they'll discount the mock up price. Thanks for the heads up!If I remember right, if you buy the mock-up version, they'll knock the price of it off when you purchase the real unit.
Worked out great for me cause there were lots of buckshot holes in the mock-up when I was finished getting the mounts all tacked in. Was nice to not have holes burned in the real unit and it didn't end up costing any more.
How to install the app on iOS
Follow along with the video below to see how to install our site as a web app on your home screen.
Note: This feature may not be available in some browsers.
You are using an out of date browser. It may not display this or other websites correctly.
You should upgrade or use an alternative browser.
You should upgrade or use an alternative browser.
Some time in its past, the tub I started with had the battery box shaved and filled. Since it is a titled '56, I was thinking I may bring it back, but instead of using it for batteries, make an enclosure for the ECM, fuse panel, and relay box, with no crawling under the dash for access. So I made a new cover for mock up. Thoughts?


gt1guy
Apparently a racist
If that's just empty space, I say go for it.
Only drawback I could see, would be if you had to get into it when it's raining. There's certainly many easy ways to deal with that though.
Only drawback I could see, would be if you had to get into it when it's raining. There's certainly many easy ways to deal with that though.
Making brackets/ prepping the heater box install.
 Tied it into the dash and firewall.
 Still tons of room on top to put in the cowl electrical box
 And still tons of room for passengers feet in the footwell.A unit any bigger definitely would not have fit with the firewall bulge.

Gas pedal modification and install this evening. Had to make a new plate for the corvette pedal
 Of course needed to modify the arm as well

 just have to drill through the pedal arm and trim it if i ever lose this pedal
 Old school barefoot gas pedal is installed and functional
 made a slider pad behind the pedal to make sure the motion is smooth and consistent. I'll be cleaning and repainting the pedal of course so that barefoot looks like its new from the 60s.

gt1guy
Apparently a racist
I don't know why, but I just smile every time I see a pic of that peddle.
Damn electronic peddles make ya nervous messing with them too. I had to put a tiny bend in mine and the whole time I was waiting to hear crunching sounds.
Damn electronic peddles make ya nervous messing with them too. I had to put a tiny bend in mine and the whole time I was waiting to hear crunching sounds.
Definitely makes me nervous, just more plastics and electronics to fail.I don't know why, but I just smile every time I see a pic of that peddle.
Damn electronic peddles make ya nervous messing with them too. I had to put a tiny bend in mine and the whole time I was waiting to hear crunching sounds.
Been a productive day for sure. Started on and almost completely finished all the ducting for the heat and AC system.
I ended up making a bunch of aluminum manifolds to make distribution easier, and to get stuff into positions that would otherwise not work. This is the drivers side manifold, under the cowl and over the column and brake pedal.

 Manifold that goes into the rear of the center console for rear heat and ac vents.
 tucked inside the console
 Flexible duct mock up begins
 "J" Manifold that drops into the front of the console under the dash
 Drivers side manifold with brackets and permanent mounts Flexible ducting to dash vents.

I ended up making a bunch of aluminum manifolds to make distribution easier, and to get stuff into positions that would otherwise not work. This is the drivers side manifold, under the cowl and over the column and brake pedal.
Passenger side ducting. I had some old aluminum intercooler piping that ended working like a charm for this. Light, strong, and it was all leftovers anyway. It looks bitchin, but no one will ever see it except you guys.
 another view
 Then I started on the defroster vent. What a pain in the ass. Not sure what inthat sheet of aluminum, but it welds terribly, and I keep getting trash to come out of it. Gald this on is hidden. 8 individual pieces to make this one.
 bottom sandwich plate with center diffuser.
 has to fit above and around the gauge cluster. Stock style will not come close to fitting.
 drilling vent hole radius'
 cut and cleaned up to meet the stock holes in the cowl.
 inlet tubes face towards the firewall
 just need to close up the fronts, and the ducting will be finished.

gt1guy
Apparently a racist
That's brilliant. Definitely cleans up everything.
Do you plan to insulate the aluminum so it doesn't sweat?
Do you plan to insulate the aluminum so it doesn't sweat?
I was thinking about wrapping them in stick on 1/4 inch foam and then taping it just to keep heat transfer down, hadn't thought about the condensation, but I don't deal with a lot of that on the regular here in socal.That's brilliant. Definitely cleans up everything.
Do you plan to insulate the aluminum so it doesn't sweat?
It's done. Definitely more of an aluminum Grinder than a welder on this one. Not sure what it's so contaminated with, I'd be welding along nicely then a bunch of trash would just bubble out of it randomly. Tried different Tungsten, different filler, new sanding discs, cutting discs, filing the edges. Still just random garbage. Screw it, it'll get the job done just fine.
firewall view.
 towards the dash. I tapered the inlets for more room.
 Installed
 you can see the diffuser ramp here to help direct the air into the windshield frame.
 showing how tight everything is under the cowl and how the inlets are tucked away as much as possible to try to free up space. That completes the climate control system other than installing the bulkheads and hoses themselves.

firewall view.
gt1guy
Apparently a racist
I've learned that flap wheels and my little Dynabrade 1/2" belt sander both leave crap behind that shows up when welding. The only thing I found that gets that crap out is a big stainless wire brush and cleaning both sides. Followed by the Acetone scrub until the rag is clean.
Naturally, I came to these conclusions as I was finishing my airbox.
Naturally, I came to these conclusions as I was finishing my airbox.
Good tip. I'll try that next time.I've learned that flap wheels and my little Dynabrade 1/2" belt sander both leave crap behind that shows up when welding. The only thing I found that gets that crap out is a big stainless wire brush and cleaning both sides. Followed by the Acetone scrub until the rag is clean.
Naturally, I came to these conclusions as I was finishing my airbox.
FLUX
@fluxoffroad
- Joined
- Sep 28, 2022
- Member Number
- 5584
- Messages
- 92
Looks great. I second the stainless brush and acetone scrub. May still just be trash aluminum too.
Removing mill scale on steel by soaking in vinegar also helps welding but you better coat it with anti splatter or paint quick cuz it will rust super fast.
I love the cowl box for electronics idea. Would you use some foam or seal material to weather proof it?
Removing mill scale on steel by soaking in vinegar also helps welding but you better coat it with anti splatter or paint quick cuz it will rust super fast.
I love the cowl box for electronics idea. Would you use some foam or seal material to weather proof it?
I was planning on using an automotive bulb type seal under the lid to keep water out.Looks great. I second the stainless brush and acetone scrub. May still just be trash aluminum too.
Removing mill scale on steel by soaking in vinegar also helps welding but you better coat it with anti splatter or paint quick cuz it will rust super fast.
I love the cowl box for electronics idea. Would you use some foam or seal material to weather proof it?
Awesome work--what heater is that?
The VUZ is heat/ac/defrost the other one is heat/ac only
Nothing major today. Spent most of the day prepping the bus for some upcoming fun. In between battery charging and letting the bus run, I squeezed in some time getting the ECU mounted and routing the engine wiring into the engine bay. Next comes chassis wiring. Every step a little closer to the finish.
I decided not to go under the cowl. I just didn't have enough room with all the AC ducting. I may still use the cowl door, but I may not.
This ended up in the drivers footwell.


I decided not to go under the cowl. I just didn't have enough room with all the AC ducting. I may still use the cowl door, but I may not.
This ended up in the drivers footwell.
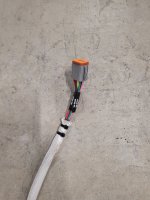
Started on some of the chassis wiring tonight. Will be using all braided loom, self sealing shrink wrap, and Deutsche DT connectors. Tail lights and reverse lights were completed tonight.


Thanks bud, appreciate it.Very nice work👍
I use to build full mod snowmobiles for backcountry riding and been down many of the same rabbit holes it seems you've been down.Thanks bud, appreciate it.
Some builds started with a new sled in a crate and others where sleds that had been totaled.
Power to weight ratio, floatation and suspension set up for weigh transfer were the key ingredients.
I'm a machinist by trade and designed / cut a lot of chassis components to take away weight and increase strength.
Always going through your build brought back a lot of memories, both good and bad.
Looking forward to seeing Judy when she's done.👍
That's awesome. Yeah, always doing research, trying new stuff. It doesn't always work out, and changes have to be made. But that is the fun of the build, right? Thanks for following along.I use to build full mod snowmobiles for backcountry riding and been down many of the same rabbit holes it seems you've been down.
Some builds started with a new sled in a crate and others where sleds that had been totaled.
Power to weight ratio, floatation and suspension set up for weigh transfer were the key ingredients.
I'm a machinist by trade and designed / cut a lot of chassis components to take away weight and increase strength.
Always going through your build brought back a lot of memories, both good and bad.
Looking forward to seeing Judy when she's done.👍
WaterH
Well-known member
Hadn’t seen this in awhile. I really like the way you used a lot of “hard line” in the HVAC. (Sheet metal instead of duct) I just used all duct and my dash is crammed full of it. I should go back and try to clean it up. One of my defrosters is not putting out anything, so the duct must have got smashed or pulled off. Between wires and ducts, I hate to even open up the dash.
Carry on.
Carry on.
Thank you sir. It definitely saved a ton of space.Hadn’t seen this in awhile. I really like the way you used a lot of “hard line” in the HVAC. (Sheet metal instead of duct) I just used all duct and my dash is crammed full of it. I should go back and try to clean it up. One of my defrosters is not putting out anything, so the duct must have got smashed or pulled off. Between wires and ducts, I hate to even open up the dash.
Carry on.
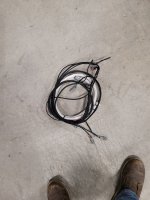
Began the main chassis harness today. Everything is broken down into sections, this is the full harness for the tail light group. Everything covered in braided loom, the front engine bay section (in white) is additionally covered in high heat resistant fiberglass insulation (the same material tig fingers are made of, very high heat/burn resistant) to keep it protected from exhaust heat. Again, all Deutsch connectors.
Rear section includes R/L stop/turn/tail, 3rd brake light, reverse lights, 7 pin trailer plug connector, and fuel level sending wire.
Entire harness is easily removable, mostly to make it easy on me to paint everything when I get there, but also for service related issues in the future. Making it hard now, so I don't have to make it hard later. Pretty happy with how it's turning out so far.
Next is onto the headlight section.
Attachments
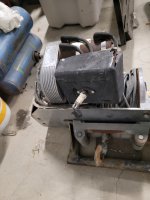
Also picked up this ugly 'ol thing from a buddy on a trade. It works but it obviously needs some work. Wanted to put an 8274 on this since I started building it, to keep with the old/new theme I have going on with everything else. This particular unit was built November 6th, 1986. Pretty sweet score. Will get cleaned up and have Synthetic rope and a hawse fairlead added. With a fresh mount on on the front bumper and I'll ditch the boat anchor its currently mounted on.


Attachments
Frodo
Active member
- Joined
- Jul 18, 2023
- Member Number
- 6623
- Messages
- 42
Why the 7 pin trailer plug?Rear section includes R/L stop/turn/tail, 3rd brake light, reverse lights, 7 pin trailer plug connector, and fuel level sending wire.