What's new

CJ5 wild stretch and full build (Big Booty Judy)

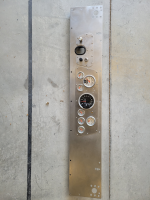
If you look close, this will make you laugh. At least it sure makes me giggle. I was going through a bunch of old switches and electrical components and a couple key switches. I happened to find this one. It's an early 60s Briggs and Stratton key switch, all the old cj's had small dash mounted keys, but when I saw this, I truly couldn't help myself but to use it for the Ignition switch. The key has the old Briggs stamping on it. I love it.
20240329_095649.jpg
also rigged it with race car push button starting (key switch is only power and accessory positions).
20240329_095656.jpg
Here is where the real fun was. Neutral safety switch and the tap shift feature wiring for the 6L80E.

Each feature (Tap shift engaged, shift down, shift up) required a different voltage with resistor banks in line... so the trans needs a 12v input that has to be split into 3 leads and each lead needs a resistor bank with specific and combined resistance for control of input voltage for the transmission shift control.

When engaged (sport mode) incoming resistance needs to be 8.25k ohms.

when upshifting, combined resistance needs to be 1.22k ohms (line resistor is 8.25k + 1.5k ohm resistor)

When downshifting, combined resistance needs to be 2.88k ohms ( 8.25k + 4.42k ohm resistors)

There are only one or 2 videos on YouTube that explain this in detail. Lokar and PSI conversions do not supply instructions on how to properly connect tap shift. They both just say to research your application. The best one I found is:


20240329_095542.jpg
Combined resistance banks to get the proper values for tap shift.
20240318_183256.jpg
sketch diagrams for values next three images. The included vidoe does a great job
He even added momentary switches to his steering wheel for tap shift. Truly a great watch if you're running a 6L80E.
1711736032133399696514099421869.jpg
1711736056515730433346751423622.jpg
17117360849018713046751359388442.jpg
 
Thanks for taking the time to put this kind of stuff together on the forum. These post are gold for those searching.
I had to look for quite a while to find it. I was just hoping to help someone else along the way. Like most of us try to do here.
 
Began this nonsense today, needed a break from the wiring. Pulled the sides off the steel top, and began mockup for the aluminum top. Looks like I'll have to make the sides a little taller to accommodate the roll cage.
20240401_164331.jpg
Plenty of room. Looks like I'll have about a half inch of clearance at the top for the cage to inner wall clearance. And the doors will be nice and big.
20240401_175056.jpg
 
Is that running e38 ecu? I think there’s a few tap shift modules out there that can be run as well but not sure on the LS stuff.

Still looking foward to the top build!
 
Is that running e38 ecu? I think there’s a few tap shift modules out there that can be run as well but not sure on the LS stuff.

Still looking foward to the top build!
No, it's a 58x. It has tap shift built in. I was lazy and had psi conversions put it together, but no one at psi or lokar could tell me how to make it work. That's why I included as much detail on the shift module as possible.

I picked up some more aluminum yesterday and started heavily in on some sketches. Hoping to start the frames today.
 
Got busy and got a ton done today on the frames for the alumitop.
20240413_105036.jpg
20240413_105102.jpg
Ended up going an inch taller to guarantee I wont have cage fitment issues
20240413_105219.jpg
I almost felt bad sanding these off today to make sure the sheetmetal sits flush as I shell the frames and make the doors/hatches. All my aluminum welds were coming out pretty solid today.
20240413_131621.jpg
five frames and one header for the rear hatch done today. Not too shabby. Though I spent hours on layput and drawings to make sure there was clearance before I started.
20240413_145512.jpg
rear hatch and header with the hinge installed, I set it up to be able to easily disassemble everything for sheeting.
20240413_155227.jpg
Header and rear hatch test fit, I did account for the extra inch of height, its currently captive, but will not be when the top is complete.
20240413_155433.jpg
20240413_155800.jpg
 
I guess you could call it progress. I installed the bluetooth stereo head unit (on the left, between the vent and the AC control unit, yes, thats a stereo) and a 12v power point on the right.

I also did some trimming on the shift plate console, and layed out my toggle switches (no fancy switch pros for me, keep it simple).

I also ran the wiring for both fuel pumps up to the fuse box/relay enclosure. No pictures of that though.
20240420_215355.jpg
 
Do you have a link for that stereo too? looking for bluetooth stereos, I just find DIN radios.
 
Do you have a link for that stereo too? looking for bluetooth stereos, I just find DIN radios.

You will have to run an amp to drive the speakers, fyi. I got this because I was planning on running comms as well, and just didn't see the need for a radio receiver since I'm always streaming music off my phone anyway.
 
You will have to run an amp to drive the speakers, fyi. I got this because I was planning on running comms as well, and just didn't see the need for a radio receiver since I'm always streaming music off my phone anyway.
Good to know. My CJ5 had a speaker, but no radio when I got it, and no cutout for one. This seems better than cutting out a spot for a DIN radio, or shoving a portable speaker into the passenger seat like I do now.
 
Not much to report today, but I spent yesterday evening prepping and wiring up a 6 gang relay box to run my accessories/ fuel pumps/fan. I did not wire as typical though. I set one 40 amp relay up as a "master" and all others down stream as parallel "slaves. Incoming wiring is 10ga, feed wiring is 12ga. And all down stream is oversized based on load. 2 fuel pumps (not intended to be run at the same time, one is a backup), single fan, and some LED lighting. Master will be triggered by ignition hot and a toggle to prevent accidental power draw/fuel flow. Will include a diagram for others shortly.
Screenshot_20240423_074304_Amazon Shopping.jpg
 

Attachments

  • Screenshot_20240423_074304_Amazon Shopping.jpg
    Screenshot_20240423_074304_Amazon Shopping.jpg
    514.7 KB · Views: 1
Finished this die up yesterday for forming the aluminum hardtop roof bows. I was struggling trying to figure out how to replicate the very tight bend radius on aluminum u channel to be able to rivet the outer skin without deformation.
20240425_173734.jpg
test bend with a C clamp (I don't have a press at my evening weld class I teach, and it was a good teaching aid to show students how to overcome problems that require one off solutions.
20240425_172701.jpg
about a 2" bend radius
20240425_173851.jpg
made a spacer plate, so I can do 1/2 inch
20240425_181606.jpg
and 1 inch aluminum U channel to serve my needs in the future.
20240425_181615.jpg
 
Managed to knock a ton of wiring out today. Layed out and installed these waterproof toggles, with aircraft/Apollo stainless switch guards. Left the cover off one, because one cover showed up un-threaded (wtf)
20240426_155017.jpg
Wired with Deutsch quick disconnects to make it easy to pull the panel, trigger wires from the relay box in one connecter, power supply in the other for the triggers.
20240426_181635.jpg
made some crowned shifter bezels so I can run leather shift boots and have something to clamp them down with.
20240426_194402.jpg
roughly an 1/8" of space under the bezels. I really do love those toggle switch guards.
20240426_194409.jpg
and it looks really sweet sitting back on the console.
20240426_194451.jpg
especially with the AC and radio panel there for a visual.
20240426_200133.jpg
Relay box is in!
20240426_202121.jpg
And i even knocked out another removable dash panel. This will house the Ignition/starter button, headlight switch and gives me room for 2 more gauges in the future.
20240426_195722.jpg
 
And with that, the wiring before paint is 100%. I haven't run battery cables yet, and left a couple key on hot wires ran to convenient areas for add ons later, but all the running, driving and stopping stuff is complete, including existing accessories. Pretty satisfied.
20240427_151918.jpg
 
Started in on that column cover panel for the Ignition and headlight switch
20240428_100401.jpg
cut out the clearances, then began the tedious process of removing the plastic film from the stainless and spending about an hour sanding the dash with a random orbital to make it match all the other stainless trim
20240428_131146.jpg
drilled and installed the Ignition switch, started button and headlight switch
20240428_105150.jpg
and not the dash is 100% complete. I decided against doing a glove box with the heat and ac box taking so much room on the passenger side, and with a console, I don't really need one anyway.
20240428_142341.jpg
Ready for final install.
20240428_142352.jpg
 
Top Back Refresh