Thanks. I'm almost done with all the steel work, after the coil towers, it's on to rear aluminum fenders/armor and then the aluminum hard top. Definitely similar builds. I screwed myself by lifting the rear floor, narrowing the rear fenders and stretching the doors that extra 6 inches. Made every panel custom except the windshield, tailgate and grille.Looking good as usual! Interesting to see the different design details as we are building the same vehicle. Our shifters and storage design is flip flopped. With my T-Rex arms I couldn’t reach the shifters in the foward position.
How to install the app on iOS
Follow along with the video below to see how to install our site as a web app on your home screen.
Note: This feature may not be available in some browsers.
You are using an out of date browser. It may not display this or other websites correctly.
You should upgrade or use an alternative browser.
You should upgrade or use an alternative browser.
gt1guy
Apparently a racist
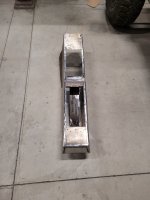
Console came out perfect.
I'm pretty stoked with itConsole came out perfect.
EndlessMtnFab
Well-known member
Hold your horses. It's coming.About damn time !
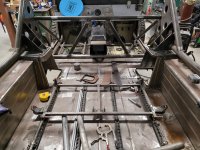
More progress on Judy. Managed to get the coil tower covers cut, fit, trimmed, rolled and cleco'd. I still need to drill and install the rivnuts. A buddy will be bringing up a cj6 hard top on Sunday, so I can extend it, then use it for a buck to work on the aluminum top and doors. Things are starting to come together and I'm excited. I ended up using too many clecos, and I'll use too many rivnuts as usual, but I like how the removable panels turned out.


 I'm starting to see the light at the end of the tunnel and thats a great feeling.

Attachments
gt1guy
Apparently a racist
It was brought up in my thread so I ask you too. Are you going to rivet where the clecos are or spot weld the holes closed or something else?
Your bead roller driving skills are spot on.
Your bead roller driving skills are spot on.
Thanks! Plan is to install rivnuts in the rear panel on these cover plates so I can pop them off to service the coilovers. Everything else has been like this and I have been spot welding the cleco holes closed. I try not to pop rivet much of anything anymore.It was brought up in my thread so I ask you too. Are you going to rivet where the clecos are or spot weld the holes closed or something else?
Your bead roller driving skills are spot on.
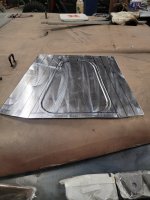
Random tidbits today. Glory shot while the shop is clean, my buddy brought me a cj6 top to work with this morning to use as a template to build the aluminum top. Center console got welded out, and the fuel filler pass through and filler neck tube is taking shape. Trying to catch the odds and ends so it will hopefully be running this year.


Attachments
WaterH
Well-known member
Very nice the way you combine sheet and tube to make things strong.
Thanks!Very nice the way you combine sheet and tube to make things strong.
- Joined
- Apr 27, 2023
- Member Number
- 6396
- Messages
- 26
Sweet build, just read through the whole thing! Keep it up can’t wait to see it finished-ish
Scottie
Well-known member
Looking foward to your aluminum top build! I have been eyeing the rallytops fiberglass cj6 top. Would be sweet for winter driving.
Thanks! Me too. Been a long road to get this far.Sweet build, just read through the whole thing! Keep it up can’t wait to see it finished-ish
We'll see how it goes. I'm hoping I can make it nice enough to polish (because that would f'n sweet!) But I'm kind of a hack when it comes to sheet metal. I make a lot of mistakes, that are usually correctable, but I'm a master by no means.Looking foward to your aluminum top build! I have been eyeing the rallytops fiberglass cj6 top. Would be sweet for winter driving.
Penetrode Offroad
Red Skull Member
- Joined
- May 20, 2020
- Member Number
- 493
- Messages
- 545
Side shot Sunday, with a side of heat and AC, including ducting to the rear seat. Going to be comfortable to cruise this thing all year round. Whipped up some brackets and got everything set up for ducting. Need to order the vintage air under dash box, but that's the last piece to put the system together.


Mike Honcho
Red Skull Member
Looks great. What's the WB?
Thanks! 117" is where it's currently sittingLooks great. What's the WB?
Spent some time this morning making some pockets and prepping to French in these LED tail lights
 stretching/ fully rounding out the ends after welding
 layout

 yet another hole cut in the body
 first one tacked in
 seamed out with my tig welder
 and tucked in tight. I really like where they ended up, will be easily visible even with a tire carrier installed and way better looking than stock jeep squares, way more visible than an early 50s stock tail light.

Ground flush and buffed, and installed the reverse lights
 Passenger side
 I think it turned out pretty slick

Mike Honcho
Red Skull Member
Looks killer 🤘 I put the same flush reverse lights on mine.
Thanks!Looks killer 🤘 I put the same flush reverse lights on mine.
Thank you sir.Looks great! Inspiring for sure.
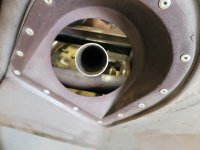
That funky looking tube wraps the parts I had to build for the fuel system. Stock filler location now supplies the rear mounted 20-24 gallon fuel cell. I wrapped the frenched tail lights, smoothed the welds, and added the reverse lights too. Chunks are coming off the list now and soon it'll be time for body filler, primer and paint.
funky underseat stainless filler tube.
 Started with a CAD template
 Layout for stainless button heads and center of filler
 drilled for fuel tank vent for ease of filling
 welded the neck on to give it a stock cj flavor
 mounted in the car. Will be putting an 8c sub under the seat so it still looks like it has a fuel tank there.

 Lined up with only sort sections of silicon hose to connect the stainless lines.

funky underseat stainless filler tube.
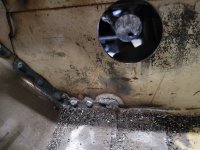
Bulkhead through the firewall. Fully welded, all stainless.
 filler neck weld detail
 like it was factory
 finished tail lights
 sanded and flapped detail shot, with the reverse lights installed.


gt1guy
Apparently a racist
I dig those tail lights.
Which Vintage air unit are you getting?
Which Vintage air unit are you getting?
The compac II mini. Only one that will fit.I dig those tail lights.
Which Vintage air unit are you getting?
gt1guy
Apparently a racist
The compac II mini. Only one that will fit.
If I remember right, if you buy the mock-up version, they'll knock the price of it off when you purchase the real unit.
Worked out great for me cause there were lots of buckshot holes in the mock-up when I was finished getting the mounts all tacked in. Was nice to not have holes burned in the real unit and it didn't end up costing any more.