Fantastic build. It all happens the same way, one piece at a time. Jealous of that super 60. Seriously unbreakable beef. You're in the home stretch, get r done.
How to install the app on iOS
Follow along with the video below to see how to install our site as a web app on your home screen.
Note: This feature may not be available in some browsers.
You are using an out of date browser. It may not display this or other websites correctly.
You should upgrade or use an alternative browser.
You should upgrade or use an alternative browser.
Tootalljp
Well-known member
- Joined
- Feb 9, 2021
- Member Number
- 3462
- Messages
- 123
Nice build. Can't wait to see it all finished up.
thank you Blase!
I’m glad to see you doing so well and it looks like you got a great family
Tootalljp
Well-known member
- Joined
- Feb 9, 2021
- Member Number
- 3462
- Messages
- 123
Fantastic build. It all happens the same way, one piece at a time. Jealous of that super 60. Seriously unbreakable beef. You're in the home stretch, get r done.
The super 60s are getting very common around salvage yards and some of them have extremely low gears I’ve seen them as cheap as $600 to about $1800
I have some more update pictures to do but we’re currently working on the brake lines and the tailgate
Tootalljp
Well-known member
- Joined
- Feb 9, 2021
- Member Number
- 3462
- Messages
- 123
seriously nice build. I appreciate all the pics you took and posted..... for those still thinking/designing geometry of stuff it helps immensely. how far is the center of the trans pinion to the center of the rear axle pinion? about how long is the straight-line distance from the upper mounting points on the upper links and the lower links?
A friend of mine used to run an off-road shop in Troy Missouri and he did the design work on all the links
I just put them where he told me to. I do remember that we set it up for 42 inch rubber and I’m only running 40’s
I and the driveshaft angles fell into his specifications maybe sometime I can get him to post up but he’s too busy running the bow shop anymore then play with off-road vehicles LOL
So on that part I have to say “ A man’s got to know his limitations and I’m smart enough to know what some of mine are“

Last edited:
Tootalljp
Well-known member
- Joined
- Feb 9, 2021
- Member Number
- 3462
- Messages
- 123
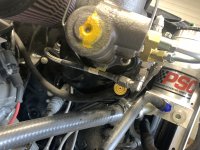
For about the last month I have looked measured and thought about where to put my ARB air compressor
I did not want it inside of the tub I wanted it under the hood and after stuffing the 6.2 LS-3 in there I’m starting to run out of room
But this is what I finally came up with and it is rock solid
I will have more pictures of it later on after I put the battery box back on that we painted this evening and the inner and outer fender
Last edited:
Tcdawg
Active member
Killer build...keep it coming!
I notice you have the AC compressor still on the motor, AC for the win!!
I notice you have the AC compressor still on the motor, AC for the win!!
Tootalljp
Well-known member
- Joined
- Feb 9, 2021
- Member Number
- 3462
- Messages
- 123
Killer build...keep it coming!
I notice you have the AC compressor still on the motor, AC for the win!!
Hell yes the older you get the more importantly AC is
For your information that amount is for the GEN IV LS series and it is made by Dirty Dingo and give you all kinds of clearance no more notching the frame
T&ERun
New member
- Joined
- Mar 3, 2021
- Member Number
- 3605
- Messages
- 3
I had my ARB twin compressor under hood for a couple of years. It would always cut out after 3 tires when airing back up. It was getting too hot. This was with the hood open. It would take it about 15 minutes to cool down enough to start back up but quickly heat soak again. I moved it to the back of the Jeep (in the rear compartment) and it does much better. I can air up all four and even help others air up. I didn't want it in the cab either, because I had ARB lockers and didn't want to hear it cycle on and off. I now have E lockers so don't have to worry about that. Just an FYI
Tootalljp
Well-known member
- Joined
- Feb 9, 2021
- Member Number
- 3462
- Messages
- 123
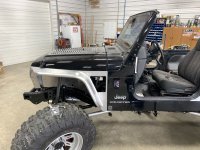
While I agree with the heat problem I have made sure that I have plenty a hood ventilation which you’ll see in some future pictures and also have no problem raising my hood when I am doing more than just cycling for my ARB‘s
that’s a great thing about doing stuff yourself is trial and error because if this is the biggest mistake I’ve made on this rig I’ll be super happy
that’s a great thing about doing stuff yourself is trial and error because if this is the biggest mistake I’ve made on this rig I’ll be super happy
T&ERun
New member
- Joined
- Mar 3, 2021
- Member Number
- 3605
- Messages
- 3
if this is the biggest mistake I’ve made on this rig I’ll be super happy
I hear ya man. You're rig is looking good. Keep up the good work!
Tootalljp
Well-known member
- Joined
- Feb 9, 2021
- Member Number
- 3462
- Messages
- 123
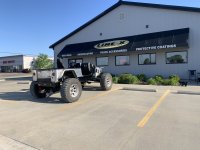
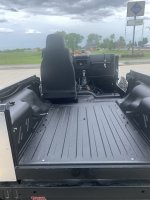
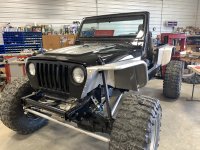
So I know I disappeared for a little while here but unfortunately for the jeep it dried up around here and warmed up and it was time to put those bulldozers back to work so I can pay for the jeep LOL
but here it is as it sits it is running and is drivable with the exception I’m waiting on two brake lines next up will be getting the tub Line-X’s and then I can make some visual progress on the jeep
But I have a little more incentive to get it finished I found a new home for it which I will elaborate on a little more tomorrow but life has its twists and turns but goes on
Tootalljp
Well-known member
- Joined
- Feb 9, 2021
- Member Number
- 3462
- Messages
- 123
I know in my last post I mention tomorrow I just didn’t say which one....But here is an update on my LJ project new home
it’s really hard to find a used trailer with all the specifications that you need but this one came really close it is a 40 foot 2018 United super hauler
it has an 8‘2“ ceiling height and a 95 1/2 inch rear door opening
One of the other things that was extremely important to me was 17.5-16 ply tires and 8000 pound axles
and yes the generator is already off the front
Since I’m going to be pulling up with our toter home we are only doing a simple build because I will use his trailer for multiple things
Tootalljp
Well-known member
- Joined
- Feb 9, 2021
- Member Number
- 3462
- Messages
- 123
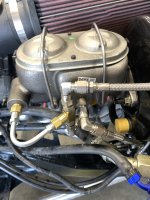
The theory behind it is not to starve the front calipers for fluid they are the factory F550 calipers
I talked to several of the brake gurus in the country and they all basically said the same thing and use this master cylinder
That is a 1971 Corvette master cylinder and it has four ports I’m assuming that the Corvette was set up the same way with a line running to each corner
I talked to several of the brake gurus in the country and they all basically said the same thing and use this master cylinder
That is a 1971 Corvette master cylinder and it has four ports I’m assuming that the Corvette was set up the same way with a line running to each corner
Tootalljp
Well-known member
- Joined
- Feb 9, 2021
- Member Number
- 3462
- Messages
- 123
Tootalljp
Well-known member
- Joined
- Feb 9, 2021
- Member Number
- 3462
- Messages
- 123
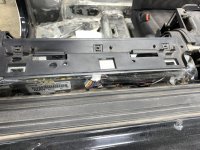
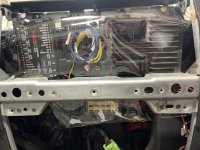
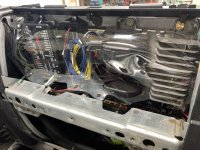
Before I finished reassembling the dash I put a 16 gauge vinyl covering over the Dakota digital control box and the ECM
Attachments
Tootalljp
Well-known member
- Joined
- Feb 9, 2021
- Member Number
- 3462
- Messages
- 123
Tootalljp
Well-known member
- Joined
- Feb 9, 2021
- Member Number
- 3462
- Messages
- 123
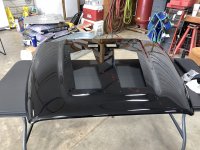
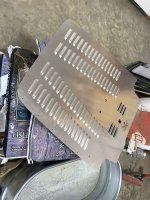
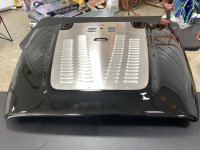
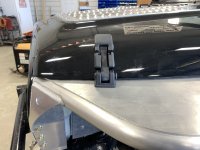
The hood and louvers or finished I hope I have enough ventilation LOL
Attachments
-
 61D124D3-56A1-4773-829A-362B26E86AD2.jpeg1.4 MB · Views: 44
 -
 E11844F7-00FE-48A6-82A3-AE421AEFEBBB.jpeg1.7 MB · Views: 42
 -
 A4658F96-C639-4ECD-A765-600A07A973D9.jpeg1.7 MB · Views: 45
 -
 CB5C0D63-CC74-4240-B9B7-F1FE0BBFD042.jpeg1.7 MB · Views: 42
 -
 3E22156D-0427-4315-AB82-8283AA1D9F31.jpeg1.2 MB · Views: 40
 -
 F1AC3FAB-2AD4-469E-BCCE-803895B5B6E8.jpeg1.6 MB · Views: 41
Tootalljp
Well-known member
- Joined
- Feb 9, 2021
- Member Number
- 3462
- Messages
- 123
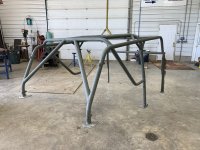
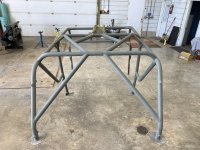
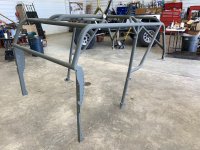
Couple pictures of the cage before I put it in it’s still needs to be painted other than primer but I need it installed for some tie in points
Attachments
Tootalljp
Well-known member
- Joined
- Feb 9, 2021
- Member Number
- 3462
- Messages
- 123
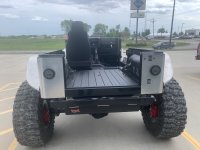
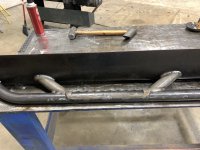
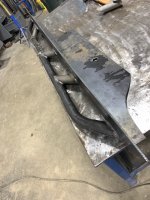
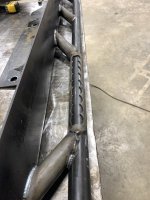
And we had to build our own rock sliders because I could not find any long enough for that matched up to my aluminum sides correctly but I have some very talented friends throughout this whole build!
Attachments

YotaAtieToo
Thick skull
That's a nice trailer. Like you mentioned, the axles and tires are sweet, I hate how so many enclosed like to go to triples. My neighbor has a similar sized one with 3 5k lb axles and 15" tires and wheels.
Tootalljp
Well-known member
- Joined
- Feb 9, 2021
- Member Number
- 3462
- Messages
- 123
My trailer like I mentioned I took to a friend down at St. Louis and they are making a few modifications on it for me looking like I may get it back late this week or early next I want to get it finished so I can take it to South Dakota with my Cherokee in the back for a Prairie dog hunt
gt1guy
Apparently a racist
Is that the AA 6l80/90 adapter you're using?
If so, what is your 6l90 out of?
I have a 6l90 out of a 2015 2500 4x4. I'm running a Hero t-case and that adapter ended up being 1.4" too short. I had thought the hero and the atlas cases had the same input lengths......turns out
I was wrong.
If so, what is your 6l90 out of?
I have a 6l90 out of a 2015 2500 4x4. I'm running a Hero t-case and that adapter ended up being 1.4" too short. I had thought the hero and the atlas cases had the same input lengths......turns out
I was wrong.