What's new

'56 willys truck

Good luck, not a chance.....

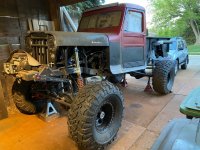
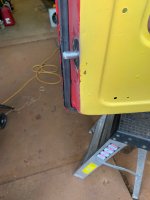
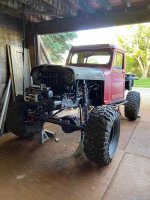
The springs are on the coil-overs, a fiasco, but they are on. Fiasco was my fault, as I thought all the springs I had were 225 lbs to weigh the corners, but somehow when I read the ones on the front I read 225 when I was doing the corner weights, but it turns out they were 250lbs. I have no idea how I made the mistake, but I did and I ordered 4 new springs(two 225lber's and two 300lbers) based on 225 lb corner weight calculations.🤬🤬🤬🤬 So of course I start with the driver front(this existing spring you can't see the numbers on) and put one together and bolt it in and then I take the other side off and that one you can read the numbers, so now I have the fiasco on my hands, as I now have a 250lb spring sitting on top of a 225lb spring on the driver's side and this is a no-no in the coil-over world. So I have one corner with no shock or spring, one corner that is wrong and the rears still have the single 225lb springs on and I have to remove those to get the 225lb spring to have 225 over 225 on the front. So it took about 500 wood blocks, jack stands, and jack moving about 100 times to get this all done. One of my brothers showed up to get his pay, so he helped me for about an hour, but this took way too long to accomplish. Now today we set the preload and monkeyed around with them and of course they sit too high no matter what I do in adjusting preload, but I still have to fill the fuel tank, bolt back on the fenders, add the rear tire carrier, and tire and a few other things, so hopefully, they will get to my desired ride height once this thing is all put together or at least close, but I'm not holding my breath. I did all the calculations on crawlpedia.com to get correct spring rates and I'm only 25lbs heavier on the top rear spring vs what the calcs spit out, so I'm a bit miffed that I'm sitting 2" - 3" too high right now on all corners. Regardless I'm running this set up for a while so that I can drive the thing and later I'll change them out if I have to.

Driveshafts are to get ordered next Tuesday now. I went there Thursday to order them and the guy got sick and went home early. No big deal I'll come back tomorrow, so Friday I go back and now the guy is on a mini-vacation until Tuesday. You'd think they could've told me he would be gone on Thursday but noooooo that didn't happen.

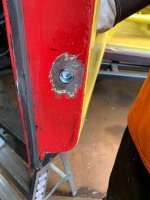
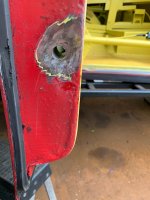
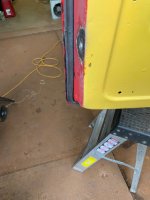
The bump cans are welded on, but now my no leak schraeder valve won't work😡😡😡, so I've ordered another one.

Geesh sorry about all the 😭😭😭, but sometimes it's not your week and I hit it big!!!

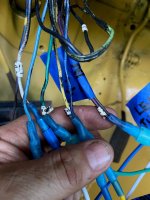
Good news is I'm closer to wiring this pig.
 
Sometimes you win and sometimes it's a flaming pile of shit. Don't sweat it. Walk away, take a deep breath and hit it again when you're not exhausted.
 
Yea, I know, it's part of the game. I stepped back a few times Saturday and yesterday shaking my head, but got back in there and went for it. Maybe I get lucky and it will all work out and the ranting above is just a blow off steam moment, which when you build these things you have to do often!!

We did start playing with figuring out some wiring things yesterday, so that was a good thing to work on to reset the head banging of coil-overs.
 
The bad days just suck, no other way to spin it. But progress does get made. Just have to realize the shit had to be delt with at some point. Dealing with it is progress.........................................progress that makes you want to walk out in traffic.:flipoff2:
 
The install or the fight of the door glass and weatherstripping has commenced and the fight is on---if the weather holds after work we will have the driver's side installed or stalled out if I have to have the glass recut. Glass recut looked like the winner when we stopped last night at dark. I'm not sure why it would need to be recut since we copied the old glass exactly, but it's super tight and very hard to roll up, so something is amiss. The door has been modified by a tree or something so maybe that's the problem, but the old glass seemed to roll up and down ok if memory serves me correct, but it was cracked in a few places, so maybe it could flex enough to account for the door being out of wack. I may have to cut the window frame in a couple of places, bend it back and weld it back into a closer to original shape(should've done that long ago, but I figured that the old glass worked, so best not to monkey with it yet). Doing that would also help close the gap at the top of the door, so that the weatherstripping could do its job. int the pic below you can see the crunch in the top left of the door. It's a bit weird that it's bent out and not in or maybe the top of the cab has moved, as it was munched in that front corner. I'll check it with a straight edge against the passenger door to see what's going on.

Hopefully ordering driveshafts today, so that's the last big purchase, well I hope it is, to get this thing moving on its own. Wiring pending of course.
 

Attachments

  • Willys front driver view 5.4.21.jpg
    Willys front driver view 5.4.21.jpg
    982 KB · Views: 54
Stopped by the driveshaft place so they are commencing. Next week I should have them if not sooner, but they have to order some parts, so that's why I say next week.

Need to cut about 1/4" off the width of the glass, so that hopefully happens today.

So then it was determined that figuring out how to do electric door locks and that's what commenced. I drilled a hole, welded in a sleeve, took a 1/2" bolt, cut it, ground it, welded on a tab, mounted the motor, and bent the connecting rod to make the system. I still need to drill the hole into the door jamb and final wire it, but we hot-wired it and it works. I bought a 4 door kit for like $35 off of Amazon and the remote worked from 50ft away at least and maybe it will go further, but 50ft seems pretty good. A couple of wires need to be switched around due to a factory screw-up, but I had seen this happen to a guy on a video I watched so that's no big deal. Then I need to figure out how to get the wires out of the door and up under the dash and I'm not sure if I'll drill into the door edge and jamb on the hinge side or come out of the bottom front corner and into the pocket behind the jamb and up to the dash, but I'm leaning towards the front corner option. Yes, it would be nice to be up higher, but the window track is in the way, so that's a no go. It does have 3/4" of throw.
 

Attachments

  • willys elec door lock1.jpg
    willys elec door lock1.jpg
    541.3 KB · Views: 38
  • Willys elec door lock2.jpg
    Willys elec door lock2.jpg
    610.3 KB · Views: 41
  • Willys elec door lock4.jpg
    Willys elec door lock4.jpg
    825.2 KB · Views: 38
  • Willys elec door lock5.jpg
    Willys elec door lock5.jpg
    392 KB · Views: 43
  • Willys elec door lock6.jpg
    Willys elec door lock6.jpg
    406.5 KB · Views: 42
Fortunately for me, I work at a glass company, so I just give it to the boys at the cut table and they do their magic. For non-tempered laminated glass, you score it, then pour alcohol over the score, light it on fire for a bit and that melts the lamination and then you can snap it. They will probably hand polish the edge with one of those small belt sanders, but they may elect to run it through our polisher.
 
Well the window still won't roll up, so cut version #2 is in the works--I should've taken more measurements, so it's my fault. I think the door being tweaked is wreaking havoc with this mission, but maybe not. It's weird that the old glass worked and now this new glass won't. I'll know more when I take some measurements of the passenger side to compare, since it's in original form.

But on a good note, I got the air bumps charged and installed. Small victory, but I'll take it now
 
Finally got the door glass in--it's not 100% and it might not even be 75%, but they are in. The passenger side works better than the driver's side and I had to do shimming down of the driver's window gasket to make the glass somewhat weather-tight, but I'm tired of dicking with glass, so it is what it is until I revisit it later. I did take a bunch of pics of the gasket/glass install and probably should've done a video, but who's got time to video when shit needs to get done?!!!! The tarp will come off and I may have to add some weather stripping here and there to get her closer to water tight, but I'll let mother nature do that testing for me at this point, unless she doesn't cooperate, but I'm not going to soak down my driveway while I still need to get under the thing to run wires and do stuff.

We got the passenger side electric door lock installed and working(temp wiring). If you remember the remote buttons were switched and so I had to switch a brown wire to white, white to brown, green to blue and blue to green at the master lock on the driver's door and at the passenger door I had to switch blue to green and green to blue and it works.

Driveshafts are ordered and I guess maybe in 2 weeks or less I should have them. They had to order parts. Yea I could've gone to ADAMS Driveshaft and had them in 2-3 days, but it would've cost me $200-300 more and I'm now pinching pennies like like a grade A miser. The rear isn't exactly what I wanted in tube wall thickness, but I'll use it as a spare in the future if I have determined I need .120 wall vs .085 rear driveshaft. The front is .120 wall and all new, but the rear is using some old parts I had to help with the cost, so that's why the tube wall is .085. Plus I need this thing to move soon, so a sacrifice was made to save $$$. If it bites me it bites me, but right now I don't care. And who knows maybe I'll be fine, the rig isn't a balls to the wall crawler at this time.

Today I hope to start laying out wiring stuff and maybe even run some wires along with bleeding the ram assist system and changing a brake line and maybe even putting some brake fluid in it, installing the dual fan temp sensor, topping off the t-case and slapping some clamps on the fuel lines. I still need to dump some gas in the tank and filter it out just for peace of mind, so maybe that happens today also. But again I may walk in the garage and change my mind on my attack plan!!! Like work on the front fenders, maybe. Too many options still, but some things don't require making the the thing run!!
 
Wiring has commenced. Started unraveling the Painless wires and hacked into the old chevy harness to steal some connectors. Since when does the starter not get a ground cable? I always remember a gound cable coming off the starter, so I put one on it. I mean it has a terminal for it, but nothing I could find shows a ground cable. So it along with the motor and body are grounded to the frame. I will probably add at least one more body to frame ground for peace of mind.

Got the ram bled, well the first stage of bleeding since it's not running yet. I didn't have any brake fluid, which is strange, so that didn't get done, but I plan to buy some today and get it filled so that the bleeding can be done soon. I made a bracket for the volvo fan relay and installed the dual temp sensor that activates it, but I still need to wire it all up. Tonight more wiring and misc to keep plugging along.
 

Attachments

  • willys door glass.jpg
    willys door glass.jpg
    1,003.2 KB · Views: 40
Last edited:
I have a Painless wiring kit, so I'll be watching closely.
I've fully rewired several vehicles with painless (or knockoff) kits. They're fairly straightforward, just take your time and I recommend soldering and shrink tubing all wiring connections. If you run into any problems let me know and I'll try to help.
 
1Sinner--thanks and will do....read last paragraph for question #1.

Yesterday was hit and miss for the most part....tried to bleed the brakes, but that didn't go so well. At this point I don't know if it's the master or calipers or rod. Master is out of a '06 GMC(hydroboost), so I gots some cipherin' to do. Parts been sittin' too long may be the issue. So I think I may have to bleed the master(didn't do that since it was used) and see what shakes after that, although I got no more bubbles coming out of it, I think I must start like it was new and proceed down the system. Maybe I'll play with it once I get the motor started. ** I JUST READ TO BLEED BRAKES DON'T HAVE ENGINE RUNNING, SO PLAYING WITH IT MORE WILL BE THE PLAN OF ATTACK** Funny I don't recall how I did it on my '48 build, my mind is going south!!!

Went to test my taurus fan and it only works on one speed. I'm not sure why as it worked before on both low and high. I do have a spare, but I am not excited if I have to swap them or buy something else. Oh well, again parts sitting too long? Seems weird. This will delay any headlight, turn signal front LED wiring.

We did get the FAST EFI wire run back to the fuel pump and secured some hoses.

Tonight I plan to work on the dizzy and tachometer wiring, as I have both the Painless tach wire and FAST EFI tach wire to connect and make work.

I will say so far the labeling on the Painless Harness does make it nice in most cases, but I have one temp sender wire that says (Light), so I have to look at the wiring schematic to see if that goes to the coolant temp sender or somewhere else. I'm sure there will be more that will make me scratch my noggin for a bit.
 
Last edited:
The temp sender wire that says light should go to a dash dummy light for over temp. If you're not going to run one on the dash it can likely be eliminated or taped back into the harness.
 
Thanks---Only thing is that wire is with the "Engine Section" and not on the cab side, so that's why it had me wondering. I have an INTELLITRONIX instrument panel, so I was hoping to use that wire for the Intellitronix water temp gauge wire instead of an idiot light. Worst case is I have to run separate wires to the Intellitronix panel, which I thought I may have to do anyway.
 
Thanks---Only thing is that wire is with the "Engine Section" and not on the cab side, so that's why it had me wondering. I have an INTELLITRONIX instrument panel, so I was hoping to use that wire for the Intellitronix water temp gauge wire instead of an idiot light. Worst case is I have to run separate wires to the Intellitronix panel, which I thought I may have to do anyway.
Then it's likely the ground side wire for the idiot light, meant to be run to a sensor that grounds out on overtemp.
 
Ok, the engine wiring is done, I think. Oops, I forgot I do need to wire the windshield wipers. I don't recall seeing a wire for that in the engine bay harness, but that may be because it's in the cab harness? I took that wire under discussion and hooked it to a sending unit that's in front of the starter. We'll see what happens when everything is wired up and fired up. I did get my fan figured out, so that was good. It was the connector, so I cut it off and put new ends on the wires. I still have to put the plastic wire mould around all the wires, but until it starts and runs I'm holding off, just in case I need to add or change something. So now it's onto everything else, headlights, taillights, rock lights, led lights and all the cab wiring. If'n I get a bit lucky maybe it starts this weekend or attempts to get started, I just need to make the decision on whether to continue to wire the lighting or get the gauges, FAST EFI and ignition wires run and shove the battery in it.
 
I have lots of loose wires running everywhere but hit a snag with the fan wiring, I need a 75 amp relay, so I ordered it and it will be here Wednesday or Thursday, There's also a wire on the engine side for the brake that I ran over to the master cylinder. I'm not sure what it does, except maybe idiot light. Headlights and front blinkers are wired up, as are the rear taillights, brakes, and blinkers(not counting cab wiring yet).

Cab wiring commences and the instrument panel is wired sans the GPS speedometer, ignition pretty much wired (I'm not sure if I'll have to add any wires to the ACC or IGN or always hot terminals). And now things get a bit squirrelly with the in-cab turn signal/brake wires. There are front left & right blinker wires and also rear left & right blinkers wires and after scratching the ol' noggin I tied the rear blinkers to the front blinker wires and I have them all lighting up with the small test battery. They don't blink yet, but that's because I haven't installed a battery and wire to the fuse panel. Then I moved onto the brakes to get them wired up. Now I don't have any plugs on the steering column, because they were removed by a previous owner and I'm using the '92 chevy brake pedal, so what I have for wires on the column are for left & right blinkers (that had two flashers attached to them
(I removed the flashers), flasher switch, and a power wire. There's 3 other wires that I have no idea what they do and I need to test them to see if they have any power running through them when power is applied to the steering column. And of course the brake switch mounted to the pedal assembly.

The brake switch has 4 wires coming off of it, but right now I'm at a loss of how to tie the brake switch into the blinkers. I can get the brake lights to work if I run power to the orange wire on the switch and tie the white wire from the switch to a blinker wire that I disconnected. So I know the switch works( I did have to add a spring to make it work though--back to that later). I would've thought the ORANGE wire from the fuse panel that says Brakes + would go to the brake switch(and I believe it does), but it's the WHITE wire that says Brake switch that comes from the panel that has me banging my head. So I thought the WHITE wire from the brake switch would tie into the WHITE wire that says BRAKE SWITCH, but when I do that I have no brake lights. So I've got some more head-scratching on that one. Also, there's two more wires coming off the switch that may tie into the tranny harness, but I haven't dealt with that yet, so when I do I'll let everyone know, because the tranny wiring involves a harness (by JAKE'S PERFORMANCE) to make the tranny manual shift and I'm unsure what can of worms I'm opening up with that! My thought was I'd be able to dump the tranny computer, but right now I'm not so sure that's the case. Soon I'll know.

Ok now back to adding the spring to the brake switch. After I shut down for the day I came in and started doing some research and it may be my brake switch is broken as it's too tie into the brake pedal arm with a clip and I'm missing the whole clip part, I think, so I may have to order a new one which may bring more wires into the brake saga. The clip that ties onto the pedal arm has no spring and that took me a while to figure out why I had power through the switch, but the brake lights came on instantly during my testing.

Oh yea, I still need to wire the windshield wiper motor too and radio and switch panels and fuel sending unit and etc.....but the bulk of the wiring to get it started is almost done.
 
Take a breath, pm me your number and hours of availability and I'll go dig up my harness instructions and walk you through the brake switch fiasco. If I remember right, you need the white brake switch wire and an orange brake switch wire to go to the NC brake switch (with pedal depressed). The engine side brake wire is for a low fluid light if I remember correctly and not needed. Did you buy a universal harness or a year/vehicle specific harness?
 
I had a 48 back in my 20's wish I wouldnt have sold it.

ExBoss has 5 or late 40's to early 50's iffin you need any parts and they interchange correctly, mostly cab, bed, frame.
 
Last edited:
PAE--thanks and I'll keep that in mind.

1Sinner--make sense on the low fluid. The harness is for 67-72 chevy if I remember correctly.(I don't recall where I got it and it may have been in my brother's garage when I moved in and since he didn't use it I kind of borrowed it)

I think, after sleeping on it and letting the research sink in a bit I'll have to dig into the column wiring. The turn signal wires are tied together(2 wires for left and 2 for the right) at the column, so I will untie them and see if I have 4 turn signal leads. If that's the case then I can split the white wire into two leads to feed the rear brake/turn signal wires and that will solve the issue. Now if that doesn't work I'll be in touch.
 
So to clarify a bit about the wiring at the Chevy steering column and I believe CJ jeeps use the same wiring, but don't hold me to that yet as that's a brain cell that has intermittent memory function. There are connectors at the column that you plug the wires into(and it's a bunch of wires when you have a modern column(70 and up and maybe some 60's)-- ignition, turn signal, brake, headlights, high beam, wipers, windshield washer, flashers, horn to name some) unless like me you have no connectors on the column and a lot of wires are gone. Usually, these wires enter the cab on the driver's side(mine enter on the passenger side due to FAST EFI wiring harness coming into the cab on the driver's side, so my wires to the column need to be extended). That's not a big deal. So we grab a wire read what it says and figure out where to connect it and we extend it. So far so good until you find a Right Rear Turn Signal and Left Rear Turn Signal wire that you weren't expecting to find. These wires were in a connector that of course, I had to cut off so I could extend them since I don't have the other connector part on the column. So my guess/hope is in the column they split and I have 4 turn signal leads. My thinking is if they were to plug into a connector at the column they must split in the column and the WHITE brake switch wire ties into those via the connector. If I had looked at all the wires before we commenced I'd've not connected the rear turn signals to the wires coming from the column yet, but so be it and if they have to come apart they have to come apart.

Now back to the ORANGE brake + and WHITE brake switch wires, those were and are long from the start, and now letting my brain cell ponder this has me wondering why?? Since they seem to go to the column there's no need for them to be long when you come in on the driver's side. For me coming in on the passenger side meant I didn't have to extend them. But are they meant for the column? I'm pretty sure they didn't have a connector on them, because the 2 or 3 connectors I cut off were on shorter wires. Oh well just more to ponder, especially when putting power to the ORANGE brake switch wire the White brake switch wire has power when depressing the pedal. Bottom line is I'll get it figured out especially with 1Sinner's coaching.
They're likely long because not all vehicles use a brake switch on the pedal, some use a hydraulic switch in the master cylinder so they would have to be routed to the engine bay , hence the longer leads (had a 71 wagoneer that was like this) Unless you have a much newer column, typically you are only going to have power, horn, ignition, turn signals, hazards in the column. On yours, you can get a clamp on turn/hazard switch that is period correct. All other functions can be run to independent switches mounted into the dash like most older vehicles. (ignition, wipers, horn, heater, etc)
 
Ah yea the ol' brake switch on the brake line does make sense for those wires being longer.

I've had those clamp-on style turn signals before and they do the job. My column is probably a 70's column with hazards, ignition, and turn signals, but the ignition has been cleaned out, so it's pretty basic, but it's what I had, so in an effort to save a $$$ I used it, since the other one I had that I shortened wasn't quite fitting correctly and all the connectors crumbled when I took it out of the donor truck. Yea I'll have a few independent switches for sure.
 
We figured it out or at least testing shows we figured it out. I unwrapped the wires at the column and all of the ones not used were just taped up, so I ran some test wires via my test battery and there are 4 turn signal wires that come down the column. So we undid what we did yesterday and ran new wires to the rear turn signal wires. Then we did a few tests to see if the brakes would work and what happens is like we talked about is the ORANGE + wire in the harness seems to go to the Orange wire at the brake switch( this hasn’t been confirmed 100%, but the logic points that way) and now the White wire at the brake switch ties into the White wire at the column and during the testing it all works. Again though the fuse panel hasn’t been hooked up yet so I’m hesitant to call it 100%, but with brakes depressed the brake lights come on and if I move the turn signal lever the lights blink.
Tomorrow is headlight/dimmer switch wiring and maybe starting the transmission wiring.

Here's a pic of the wires to make the brake lights work. The left white wire is from the brake switch and the right white wire is from the column.
 

Attachments

  • brake switch wiring at column to brake switch.jpg
    brake switch wiring at column to brake switch.jpg
    562.6 KB · Views: 35
Last edited:
This isn't 100% as of my findings on 6/12/21---can't get flashers to work the turn signals or hazards.....comments added to PURPLE & BLACK wires:

Ok, here's the wires you need to make your turn signals and brakes work if you have a hacked steering column.

From left to right:
White wire is for the BRAKES and connects to the brake switch
Light Blue wire is for the LEFT FRONT turn signal(I need to double verify this--it might be for the RIGHT FRONT)
Green Wire is for the RIGHT REAR turn signal
Yellow wire is for the LEFT REAR turn signal(it is not tied to the dark blue wire as it kind of looks like in the pic, there's 2 wires under my thumb)
Dark Blue wire is for the RIGHT FRONT turn signal(I need to double verify this-it might be for the LEFT FRONT)
UPDATED 6/12/21:
PURPLE wire is for the TURN SIGNAL(incoming power or negative--not sure yet where that is to come from 6/12/21) see next sentences
BLACK wire is for the HAZARDS(incoming power or negative--not sure where that is to come from as of 6/12/21) see next sentences

AS OF 6/12/21 CONCERNING PURPLE AND BLACK WIRE ABOVE: Originally as shown in the pic these two were tied together, I have since cut them, so I know which wire goes to the turn signal and hazard switches. Problem is I'm not sure how to wire it up yet. The turn signals, brakes, and hazards all come on as they should as solid lights when I activate the turn signal switch and hazard switch, but I can't get them to flash. My line of thought now is that the turn signal switch and hazard switch activate the ground, but I'm not sure how to supply power to the system to make it all work and my brain hurts right now. Battery was put in on 6/10/21.

Below is from original post:

We threw the battery in it and commenced to run the main positive wire and main breaker. I didn't buy enough 1/0 RED wire(6-8inches short--no wise comments lads:grinpimp:
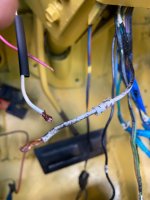
), so I plan to use what's left of the 1/0 BLACK ground wire to make up the battery to breaker wire, if there's enough left over.

I mentioned before I have the JAKES PERFORMANCE 4L80E manual shift box, so that I could dump the computer. Now on the 1992 4L80E there's a big round main plug and 2 small plugs. With this box you plug in the big round connector to the tranny and you don't use the 2 small plugs, as they are speed sensors, so I will just cut the wires on the plugs and heat shrink them, that way I have them for the future if needed and they will keep crap out of the plugs. JAKES PERFORMANCE box has 4 wires: one is hooked to ignition power, one to a SWITCH to ground for TCC LOCK-UP (if desired) and the other 2 are for different models of TRANS BRAKES if you have them installed in your tranny. I don't, so I wrapped them up. And that's it, I should have a full manual shift 4L80E tranny now with no computer.

Onward to more wiring and figuring out the windshield wiper motor. Seems I lost a piece off the motor from what the previous owner did or they just used friction to make the motor move the wipers. I'll have to take pics to show what I mean. I may now try and use the '92 motor and wiper linkage, but that's going to take some thinking, hacking and who knows what to make that work, but it will be a better system. We shall see, as I have some research to do on that and tracking down the wiper arms unless I have them shoved somewhere.
 

Attachments

  • Willys column turn signal.brake wiring.jpg
    Willys column turn signal.brake wiring.jpg
    687.8 KB · Views: 30
Last edited:
Top Back Refresh