How to install the app on iOS
Follow along with the video below to see how to install our site as a web app on your home screen.
Note: This feature may not be available in some browsers.
You are using an out of date browser. It may not display this or other websites correctly.
You should upgrade or use an alternative browser.
You should upgrade or use an alternative browser.
Well I got the one fender stretched and then I got to really thinking about how do I make these things rock-vincible, yet be able to remove the bed if needed? Although I had a plan before I started the fender cut & stretch and thought it would work I'm now on a 1/4" plate steel fender fab path....I think. After one fender stretch(haven't commenced on the other one yet until I decide what the 'ell I'm doing) and screwing it to the side of the bed to get a look at how I could reinforce them for war-fare I came to the realization that I would be locking the fenders into place and that weren't good cuz I was going to weld them to the bed. This equals no way to get the bed off without hacking the fenders up!!! I no likey that, so plan B is now in the works, so we shall see where it heads. Either I cut off a lip or two of the stretched fender and bolt it to the 1/4" plate steel rock bashing fender sub-structure or just build the 1/4" plate steel fender that will be welded to the frame and that will bolt to the bed. Brain cell is turning.......
Oh yea how many colors has the thing been?? Not to mention someone loved bondo!!

Oh yea how many colors has the thing been?? Not to mention someone loved bondo!!
Last edited:
Well I didn't like the way this looked, so I'm building a 1/4" plate structure under the modified original fenders...using some 1/4" rod to make the outside radius along the long side, since it's a double radius at the corners and the rest is a combo of plate steel in various sizes. My hope is that the original modified fender will slip off this structure, but there's so many tack welds needed that I'd be surprised if some of them didn't end up getting to it and it's possibly welded to the 1/4" plate structure. I'll cross that bridge later once I've got the last few end pieces tacked in and apply some more tacks so it don't move. Fricking thing is getting heavy, but I knew they would be, but they should be strong Pics to come later.
Well I finally untarped the truck on Friday and I'm back to wrenchin'. First up was to swap out the vacuum-assisted master cylinder for a 2006 Chevy hydro-boost unit. There's no lines to deal with, so I figure this ought to take 30 -45 minutes, but surprise, surprise, surprise. How about 6 hours later!! After redrilling one hole and finding out the rod doesen't align, drilling 4 new holes and then finding out the hood won't close now and it still doesn't align nicely, then to lower the unit by cutting out the old mounting plate making a new one & welding it back in and hacking apart my shock tower to be able to lower the unit to line up it finally fit. Now I'm running brake lines, so the dreaded let's play the game of finding the correct -04AN fitting to screw into the brake proportioning valve is the next hurdle and of course to make new power steering lines to mate up to the hydro-boost. I did add one of those inexpensive push/pull line locks for the rear and mounted it in the cab. Ordered some fittings for the front calipers so I have to wait for those to show up later this week if I'm lucky, but next week for sure and then maybe I'll have the brake lines done. I'll add some pics later, but I will say the shock tower mod may be a temporary design cuz I'm not excited about it, but I need to get this thing running this year, so some things may not be pretty or the final design, but I want to drive it and I can change things out later. Still have a ways to go before it can move though, so let's not get to excited!!

Last edited:
Just been working on brake lines and fuel tank and lines--brake lines are run, but I'm not sure I'm content with lines from master cylinder to front and rear lines, but if I don't get to changing them I can at least drive it as is and work on them later. The fuel lines are run and the only thing remaining is to do the vent line and paint the tank. Again I'm not sure I'll keep the fill set up, but again it will work for driving it(when that time comes). Worked on radiator hoses, but need to buy a bottom hose to complete that. Then it's time to fill it with oil, coolant, tranny fluid, front and rear diffs and then wire it and make it run, but there's still some welding and fabbing to do before wiring commences, but I could get antsy and jump the process to hear it run(hopefully). Bottom line progress is being made(to some extent).
Word of wisdom learned the not so smart way--put gear oil in and rotate axles off and on every couple of weeks or so until you have that vehicle moving.
My rear 14bolt has been sitting without any gear oil in it for a couple of years since it's been under the truck. So I go to put the gear oil in it, but luckily I jack it up so that I can rotate the tires and lo and behold I can hardly make the tires move. So off comes the cover, out comes the ring gear and we PB blast the pinion gear as it's stuck. So we brake clean, PB blast it quite few times and spray some white lithium grease around the bearings and she's spinning like a brand new unit. Weird it was so stuck, but yet wasn't all the hard to break free. Bummer to have to go back and do that, but the vent line has been open to the elements, but it's under the truss, so there's no way rain water could've gotten in there, but moisture over time and thru the winter freezes and thawing I guess enough could be made to make things rust and gum up. So back together she is now with pinion rotation checked, backlash and pattern and filled full of gear oil and a vent bellow on it now.
Of course we filled the tranny and the pan leaked, so off it came and it has a funky damage to the lip at one spot and although you wouldn't think it would leak because the damage it at the outside edge it did. So off it came, cleaned it, slapped on some right stuff, then pressed the rubber gasket into the right stuff and applied more right stuff on top of the gasket and on the tranny it went. That ought to fix that issue.
We started running some wires yesterday, so of course I'm missing a water temp sender, so that will require some digging to find it, but it's going to be slow going for the painless wiring system to get completed and I still need to do a bit of welding on the rear bumper before I can install the taillights. I'll be tinkering with other small items during the wiring process.
UglyTruckNut
Member
- Joined
- Mar 29, 2021
- Member Number
- 3728
- Messages
- 13
Cool rig, love old Willys Jeeps.
We've been knocking things off the list. I will have to get some pics to update once I get a couple of more things completed. Seems it could be running in a couple of weeks, but that doesn't mean it will be moving as driveshafts are still not ordered, but hearing it run and shifting through the gears and checking for leaks and such will be a huge victory in my eyes. So now rain is the only killer on timing to keep crossing things off the list to get it running and moving.
OK--nothing to earth shattering, but some pics never the less. When I cut open the front cab corner to fix the rust on the passenger side the electrical adapter and air hose connector were sitting inside there. Crazy!! Any way the rockers are upgraded to 1/4" 3"x3" "L" angles and I'm working on the final wrap up the inside to the floor using 16ga metal to close off all the original body rockers. From the factory they are stamped and have factory openings in them where mud and salt(winter roads) can just sit and fester into rust, so this add(pic later) will prevent that. I decided to reuse the fuel tank that came with the truck when I bought it and I welded up the old openings and turned it on its side and made new openings for vents, fuel return, fill tube and new fuel sending unit. Also you can see my vent block for the tranny and t-case and the tranny cooler. The front vent is the fill port to the t-case and I have to remove the bellows vent and install the plug, but I didn't have a plug so I used the bellows vent to keep the water out for now. I still need to run the vent for the fuel tank.
I bought a Duracell AGM battery, because I needed to figure out where I could put it(under passenger seat won) and wiring is commencing soon. I was looking at the Odyssey and X2 Power, but the store didn't have any in stock so I figured I would give the Duracell a chance and see how it holds up. $20 cheaper than an Optima Red Top and I wasn't buying one of those and the warranty is 4 years so we shall now wait and see. I may add another battery in the future.
I started to look at the locations for speakers, sub and amp to start to figure out wiring along with the myriad of stuff that needs switches & wiring thought before I jump full bore into that and I still have console panels to make. All in all it feels close but I know I still have a lot of time left before I get it road worthy.
I have 4 new Profender 16" adjustable remote reservoir coilovers that were to ship last week from HIred Gun Offroad and the rear anti-rock sway bar from TK1 racing shipped last week, so depending on when they show up they may take precedence over all the other items on the list.
Besides what little parts that need to finish bolting stuff up or connecting stuff and wiring crap I'm down to drive shafts left to measure & buy before it will actually move, if it does move!!!
I've said it before and I'm saying it again--WELDING while on your BACK looking up SUCKS, but the underneath side of the rockers are ready for paint. This weekend is the rear TK1 Racing anti-rock sway bar install if the rain stays away and then whatever else I can attack that's on the list, which probably is painting and finishing the vent line at the fuel tank and installing a fuel shutoff for ease of fuel filter and fuel pump replacement.
sway bar needs axle mounts welded on and I need to make the links.
Jacked the dog up for the new coil overs only to find that whoever set the shock brackets on the axles set them to 1 ¼” width and I need 1 ¾”, so tomorrow that’s what’s in the works— hack and relocate one tab on each side and maybe get them sitting back on a spring to begin spring calculations at a later date once fenders are done and spare tire is in the bed and get some gas in the tank.


Jacked the dog up for the new coil overs only to find that whoever set the shock brackets on the axles set them to 1 ¼” width and I need 1 ¾”, so tomorrow that’s what’s in the works— hack and relocate one tab on each side and maybe get them sitting back on a spring to begin spring calculations at a later date once fenders are done and spare tire is in the bed and get some gas in the tank.
Well I have to move all the upper shock mounts due to the longer shocks--funny how a 16.5" coilover is 6.5 inches longer than a 14" coilover, but it is, so hacking away over the next few days to get that done is the next pressing project.
We got the front done and we had to remove the air bump on the passenger side(will do the same on the driver's side so once I relocate it on the passenger side I can relocate the driver's side to match) because the axle movement from a 3 link system at full droop pushed the axle over and it hit the air bump which prevented it from being slid into the upper mount. I'm not sure why it hit with these coil overs but not with the 14" ones, but it did and so it is what it is. Also, this forced me to redo the shock tower to shock tower bar, so not a quick fix.
I started working on some sliders and I'm making them out of 1 1/2" square tube that's 3/16" thick because it's what I have. So a bunch of pie cuts to make a radius bend. So how does one accomplish knowing how many pie cuts? Trial and error. First I surmised that I would need 10 cuts 1" apart, with the first and last being 5* and the middle ones being 10*, but I didn't do that because I figured if it didn't work I'd just cut the remaining or weld up any unused pie cuts. What I did do, was make 8 marks and commenced to hacking, but I came to find out that when I bent it to 90* that I only needed 6 cuts, so I had to weld the extras up by fitting in the cutout pieces and burned away. Again the first and last cuts got 5* and the remaining were 10* and I clamped a square to the tube after I bent it to hold in place to weld it into a 90* shepe. I now know the formula and once I got the one end done I made a cardboard template to know where I needed to start the cuts for the other end, but there are frame plates to still make and tube to be added and then the passenger side can commence. but that's been pushed to a later day at the moment.
Also ran most of the fuel tank vent(FATS), but need to terminate it and I'm going to go through the bed so the air breather is under the bed. I just need to drill the hole and add a couple of fittings to lock it into place.
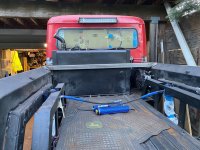
I then made a bar to go across the bed rails at the fuel tank. It will or may serve a few purposes, but what all that is is to be determined. It was to help hold the tank, protection for the tank and to mount the spare tire too, but I'm not sure about the spare tire as it will block the back window. Now does that matter? Not really if push comes to shove, but I do like my back window clear or at least partially clear, so we are still in the thinking mode for now.
The interior is getting painted with the ol' rattle can, so that when I start the wiring I won't have too much more painting on the inside if any.
I started working on some sliders and I'm making them out of 1 1/2" square tube that's 3/16" thick because it's what I have. So a bunch of pie cuts to make a radius bend. So how does one accomplish knowing how many pie cuts? Trial and error. First I surmised that I would need 10 cuts 1" apart, with the first and last being 5* and the middle ones being 10*, but I didn't do that because I figured if it didn't work I'd just cut the remaining or weld up any unused pie cuts. What I did do, was make 8 marks and commenced to hacking, but I came to find out that when I bent it to 90* that I only needed 6 cuts, so I had to weld the extras up by fitting in the cutout pieces and burned away. Again the first and last cuts got 5* and the remaining were 10* and I clamped a square to the tube after I bent it to hold in place to weld it into a 90* shepe. I now know the formula and once I got the one end done I made a cardboard template to know where I needed to start the cuts for the other end, but there are frame plates to still make and tube to be added and then the passenger side can commence. but that's been pushed to a later day at the moment.
Also ran most of the fuel tank vent(FATS), but need to terminate it and I'm going to go through the bed so the air breather is under the bed. I just need to drill the hole and add a couple of fittings to lock it into place.
I then made a bar to go across the bed rails at the fuel tank. It will or may serve a few purposes, but what all that is is to be determined. It was to help hold the tank, protection for the tank and to mount the spare tire too, but I'm not sure about the spare tire as it will block the back window. Now does that matter? Not really if push comes to shove, but I do like my back window clear or at least partially clear, so we are still in the thinking mode for now.
The interior is getting painted with the ol' rattle can, so that when I start the wiring I won't have too much more painting on the inside if any.
Last edited:
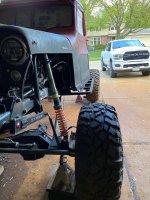
All Coilover mounts are relocated and they are mounted, but I need to weld in two cap pieces on the rear mounts and I need to figure out where to mount the reservoirs and still cut off the front driver's air bump can and relocate it along with the passenger one and mount the rear cans also. I also found out my front brake hose wasn't long enough for the new droop, so I ordered a new one and it's on, but needs to be tightened. Still need to figure out spring rates to order springs once I get stuff in place. That could be a couple of weeks away or more.
Swapped out the yokes on the front and rear axles to 1410s. Driveshaft measuring will be determined once I figure out the spring rates and get the new springs on and can dial in the ride height.
Fuel tank vent done.
Still have a lot to do, but at least things are getting knocked off the list.
Swapped out the yokes on the front and rear axles to 1410s. Driveshaft measuring will be determined once I figure out the spring rates and get the new springs on and can dial in the ride height.
Fuel tank vent done.
Still have a lot to do, but at least things are getting knocked off the list.
The frankenstein rear fenders are welded up and will be going into the grind shop--what a job--I really should've have done this way different now that I've gotten this far on them, but I did the one a couple of months ago and decided to just do the other one the same. Stupid of just not thinking through it more than I did. But they are going to be strong, so that's a plus.
Now I'm on the search for driveshaft parts--2" pilot hole 1410 CV don't seem to be a household thing, so I'm on the search to see what I need to do for driveshaft parts. I found a 1410 flanged yoke that has the 2" pilot, but I'm not sure what the compatibility of it is with a 1410 cv, so I'm going to call a couple of the shops to see if I can get some info. The driveshaft shop said they'd weld up whatever I brought them, so I may have to order a couple of driveshaft kits and parts from other sources to get what I need without selling a kidney.
Next move is back on the sliders, as my buddy Dennis the grinding legend attacks the rear fenders, unless he tells me to go pound sand then it will be me doing the grinding.
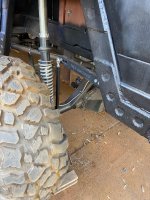
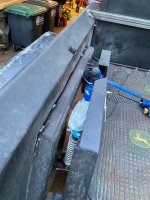
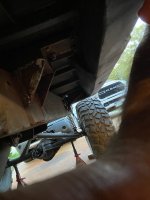
some pics--front shock mount redo, fuel plumbing, bar at fuel tank, rear shock mount redo and boxed in rockers
Attachments
-
 willys front shock mount redo side pic.jpg869.2 KB · Views: 62
 -
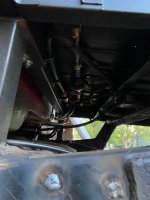 Willys fuel filter & pump plumbing.jpg642.6 KB · Views: 65
 -
 Willys fuel tank, tranny fan and tank.bed bar.jpg906 KB · Views: 58
 -
 Willys rear shock mount not completed & wheel well framing.jpg864.6 KB · Views: 52
 -
 willys rocker boxed in.jpg698.5 KB · Views: 53
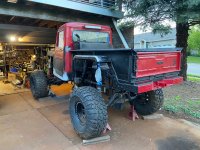
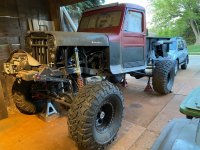
3" x 3" x 1/4" rocker from front to back of cab and front and rear driver's view of current status--tack welded the Frankenstein rear fender on. It still needs some work, but at least it's off the garage floor and on the truck. Passenger side will be tacked on tonight. I'm also working on sliders and then the front fenders, which I'm not quite sure of my plans here. I do have to hack them to fit up due to the 1/4" rockers and the sliders, but I'm kind of thinking about how I can make them stronger with what I have on hand or that may wait as I don't have enough DOM left and I still have to buy driveshafts and springs. I'm probably holding off on finishing the rear fender wells until I get some flexing done to make sure I don't have to hack and adjust something. Closing in on the wiring phase.
Attachments
gt1guy
Apparently a racist
I dig it. Very cool build.
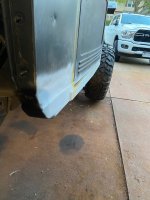
The rear fenders are fully welded on. My original plan was to weld and grind them smooth, but now I'm wavering to just skinning them with the original modified fender skins for a smoother look because I'm not sure I can make them look as smooth as I'd like even with more welding/grinding. Would they be close, yes they would, but as much as I had them clamped to the original skins when making them there was still some movement after welding them to this point and not to mention making rounded transitions with flat pieces of metal means grinding through a lot of weld on the top side to get them looking really good. Kind of defeats the purpose of making them out of 1/4" steel to withstand abuse. Still need to think about it a bit more but that's the way I'm leaning this morning.
Rock sliders are on. I'm not sure if they are completely done or not. Is really anything done on these things??!! As in ,am I adding any more gussets or something on top or even ¼" plate on the bottom? But they are on and to a point that I can move onto something else like where to mount the coil over reservoirs and front fender rework and then revisit them later.
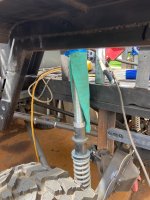
Welding & paint protection using welding sleeve on the the coil over and pics of the rock sliders.
Mounted the front coil over reservoirs to the shock tower crossover bar and then sat in the bed and fooled around with where to mount the rear coil over reservoirs. Finally decided to mount them on the wheel wells, which then prompted me to start making the skins. Got ½ of each side welded in and primed, so tomorrow is continuation of painting and maybe mounting the rear reservoirs and more skins. I will have to make a couple of removable covers for the coil overs and hose for protection and removal of the coil overs and incorporate access to the shraeder valve and until they are mounted I'm not sure what that will look like.
Mounted the front coil over reservoirs to the shock tower crossover bar and then sat in the bed and fooled around with where to mount the rear coil over reservoirs. Finally decided to mount them on the wheel wells, which then prompted me to start making the skins. Got ½ of each side welded in and primed, so tomorrow is continuation of painting and maybe mounting the rear reservoirs and more skins. I will have to make a couple of removable covers for the coil overs and hose for protection and removal of the coil overs and incorporate access to the shraeder valve and until they are mounted I'm not sure what that will look like.
Attachments
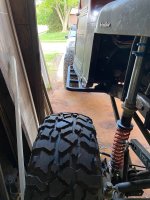
I got the rear reservoirs mounted, but I still need to secure the hoses. I also learned that zinc panel metal doesn't weld very nicely, so that wasted time and I'll need to cover it with some scrap metal to be able to weld the top of the wheel well at this location(wheel well end that's closest to the cab) I tested it with a magnet to make sure it was steel and it was, but it doesn't like welding at all. Live and learn.
Installed new spark plugs also. Now I'm waiting for the plug wire set to show up.
Installed new spark plugs also. Now I'm waiting for the plug wire set to show up.
Last edited:
I got the rear anti-rock sway bar done, spark plugs wires are in for the most part and the rear wheel wells are done. Still need to add the protection for the reservoirs. I did hack the front fenders so that I could put them, which led to notching for the coil overs and now I have to figure out how to make them stronger with what metal I have on hand, but it may be that this is a down the road project. I still have about 58 items on the list, but a lot of them are related to wiring.
I ordered my springs from Dave's Offroad Supply, so once those come in we will slap them on and then the front fenders will get bolted on, although weather permitting I may do some added stiffeners while we wait, since the front fenders are in place with one bolt. Door gaskets and door glass loom in the near future along with the air bumps and I do have a new gasket for new rear glass and the same with the windshield, but I may have screwed myself with the windshield. The windshield glass and gasket install from the inside and not the outside, so I'm not sure if we can get it past the roll bar, so there may have to be some hacking and splicing taking place, but that will be down the road as will the rear glass.
I keep thinking about the door locks also, since I'm not sure if I have a key for them. The passenger side has a sliding gate latch on it that is used to lock it from the inside, but the driver's door I don't recall if it could be locked. So what to do?? Got some research to do in that dept.
Also my brain says I should add some sort of protection at the rear axle for the anti-rock tab and brake lines, so we will do some more thinking about that.
You might ask what's the box on the side of the wheel wells doing? Well I'm not sure if I have to cut into the bed and it's supports at full flex. I don't think I have to, but I'm being cautious, so it's there for future possible hacking and it protects the coil over hose. Once I can flex it I'll know what has to be done and it may become smaller, as it's just bolted on.