What's new

1972 F-250 2wd to 4wd build

Emptied first tank of fuel (87 octane) and calculated consumption rate. City was 7.0 MPG, up from 5 MPG, so that is 2/5 = 40% increase !! Super happy with results. Highway was about 8.5 so given similar increase should get around 12 MPG.

40% range increase is much better solution than carrying 40% more fuel weight, which was a plan at one point. Build a custom in-bed fuel cell, gravity feed to main tank. Filler neck through bed, ethanol fuel going to **** quickly in secondary tank.

Fuel tank is a 'Burb 31g with OEM EFI pickup modded for a 340 lph pump. Fuel light comes on at 5 gal remaining. Once down to 3 gallons it will suck air when cornering. So effective capacity is about 27 gallons.

Range calcs
7 m/g * 27 g = 189 m
12 m/g * 27 g = 324 m

Cost analysis (yes a joke on a big block, haha)
Built C6 cost me 1900 all in
6R80 was 5000, so difference is $3100. Fuel is around $3.50. So can buy 900 gallons to break even. 900g * 8 m/g = 7200 miles, one year for some, more like 2.5-3 for me.
 
so hows the ride quality with the tension shackle?
Much improved axle control and no longer bottoming out and bucking. The ride otherwise is similar to before, like a truck with heavy axle/tire.
It's still limited by up-travel but the increased progressive rate within ride/bump range was what it needed. The front end will bottom out first now.

Haven't towed with it yet but I imagine it will be a big improvement there too.
Looks great and I love the color on that bump side.
Thanks it's 70's for sure. :smokin:
 
I had a random sighting of your truck today on my way home from work. Dobson and Pecos about 4:30. Looked awesome, love the color. My bronco is the same color but very faded.
 
still tweaking in the trans controller shift points and farting around with sniper tuning. RPMs drop too far when dropping it into gear cold.

Ordered a sway bar from TK1. 1.25" 'KOH' version, 16" arms. Will have to redo the frame side track bar mount to get the bar to fit properly.

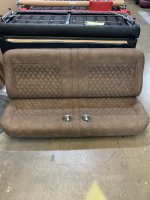
Also ordered a new bench seat. 67-72 style with springs sucks, time to move forward 30-50 years and go foam. long lead time...
2704540643.jpg
 

Attachments

  • 2704587189.jpg
    2704587189.jpg
    317.3 KB · Views: 6
Last edited:
Back to wiring on the '72 Ford. I don't want any aftermarket switches on the dash so I am using ash tray to house a bank of switches. Will control rock lights, digital dash, and so on. AoH press has me spoiled now.
Cut some 16ga on CNC. after some experiments I got it to cut decent.
IT1ywYeZVeTH5cbHvJ1SD9rKG=w1118-h838-no?authuser=0.jpg


Friction fit in the ash tray. tight fit to work around the existing items.
XSSA7be8E_m_hULzSW6RejMqGp=w629-h838-no?authuser=0.jpg


paint it black and put it back. Will swap out some of the switches for other types, colors.
x6lbGvVGwcXOUzjLG6AiYSwB3e=w629-h838-no?authuser=0.jpg
 
I'll have to wait 4-5 months to have it made. Looking forward to not being bounced around by the seat itself.


I might have to increase my $3.50 offer after all of these upgrades.

I might even triple it, pending delivery discussion. :flipoff2:
 
Received a few sets of replacement poly bushings. The traction bar has a hard life and both axle end bushing were sloppy, so swapped out the upper set and now all is tight. I also moved the upper axle position to the upper hole as it will put less leverage on the bushing for same axle torque. Won't alter the instant center.
ORS-opzHzkQS47RISHItt1xgsR=w727-h969-no?authuser=0.jpg


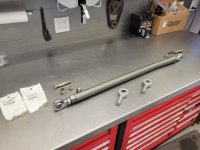
And while I was there I swapped out the track bar heim joints. They don't last long, this is already 3rd set in 3k miles, so need to go to a rebuildable joint like a johnny, ballistic or other. The ruff stuff heims are imports maybe these FK will be better. other than banging noises there was no indication while driving, no death wobble. Likely because the track bar is flat, no bump steer so vertical movement is not transferred to horizontal steering/track bar. Something about SIN function approaching zero and stuff.
I also removed most of the rest of the bend in the track bar, as it is not needed, and with opposite threaded joints can be adjusted in less than integer turns now.
_FjSasP7y5SyMg5mrPRktG7uO=w1292-h970-no?authuser=0.jpg
 

Attachments

  • _FjSasP7y5SyMg5mrPRktG7uO=w1292-h970-no?authuser=0.jpg
    _FjSasP7y5SyMg5mrPRktG7uO=w1292-h970-no?authuser=0.jpg
    183.1 KB · Views: 10
Last edited:
1000 miles seems low, no?

Tacoma had 30k on trac bar joints before it got complete new suspension… maybe it just needed new heims. :laughing:
 
well 1500 miles a set to be more accurate. but yes not good life at all. I think now that the track bar is flat and no longer effected by vertical motion they should last longer. My 2014 F250 ate a 1.25 heim by 30k.

Sway bar should help the radius arm bushings last longer.
 
Back to rock light and isolated battery wiring on the old Ford. After much deliberation decided on a path and got started. Fiddled with light placement, committed and cleaned the undercoat off, painted. The lights use magnets to adhere so surface needed to be clean and flat. Instead of 'home run' style wiring that this kit was designed for, I decided to make some branches with connectors to not impede removal of the bed, cab, fenders and so on that 8 home run wires would inherently do.

But first I modified the relay box power wiring. No need to fuse at this location, replaced with a simple wire of correct length.
aHZwj1qH_EURcEMNE2Iocclo_=w1292-h970-no?authuser=0.jpg


Ended up using 4 runs (3 shown here) out of the box to the various lights.
6PvLB6Sq1XBvFaVcR08LnxjD4=w1292-h970-no?authuser=0.jpg


Tried out these small 2 pin screw terminal connectors. Used a few in appropriate places to make branches or allow disassembly.
Ct1iNLSaxLcT-RfV4Y45QAhy7=w1292-h970-no?authuser=0.jpg
 
With Isolated battery system plan finalized, time to run wiring. Using power from the high power audio system, 2 ga to main battery. Was able to use one of the open position in distribution block.
b9ckeSuSQzD_EBRUg66hbmeeKT=w727-h969-no?authuser=0.jpg


Through floor with a 10 ga SAE 2 pin pigtail. This is so bed or cab can be removed with un-wiring things. Bed is also grounded through this connection, though cab-to-chassis cable.
rTwWdpMIicAyAmWup52BQOMII=w1292-h970-no?authuser=0.jpg


Isolated battery is a 30 AH motorcycle bat. Mounted in corner pocked space that is otherwise wasted due to spare tire. Some changes to be made to protect the open terminals. But will work for now.
zB5mBX4_aiEm71OX7xxpwHP2S6=w727-h969-no?authuser=0.jpg


I needed a way to get wiring from bed front to back. Ended up using 1/2 EMT under the bed rail as a condiut. secured with P clamp on back of stake posts.
tCaBE70hucLvaIOA1d8cDBwcg7=w727-h969-no?authuser=0.jpg


Back post not exposed to secure so made a bracket to hold that end.
ahnZlnEjBUf8CoaX_6Wz-YMGAm=w727-h969-no?authuser=0.jpg


Rear panel yet to go, but getting close.
 
Round 2 of truck bed control panel. On 1st round one hole was too big due to CAD error, but went ahead and bent it up to see how corners would come out. I was aligning the centerline with outer edge of press finger, but finger is flat on bottom for 1/8 or so and bends were too far out.
Fixed the drawing and cut up some more 16 ga. on plasma. This time I added another guide line back from center, so centerline is centered in press and I can still see a parallel line.
4A-lahol-R99jw30WoIhrRx9Ba=w727-h969-no?authuser=0.jpg


Press ram has great spot for magnetic light,
2wuhoxOOvYa3Lv2Ir_mMUAQ1Gg=w727-h969-no?authuser=0.jpg


It folded itself into this.
CrZqUX7EWjTIJfc0dhvZpQmPFk=w727-h969-no?authuser=0.jpg


Corners came out ok.
BmqKLngzyQ0mkqFoViWKB4O6-=w1292-h970-no?authuser=0.jpg


Test fit in truck bed
2pFKwTd8MFKPLotil1y3yCgSGu=w727-h969-no?authuser=0.jpg


Loaded it up for some instant gratification.
lIp-CE6wqvfDitFPlAT5Fj2Jog=w727-h969-no?authuser=0.jpg


Next step is mounting provisions, prep and paint. Going to paint it green like the body.
Dwe2re5p_9wzR4VUB5JgFWwh2=w1292-h970-no?authuser=0.jpg
 
Mixed a very small batch of green paint to spray a few items including the new switch panel.
7mS74-sAwpTuI_wj--R3Bit1Z=w1292-h970-no?authuser=0.jpg


installed the components and wired it up daisy chain style
U9mwysrhRsdk853vVfshv8jI0=w1292-h970-no?authuser=0.jpg


Left wiring long to ease access for modifications. Installed a ground stud in an existing hole inside the steak pocket.
gcHcYNIhhvg4CnwHSrd6n3cCN-=w727-h969-no?authuser=0.jpg


KGNLSuTzC8MQjp2eODRAySy_BJ=w727-h969-no?authuser=0.jpg


Reworked the battery mount to address shortcomings and exposed terminals. Spun battery 180* to get the terminals tucked in. Made a new upper piece out of 1/8 mild with a tab to mount solenoid rotated so bus bars aren't on top. Added another fastener.
mbqSJZzwERkmRd4B8UE9JAEPet=w727-h969-no?authuser=0.jpg


used some hose to cover exposed terminals.
zloHphjylyaPSRH9hHMuwkeeU=w1292-h970-no?authuser=0.jpg


Pic in the sun. The lower power connector is high current for audio system. 10 ga to battery. The upper one is for camper shell power, lights/fan. SPDT switch is for the rear 2 rock lights, can group with rest or run only back two on Iso battery.
FtajpVZRTssxwot1ZLuO65D0_a=w727-h969-no?authuser=0.jpg
 
At Barrett Jackson this year we ran into Rockford Fosgate CEO, who ended up buying a sweet '59 vette (only $250k, haha) a friend built. My wife still does work for RF and recognized him, so we BS'd, showed some pics of the truck. He offered to hook me up with new equipment to replace the 20 yr old RF amp and last gen sub. Sent a list, time went buy, gave up but got a 'come get you stuff call'.
Pair of Power shallow 10s, power 750W mono, 400 4ch and a 8 ch DSP. Hell ya shit is expensive.
Going to wait for new bench seat before building a new box and mounting the equipment. Will be a significant improvement. More power, more cone area. Then full mic EQ, time align, active cross over to replace passives. Going to be kick ass like my car system.
dsQehQOWz8FSIGbyIKIg4sO=w1292-h969-s-no?authuser=0.jpg
 
Received a few sets of replacement poly bushings. The traction bar has a hard life and both axle end bushing were sloppy, so swapped out the upper set and now all is tight. I also moved the upper axle position to the upper hole as it will put less leverage on the bushing for same axle torque. Won't alter the instant center.
ORS-opzHzkQS47RISHItt1xgsR=w727-h969-no?authuser=0.jpg


And while I was there I swapped out the track bar heim joints. They don't last long, this is already 3rd set in 3k miles, so need to go to a rebuildable joint like a johnny, ballistic or other. The ruff stuff heims are imports maybe these FK will be better. other than banging noises there was no indication while driving, no death wobble. Likely because the track bar is flat, no bump steer so vertical movement is not transferred to horizontal steering/track bar. Something about SIN function approaching zero and stuff.
I also removed most of the rest of the bend in the track bar, as it is not needed, and with opposite threaded joints can be adjusted in less than integer turns now.

Its funny...your truck is my truck/ Yours may be a little better quality...but we have the same parts and pieces basically building the same truck......I did rip that trac bar off last summer on a 500mile off road trip up through northern Maine.
 
Top Back Refresh