What's new

1968 Ford F-250 Prerunner Build

Got the window V added and will continue that down to frame as well once I get engine cage/shocks mocked up. Also I moved the radius arm tube up again to clear the axle at full droop/driver at full bump and clears perfectly over 30" of travel which is more than it will have. Also got some new steering box bolts since they are metric and found them as 12.9 12pt as well which is full race. And notched cross member to get full bump at driver side. Will clean it up and box/plate it in once motor is removed.
20210421_145906.jpg
20210421_171717.jpg
20210421_171733.jpg
20210421_171726.jpg
 
Last edited:
Well didn't do much today but I did finish boxing the frame and I removed the rubber core support mount and made some steel tube mounts to replace it and solid mount it since the entire body is solid mounted and any flex will result in broken fiberglass. I installed some tube through the factory rubber bushing hole and welded a piece of 2.5" round plate on top to bolt the core support to.
20210307_125020.jpg
20210422_154022.jpg
 
Last edited:
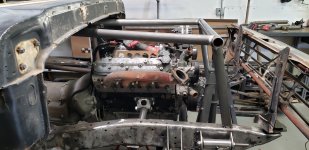
Well I started the engine cage today but can't get too far along until I get a few more missing parts, Radiator and Turbo, hence why exhaust manifolds are upside down, to mock up so I don't build something where something else needs to go. Also I did the outer tube for the passenger side but didn't take any photos of that. Will fit the outer tube on driver side tomorrow and get some more photos of that. Also will be posting the next video on mounting the motor and removing the firewall in the next few days.
 

Attachments

  • 20210423_140430.jpg
    20210423_140430.jpg
    2.7 MB · Views: 61
Last edited:
OK So got the driver side outer tube put it and to get the tube the height and location I wanted it I notched the bottom of the cowl/firewall a bit. Made some stainless patches for where the vents used to be in the bottom outside of the A pillar which will be coated with Raptor liner and dynamat once it's to that point. Last thing my turbo and radiator will be here this week so started making the T6 turbo flange to 3" exhaust adapter out of stainless steel. A nice 12 bends per half to get it to fit the round and rectangle on the bottom.
20210424_162419.jpg
20210424_162504.jpg
20210424_162508.jpg
20210307_125020.jpg
20210424_162657.jpg
 
Last edited:
Was able to make the pitman arm which sits directly above the link between the swingers. Also used a RMSX heim with 7/8" thread to match the rest but a 3/4" bolt which the bolt it big but short at 2" long but everything clears lock to lock with that short length. Will use a 2:1 quickener to get me round 1.75 turns lock to lock. to get quicker I would need a box with faster ratio than what I have now.

20210425_150826.jpg
20210425_150822.jpg
20210425_150815.jpg
 
OK here is some of the parts. Tomorrow my turbo should show up, tomorrow my radiator and friday my intake manifold so I can start mocking all that up.
Got a swag bandsaw kit and a bauer bandsaw so I can cut the tubing much easier as well for all these bent pieces. Also need to figure something out on this water pump the upper hose where it connects is directly at the intercooler and stuff, I did get it to turn with a little heat and removed it and reinstalled it with some JB weld. Anyone know of a replacement Upper rad hose neck that is bent at a 90 or steel that I can cut/weld to it if necessary, Or should I just weld an aluminum piece of tubing the direct I need? Anyone know of a truck spacing LS Water pump with the radiator hose in a different location, OR do I need to get an LS1 water pump and the spacers to make it fit truck accessories? The LS1 water pump with upper hose directly out the front should work perfectly so probably go that route.
Intercooler.jpg
Turbo flange to pipe adapter.jpg
Flex pipe.jpg
Driver Manfiold.jpg
Passenger Manifold.jpg
Water pump.jpg
 
These guys have some good info on LS water pump compatibility and sell the spacers.


water pump.png
 
You could pull the steel tube and cap that hole with a piece of aluminum and machine a new hole in the front of the round boss. Then weld on a new aluminum tube to point where ever you need it to.
 
You could pull the steel tube and cap that hole with a piece of aluminum and machine a new hole in the front of the round boss. Then weld on a new aluminum tube to point where ever you need it to.
He could but that seems like a great way to ensure you can't get a spare water pump the one time you need one. It's one thing to make custom brackets and other static objects. I wouldn't want a custom semi-consumable like a water pump or alternator
 
He could but that seems like a great way to ensure you can't get a spare water pump the one time you need one. It's one thing to make custom brackets and other static objects. I wouldn't want a custom semi-consumable like a water pump or alternator
I agree, but it's pretty common in race vehicles. I know this truck probably isn't going to be race only, but I doubt it will be a daily either.
 
Yeah I'm not going to want to weld anything onto the water pump. If I'm down in mexico I want to be able to go to autoparts store and find an off the shelf water pump to comtinue on my trip. Driving 6 hours to go offroading to have something custom fail is a fail so want to avoid doing that. I will know in a couple days when rest of my stuff arrives so I can start mockup to see if I need to change it of it truck one will work.
 
OK ordered some 4" stuff and a dynomax bullet muffler since I'm planning on driving this on the street and don't want it super loud.

Griffin Radiator showed up today as well as the turbro showed up S475 75mm turbo should be good to put down 600 or so easily.

Now I'll get to mock that up along with more stuff so than I can fit the shocks and everything else and have nothing look like an afterthought. Also fabbed up a 5" to 4" exhaust reducer out of stainless. The reducer I had cut out was 5 to 3" so once the tubing shows Up i'll mark where it hit and cut it to not reduce any flow. Also I don't have a slip roller so did a lot of slightly angled bends on my press brake than hammer formed it around a piece of heavy pipe I have.

Radiator.jpg
Turbo.jpg
Exhaust reducer.jpg
 
eah I'm not going to want to weld anything onto the water pump. If I'm down in mexico I want to be able to go to autoparts store and find an off the shelf water pump to comtinue on my trip. Driving 6 hours to go offroading to have something custom fail is a fail so want to avoid doing that. I will know in a couple days when rest of my stuff arrives so I can start mockup to see if I need to change it of it truck one will work.

make three
  • one on the motor
  • one in the truck as a spare
  • one in the shop
 
Got the crossover tacked on, just gonna get another v-band so it's easier to remove when radiator and everything is in there. Mocked up the turbo as well. The final 3" bottom bend will have a piece of 2" tube connecting that to the Wastergate which will then exit back to the exhaust after the turbo. The intake tube side of the turbo will have a 90 then the MAF and intercooler at a slight angle with a 90 into the throttle body. I'll add the BOV to one of the end tanks of the intercooler as well. Starting to mockup the shocks/intake and intercooler stuff over the next few days to see if everything will work before anything gets welded. Also it appears that the truck water pump outlet hose location will work as is so no need to do anything custom there.
20210501_151931.jpg
20210501_172124.jpg
20210501_172129.jpg
 
This thing is super cool, such a great way to mock up a suspension using a jig like that. Definitely taking notes from this build!
 
Driver side mocked up and going to do the coilover mount a bit different than how it's mocked up to clear brake hydroboost when mounted. Also the distance between the shocks on driver side is 1" farther apart than pass side so upper mounts are correct angle but farther apart to keep them parallel and the same as passenger side mock up mounts.

20210503_162205 - Pass Upper.jpg
20210503_162211 - Driver.jpg
20210503_162218 -driver.jpg
20210503_162222 - driver.jpg
 
OK got the passenger side upper/lower mounts tacked in place. They will be fully boxed as well once it's stripped down to weld. Also got the driver side mounts on the bottom done and upper bypass mounts tacked on as well.

20210508_134725 5.8.2.jpg
20210508_134732 5.8.3.jpg
20210508_134738 .5.8.1.jpg
20210508_134741 5.8.4.jpg
 
OK I moved the turbo forward 1/2" to increase the clearance between it and the bypass at full bump AND clearance between the y-pipe and AC Compressor pulley/clutch as well, also added another v-band on passenger side to make it much easier to remove in case I need to change a PS Pump or something I don't have to remove the whole turbo etc to service items like steering box or anything. Also started on front bumps and got the lower pad tacked together for the passenger side. Welded the radius arm tab fully and then put a piece of 3/16" plate between the weld and bottom of bump pad and welded that so it's not hollow in the middle and won't dent at all now. installed my now boosted Minh Worx power steering pump with a remove reservoir can, and got a CBR oil cooler for that since the steering is gonna be working with hydroboost and the ram assist. Also installed a freshly blasted/cleaned accessory bracket as well as a new water pump too.

20210514_153449 - 1.jpg
20210514_153453 - 1.jpg
20210514_153503 - 1.jpg
20210514_173106 - 1.jpg
20210514_172900 Bump pad 2.jpg
20210514_172850 Bump pad 1.jpg
 
Yeah it's turning out exactly like I imagined I just wish I could've gotten the tie rods straight but no way unless I build a entire knuckle from scratch and moved the tie rod at knuckle out way farther.
 
Top Back Refresh