What's new

02 Dakota QuadCab 4x360x40s

well shoot. Started to refill my cooling system this morning only to discover that despite my best efforts to keep it safe the radiator somehow got a small pinhole...and coolant is leaking out (bottom pic). I've decided to go back to a stock off-the-shelf radiator and make this one available for $200 (normally an $800 radiator). I figure there may be someone out there who can use a super-high-capacity Dakota/Durango radiator and knows a good radiator repair place to fix the small hole and can take advantage of this one.


8O6QiR7.jpg


L3oGyFB.jpg


G1WaRuJ.jpg


- Sam
 
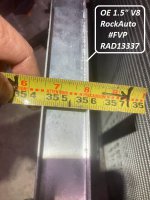
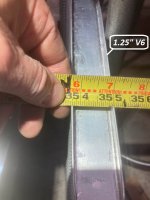
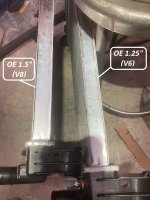
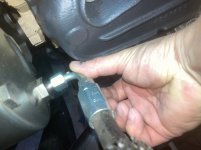
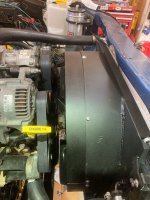
alrighty - the previous (OE) radiator is back in place (the same one the 440 first used), coolant has been filling the system all weekend, and no leaks 👍 . The lower rad hose is an OE unit, and the upper is from the next earlier gen Dakota 98-99 ish (which does not have the rad cap 'insert' inline with the hose - the rad cap is in the radiator), I spliced the OE 02 rad cap insert unit inline, and worked perfectly to get around the A/C compressor - worked awesome.

I'm not worried about the OE radiator cooling the engine - it did so effortlessly when this engine was between the fenders before the buildup began and I'm sure it will do so again, not to mention the 440 initially ran 'warm' because I had the wrong thermostat in it, which is why I got the big Wizard rad to begin with. Plus, honestly I'm happy to have an off-the-shelf (read - easy to replace) radiator back in place - raises the reliability/maintainability factor to the very top 👍 .

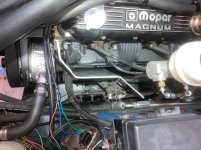
Made the necessary mods to (re)position the fan shroud back in place to centerline on the fan, the extensions are in place, trans cooler and lines are all in position and connected, and I'm giving everything a close inspection and once-over, and cleaning up the shop in preps for firing it all up. All systems "Go".

I decided to swap engines 4 months ago (Nov 29th), and after working ~1.5 hrs nearly every single morning since I'm happy to say the swap is 'done'. The original 360 had ~125k miles on it and ran perfectly, so instead of a full rebuild I decided to refresh/restore it down to the rear main seal. Here's a quick recap -

Bottom end: Original bearings and rings, nearly no ridge, new rear main seal
Heads: Tanked and fluxed - no cracks, and even the guides were still good; surfaced, new seals and springs to match the Comp cam, and Extreme Duty head gaskets #519SD).
Cam: CampCams 20-745-9: 212-218 (264/270), .480/.480, 114* LSA, with matching springs
Valve train: Restored the lifters/pushrods/and all hardware (sonic cleaner is awesome)
Oil Pan: Ram/Jeep magnum (not Dakota/Durango) with custom oil baffle, matching pickup tube, and OE '02 Dakota/Durango dipstick (required new 'full' 5-quart mark scribed on dipstick)
Intake: Edelbrock 7577, with HVH Super Sucker 2bbl carb adapter
Induction: Holley Sniper 2300 2bbl with matching HyperSpark ignition
Motor mounts: 94 Jeep GC (pass-side x2)
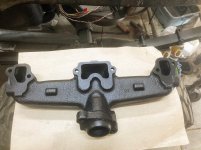
Exhaust: pair of mid-late 70's pre-smog center dump truck manifolds (4041466), Cerakoted
Alternator: OE 02 Dak, with old-school voltage regulator
Power Steering: PSC pump with remote reservoir
Valve Covers: Mopar Performance

Now it's time to see if I got it right :)

Gev01BC.jpg


qO0tJpQ.jpg


j5wuviB.jpg


kyIJhRG.jpg


bmPO8g8.jpg


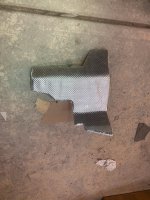
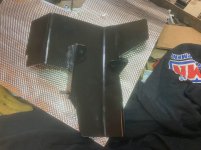
stainless bolts and nylon washers hold the shroud extensions in place - looks good, won't rust or mar the paint -

XwQ9HT7.jpg


trimmed the back edge of the extensions to allow the back of the fan to be about 1/3 'out', which should help evacuate the air. Jury's out on whether that was a good decision or not, and I'll know soon -

m08HOT2.jpg
 

Attachments

  • m08HOT2.jpg
    m08HOT2.jpg
    150.5 KB · Views: 13
Last edited:
One of my goals all along is to have as 'clean' an engine compartment as reasonably possible (meaning to be the least bit 'stinky' as possible), and to that end I routed the valve cover breather to the air box.

qKJIFB9.jpg


Picked up this nice stainless steel 5/8 bulkhead fitting -
MDpBScB.jpg


...secured it in the airbox below the filter because I didn't want the engine intake air draw to be 'competing' with the breathers' intake air draw - probably inconsequential but whatever -
ugAfnJK.jpg


...and clamped on a simple filter just to keep debris out -
7NGMLRR.jpg


So now any valve cover 'inhaling' will come from the filtered clean air, and any 'exhaling' will at least be captured in the airbox...and such vapors should get drawn into the air cleaner and burned...which should help keep things less 'stinky'. I can't imagine it'll hurt...

Along the same vane, I came across some info stating that the Snipers run best with a 'fixed orifice' PCV valve. Many PCV valves...including the OE Mopar one I (was) using...have a variable orifice (and variable rate) based on the spring and plunger under variable vacuum (throttle) loads, but, there are many many many threads talking about how the 'variable' PCV valves can make a Sniper's ability to precisely meter the idle control quite difficult...and the solution from every reputable source including Holley tech and EFI Sys Pro is to use a 'fixed orifice' PCV valve. I am very surprised I'm only just now hearing about this, and it is not mentioned in the instructions anywhere. I only came across it when I was asking EFI Sys Pro about my gas tank vapor hose being routed to the secondary manifold vacuum nipple (no problem there BTW).

A fixed orifice PCV is just as it sounds - no spring-loaded plunger valve, just a permanent, single, small hole, in most cases I've read the hole is to be 0.100", or juuuust under 1/8" (0.125), although I'm told 1/8" is plenty fine so - the main issue being so long as the orifice size doesn't change. I can buy a simple fixed orifice PCV valve...but they're for a Chevy (of course) and bigger than the 1/2" Mopar valve cover grommet I have (of course).

So, I cracked apart my plastic PCV valve, tossed the plunger and spring, filled it full of JB Weld, clamped it back together, and drilled a hole through the epoxy just under 1/8", and stuck it all back together this morning. Problem (allegedly) solved.

Makes me wonder how much grief this issue might have been giving me the whole time with the 440 and the 4bbl Sniper... :unsure: ...

Standard Mopar PCV valve -
PoX5z9v.jpg


...gutted -
7FPGicY.jpg


Filled with JB weld, drilled just under 0.100", and 're-assembled' (glued together) -
lLe5vkk.jpg


Meanwhile, as best I understand, this is the correct diagram for the front vacuum ports on the 2300 series 2bbl Snipers (and back of the 4500 4bbl units) -
sHaFvar.jpg


- Sam
 
I had some idle issues for a long time that were not too bad. I also found same info about fix orifice valve. But I also found info on the secondaries not seating/sealing (not an issue for 2bb you have). Centered blades and added a wrap to spring. Solved.

Still plan to get a fixed PCV, but I like your hack on existing. thanks for sharing.

Also I disagree with Holley's doc saying to use ported vac for distributor. defeats the purpose of vac advance. Ported was a hack for emissions (retard to burn mixture in exhaust) and makes idle hotter.

Currently I run PCV vac source from intake runner instead of sniper 3/8 port, as I don't want oil vapor going through efi and over nitrous spray bar. How do you have it set up?
 
I've got the PCV routed to the 3/8 main port on the throttle body - it is under the blades and I doubt it'll vapor much if anything...at least no more than any old-school carb setup?

Don't know about the ported/dizzy vacuum advance port - suppose it works same-same as any old school dizzy, but in my case it'll remain capped 'cuz my HyperSpark ignition handles all the advance n stuff in the 'puter - my dizzy is locked at 10* and won't ever move.
 
Fired up the 360 yesterday 👍 - it fired right up, got up to temperature, and idled along just dandy - some of the normal fine-tuning to dial in the idle and such, and all seems to be well. Bit of lifter chatter (or something) on the p-side, so all is not 100% awesome, but I don't know if there is a problem or not, but it seems to run just fine, and I'm just gonna run it.

Throttle response is real nice - no where near as 'explosive' as the 4bbl was, and just like the tech at CompCams said the cam idles niiiice and smooth - ze-ro lope. I'll be running it more and more and just dial it in more and more.

No apparent leaks, exhaust is good, tranny engages, steering works - all in all a great new build start-up 👍 .

Really hope re-using the original lifters wasn't a bad decision... - dang it why is it always 'something'... :shaking:

- Sam
 
Last edited:
...I might have figured it out. I pulled the valve cover, and everything looked 'good' - all the rocker bolts were tight, and I could just barely spin the pushrods of the valvetrain on the base circle. So everything appeared to be 'good'. Wiped off the Fel-Pro reusable valve cover gasket and bolted it back together - total time to R&R the valve cover about 1/2 hour (Magnum engineering for the major win 👍 ). So...having not found anything obviously wrong, what else could it be.

Remembering that Hemi's are very particular about the oil they use (particularly the lifters), I re-read the owners manual and there in black n white it says the oil viscosity spec for the engine is 10w30...and I had 10w40 in it (specifically Lucas Hot Rod & Classis w/ ZDDP). I don't remember why I opted for 10W40...but I did and there it is (probably an 'old-school mentality' that thicker oil is mo'bettah - not). Now...it was a long shot, but knowing the Hemi's are picky about the oil they use I thought maybe the Magnum's are too - I know the tolerances of the hydraulic lifters are very, very precise, so what could it hurt. This morning I drained the 10w40 and poured in 10w30, regular off-the-shelf Orielly house blend (no high-zinc requirement now 👍 ), and a new filter.

I didn't really expect much of a difference, but I think I can honestly say it is running quieter 👍 . Now...it might have been noise coming from the p-side exhaust manifold (might have a gasket leak - not sure yet)...but I didn't do anything to it and that side is now quieter, and as such I think now I do detect some exhaust manifold leak(s), but bottom line is changing to 10w30 might just have been (and resolved) the issue. Lesson learned.
 
Last edited:
Took it out of the shop and drove it around a little. Overall I think it's much better - still plenty of teething issues to resolve but better...but next time I want to do a full off-road build from scratch I need someone to just slap me back into my senses. I'm so fawking tired of building this thing - should have just put big axles under it and been done...
 
Success! :beer:

Given your 'attention to detail' you can't just slap big axles under it. You have to make everything 'right' and work together.
 
ok - found another drivers-side pre-smog 318-360 truck manifold on ebay, hand-planed the port faces flat, ground out the same ribs as before, had it blasted and Cerakoted, and bolted it on. Had the y-pipe blasted and Cerakoted too and have the exhaust just about reinstalled - now with the exception of the tailpipe/muffler the whole exhaust is coated in either Cerakote or Jet-Hot -

9KBkFZw.jpg


uIkpXfG.jpg


HyMTbQJ.jpg


vBHXCCh.jpg


H2c9MBu.jpg


...and I'm fabbin' up a bunch of armor and who doesn't love having a fresh supply of death wheels, flapper discs and sawzall blades for 'doom and destruction' bwwaahaahAHAHAHHAHAHhhhahahahhaaaaaa.... :grinpimp:

KoK3kF1.jpg
 

Attachments

  • KoK3kF1.jpg
    KoK3kF1.jpg
    295.7 KB · Views: 5
  • H2c9MBu.jpg
    H2c9MBu.jpg
    174.8 KB · Views: 4
  • vBHXCCh.jpg
    vBHXCCh.jpg
    132.5 KB · Views: 5
  • HyMTbQJ.jpg
    HyMTbQJ.jpg
    135.4 KB · Views: 4
  • uIkpXfG.jpg
    uIkpXfG.jpg
    206.9 KB · Views: 5
  • 9KBkFZw.jpg
    9KBkFZw.jpg
    189.4 KB · Views: 4
Last edited:
ok - for the first time since the the buildup, drove the truck around the neighborhood loop, and I'm happy to report it drives well and running better and better - the chassis feels good, no bump steer, etc. So yayee.

Initially the Sniper wasn't running the engine 'to my satisfaction' - it 'ran' but had acceleration stuttering and dead spots, but...the more it runs...I'm cautiously optimistic that the more the engine runs and drives around the Sniper is indeed learning how to 'do its job'. I am hopeful that the EFI will tune itself into perfection the more it runs, so that is the plan - drive it every day and let it 'learn'.

LOTS of work yet to do, but...it appears...to be coming together. Oh also, I'd been looking for some sort of 'seal' to put between the exhaust manifold exit and the collector inlets for the two primary pipe(s) - this is the manifold exit -

fvHQRK9.jpg


...and the inlets to the primary pipes just slip over the manifold lip - metal-to-metal, but it isn't a perfect seal, and I wanted to try to get 'something' between them to help seal things up, and so I tried these Remflex gaskets, which juuuust barely fit over the manifold edge lip, and the pipes just capture/compress the gasket up onto the manifold. Remflex #6006 (2-1/4" pipe flange, 2 hole, 3-1/2" bolt spacing), and after being torqued tight they haven't split out, and it's nice n quiet -

XlFNcQn.jpg


In the meantime, since it was actually out in the sun...took some semi-gratuitous pics -

EvzOy5P.jpg


RRXNOSV.jpg


yXTuj4N.jpg


YTlXVoI.jpg


yjt1VfV.jpg


X51KwF1.jpg


stCSptR.jpg
 

Attachments

  • stCSptR.jpg
    stCSptR.jpg
    354.9 KB · Views: 8
  • X51KwF1.jpg
    X51KwF1.jpg
    213.7 KB · Views: 7
  • yjt1VfV.jpg
    yjt1VfV.jpg
    264.7 KB · Views: 9
  • YTlXVoI.jpg
    YTlXVoI.jpg
    441.1 KB · Views: 9
  • yXTuj4N.jpg
    yXTuj4N.jpg
    242.3 KB · Views: 9
  • RRXNOSV.jpg
    RRXNOSV.jpg
    218.7 KB · Views: 10
  • EvzOy5P.jpg
    EvzOy5P.jpg
    232 KB · Views: 10
Last edited:
Makes me miss mine for sure! Looking good.

What's the red tape on the fender? Documenting the dings and scratches for the next rental? 🤣
 
tossed the bed on and took a couple pics. Fender trimming voodoo is forthcoming, and after a bit of photoshopping with the rear fender I'm really diggin' how it looks -

here it is untouched -

Nq9YyU8.jpg


and after some rear fender photo-trimming -

cpLFuX2.jpg


...and this is the truck that has been my inspiration, and I've just photo-moved the rear axle and rear wheel well back a bit to look like this -

LNGZJea.jpg
 
Last edited:
Well the show got rained out - quick soggy pic from us waiting to get in - our silver dually with the Willys and Ben's blue 2500 with the Dak -

2rbjlnx.jpg


Meanwhile, as I'm waiting for the rain date to be determined, it's back in the shop for continued work. This morning I installed a just-sourced radiator from rockauto - found one with a 1.5" core (apparently for the V8 trucks), vs the 1.25" core I had in it apparently intended for a V6.

Filled it with coolant and checking for leaks now. Just this alone might be the sole reason it was running a bit warm, but a 1/4" thicker core is a lot, and I'll know for sure soon. I will be verifying I have the base timing dead nuts, and if that and/or the new bigger radiator don't resolve the running warm issue then I'll go with a stronger (or at least new) fan clutch, then a fan. I'm pretty confident tho that the bigger/thicker radiator might be 'it'.

hFycpGG.jpg


ZFrc8Ws.jpg


Rockauto 1.5" rad # FVP RAD13337 - More Information for FVP RAD13337

PwasvYi.jpg
 

Attachments

  • PwasvYi.jpg
    PwasvYi.jpg
    154.2 KB · Views: 5
  • ZFrc8Ws.jpg
    ZFrc8Ws.jpg
    118 KB · Views: 3
  • hFycpGG.jpg
    hFycpGG.jpg
    159.7 KB · Views: 6
Last edited:
alright, had a real good day yesterday - after 4-1/2 years (4 yrs, 4 months, and 29 days to be exact) of being apart...and two engines...the Dakota 'went' someplace. We took the truck out to our local Ram Off Road Park and got the truck good n flexed out...and fully heat soaked.

Overall pretty good - couple teething problems but nothing massive. It was a hot day - about 80*, and after about an hour and a half of continuous running and mostly idling the engine never got above 190*!!, mostly hovered in the low 180's, and that was the huge 👍 . Had Tracy's Grand Cherokee out with us but didn't need it.

One of the main tasks was to confirm placement of the rear leaf shackles, and in order to get a good suspension test I loaded as much 'weight' as I could to try to simulate a 'full load', so I tossed on the topper, spare tire, tools, rear winch, and an extra battery in the bed box next to the service battery.

Issues:
1) D-side motor mount allows too much torque-flex (up) and the radiator fan was contacting something on the shroud, so I'll likely get a polyurethane version on the drivers side, maybe both.

2) Power steering pump and ram output lines are 'kinda' close to the exhaust manifold and the fluid got kinda hot and was making some noise so I have to do something about that (heat shields n such to shield the pump and ram lines from the exhaust, etc).

Flexes good - didn't get air under any tire, and everything else seemed to be 'good'.

k4DGkuI.jpg


vHbMCfG.jpg


R6zqcUA.jpg


UMxCaSR.jpg


tiHihVT.jpg


Epo9TcG.jpg
 
....Overall pretty good - couple teething problems but nothing massive. It was a hot day - about 80*,
Haha 'hot day' is relative. 80 is night time low. Anything over 115 is a hot motherfucker.

Should feel good to take it out and enjoy instead to re-working thigs.
 
the front has around 4-5 inches of total 'possible' compression but it's unlikely the leafs will let it compress that far, and I'll have bump stops eventually. It has maybe the same amount of extension, and with leafs I probably won't even bother with limit straps. The rear has around 6 inches of total compression, but a ton of extension - maybe 8-10 inches 👍
 
Last edited:
Swapped out the flimsy OE motor mount bushings for a set of Prothane polyurethane units - these aught to cure the engine-shifting problem 👍

Smoothed out the outer 8-point corners of my rockwell hub nut socket which fit both the bushing edge and i.d. of the sleeve perfectly

5x4Nbmz.jpg


Pressing the poly bushing into the sleeve proved to be pretty much impossible without it slipping every which way except straight in, so I cut the bushing in half which made 'installation' a bit easier...

rh0UiLV.jpg


4v4epkg.jpg


The beefy center sleeve came with a 1/2" hole, but the OE's (and my main bolts) were 9/16, so a buddy opened them up to 9/16 for me -

XYY9cSl.jpg


Way more awesomer 👍

t6NpHUk.jpg


Power steering heat shield is in work, and pushrods are in the mail. 'Forward Progress' 👍
 
been doing some minor fender voodoo to 'expand' the edges of the front/rear wheel wells...

before -
s1S2cgI.jpg


1H3MCtu.jpg


cXUOyfy.jpg


cutting from the blue bed to fill in what was strategically removed from the green bed. Drivers-side was the first try - got it right on the pass-side -relocated the green portion 'back' then filled the gap with a chunk from the blue bed -

sU0WMiV.jpg


...then it occurred to me that I can avoid the 'gap' by being smart about where I'm cutting; took this section from the blue bed...

PS2iGfr.jpg


...and inserted it 'here' -

xwYbvYC.jpg


worked great -

OAXxeMq.jpg


Wheel wells are being deleted completely, which will add a ton more room in the bed.
 
Took it out for more testing and the new polyurethane motor mounts work awesome. But, even after installing a heat shield the power steering is still getting too hot, and the reason (presumably) is a combination of proximity of the pump/plumbing to the manifold and...my #1 suspect...a cooler that apparently is useless. Here are the space constraints I'm dealing with, and this is all OE spacing...

before -
abN3vPm.jpg


co496qp.jpg


Plus the ram assist lines are 'closeish' to the exhaust...so I made a heat shield, had it powder coated, lined it with the same reflective lining I used under the cab, and while it helped after a while the steering was still getting too hot and 'groaning', so I'm getting a bigger cooler. Meantime, pics -

after with the heat shield -
Kqx2E9O.jpg


Z1PLCoZ.jpg


installed -
r6UhlqK.jpg


B8CTEy4.jpg
 

Attachments

  • B8CTEy4.jpg
    B8CTEy4.jpg
    146.8 KB · Views: 4
  • r6UhlqK.jpg
    r6UhlqK.jpg
    280.1 KB · Views: 4
  • Z1PLCoZ.jpg
    Z1PLCoZ.jpg
    161.7 KB · Views: 5
  • Kqx2E9O.jpg
    Kqx2E9O.jpg
    217.9 KB · Views: 4
  • co496qp.jpg
    co496qp.jpg
    137 KB · Views: 5
  • abN3vPm.jpg
    abN3vPm.jpg
    253.1 KB · Views: 4
  • B8CTEy4.jpg
    B8CTEy4.jpg
    146.8 KB · Views: 3
  • r6UhlqK.jpg
    r6UhlqK.jpg
    280.1 KB · Views: 4
  • Z1PLCoZ.jpg
    Z1PLCoZ.jpg
    161.7 KB · Views: 4
  • Kqx2E9O.jpg
    Kqx2E9O.jpg
    217.9 KB · Views: 4
  • co496qp.jpg
    co496qp.jpg
    137 KB · Views: 3
  • abN3vPm.jpg
    abN3vPm.jpg
    253.1 KB · Views: 4
  • B8CTEy4.jpg
    B8CTEy4.jpg
    146.8 KB · Views: 3
  • r6UhlqK.jpg
    r6UhlqK.jpg
    280.1 KB · Views: 3
  • Z1PLCoZ.jpg
    Z1PLCoZ.jpg
    161.7 KB · Views: 4
  • Kqx2E9O.jpg
    Kqx2E9O.jpg
    217.9 KB · Views: 4
  • co496qp.jpg
    co496qp.jpg
    137 KB · Views: 3
  • abN3vPm.jpg
    abN3vPm.jpg
    253.1 KB · Views: 4
Last edited:
Nicely done. However, you might want to consider ceramic coating your exhaust manifolds inside and out to help move the heat further down the line in the exhaust.
 
thanks. The manifolds have been Ceracoated - not sure Jet Hot or other similar stuff would do much more? I think the fluid cooler is just not doing enough good, and I've got a much better cooler design forthcoming. I've just got a finned 'heat sink' cooler in there now and apparently it isn't shedding enough heat - it's a 12" dual-pass in/out unit and is apparently unable to shed enough heat, and I'm going to replace it with a big tube-n-fin cooler in front of the radiator. Actually...hmmmmm - I've just had an idear! - the cooler in there now is only inline with the gearbox return line - the hydrobooster line doesn't have a cooler...hmmm - since it's already in there...I'm gonna take advantage of this finned cooler and route the h-booster return line to it, and run gearbox return to the bigger unit - 'dats not a bad idea :smokin:

GV3hpnr.jpg


W3jNYnc.jpg
 
Last edited:
yeah that'll be much more gooderer 👍

If you haven't gotten the memo on latest best hydraulic practices, try to get set up with something to keep at least 5psi in that resi too, instead of just a straight vent to atmosphere.
 
copy that 👍; it's got the PSC vented cap and splash valve which IIUC is supposed to do 'that', but I don't have the tech specs on the top of me brain just now...
 
The return flow from hydro boost is minimal and not worth the effort of a dedicated cooler. Suggest one sufficiently sized one in main return (the box).

How do you knw PS is too hot? What is temp if gauge?
 
Top Back Refresh