What's new

02 Dakota QuadCab 4x360x40s

FLIR snapped the pump housing at 300* (before installing the shield) - probably wasn't that hot inside and now that I'm thinking about it I don't actually remember what the gauge read; after the shield the gauge got to ~180* (and minimal 'hard work'). It was really unhappy the first trip, and better the second but still unhappy. The pump might be toast, and if so PSC will work with me on a replacement. Agree on the hb return but the old cooler is 'there' so I might as well use it, and the new big one will go up front. Will probably up the fan clutch rate too.

New build = don't know what I don't know until I know, ya know? :dustin:
 
Last edited:
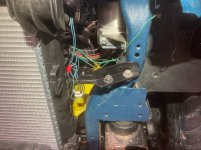
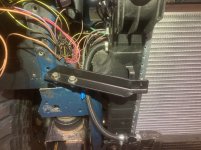
One thing I haven't talked about is the small but critical verification to ensure the timing is correct. Before confirming the timing, the engine/EFI ran 'pretty good' - sometimes a little curious nature to it and stumbling on acceleration etc, but I figured that would just sort itself out as it 'learned'...which was not an accurate assumption.
I was talking with the folks at EFI Systems Pro (who I bought the 2bbl Sniper system from), and Scott recommended I confirm the 'static timing', and I have to say that ever since doing that the engine is and has been running 'right'.

Bottom line is the engine was 15* advanced - I retarding the timing, confirmed the timing in the handheld ECU, and it has been running/feeling like an OE setup ever since.

I simply missed this step (checking static timing), but it is an 'essential step' once running.

Static timing check is pg. 45 of the 2bbl manual,


...and pg. 6 (steps 16 and 17) in the HyperSpark manual -


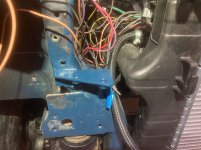
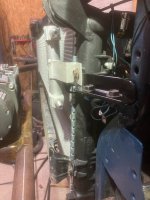
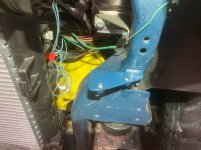
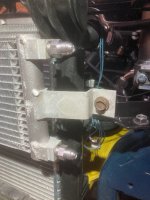
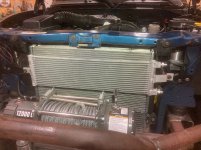
In the meantime, I am chipping away on all the small stuff to get the truck fully 'up'. The power steering is still getting hot so a bigger/better cooler is going in, shocks, bed mods, LOTS of small stuff, and so far it's going well. Assuming it's 'ready' I'm taking it down to Caballo Lake, New Mexico in October for a week-long off-road gig known as Chili Challenge where I'll play around with a bunch of other machines on some great trails. Tick tick tick...
 
ok - I think I have the power steering cooling problem under control. First, I talked with PSC and they informed me that the vertical dual-pass cooler bolted to the back of the fan shroud I was using wasn't doing me any favors, so I eliminated it, and instead got a much bigger cooler which is now bolted up in front of the radiator, using the engine fan to provide airflow. I don't think the old/original fan clutch had much schlitz left in it so I also installed a fresh one of those - not the severe-duty version but just a new HD unit (Hayden 2781). I can 'hear' it but it isn't 'jet engine' loud - just normal loud.

Initially the PS pump was moaning but it apparently sucked in some air and has since burped it all out, and is now totally silent and by all accounts is functioning nominally. The fluid/system is remaining nice and cool, and I 'think' I have that problem solved 👍 .

Cooler. I got another new replacement Dakota tranny cooler that I re-purposed as a PS cooler, which seems to be working great. I used Russell o-ring power steering adapter fittings (648030) which fit the cooler perfectly, and Allstar 90* hose ends (ALL48273) to connect the hoses.

The PS cooler bolts up to custom mounts which allow it to 'hover' a few inches above the tranny cooler, which fits nicely between the grille and A/C condenser.

lnb4ylx.jpg


olqvOWJ.jpg


sE27g4H.jpg


BIIwUfh.jpg


QNuhUbW.jpg


qcGzBvd.jpg


ginLFSX.jpg


wSc9qHN.jpg


Meanwhile...I have been really frustrated with how much 'noise' the engine is making - just seems to have excessive 'chatter'...and I know the oil pressure hot idling was around 20 psi - not really awesome but it isn't a new engine - the bearings still have ~125k miles on them. So...in a bout of frustration...over the weekend I had the thought about draining out the 10W30 and just dumping in something thicker - I figured what do I have to lose? - it'll either like it or blow up...and at this point I'm fine with either because one version means 'better' and the other means 'will be better'...and since we're (hoping to) keep this truck we'll put whatever investment into it that's required...within reason of course. So...I went to O'rielly and just looked over the oils sitting on the shelfs there...and after a few moments of surfing one in particular just looked 'right', and after pouring it in seems to be just what the engine needed, because after putting it in the engine is now noticeably quieter and has double the oil pressure hot at idle - it now idles at about 40-45 psi hot...and maybe 15-20 psi more cold (maxes out at about 75 psi). This'll be the oil the 360 uses from now on 👍

XkHBdV8.jpg


I'm figuring the low oil pressure was simply allowing too much 'slack' in the lifters, and the higher viscosity enables the system oil pressure to remain high(er)...which by the sound of things seems to be just what it wanted. It still makes some noise but it's now more of a general 'engine running' sound...like a sewing machine, but it sure seems to have much less 'chatter', and hey if it's this easy and will get me by until I do a full rebuild (if ever) then horray :) . I know I didn't 'need' the extra ZDDP but I figure it can't hurt, and VR1 sure has a very good reputation, so there it is.

There are two columns for projects like this: Needed, and Wanted. Needs include things like engine, transmission, axles, steering, brakes - the things that make it 'go and woah' and cannot be forsaken. Wants are everything else including gauges, two gas tanks, ram-assist, on-board air - I can now FINALLY start to work on those :) . And finally, the best part is...I think the truck is now 'good' - I think the overall core machine is now where it needs to be...and where I've been wanting it to be since first fire...and now I can finally start jammin' on my 'wants'! Booyah

- Sam
 

Attachments

  • XkHBdV8.jpg
    XkHBdV8.jpg
    106.8 KB · Views: 3
  • XkHBdV8.jpg
    XkHBdV8.jpg
    106.8 KB · Views: 3
  • wSc9qHN.jpg
    wSc9qHN.jpg
    108.8 KB · Views: 4
  • ginLFSX.jpg
    ginLFSX.jpg
    115 KB · Views: 4
  • qcGzBvd.jpg
    qcGzBvd.jpg
    209.7 KB · Views: 3
  • QNuhUbW.jpg
    QNuhUbW.jpg
    185.3 KB · Views: 4
  • BIIwUfh.jpg
    BIIwUfh.jpg
    227.8 KB · Views: 3
  • sE27g4H.jpg
    sE27g4H.jpg
    181.8 KB · Views: 6
  • olqvOWJ.jpg
    olqvOWJ.jpg
    120.9 KB · Views: 5
  • lnb4ylx.jpg
    lnb4ylx.jpg
    226.3 KB · Views: 5
  • XkHBdV8.jpg
    XkHBdV8.jpg
    106.8 KB · Views: 4
  • wSc9qHN.jpg
    wSc9qHN.jpg
    108.8 KB · Views: 3
  • ginLFSX.jpg
    ginLFSX.jpg
    115 KB · Views: 5
  • qcGzBvd.jpg
    qcGzBvd.jpg
    209.7 KB · Views: 4
  • QNuhUbW.jpg
    QNuhUbW.jpg
    185.3 KB · Views: 4
  • BIIwUfh.jpg
    BIIwUfh.jpg
    227.8 KB · Views: 5
  • sE27g4H.jpg
    sE27g4H.jpg
    181.8 KB · Views: 4
  • olqvOWJ.jpg
    olqvOWJ.jpg
    120.9 KB · Views: 5
  • lnb4ylx.jpg
    lnb4ylx.jpg
    226.3 KB · Views: 4
Last edited:
Can I get the measurements of your cooler? I'm not happy with my plate stack type with bottom fittings. Want to see if this will clear my winch. Thanks.
 
This is the cooler itself - Amazon.com

And I'll say this too - I don't know what the burst pressure is for a tranny cooler compared to the low-pressure side of a power steering system...but so far mine hasn't burst so just keep in mind I do not know for certain that this(these) tranny coolers are 'rated' for the low-pressure side of a power steering system...but so far it hasn't blow'd up...

right about 24.5" measured from here -
2MMLbnz.jpg


to here - fittings add about 2 inches -
EWaRtNH.jpg


The adapter fittings are from Russell #648030: Aluminum -6 AN male x 5/8-18 o-ring bump tube -
The hose ends are nice steel units from Allstar #48273 - I like the steel hose ends because they won't gal the threads onto the aluminum fittings and won't deform when tightening...which I've discovered the aluminum swivel hose ends like to do; the Allstar fittings are -6 AN x 3/8 hose
And I used PSC 3/8 low pressure hose - Bulk Hose, Low Pressure

I also have the hoses routed as shown - at first I had the inlet on top but a friend suggested I swap them to help push out any air bubbles -
35MNiTj.jpg


this is how it 'fits' - it's 'tight' but it clears - it's less than 1/4" away from the grille, and about 1/8" from contacting the radiator mounts, but plenty of clearance to the AC condenser -
Xa0khwb.jpg


Also, I cut the original/as-ordered p-side (in my case) dogleg tab and had a standard straight tab TIG'd on - the chinesium aluminum was shit and the original tab seemed to be both welded and soldered on...but my guy got it done -
IemjcIX.jpg


In the factory-intended application the original (d-side) mounting tab matches this configuration...if that makes sense -
x3UreoC.jpg
 
Last edited:
I know all coolers are the same to some extent but that core in particular looks suspicously like an A/C condenser for something small (small tractor, chinese compact car, etc) :laughing:
 
...could be - the internal tubes are not very big...but cumulatively are apparently big enough... (??)
 
...could be - the internal tubes are not very big...but cumulatively are apparently big enough... (??)
According to rockauto, this is a trans cooler. And P/S low pressure side isn't much at all.
Screenshot_20230807_200110_DuckDuckGo.jpg

I might try it on mine. I'm not happy with my setup. Currently setup..
received_2764804863845797.jpeg
 
...could be - the internal tubes are not very big...but cumulatively are apparently big enough... (??)
Oh I'm sure it's enough. I'm just saying it just looks more like an A/C condenser core than a trans cooler core.

I'd have no qualms about using an A/C condesner as a trans cooler if it fit the space right and flowed enough.
 
...also appearing on the long list of 'needs' was a way to fill up the gas tanks (x2)...but there isn't a lot of real estate on the bedside so I had (wanted...ok "needed") to devise a way to easily fill (and vent) two tanks with one filler neck, whilst also incorporating a way to flow fuel from one tank into the other via the fancy filler neck...and this is how I'm intending to do it; keyword = "valves".

Here's the land mass I have to work with...and it ain't a lot -
1099pWK.jpg


I picked up a pair of manual fuel-proof valves, IIRC with Viton seals and stainless hardware, that with a simple flip of a lever will allow me to close off one filler hose and open the other...and vice versa. I really wanted to utilize the fuel fill neck in the stock location (no need to turn the truck around to fill the other tank), but needed two outputs, so I grafted another OE output tube onto the original, then added the valve ends so they bolt on; then added a fresh 3/4" port for the main vent and an NPT port for the eventual aux fuel fill inlet. Close the auxiliary (upper) valve and fuel flows into the main (lower) tank...then when the tank(s) fill up the nozzle should (hopefully/presumably) shut itself off, then I'll close the main valve and open the aux, then hit the nozzle again and fuel will fill up the lower neck and then 'should' flow into the auxiliary tank. When both are full I'll close the aux valve, open the main valve (or I suppose I could leave it closed to prevent fuel from flowing out off-roading)...and motor on - at least that's what I'm hoping will happen 👍

For comparison, here's what the original looks like-
8OLUAKN.jpg


And here's my dual-fill version - Kinda reminds me of something out of a KC-135...and hey I'm retired Air Force so extra kewl points -
kRnzSQ7.jpg


mgtH4it.jpg


Installed; naturally I'll have a flexible 'shield' to keep debris/mud/rain from impacting the plumbing -
Je5Sd0o.jpg


Filling the main tank: main valve open (lever in-line)/aux valve closed (90*)-
vdVDrxS.jpg


...and the opposite to fill the aux tank -
tfZLSgz.jpg


Will prolly haul the truck (or clandestinely drive it) to the nearest gas station to test it all out...
 
Last edited:
speaking of multiple gas tanks....I wanted to be able to maintain both gas tanks and respective plumbing without having to remove the entire bed, so I cut a big hole and using the leftovers from the spare tire trap door made a big access panel to allow me easy access under there -

MVIYPdf.jpg


access to the main tank...
zu1dfZa.jpg


and the aux tank...
WgMwpWk.jpg


bolted up -
Kkd1j5G.jpg


Spare tire cover/trap door is in work now...
 
So I'm thinking about doing a dual tank setup in my future project but going to be a very budget setup and I'm going back and forth on having the shut off valve on 1 tank or none. Chassis is a 1994 ram 2500 reg cab long bed with 35gal fuel tank and I'm thinking of grabbing a 1500 reg cab short bed tank as the aux at 26gal, my thought was to replace the in tank pump in the aux tank to a low pressure one (diesel) and put the output from aux into the fill of the main tank below the T for the aux tank fill. That way incase I am a moron one day and leave the switch on the fuel will just fill up the fill tube up till the T and then start refilling the aux tank instead of overflowing out the main fill. I know with no shut off in the fill tube I will basically have to fill main tank till fuel starts up the tube till it reaches the T then it will fill aux but I'm ok with that. If I did a shut off it would only be on the aux tank so that I can just fill main tank like normal but I'm wondering if there is a issue with this that I haven't thought of that maybe you have.
 
not sure I fully understand your plumbing - can you make a diagram and post it?
 
I'm probably having as hard of a time explaining it lol. I hope this quick MS paint sketch works. Basically aux tank cant over fill the main since fuel would just fill aux tank back up. The possible valve would be in aux fuel fill hose.
Fuel tank plumbing.png
 
yah that looks to be pretty similar to how I have mine plumbed too - I think that should work.
 
...got the big hole in the bed covered up -
2zkpX4s.jpg


...and taking maximum advantage of every cubic inch of available space under the bed...this is what it covers...leaving the entire bed open for gear/sleeping/whatever -
0GWkMbx.jpg


Look close - there's an inflated 40x13.5 Toyo in there - the tire edge 'is' the support for the big access door - works awesome -
Q0dhA52.jpg


od68nvY.jpg
 
I'd try to rotate that through the tires, I bet that muffler is going to cook it a bit if it's always the same part of the same face of the same tire there for years on end.
I see the heat sheild, but I bet it's still gonna get that part of the tire pretty warm on a trail day without much air circulating.

awesome use of space though
 
yup those were my thoughts as well - fortunately all the testing indicates the top side of the heat shield is 'cool' - not hardly even warm, so I think the effects of exhaust heat to the tire will be minimal - I figure as little as a tire in the sun would be. But, yes I do plan to rotate the tires once a season including the spare.
 
Last edited:
...so making brackets from 1/4" plate can be a challenge, especially when bends are involved, and I can really use a way to break 1/4" plate, and I had a decent press, so I made a jig for making up to about maybe 4" breaks, which worked great (so far) for making the rear upper shock towers -

Harbor Freight 12-ton press as the core -
7R4oaBo.jpg


Carved a 90* punch & die set - primitive but effective -
TKRgd2u.jpg


w513ZTo.jpg


8F9yQvo.jpg


Rear shock towers nearly ready to weld on -
Lt42FCj.jpg


OSgITLq.jpg
 
so...progress is going good...and I think the truck will be ready for Chili Challenge in October...and I'm going through all of the '...gee I wish I'd have just done this or that...', and I'm just pondering what's coming up for the truck and posting my thoughts - nothing more.

Electrical. The key switch starts the truck and it'll run until I turn it off, so that's really great 👍 . What I do not know is if the lights will turn on, if the wipers will work, if the door locks will work, if the HVAC will work...or if they will come on for 5 minutes and then turn themselves off after 5 minutes of 'no engine rpm signal' or other such nanny sensor not telling the OBD2 system what's going on. I have no idea, and we're going to plug in headlights and respective dash controls and 'see what happens'. It's just one of the things I'm dreading is all..., but if this Dakota rolls or gets otherwise destroyed and I were to do another truck...well it wouldn't be another 4-door Dakota...
 
got the shocks installed. Fabbed up the axle mounts, and a set of Bilsteins are now bolted in place.

Fronts (8 inches of total flex) -

sgbIn73.jpg


SiiAgvE.jpg


uwdRSK6.jpg


JLLFLgV.jpg


Rears - (12 inches of flex)

n0ZKnST.jpg


j1BZMBL.jpg


vCVtR2Q.jpg


c5ciz3F.jpg


Fhf8mkn.jpg
 
Last edited:
ok - lots of forward progress, and taking the Dak to it's first 'o-fficial' trail ride tomorrow to Chinaman Gulch :dustin: .

Shocks - done
Fuel filler neck dual-feed leak tested and functional - done
Rock sliders - done
Front winch - done
Bed inner wheel wells tacked in place - done

Drove it on the back roads a few miles to the nearest gas station - tested the shut-off valves and no leaks, then filled up the main tank until the handle shut itself off just like it's supposed to - that was huge 👍 .

Bolting together the space tire/wheel and installing the p-side seat today, and then I'll clean it off, then toss in all the gear for tomorrow's run to Chinaman 👍 .

Steering is a bit 'twitchy' when trying to go straight - seems I may need to check the toe-in to see if the tires need a garage alignment - might be causing the 'twitchy' part, or else there's some other fine-tuning needed - TBD.

- Sam
 
alright - we had a successful trail run to Chinaman's Gulch this past Saturday. Had a couple issues but the truck wheeled itself onto and off of the trail under it's own power, and overall is 'felt' really good. It crawls every bit as smooth and sure-footed as its predecessor...and I'm very tempted to carry over the name Big Ugly Dodge...or Blue Uber Dodge...or Big Uber Dakota - a.k.a. "Bud" - I think that's just the name for my truck :)

So - how'd it go. First thing I noticed was after a half hour or so the steering was getting 'sticky'...'jerky'...and it turns out one of the things I apparently overlooked was...and don't laugh...but I apparently forgot to grease the kingpins/bearings on my front D60 knuckles. Yah yah I know. But, fortunately for me, one of our gang just happened to have a mini-grease gun and two extra cartridges...and we pumped it all in and that alleviated most of the sticky knuckles, but they still may need more. Gonna pull the caps and have a look and I won't be surprised if I roached the bushings, but I might have got lucky and caught it before causing irreparable damage. I know I lubed the bushings on assembly, but (apparently) didn't pump it all full of grease - might be some other problem altogether, but in the meantime use my silliness and remember to grease yer joints!

Next - fuel pressure. It appears my decision to place the EFI mini fuel tank under the hood was a mistake - seems it's absorbing too much heat, and the crap ethanol fuel nowadays is simply boiling in the tank and lines...which caused all sorts of havoc on the requisite 60 psi for the Sniper. Probably had to stop a couple dozen times to let the low-pressure pump try to fill the EFI tank with cooler fuel, push out some bubbles, and give the EFI pump enough fuel to run the engine. It took many many many many stop/refuel/go moments but the truck did drive itself off the trail under its own power.

My solution is going to be to relocate the EFI tank under the bed, which should eliminate all of the heat problems, leaving only the actual high-pressure fuel lines along the cab/up the firewall to the Sniper, which I will additionally shield from engine heat...and hopefully that'll solve that problem.

In the meantime, I've tidy'd up a few items, including tack-welding the bed fender wells together, eliminating two giant holes in the bed so my gear won't disappear. I think I'm still good for the mega-trail run called Chili Challenge next month, but that'll all hinge on curing the front axle and fuel pressure issues.

Here's a couple pics, and some from the trail - it's amazing how much room is in the bed now without a giant spare tire taking up all the space...

EKrkqjh.jpg


LJ8KRBf.jpg


8smlPAQ.jpg


2Iys2yj.jpg


QVxPdt2.jpg


2z1u5iw.jpg


Anthony's lifted F150 on 35s did the whole trail without issue - his first time out -
OATYr3E.jpg


Thomas' buggy does whatever he/it wants -
hxvDwRI.jpg


01V0doN.jpg
 
Last edited:
So there's something I just don't understand about my RobbMC PS550 surge tank. First, this is how I understand how it works: the low-pressure pump back at the main gas tank sends fuel into the surge tank (which can only happen if the surge tank is 100% full/'overflowing') - there's no other place for fuel to 'go' other than into the engine it's feeding. It has a return line back to the main tank - fuel just circulates in/out of the surge tank all the time, and it is always '100% full'. In the surge tank is the 60 psi EFI pump, which draws fuel from the surge tank, to (in my case) the Sniper, which is then regulated exiting the Sniper and returns the remaining fuel back to the surge tank. Here are diagrams of the surge tank head unit -

5gAnhjm.jpg


KC19NAc.jpg


WIEZSxQ.jpg


That tiny tiny orifice is the low-pressure fuel inlet from the main tank - that's 'it'. Granted, these surge tanks are "typically" used for racing application...probably primarily drag racing...where 'short sprints' are the norm. In the pure OE form these head units come with a .055 inlet, but for 'longer-term' use they recommended I open it up to a whopping .073" - that is still incredulously small. This surge tank is simply 'another' gas tank between the chassis tank and the EFI, and in my case it is the main EFI tank for all-day-long use. What I cannot remotely understand...is why the inlet port is so friggin tiny? Why would it need to be so small? Why can't it be 5/16" same as the return line back to the tank?

I'm told it is so small to avoid pressurizing the tank, and with it being a fully sealed unit I can maybe understand that, but if the low-pressure return line is bigger than the low-pressure inlet line I cannot understand 'how' it could become pressurized, especially considering there is a 5.9 liter engine drinking from the same container.

Someone educate me on why I cannot/should not open up the fuel feed inlet to at least 1/4"...'cuz me don't understand...

And please don't get me wrong - I'm not knocking this product nor Rob's info or recommendations...I just don't understand why the inlet has to be so small, and once I do I'll probably be better armed to make the best decisions on how to correct the issues I'm having.
 
Last edited:
Aside from your main question on office size, I think your vapor lock is due to the sniper return going into the surge tank. I would replumb the sniper return to the main tank. That way it can clear a lock condition, fresh fuel from tank instead of circulating vapor in surge.

The stock Mercruiser fuel system on my boat was that way. fuel sat in cooler and boiled. Pump would try to recirculate vapor, no pressure, no start. I moved the return to the tank itself and never had another issue. Not coast guard approved.

My truck had fuel boil issues especially when it is 115-120 ambient. Fuel boils at 130-ish, so it's already slightly boiling in tank, parked engine off. Once vehicle is heat soaked, all the fuel in the lines would boil. The recirculation would further heat fuel in tank and boil/pressurize. When removing cap to fill tank, the vented cap would blow off and shoot fuel vapor in your face.
To fix I completely replumbed and moved all the fuel lines to the left side where there is no exhaust. Now it is better but still hear cap hiss in 115+ shorts stops/restarts.
 
I would think the tiny inlet hole at the top of the surge tank would aerate the fuel. note the return line on an OEM tank is at the bottom to avoid this. I would drill out and put in a tube to the bottom, or get rid of the surge tank altogether. I know delete causes problems with dual tanks setup.
 
I figured it was time for a few other opinions, so I poised this question/issue to a couple other mfg's of surge tanks and the consensus is so long as there are no blockages running the same size line in/out should not pose any problem to the surge tank's performance, along with there is no chance any engine could run for minutes to hours on end with a .073" fuel feed line. So, along with relocating the surge tank to under the bed (no where near the exhaust), I'm going to open up the low-pressure outlet port to 3/8" and the inlet orifice to 5/16". I'll run 3/8" HP lines to/from the Sniper...and press on.
 
Another great thing about this past trail run was the truck ran cool all day long - it ran 180* all day - never got over 185* the whole day, and the power steering similarly ran cool - no issues at all. Also, overall the truck 'felt' really good, and of course not having the loud 'diesel' 6BT sound was not missed at all - the diesel rattle was awesome...but wanting/needing to put in ear plugs to make the trail run more enjoyable got old pretty quick.

One of my #1 goals was to have the engine 'behave' just as well as it did before taking it all apart, and I'm extremely happy to report that goal was achieved. The Sniper felt "OE" - just how I wanted it. I never noticed any 'hick-ups' with the Sniper or any of the associated components - not once - it acts and does what my brain 'expects' it to do, which was outstanding.

The tranny also felt 'perfect' - again doing what I expected it to do.

The Atlas...lemme just say that having LOTS of gears is fantastic. I have two gearing options available: 3.8 in the main case and a 2.72 doubler - it's a 'similar' setup to a 203/205 doubler. I was in 3.8 most of the day, and when the steep descents came along I'd throw in the doubler, and the total of 10.34-1 double-low gearing made the steep descents effortless - the engine would just 'hold' the truck back even coming down the other side of big rocks - all under control, and all I had to do was steer. It's awesome.

Meanwhile, I've got the surge tank relocated to under the bed and I'm redesigning the fuel lines - should have it all done in about a week. Then on to check a couple other items, and continue prepping for Chili Challenge...which I hope to be heading back from one month from to-day.
 
Last edited:
reinforced both sides of the front bumper with another tube and added a chunk of 1-1/4" plate (which also serves as the D-ring mounts), and the front lights are bolted on. Fuel lines are almost done and I'm hoping to re-test it this weekend.

6XhxrwT.jpg


gauY7hn.jpg
 
Last edited:
Top Back Refresh