What's new

The 3D printer thread

After hacking the giant tail assembly on my Honda dual-sport, the license plate was just kinda dangling out there. It seemed ok with that for a while, then it started fatiguing and cracking from the stress of holding itself up. I was going to try to stiffen it with some thin aluminum, but I didn’t have any handy, and tractor supply is almost 15 minutes each way. So, instead, I drew this up in maybe 30 minutes, then it printed for an hour, then I figured out it wouldn’t quite fit, I redesigned it, printed it again, and bolted it up.

As with most of my projects, I saved negative time. But damn, is it satisfying sitting at the desk with a pair of calipers to figure out what size it needs to be, drawing it up in absolutely the least efficient manner possible, and then printing out exactly what you told it to do. It’s satisfying—you guys should start messing around in OnShape and order a printer.


2F0EA81F-3392-4951-8A1D-9E66B61DDBAE.jpeg
 
After hacking the giant tail assembly on my Honda dual-sport, the license plate was just kinda dangling out there. It seemed ok with that for a while, then it started fatiguing and cracking from the stress of holding itself up. I was going to try to stiffen it with some thin aluminum, but I didn’t have any handy, and tractor supply is almost 15 minutes each way. So, instead, I drew this up in maybe 30 minutes, then it printed for an hour, then I figured out it wouldn’t quite fit, I redesigned it, printed it again, and bolted it up.

As with most of my projects, I saved negative time. But damn, is it satisfying sitting at the desk with a pair of calipers to figure out what size it needs to be, drawing it up in absolutely the least efficient manner possible, and then printing out exactly what you told it to do. It’s satisfying—you guys should start messing around in OnShape and order a printer.

2F0EA81F-3392-4951-8A1D-9E66B61DDBAE.jpeg
I just bolted the plate right to the fender in a barely visable angle like god intended
 
with a enclosure too? sorry if i messed that
I have my voron mostly enclosed and I put the doors on it when I do ABS+. But i also used my ender and just tossed a box over it.

It's mostly about not having stuff blown on, so if its near a vent or a door there is more to deal with.
 
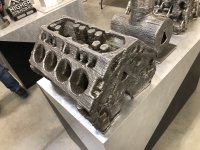
I was at Lincoln Electric a couple weeks ago for a class. They gave us a tour of their additive manufacturing department. Basically they are developing software to turn weld robots into 3D printers. They had a bunch of sample parts on display. This is an LS engine block. They said it was printed just because they were testing some tool path stuff. I think they said the largest part they have made so far was 8000lbs.

9E80CE45-963B-4C5A-AC63-5ECDE6BA3A40.jpeg
my brother works at boeing and they have an entire additive manufacturing division now.

There's 3d printed parts certified for flight in 777 and they're working on replacing old chinook parts with 3d printed pieces.
 
I worked on a machine that did that for steam turbine blades. You set it up on a track on a perimeter of the turbine, fed the software a CAD file for the blade profile and it would do a lap with probes and a laser scanner figuring out what was missing, do a lap MIG welding, repeat. Then you drop a milling spindle where the welding head went, do the usual calibration song and dance and it would bring the mess back to spec. This was in 2015. IDK if they ever got it refined and fast enough to use in the field.
 
My next post will be how I started drinking...

Back to attempting 3D printing...
I got a new spool of pla and a desiccant container for it. I spent a lot of time leveling the glass bed and found it had a 8 tin foil layer low spot in the center.
After fixing that and re-leveling many times I got some consistent layer heights and bumping to 60c bed temp seemed to help adhesion.

So here we are it's going well, this first print I'm foolishly trying 100% infill.

1000005525.jpg


1000005527.jpg


Working on building the Jaxe ADV Bar Buttons.

1690055243021.png
 
My next post will be how I started drinking...

Back to attempting 3D printing...
I got a new spool of pla and a desiccant container for it. I spent a lot of time leveling the glass bed and found it had a 8 tin foil layer low spot in the center.
After fixing that and re-leveling many times I got some consistent layer heights and bumping to 60c bed temp seemed to help adhesion.

So here we are it's going well, this first print I'm foolishly trying 100% infill.

8 tinfoil:grinpimp:
I measure by papers:laughing:
 
I use a .013mm feeler gauge to level my machines. And I don’t use glass beds on any of them. Magnetic PEI flex sheets only for me.
Feeler gauge is smart.

I got a pei magnetic sheet today in the mail with the other stuff, I'm worried about the flatness or lack there of just putting it on the platten. With the glass it seemed easier to get it it consistent.
Anyone put the magnetic sheet on top of the glass?

just get a BL or CR touch probe.

makes life easy.
That's what I intended to do but I think I need a driver board update to handle the 10 point auto leveling. Maybe not need to look into it, that might solve my concerns in the above post.
 
Attempting a "temptower" now.
I'll probably fuck it all up trying to "improve" it.
 
Well this is what I was having before, at some point in the print it breaks loose.

Might just need to install the pei plate?

I can't tell much difference from 200-210 so I upped it to 205, maybe that helps?

1000005534.jpg

1000005535.jpg

1000005536.jpg
 
Well this is what I was having before, at some point in the print it breaks loose.

Might just need to install the pei plate?

I can't tell much difference from 200-210 so I upped it to 205, maybe that helps?

1000005534.jpg

1000005535.jpg

1000005536.jpg

Try printing with a raft. It helps the part adhere to the bed and will prevent it from breaking loose during the print.
 
I guess it's important the clamp I printed was at 62c bed this was at 50c...
So maybe I need to up the bed temp?

The bottom of the clamps had some taper, opposite of elephants foot, I haven't looked up how to fix that.
 
Does the raft help with the tapering?
It’s creates a small platform then prints on the platform. This Alicorn was having trouble being pulled from the build plate before I tried printing it with a raft. Most softwares have the options in the Adhesion section.
image.jpg
 
It’s creates a small platform then prints on the platform. This Alicorn was having trouble being pulled from the build plate before I tried printing it with a raft. Most softwares have the options in the Adhesion section.
image.jpg
My printer is doing another raft for a different piece right now
image.jpg
 
Top Back Refresh