What's new

The 3D printer thread

I'm still making mostly knickknacks and stuff with my printer. My wife works in an ASD classroom, so for valentine's day yesterday I made a plateful of heart spinners for her to give to the kids, and some earrings for her coworkers, and a set of rose earring for her.

20240203_192527.jpg


20240213_224346.jpg


20240213_234449.jpg
look at what Pirate has sunk to
 
Kid bugged me for about a week, pulled the prusa mini plus off the shelf. Sat with a roll of PLA for at least a year and a half.

Fired right up, re ran setup wizard and started making knick knacks. Replacement controller cover, 20 sided dice, novelty shapes etc. Kid has been plating around with scaling, resolution, times and all the settings in the slicer program, all using pre-made stl files.

Pretty neat.

Smart, it gets them thinking.

Making some wheels and trucks for some mini carts/pallets that I am building. The idea is to have a 1/8" steel plate about 2'x2' with wheels so I can put stuff on the carts and easily roll them under a shelf instead of piling stuff under there and never seeing it again.

20240219_202051[1].jpg
 
Last edited:
I purchased our printer when the kid got to the math in school that she started asking 'when am I going to need to know this"
here is your printer

then she went 'oh!'
ok, now I get it :laughing:
 
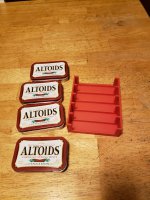
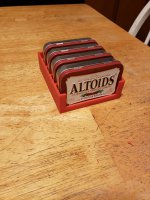
Need one more tin for the complete set.

Still can't get the smell out.
 

Attachments

  • 20240219_032743.jpg
    20240219_032743.jpg
    2 MB · Views: 14
  • 20240219_032728.jpg
    20240219_032728.jpg
    1.8 MB · Views: 15
Here's the cart with the wheels on. Rolls real easy. Still need to weld the handle on and paint.

20240220_210330[1].jpg


Here's the finished storage cart. Amazon never sent the M5 nuts so I 3d printed my own. Surprised at how tight you can torque the nuts before the plastic strips out. Trucks, wheels, spacers, bearing retainers all printed in PLA on an BBL X1C. Bearings are skateboard bearings off Amazon. Cart/truck assembly all designed in F360.
20240315_152313[1].jpg


Here they are in use. I (230lbs) can stand on one and it still easily rolls. I do question if the 3d printed wheels will eventually get flat spots on them from sitting with that much weight on them.
20240407_141149[1].jpg


Edit: Added final pictures of the cart.
 
Last edited:
I'm currently putting together some dry boxes I can print from directly and looking at the various designs got me wondering, is there any actual benefit to using a bearing based spool holder Vs the standard pole through the hole style? I can definitely see the disadvantage of the bearing ones spinning too freely and allowing the spool to uncoil under it's own springiness a create tangles but friction wise with standard hard filament types I can't see any real advantage.
Any thoughts/experience from the collective?
 
I just have a piece of conduit on my stand a d have zero issues. When it has an issue with filament feeding it's is always a bad load from the factory where the filament gets under another wrap and jams.
 
I'm currently putting together some dry boxes I can print from directly and looking at the various designs got me wondering, is there any actual benefit to using a bearing based spool holder Vs the standard pole through the hole style? I can definitely see the disadvantage of the bearing ones spinning too freely and allowing the spool to uncoil under it's own springiness a create tangles but friction wise with standard hard filament types I can't see any real advantage.
Any thoughts/experience from the collective?

I just have a piece of conduit on my stand a d have zero issues. When it has an issue with filament feeding it's is always a bad load from the factory where the filament gets under another wrap and jams.
I don't think it matters your method, but you should re-calibrate your extrusion multiplier after setup because friction will vary on your feeding methods.
 
I don't think it matters your method, but you should re-calibrate your extrusion multiplier after setup because friction will vary on your feeding methods.
Makes sense, apparently my bougie printer does that itself so I suppose that's one less thing to run repeated tests for.

To make things simple, K1 Max introduces AI LiDAR for the pressure advance. It takes advantage of an end-to-end deep learning neural network and an attention mechanism similar to the selective visual attention of human beings. The whole process goes like this. K1 Max prints a simple zigzag test model. The AI LiDAR scans the test model to form a digital model. Algorithms analyze the key details relating to under-extrusion and over-extrusion by comparing the digital model to the original G-code file. Then, an optimal pressure advance (PA) value is applied to balance the extrusion at the start and end. All in all, the AI LiDAR can minimize over-extrusion and under-extrusion for best print quality automatically.

ai-assisted-pressure-advance.jpg
 
I'm currently putting together some dry boxes I can print from directly and looking at the various designs got me wondering, is there any actual benefit to using a bearing based spool holder Vs the standard pole through the hole style? I can definitely see the disadvantage of the bearing ones spinning too freely and allowing the spool to uncoil under it's own springiness a create tangles but friction wise with standard hard filament types I can't see any real advantage.
Any thoughts/experience from the collective?
bearing style is what came with my printer, never had any issues with it attempting to free roll. I figure the less stress/resistance i'm putting on the little filament gears, the happier they should be.

doubt there is a verifiable difference for the average user
 
I printed some bearing style ones when I first got my printer. Been working fine for me.
 
Here's a stupid question that Google hasn't been able to readily or definitivley answer.

I just added the CR Touch probe to my CR-10 V2 and updated to Creality's latest firmware for the probe. Now when I auto home it puts the probe more or less in the center of the print bed instead of the nozzle in the corner like it used to. I assume this is what it's supposed to do now? It hits the X & Y limits like before but instead of stopping in the "origin" it now shoots over to center the probe.
The Creality machines I work with that have auto level set the Z in the center of the bed. Doesnt matter where as long its the same reference point every time, and goes through auto level like its supposed to.
 
  • Like
Reactions: Lee
I'm FINALLY getting decent prints on the CR-10V2 again, down right amazing prints compared to what I was getting. There's room for improvement but the upgrades, "down grades," and new parts have me back in business.

Biggest improvement, I ditched the Micro Swiss nozzle and went back to a factory replacement Creality nozzle, set my G code extrusion back to stock too of course.

Probably the next best upgrade are beefier die springs on the bed level adjustment screws. I don't know if I got a lemon, but the original springs never held much tension with the bed trammed. I made shims out of some rubber gasket material to increase tension, but I ditched the stock springs and DIY shims for some skookum springs. Very happy with how solid the bed is now and I'm not having to retram it every five minutes.

1000000340.jpg


I added the CR Touch probe and requisite firmware like mentioned before. I'm not going to admit how many times I crashed it setting my Z offset after installing the sensor, Creality's Chinglish instructions were a challenge. Thankfully some nice folks way smarter than me made some YouTube videos to follow. I added a G29 code in my machine parameters so it probes the bed before every print now too.

1000000341.jpg


1000000342.jpg


I put a new magnet pad and textured, flexible, bed on since my old one was kind of beat up. After my Z offset saga though, my old flexible plate is in better shape than the new one.

I printed a PETG Benchy right away and was mostly happy with it, made some slicer adjustments and made a real part.

This is to hold a hose and data cable in a panel mount gland nut. Gland nut needs to be big enough for the sensor to get through and the sensor's cable is preterminated with a non-servicable big barrel connection, hence clam shell design. I made it snap together like Legos.

1000000344.jpg


1000000345.jpg


1000000346.jpg


I giggled a little when the two halves snapped together. Very satisfying!

Thanks everyone for all the help with this stupid thing! :beer:
 
Some of the stuff I’ve been cranking out lately. Getting stocked up and heated up for event season. The Mew is life size and absolutely huge. The storage boxes I designed myself in fusion 360.
IMG_0124.jpeg
IMG_0122.jpeg
IMG_0108.jpeg
IMG_0094.jpeg
IMG_0090.jpeg
IMG_0077.jpeg
IMG_0074.jpeg
IMG_0065.jpeg
IMG_0062.jpeg
IMG_0051.jpeg
 
Still haven’t bought a printer, but everyday the want grows.

Not strong enough for most rifle cases,
GIqaGC5WQAAXq8-.png
GIqU5GNWMAAlVRC.png
 
Powder coated lead. I don’t know why baby blue is so popular, I think it looks dumb. I use hi tek something green. Has a nice metallic shimmer.
 
How and why do I want to use different filaments?

I've only used PLA so far. I want to print a vacuum dust cyclone for a 5gal bucket.

Seems a lot of people are using PET?

If anything I was considering "tough PLA" or ABS because it's going to be used with a sand blaster cabinet.
 
How and why do I want to use different filaments?

I've only used PLA so far. I want to print a vacuum dust cyclone for a 5gal bucket.

Seems a lot of people are using PET?

If anything I was considering "tough PLA" or ABS because it's going to be used with a sand blaster cabinet.
Some materials have different properties that make them better for some things. I use PLA the most, but if it’s something that’s going to be outdoors or see some heavy use, I’ll go with PETG, PETG-CF, or ABS. PETG has a higher heat resistance, chemical resistance, and up resistance than PLA does and is generally stronger. ABS is even more so. Still, walls and infill give strength so bumping those up helps a ton too.
 
I use PETG for its higher temp and UV resistance, since a lot of stuff I'm making is for outdoors.

ASA would maybe be a better option for me, but when I started down this path I didn't know it existed. I knew folks used ABS and PETG for outdoor prints and ABS is supposed to be a nightmare to print so I chose PETG.

PETG has more or less done what I need it to. 🤷‍♂️
 
Last edited:
Depends on use and price, everything has their place.

Petg v abs.

Abs prints faster and is vapor smooths, uv stable and cheap. Downside it stinks and fumes are not great for you. This is what I use for anything that’s not a knickknack.

Petg is more chemical resistant and slightly more durable with less fumes.
 
What about pet VS this "tough pla"?

I watched a vid where a guy made a press brake tool out of it and it survived rather well.

I don't know a thing about pet
 
Top Back Refresh