I HATE PONIES
Well-known member
- Joined
- May 20, 2020
- Member Number
- 813
- Messages
- 151
As an aside...Do I need to delete the file and start over or will it now print in the center of the bed with no crashing like it should?
Follow along with the video below to see how to install our site as a web app on your home screen.
Note: This feature may not be available in some browsers.
I would re-slice it and reprint it. When the program slices it, it includes the "Printer setup" in the slicer, that is the bed dimensions, max bed height, extruder settings, etc in the g-code file. You said that the last time you went to print it the hot end started jumping around and making weird noises, that is probably because those settings were incorrect for your printer.As an aside...Do I need to delete the file and start over or will it now print in the center of the bed with no crashing like it should?
That should print fine as one piece. The only issue I see with printing is the round holes the cross piece goes in. Make the round holes hexagon and it will print fine or size them where you can clean them up with a drill bit. I have some ASA loaded up now printing an under-hood bracket for my winch install. Post the file, I'd try it just for the hell of it.For those curious, this is what my model is at at the moment. It's a multibody model that wil be split into 4 parts. The white part can be disregarded. It is off the shelf hardware. The others will be screwed together. This way they can all be printed flat for the best finish. Dimensions are about 3" cubed.

I model pilot holes and post print drill them. I learned to do that for my professional jobs. Oval holes and artifact lines in holes are tough to avoid unless you have a high dollar machine.That should print fine as one piece. The only issue I see with printing is the round holes the cross piece goes in. Make the round holes hexagon and it will print fine or size them where you can clean them up with a drill bit. I have some ASA loaded up now printing an under-hood bracket for my winch install. Post the file, I'd try it just for the hell of it.
Here's a pic of the bracket. It holds the winch power disconnect just above the passenger side battery. The Red one is ASA, the Grey one is PA6-GF.
![20240124_153301[1].jpg](https://irate4x4.com/attachments/20240124_153301-1-jpg.804413/ "20240124_153301[1].jpg")

I have a network of printers around the country. They do great work. Just send me your .stl and I'll quote it.Think' the same as rugger. I can't get a printer yet, so I may have somebody here print me some stuff.

It'll beat Xometry, right?I have a network of printers around the country. They do great work. Just send me your .stl and I'll quote it.
I'll have to quote there and Protolabs and see how they compare.It'll beat Xometry, right?
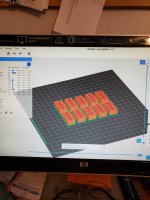
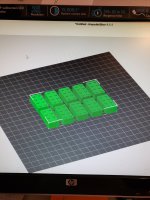
When I click the link the page opens and says file deleted. Probably me messing something up.Alright, here's a link to the model. I say let's coordinate printing in the open here. At least a couple of you are willing. What I don't want to do is get 3 or 4 prints and then I'm into shipping for all of them. I'd like to get the best quality that I can. But, you know beggars and what not.
Let's see how it slices and what you guys think. It should need minimal support. Volume is 5.64 cubic inches. Dimensions are 3" x 3" x 2.7" tall. I'll be needing qty 2. Let me know if you have download issues. Thanks in advance!
I guess you guys deserve to know what it is going on as well. It's my sailboat restoration. I'm racing it for the first time in the Winter series, and these will be my spinnaker pole mounts on the forward deck.
Tinstar
chaplinfj60
Great points, I agree mostly. That Grey bracket I posted above is PA6-GF or glass filled nylon. Its incredibly tough.That’s an attractive design, rugger, but I wonder if it will be strong enough for your uses. How does it mount to the boat’s deck? I would at least tend to think that you’d want even more material around the top shaft to help with it tearing out. And if you’re bolting through the bottom plate, I’d make it thicker and maybe give it some reinforcing ribs or something. I’d definitely print this as one piece to get a feel for its strength before worrying about how the finish looks. You typically can’t screw anything into this stuff with any strength, so the 3 piece setup probably weakens the thing.
I’m assuming this piece would normally be made for glass-reinforced nylon or something? If so, you have substantially less material strength to work with with most printable plastics.
Note that the strongest UV stable material that I mess with is PETG—my printer can’t handle the hotter ones yet. So maybe the more exotic ones are stouter.

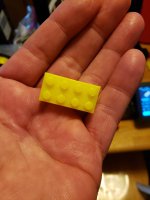
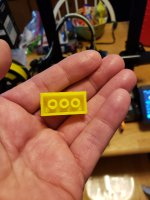
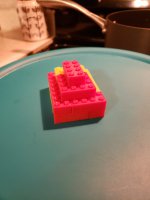
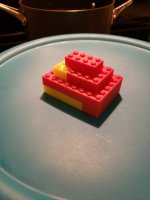
Nice work!The blocks fit together a little loose but they do fit together.
Now that I can get the system to work I can start fine tuning it.
I used PTEG for the lego.Nice work!
Run a caliper over the dimensions. Might be a simple shrinkage compensation factor in the slicer software to get to the modeled size.
For instance, on my machines, PETG requires a shrinkage compensation factor of 100.5 to get modeled dimensions on the printed part.
Shit....I hadn't thought of that.how do you know they fully function as a lego?
Did you even step on one?

PLA will shrink less. Around .2 or .3 %. Each brand can be slightly different.I used PTEG for the lego.
Will PLA give better results on actual size or should I edit my model?
I believe you can post a .zip file here containing the .stl, if that helps any.That's odd. It's a free file hosting site. I can't follow the link now. We can switch to email if you guys want to message me your emails.
Yeah, I was being a bit weight/material conscious. This works in compression but could see side loading under some conditions. It is just for stowing the spinnaker pole so no dynamic loads unless a line gets snagged or it is stepped on which is likely. Since weight is not a great concern maybe I'll beef it up some. It is a single piece design. The different colors are representing different bodies within Creo.
forts need a flagFort