What's new

glacially slow machine shop build

This is in fact an oddball shit lathe seeing as nobody was proud enough of it to cast their name somewhere. :laughing:

I'll try to remember to pull the measurements today.
 
I'd blue up the 4mt and stick it in and see what kind of contact pattern you get. If it's only around the larger part of the taper, I'd bet you're dealing with B&S.
 
I'd blue up the 4mt and stick it in and see what kind of contact pattern you get. If it's only around the larger part of the taper, I'd bet you're dealing with B&S.
The way he said it didn't get tight til the end (don't they all? But I understood) with the MT4 tells me it's a different taper
 
4MT bottoms out before there's any contact on the part of the taper that's supposed to make contact.

5MT doesn't fit at all (because the small end is too big).

Oh, and I don't have any conveniently sized round stock in the usual places. I'll keep my eye out while I'm cleaning today.
 
If youre crafty, you can use a pair of indicators to measure the angle of the taper using the cross slide
 
4MT bottoms out before there's any contact on the part of the taper that's supposed to make contact.

5MT doesn't fit at all (because the small end is too big).

Oh, and I don't have any conveniently sized round stock in the usual places. I'll keep my eye out while I'm cleaning today.

I've got a pile of random B&S tooling and adapters. Mostly smaller stuff for a jig bore, but there's a handful of #10 stuff mixed in. At a minimum, I can get you to a smaller MT. If you can verify the taper, I put them aside for you.

You should be able to mount to a TDI on your carriage and touch it to the outer part of the taper. Move the carriage in an inch or two and calc the taper rate by how much the TDI moves over that distance.
 
Watched eBay for a month and got my hands on a cheap B&S #10 tool.

Turns out it's not that.

It seats at the small end but the taper is about ten thou wider at the top end (I just crammed a bunch of feeler gauges in there) about 4.25" away which gives me a taper of .045xx per inch assuming I'm off no more than one thou on the slop measurement and no more than .01 on the length.

(0.04301 * 4.25 + .010) / 4.25

attachment(136).jpg


Edit: Went through my American Machinist Handbook, 2nd edition. Nothing in the .04x per inch ballpark other than B & S
 
Last edited:
Sounds like you're going to have to either make an adapter to get it to the next size down MT and live with it.....or maybe get lucky and find a taper that you can ream it out to?
 
I almost wonder if it’s B&S but with 100yr of crud causing the small end to seat early.

In any case the small end does seat and locate the tool so I can probably green loctite in a reducer sleeve or something. :laughing:
 
Find a ream in B&S #10 flavor, light ream of the existing taper?
 
Yeah I was considering that in the back of my mind.

A taper I can't get tools for is worthless so....

I think your best bet is going to be to ream it (or clean it?) out to B&S 10 and find or make an adapter to get you to MT3. Not ideal having to go to a smaller taper on that big of a machine, but it'll at least give you something usable.


What do you plan to use the taper for? You CAN get B&S #10 dead centers so that'd let you turn between centers. And you should be able to get #10 to weldon shank holders if you wanted to do some goofy milling or make an adapter for something.


What's your tailstock taper?
 
I primarily want to be able to use centers but I also want to be able to adapt down to one of those 4" mini lathe chucks since my big chuck won't hold under 2" and double chucking is kind of a pain.

I agree the first step is to clean it.
 
I primarily want to be able to use centers but I also want to be able to adapt down to one of those 4" mini lathe chucks since my big chuck won't hold under 2" and double chucking is kind of a pain.

I agree the first step is to clean it.

How would you secure the mini chuck? With a drawbar?


Is your spindle threaded? I'd just make or buy adapters off that for other chucks or collet holders.

I made an ER32 collet holder for my craftsman that threads on to the spindle. If my work fits in a collet, I use that over a check whenever I can.
 
How would you secure the mini chuck? With a drawbar?
IDK yet. Maybe that, maybe a bracket that attaches to the existing chuck/faceplate.

Is your spindle threaded? I'd just make or buy adapters off that for other chucks or collet holders.

Somewhere under the adapter the chuck uses. It's a huge thread and I'm not gonna pull the 24" chuck every time I wanna turn small parts though.

I'd make a fixture that makes it "easy" to double chuck before I did that.

I made an ER32 collet holder for my craftsman that threads on to the spindle. If my work fits in a collet, I use that over a check whenever I can.
Yeah, collet chucks would be nice but being able to turn centers and being able to quickly and easily chuck small stuff are higher priorities.
 
Somewhere under the adapter the chuck uses. It's a huge thread and I'm not gonna pull the 24" chuck every time I wanna turn small parts though.

I'd make a fixture that makes it "easy" to double chuck before I did that.

That's such a weird machine. Huge spindle thread but only a 1.25" through hole?

Why not just throw a 6" 3-jaw in that 4 jaw and dial it in and be done with it? I'd kind of assume you'll be working on small stuff more than big any way.

Hell, even an ER or 5C collet block in the 4-jaw. Stick a piece of drill rod in the collet and dial it in. Should be able to do that in under 5 minutes.


I use the shit out of these between the mill and lathe.
3900-5123__48774.1490188264.jpg


Yeah, collet chucks would be nice but being able to turn centers and being able to quickly and easily chuck small stuff are higher priorities.

If you get it cleaned out and determine it's #10, I'm pretty sure I have some #10 centers in my "why the fuck and I keeping these?" bins.
 
That's such a weird machine. Huge spindle thread but only a 1.25" through hole?
It's not a through hole. The spindle is solid. This mfer is old.

Why not just throw a 6" 3-jaw in that 4 jaw and dial it in and be done with it? I'd kind of assume you'll be working on small stuff more than big any way.
Seems like it alternates between big and small often enough that I'm getting annoyed with that arrangement. :laughing:

Hell, even an ER or 5C collet block in the 4-jaw. Stick a piece of drill rod in the collet and dial it in. Should be able to do that in under 5 minutes.


I use the shit out of these between the mill and lathe.
3900-5123__48774.1490188264.jpg
I pretty much never use collets for holding the work for whatever reason. I always go for other stuff first.
If you get it cleaned out and determine it's #10, I'm pretty sure I have some #10 centers in my "why the fuck and I keeping these?" bins.
I'll keep that in mind. I'm strongly considering reaming it out to #10.
 
Finally got the crane beams tied down. Trolleys for the traveler should be here later this week.

attachment(55).jpg
 
Made a push to get the travelers up over the weekend. Got it done. Dropped another $240 on trolleys and hoists so I can actually use it at some point later this week.

So the pipe on the Vevor 1-ton trolley is just 3/4 pipe. I omitted the washers and stuck a length of whatever was around on there.
attachment(80).jpg


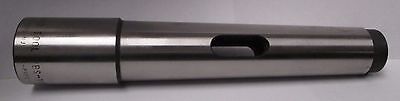
Then because 1/8 wall isn't enough I drilled out some 1" nominal pipe to 1-1/6 to fit over all the 3/4 nominal. I love my 1/2" square to ER32 adapter. Everyone should make one.

attachment(81).jpg

The fixture squeexed the pipe enough it wound up being a press fit. Whatever, doesn't need to be accurate just needs to work. With the pipes it adds up to ~1/4" wall worth of metal for shit to ride on.

attachment(82).jpg


I made the brackets that bolt the traveler the trolley. The extendo jaws work great for welding shit like this. Tubes are 1/4 wall from the ROPS of the forklift I parted out recently. There's like 1/8" of slop between the ID of the tube and the 1" pipe on the trolleys.

If I had the luxury of being able to move the fixed beams around a bunch I would have just welded the trolleys straight to the travelers and skipped all this shit but I knew I was gonna need joints that could be adjusted.
attachment(83).jpg


Steam pipes came in real handy. Climbing a ladder with one of these on your shoulder is kind of a bitch.
attachment(85).jpg


Radio was the only casualty. The chain that holds the beam keeps the zip tie from fully engaging the screw it hangs on so it got bumped off when I hit it getting the beam up.
attachment(86).jpg


I'm really happy with how the joints came out. I can shim under the bolts for perfect level and I can shim either side of the tube to get the beam shifted about 1" left or right as needed.
attachment(84).jpg


I still need to remove the steam piping and re-route gas, one hose bib and a little bit of electrical in order to get the full travel out of it but that's all easy shit I can do without breaking a sweat. :laughing:

I'm pretty sure this gives me the 2nd biggest shop crane on IBB after Panzer. :flipoff2:
 
Last edited:
Crane still works great, especially for hanging engines and other shit over an oil pan and for putting shit on the table. Still need to remove steam piping to get full travel.

In retrospect I should have used two trolleys at each end like this since with the current configuration it's possible to push one end and wedge it but not bad enough that I can't just push the end so other than being kind of clunky to work with it's really not a problem and therefore I'll probably never fix it.

Screen Shot 2023-07-18 at 7.32.54 AM.png
 
How much of the beam do those Vevor wheels ride on?

I'm back working on trolleys for my hot riveted beams and only have 7/8 inch of lower flange available before the rivets get in the way.
 
Ugh, enough. Maybe 3/4. Definitely not a full inch. I'm on vacation right now. I'll measure when I get home.
 
Is there any reason to hard mount a rotary phase converter motor vs rubber insulators?

Is there any reason a car tire on its side wouldn’t do the job well?

I’m using two 15hp motors to get 30hp worth of amperage. Motor location will either be under the three season porch or the basement stairs so I’m not hard pressed for space like I normally am. Controls and caps box will be elsewhere.
 
The rotor is balanced, so the motor will be fine regardless. It could be bolted to a concrete slab and it'd last damn near forever. I think the reason why rpc suppliers suggest mounting to rubber is to reduce noise.

IMO, no issues, full send.
 
Is there any reason to hard mount a rotary phase converter motor vs rubber insulators?

Is there any reason a car tire on its side wouldn’t do the job well?

I’m using two 15hp motors to get 30hp worth of amperage. Motor location will either be under the three season porch or the basement stairs so I’m not hard pressed for space like I normally am. Controls and caps box will be elsewhere.
Mine is sitting on a harbor freight furniture dolly. Only reason for a shift mount would be if you're worried about vibration and noise carrying through the shop or house.
 
NVH is what I'm worried about. I figure placing them on rubber on concrete should solve everything but the N and I can just throw mass at the underside of the stairs if the noise is an issue. No idea how loud these particular motors will be since I've never run them but they're both fully enclosed cases so I'm hoping they'll be on the quiet side for their size.
 
Top Back Refresh