What's new

'56 willys truck

Working on the cooling system after reworking the radiator frame. So see the pic with the Reservoir and me pointing at the black line on the reservoir, that would be the new fill line (= top of radiator)vs where the seam of the tank is. Does anyone have an opinion on if it’s ok or do I need to raise the reservoir so the seam is = to top of the radiator? I really don’t want to raise it any higher, so if it’s a must then I may think hard and heavy on tilting the radiator more.

Poser shot of the new tranny and the plan is to shove it in tomorrow if the weather permits.
 

Attachments

  • 3EB8A83F-BEF8-46C4-A2F7-FDBA59499F0D.jpeg
    3EB8A83F-BEF8-46C4-A2F7-FDBA59499F0D.jpeg
    1.5 MB · Views: 20
  • 418F522C-73E2-4566-8114-48F21A0E6C98.jpeg
    418F522C-73E2-4566-8114-48F21A0E6C98.jpeg
    2.1 MB · Views: 19
  • E31F8B87-6E12-44F4-9734-7B71943C4F81.jpeg
    E31F8B87-6E12-44F4-9734-7B71943C4F81.jpeg
    1.9 MB · Views: 19
  • AE28004B-E452-4D80-B562-5B8EB46AAA52.jpeg
    AE28004B-E452-4D80-B562-5B8EB46AAA52.jpeg
    2.3 MB · Views: 17
Tranny is in— Circle D torque converter & flex plate are ordered and are to be here around the 2nd week of July. I still have the cooler lines, dip stick, wiring and fluid fill on the tranny to do list.

So I removed the OEM tranny cooler lines fittings in the radiator and replaced them with the -06 fuel line to -06 flare. I cut the fuel line side down about ⅛” to duplicate the OEM fitting threaded side and chamfered it, but I have a feeling that those OEM fittings help hold the coolant in and also seal the tranny fluid tank inside, cuz the tank moves around. So I have some research to do on that and I’ll have to get some radiator hose and some ¼” or ⅜” hose for the other ports to make block off hoses so that I can fill the radiator.
 
Ok, so my buddy Dennis and I filled the radiator with water & the new radiator tranny cooler -06AN fittings do indeed let the water leak by them, so we think there’s an o-ring seal on the tranny cooler inside the radiator that seals up against the radiator when you tighten down the fittings because the old one has a flange on it. So we decide to see if we added a washer, which had to be thin, to the -06AN fittings to see if that would allow the tranny cooler to be pulled up tight to the radiator to seal it and so far it has worked. Of course there’s no pressure in the system so the jury is still out if I use the -06AN fittings or go back to the OEM fittings and get the ends and put a flare one them or a compression fitting so that I can use hose for the routing to the transmission.

I also finished putting together my super jacks to assist in coil-over spring removal and install and they work, so I’m stoked about that.
 

Attachments

  • 477E2AAD-D8FB-4D97-94F2-9B434178409A.jpeg
    477E2AAD-D8FB-4D97-94F2-9B434178409A.jpeg
    1.1 MB · Views: 19
  • 08EB7C96-6020-4EA8-8BB9-888E212D3741.jpeg
    08EB7C96-6020-4EA8-8BB9-888E212D3741.jpeg
    1.9 MB · Views: 19
  • 94460193-C056-4E31-8147-CDC28ED7909D.jpeg
    94460193-C056-4E31-8147-CDC28ED7909D.jpeg
    2.5 MB · Views: 19
Been working on the radiator reservoir protection module. Probably overkill but it will be out of the sun, which I think would make it deteriorate sooner vs later. I’m thinking I’ll add 2 springs to keep the top held down.

On another note the radiator is not hail proof, so now I probably have to buy another one and although my intent was to put some sort of screen protection on it , but I was late to the game😩😩 in getting it done.
 

Attachments

  • BDED40F8-AAAE-4F9B-AEF6-A4817B5B7869.jpeg
    BDED40F8-AAAE-4F9B-AEF6-A4817B5B7869.jpeg
    1.7 MB · Views: 16
  • 61EA9FE9-1B15-4A75-9464-FB9D32A93A6D.jpeg
    61EA9FE9-1B15-4A75-9464-FB9D32A93A6D.jpeg
    2 MB · Views: 13
  • 8B624F9E-932F-4B96-BBB7-C9624FE811CB.jpeg
    8B624F9E-932F-4B96-BBB7-C9624FE811CB.jpeg
    2.1 MB · Views: 12
  • FFEF3206-192C-4266-AE5C-E4C36D6DA855.jpeg
    FFEF3206-192C-4266-AE5C-E4C36D6DA855.jpeg
    1.2 MB · Views: 13
  • 4F5F1DFC-6C8F-4AA2-BAC9-68286B0963C6.jpeg
    4F5F1DFC-6C8F-4AA2-BAC9-68286B0963C6.jpeg
    2 MB · Views: 13
  • 62C98E8C-F6EE-4F11-8026-44BD6C10B2DD.jpeg
    62C98E8C-F6EE-4F11-8026-44BD6C10B2DD.jpeg
    1.6 MB · Views: 14
  • 9263FE24-806E-4086-98A9-4900314189C6.jpeg
    9263FE24-806E-4086-98A9-4900314189C6.jpeg
    2.1 MB · Views: 13
  • A69DDA9B-93AD-4AF9-9D5D-A77B953F1B3E.jpeg
    A69DDA9B-93AD-4AF9-9D5D-A77B953F1B3E.jpeg
    1.7 MB · Views: 12
  • 06BE9773-3F32-4F80-8C34-899DAA0230E1.jpeg
    06BE9773-3F32-4F80-8C34-899DAA0230E1.jpeg
    1.9 MB · Views: 14
  • FFFDE273-FE5D-4A54-9E8E-89CC2BFDB1AD.jpeg
    FFFDE273-FE5D-4A54-9E8E-89CC2BFDB1AD.jpeg
    2 MB · Views: 14
Last edited:
So, a small update on the motor--now it will be honed .005 over vs boring it out .030 and it will get some JE pistons(for boost), the 317 heads that came with the motor and which I thought I could use are toast(so besides a broken piston ring in this motor the heads are cracked between the valves on each head and between all valves--so good thing I did tear this thing down and move to rebuilding it vs slapping it in, as it wasn't going to last long!!) As for the heads, I have some 862's that have had some work done to them, so now we are going to put bigger valves in them, thinking 2.02 and 1.59, but the builder wanted to verify those sizes before he locked in on that program and we could go to 2.00 and 1.57. Anyway the motor is in the honing process and head work was commencing until the cracks appeared, so a minor setback, but still looking mid to late July for me to pick it up.

I also ordered another radiator and it's to be here the 28th, so I can work on buttoning up that up as much as possible once it's here and I ordered what is hopefully is the last of the tube for the back roll bar/cage.
 
Last edited:
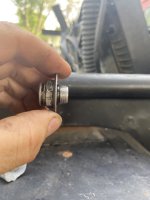
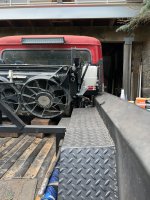
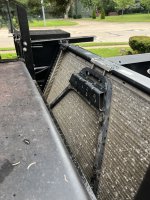
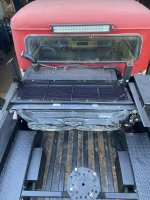
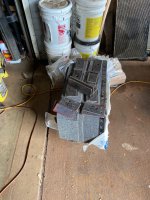
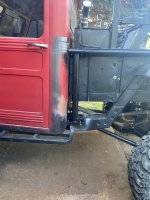
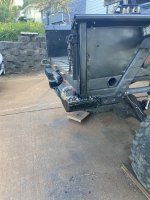
Yea I bought one and none of the 6 tips that came with it would work, so I sent the kid after it with a small screwdriver and he worked on it for about 6hrs and there are just too many still totally smashed even after he straightened what he could. Ping pong ball size hail means radiator loses!!

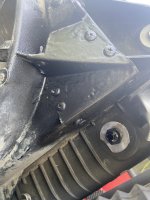
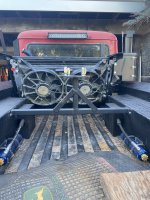
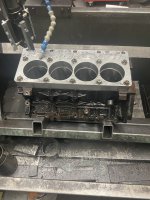
The radiator isn't a high-dollar one, but it has aluminum tanks vs plastic and it has both an oil cooler and tranny cooler built-in. It's probably a Chinese one, but it looked pretty good and it's stock size and will bolt right in, so I figured why not give it a try. I'll keep the old one as a backup for now and maybe see if I can work on it more once it's on a bench, but right now I need shit done, so that I'm ready for the motor.

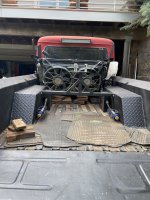
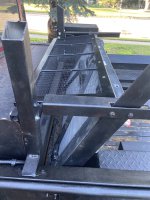
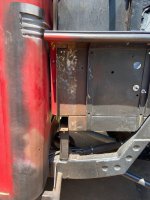
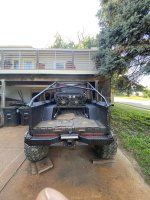
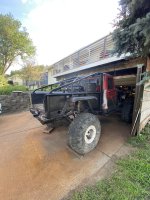
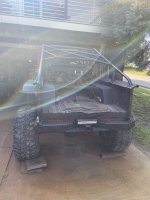
I did make a radiator fin protection frame and bought some 1/4" wire mesh to weld onto the frame(hope I can get it to burn in, because it's pretty thin, otherwise I'll have to make some keeper pieces and bolt (sandwich) it together), but I decided to wait until the new radiator is in before I finish it just in case I have to make an adjustment.

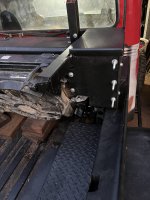
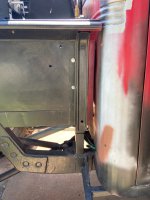
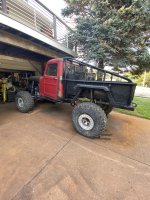
On another note to cut a 7' piece of 5/16" thick 5"x5'' angle iron into two 4 1/4" x 7' strips takes fourteen(14) 4 1/2" grinding discs. These went on top of the angled part of the bed to add some stiffness, protection and mounting surface for the back roll bar/cage. I tried to cut it with the YES Welder DS55, but either my air compressor isn't up to the task or it doesn't like the thickness. It would cut about an inch and then shut down, so out came the grinder. I have a 26-gallon air compressor, but I have to do some more research to see what other guys have been using, because on the internut guys are cuttin' thru 1/2" stuff, albeit not long cuts, but they did better than I did. Could be operator error also, but there are no operating instructions, so the internut is your only option for info.

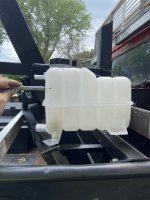
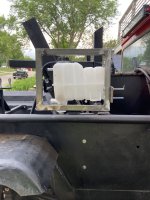
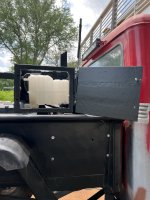
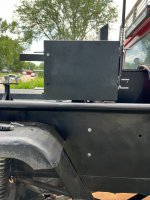
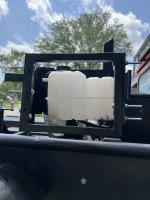
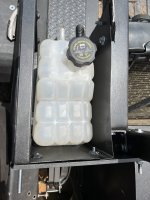
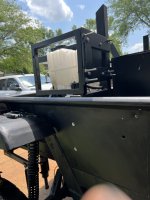
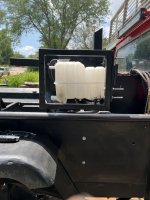
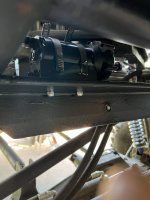
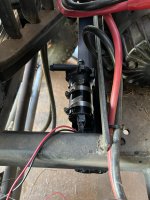
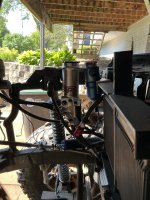
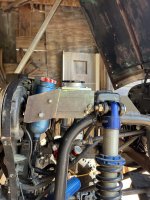
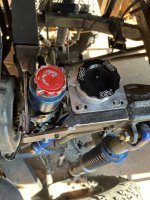
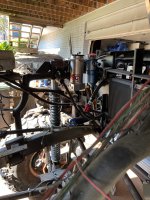
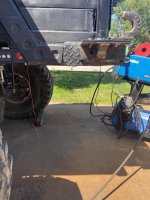
Next up is seeing if I can mount the innercooler tank and pump and some plumbing, but I may have to wait until the motor is in, but I'm going to give it a shot and I may work on tranny cooler lines too and who knows what else.
 
Started the steering box rock protection slider & then built the mount for the inner cooler and attached it to it and then commenced on building mounts for the inner cooler reservoir and power steering reservoir and hoping that I won’t have to redo them once the motor is in.

Did a rear roll bar mock up to get the ideas flowing in the ol’ brain cell and took a pic of the not resistant to hail radiator for you lads.
 

Attachments

  • C5C814DC-44BA-43F4-BD71-212E83BA7A5A.jpeg
    C5C814DC-44BA-43F4-BD71-212E83BA7A5A.jpeg
    2.6 MB · Views: 26
  • 16022A11-259C-41B7-BD0C-FE308D7B7170.jpeg
    16022A11-259C-41B7-BD0C-FE308D7B7170.jpeg
    1.4 MB · Views: 11
  • BD0BEA48-4FC6-4B5A-AC9C-DD0C8A60EEE2.jpeg
    BD0BEA48-4FC6-4B5A-AC9C-DD0C8A60EEE2.jpeg
    1.5 MB · Views: 25
  • 51CACFD7-B75A-457C-9051-C913324239C9.jpeg
    51CACFD7-B75A-457C-9051-C913324239C9.jpeg
    2.8 MB · Views: 26
Pics of the not so exciting mounts for the inner cooler reservoir and power steering reservoir. In the future I may redo them as I’m not overly happy with the way they look, but I’m using what I have in hand in my scrap metal piles and thus I’m limited. But the bottom line is it’s parts moving forward and I’ll take that now. In the one pic with the power steering ports pointed toward the cowl is what I think will happen and once the motor is in the decision will present itself and I can make the lower mount for it.
 

Attachments

  • 6239AA8D-F6DD-4291-A3B7-1F98932D50E0.jpeg
    6239AA8D-F6DD-4291-A3B7-1F98932D50E0.jpeg
    1.9 MB · Views: 8
  • 69D53DED-8867-4EAC-B7D5-5C2D3CC644BE.jpeg
    69D53DED-8867-4EAC-B7D5-5C2D3CC644BE.jpeg
    2.1 MB · Views: 9
  • 8A002D69-353D-4CF9-828D-2A41484E087B.jpeg
    8A002D69-353D-4CF9-828D-2A41484E087B.jpeg
    1.7 MB · Views: 9
  • 61CB0982-FC09-4AB4-A64B-5593B1415EC2.jpeg
    61CB0982-FC09-4AB4-A64B-5593B1415EC2.jpeg
    2 MB · Views: 9
Last edited:
The radiator showed up and I commenced on removal and installation and true to my expectations I had to modify the mount to fit a non-bent radiator. I had to hack out a corner of the upper support tube and drill 2 new holes for the upper support mount, so it wasn't too bad all in all, just in and out of the truck bed multiple times for fit checking before I got it dialed in. I then commenced on the Hail protection, which I should finish up tonight if the paint dries in time otherwise I will mount it tomorrow.

I may work on the tranny cooler lines a little tonight also. So the new radiator uses the 5/8"x18 thread fittings for the tranny cooler and for the oil cooler ports they are larger(not sure what size those are yet) and as of now I don't intend to use the oil cooler since I have the one in the front, but we shall see if I stay with that plan. So concerning the tranny cooler I think I'm going plumb from tranny to lower radiator tranny cooler port, out of the top radiator port & into the top port of my dedicated tranny cooler(with fan) and out the dedicated tranny cooler bottom port and back to the tranny. This way the fluid travels up through the radiator tranny cooler and then down thru the dedicated tranny cooler and down to the tranny. This way the fluid travels down as much as it's pumped up and the dedicated cooler would only come on if the radiator tranny cooler hadn't cooled the fluid enough.
 
Radiator hail protector version 1 completed.

Tranny cooler lines are connected to the radiator and dedicated tranny cooler. I need to buy 2 hose to hose connectors to complete them and then secure them.

Test fit a piece of 3” tube I had to see if I can run 3” exhaust and it looks promising.

Then played with some 1 1/2” radiator hose under the truck to see what issues I may have in running the lines from the water pump to the radiator. It looks like I’m going to have some fun with this and I may have to wait until I have the exhaust run before I can figure it out totally.
 

Attachments

  • 0E15258D-2640-4A90-9D21-F61F10179060.jpeg
    0E15258D-2640-4A90-9D21-F61F10179060.jpeg
    2.4 MB · Views: 13
  • 4F2E032D-7AD1-44BC-AF57-AD2FE4CABED3.jpeg
    4F2E032D-7AD1-44BC-AF57-AD2FE4CABED3.jpeg
    2 MB · Views: 17
  • 0720BF42-016C-4FBA-B999-B685DA471D54.jpeg
    0720BF42-016C-4FBA-B999-B685DA471D54.jpeg
    2.2 MB · Views: 13
  • 23177211-1E4B-4495-A81D-50865902067D.jpeg
    23177211-1E4B-4495-A81D-50865902067D.jpeg
    2.2 MB · Views: 13
Last edited:
Looking good.

Are you doing the long ass radiator hoses in rubber or pipe/tube? Id think something solid would the best choice.
 
I believe I have found another block for a couple of hundred bucks, but until it's in my hands we shall see, and then there are the looming unknowns that won't be known until the machinist can check it out. Crap shoot, but anytime you buy something used it's a crap shoot.
 
Luck is not on your side here, but your perseverance is exceptional. Keep up the good work. :beer:
 
Ok, so I now have a gen lV 6.0 block sitting at the machine shop. I picked it up yesterday and took it to my machinist. I bought the DOD delete valley cover, knock sensor relocation wiring kit and a front cover with the cam sensor and wiring extension kit just now, so I think that's all I needed due to the change in blocks. I'm using my 24 tooth crankshaft(I didn't get a crankshaft with the gen lV block), so all my other components should work. Now I wait to hear what the machinist finds and how to move forward, but the crank journals looked good and it had new cam bearings in it, which seemed odd, but oh well they were in it, so back on the saddle again we are.
 
Started the hack attack and prep for the rear roll cage on Saturday. Everything is based on the rear cage and support posts to be removable so that the bed can be removed. I removed 2 sides of the front and rear stake pockets because I'm going to put 2"x2"x1/4" square tube bolted to plates at the frame and bolted through the angle of the bed and the 5/16"x4 1/2" x 82" long plate that I put on top or the angle bed top and onto the 4 base plates of the roll cage. The remaining stake pockets will receive a couple of bolts to the 2"x2" to secure it in place. There will be two more 2"x2" base posts with plates bolted on top of the mega rear fenders, so 4 anchor points at each side + the roof. I'll probably add a few more bolts in between the plates so that if I every remove the roll cage the 5/16" plate will stay on. I then commenced on making a bunch of plates-28 so far and I need 2-4 more for the top of the cab, as I'm bolting the rear cage to the top of the cab and will tie it into the interior roll cage some how. Now way back 3-4 years ago the cab top and the rear cab corners got wrapped with 3/16" plate, so it's a bit stout as it sits, but tieing it into the interior cage will make it even stronger. It's been one hot adventure and today I could only cut out the rear stake pockets as it's mega toasty. I primed the areas with rust stop primer and then hit it with bed liner. Next week I'll be picking up the tube and will commence with building the rear cage. At some point in the future I'll do the repair work at that bed sides, as you can see there's rust holes in some spots, but for now it will have to be what it is.

Oh yea, cutting, grinding, drilling rusty metal adds a lot of time to making plates, but I need to do what I must to save any buck or two I can.

My new machinist went to his shop today and messed around and says so far the new block looks good to go, so it will get honed .005 or so and then assembly will begin. I'm guessing(hoping) 3-4 weeks before I get it if my luck has changed, but it will depend once it's honed and if everything looks good to buy pistons, wait for them to show up and then slap them in and then slap the heads on(once those are massaged) and check for clearances and buy the correct pushrods, although stock length should work he wants to be sure and I'm all for that. so all said I don't think I got delayed that much.

To relocate the Gen lll knock sensors all you have to do is drill out the existing Gen lV sensors threaded port on both sides of the block with an 8mm drill bit and tap it to 10mmx1.5. There may be some tuning that may have to happen due to the relocation, but I'm not there yet, so I can't comment on if it's actually needed or not.
 

Attachments

  • rear roll cage prep 2.jpg
    rear roll cage prep 2.jpg
    910.9 KB · Views: 11
  • rear roll cage prep 3.jpg
    rear roll cage prep 3.jpg
    1.1 MB · Views: 11
  • rear roll cage prep1.jpg
    rear roll cage prep1.jpg
    848.4 KB · Views: 11
Last edited:
I picked up my rear roll cage material yesterday, but it was smoking hot yesterday, so no workie for me.

I got a call from the engine builder saying forged pistons were 8-12 weeks out and man I knew this was going to happen and although he was correct in waiting to order them due to the fact we weren't sure where we would end up when I dropped off the " unknown to me cracked block". So no fault there; he did order them a couple of weeks ago, but now with a new block where were we going to be. I misunderstood him that we were honing it .005 and were going to use the pistons he ordered, but in fact, he said it was already 2 over(I took it meaning it was .002 and not .020) and we couldn't have used the pistons he ordered anyway, because we have to bore it .030 over(my kind of original plan-funny how we are back to that now). So he says "and for some reason my vendor didn't place the order", so good that we don't have pistons I can't use coming, but we also don't have spot in line to change the order, so maybe you can find some cuz I'm having no luck with all my vendors. So I head to the computer and I got some Summit Racing PRO LS 4.030 -12dish forged pistons and rings. Funny thing is I've been keeping track of pistons at Summit, Jegs, Brian Tooley and Texas Speed and there hasn't been much available to order and get within a week, so Summit must've got some stock in as they had a few different sets ready to ship.

Man I'm not sure I can take too many more of these types of calls, but in the end it worked out and I should have them in my hands maybe Thursday and I'll take them up to him either Friday or early next week. I did ask him if he'd ordered the valves for the heads and he said yea and they are here. I think the last thing that will need to be ordered is pushrods. So maybe, just maybe I'll finally get an engine to put in this thing in a couple of weeks or so.
 
It looks like the pistons and rings showed up today and the valley cover and front timing cover showed up yesterday, so I'm hoping I can sneak out a little early to get all of that up to my machinist.
 
Delivered pistons and the covers to my machinist. Heads are put together and the motor is in the final stages of getting the .030 treatment.

I got home in time to start the assembly of the 8 lower supports for the rear roll cage. I got 3 of them welded up and painted and they are temporarily semi bolted in.
 

Attachments

  • A85B320A-16EB-493E-9198-474322FCACBD.jpeg
    A85B320A-16EB-493E-9198-474322FCACBD.jpeg
    2.2 MB · Views: 16
  • BA04B09E-D910-45D4-B877-2D826807A91D.jpeg
    BA04B09E-D910-45D4-B877-2D826807A91D.jpeg
    2 MB · Views: 16
  • 465E4D3D-3B4B-4D15-B658-DA7F99D889BD.jpeg
    465E4D3D-3B4B-4D15-B658-DA7F99D889BD.jpeg
    2.3 MB · Views: 16
Tow hooks vs drill bits— since I decided after the fact to extend the bumpers so that I could have a base support for the rear roll cage I figured I might as well mount the mega tow hooks that came with the truck. This would mean abandoning one ½” hole and drilling a new ½” hole for the mounting bolts. Now one would think that it’s would be fairly simple task, but not in my world. I think I broke 7 or 8 bits, most smaller bits just to get a pilot hole, but I also broke a ¼”, 7/16” & ½” bits & the drill bit eating tow hooks destroyed another 15 or so bits & I was using tranny fluid as my oil. It took me about 3 hours to drill two ½” holes!! I also added one ⅜” bolt to each tow hook, but those drilled out normally. I’m not sure what’s in those tow hooks but it’s some nasty metal for sure. Anyway all the frame tie-ins are completed and it’s time for phase rear roll cage to commence.
 

Attachments

  • 1735BC53-BC56-4ED5-89F6-B03E84047057.jpeg
    1735BC53-BC56-4ED5-89F6-B03E84047057.jpeg
    2.6 MB · Views: 17
  • D5A7ADFE-A96F-49AF-AA89-1CA25A8DE434.jpeg
    D5A7ADFE-A96F-49AF-AA89-1CA25A8DE434.jpeg
    2.7 MB · Views: 16
  • C8CB3108-16EA-4CED-92E0-F4B8F289A52B.jpeg
    C8CB3108-16EA-4CED-92E0-F4B8F289A52B.jpeg
    2.5 MB · Views: 15
  • B45000E1-42E5-4DA9-A58D-70BC84DB4126.jpeg
    B45000E1-42E5-4DA9-A58D-70BC84DB4126.jpeg
    2.3 MB · Views: 16
Yea they are, that's one reason I decided to keep them along with if I ever attempt to enter and get picked by the Ultimate Adventure, tow hooks are mandatory or they were at one time. I may weld them to the base plate too, but I've not made up my mind on that and I can always do it later.

On another note, my motor is getting closer and closer to being ready to be picked up.:bounce::bounce: I think the head gasket was coming in this morning and then we can do the final measurement on pushrods and then I may have to order pushrods and that should be it. I'm still on the fence $$ for it to be broken in, cuz I'm in the hole so much on it, but we shall see where we end up $$ wise on the build and I'll make a decision then. The torque converter and flex plate showed up Tuesday afternoon, so it will be ready to shove in and then I can start all the plumbing, wiring, exhaust, etc to get her to fire up.
 
I’m beat!! Not done yet but with help from my 15 yr old son today we put a major dent in it. I need to add some gussets and at least one angled bar behind the radiator and a couple of horizontals to protect the gas tank.
 

Attachments

  • D03E3A04-2F5F-4354-8C36-3814FC206119.jpeg
    D03E3A04-2F5F-4354-8C36-3814FC206119.jpeg
    2.1 MB · Views: 18
  • 53B2237B-4DB3-49BC-AF7A-769866DE1D47.jpeg
    53B2237B-4DB3-49BC-AF7A-769866DE1D47.jpeg
    1.7 MB · Views: 17
  • 2FFCD4B2-DD92-451C-8F99-6D9580DFD4A6.jpeg
    2FFCD4B2-DD92-451C-8F99-6D9580DFD4A6.jpeg
    2 MB · Views: 18
  • 3745AA0C-F9B9-469E-B709-379CE73617DA.jpeg
    3745AA0C-F9B9-469E-B709-379CE73617DA.jpeg
    2.1 MB · Views: 18
Motor almost ready to be picked up. I took the oil pan up to him and chatted and I had to order pushrods so those are to be here sometime Tomorrow , so depending on the arrival time I may get them to the builder tomorrow and then it will be possibly bringing it home or pick it up next week. At this point I’m leaning heavy towards doing the break in myself.
 

Attachments

  • 59D52A68-4BEF-4372-BEFC-B619321DE981.jpeg
    59D52A68-4BEF-4372-BEFC-B619321DE981.jpeg
    1.9 MB · Views: 6
Last edited:
Just a simple 10 hr project to add 6 bars to the roll cage!! Is it possible to have compounded heat strokes on top of each other? Cuz I’m frickin’ whooped. Maybe the 100* heat had something to do with it? 😵‍💫😵‍💫😵‍💫. Evidence of how I feel is proven by the 2nd pic🤪🤪. I’ll get a better one later or tomorrow.
 

Attachments

  • 89AE0809-AF3E-4AC5-9466-9D344A811063.jpeg
    89AE0809-AF3E-4AC5-9466-9D344A811063.jpeg
    1.9 MB · Views: 10
  • 1549430A-7D60-47E7-A9B1-7D3D02C8FD28.jpeg
    1549430A-7D60-47E7-A9B1-7D3D02C8FD28.jpeg
    1.7 MB · Views: 10
Top Back Refresh