Looking good
How to install the app on iOS
Follow along with the video below to see how to install our site as a web app on your home screen.
Note: This feature may not be available in some browsers.
You are using an out of date browser. It may not display this or other websites correctly.
You should upgrade or use an alternative browser.
You should upgrade or use an alternative browser.

Well I attacked the front coil overs to get set for final spring weights and damn I must’ve been drunk when I put all them together cuz one side was 225 over 225, which is what I thought I needed originally, but the other side was 225 over 300. I have no idea how that happened as like stated the fronts were to be 225 over 225 and the rears 250 over 300. So the rears are all jack-a-fied too. But since I need to re-weigh it the rears will come apart too which was the plan.
Question, so I have 2 18” 225lb springs and 2 16” 225lb springs and 2 16” 250lb and 2 18” 300lb springs so do I use the 18” 225lb springs to weigh the rear or the 2 16” 250lb springs since I have the 16” 225lb springs in the front?
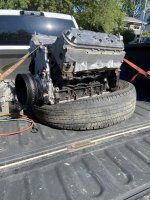
And then after I got the front back together this happened:
Question, so I have 2 18” 225lb springs and 2 16” 225lb springs and 2 16” 250lb and 2 18” 300lb springs so do I use the 18” 225lb springs to weigh the rear or the 2 16” 250lb springs since I have the 16” 225lb springs in the front?
And then after I got the front back together this happened:
Attachments
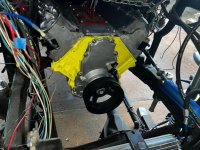
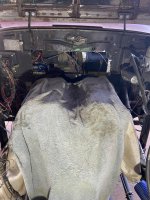
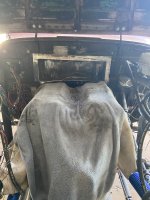
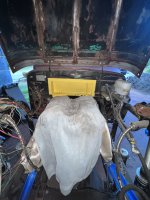
M122 adapter plates and cowl re-work.
Attachments
-
 64C73EE3-2813-45CC-948A-3ED93330DBBE.jpeg1.9 MB · Views: 15
 -
 BE7FB709-24B4-4B3B-A9BF-C8D020546F81.jpeg1.1 MB · Views: 16
 -
 C1CD218E-FF0A-4931-B268-EE8BE59C57E7.jpeg3.1 MB · Views: 13
 -
 DD808475-F008-4693-8E58-FCF2350225E8.jpeg2.5 MB · Views: 18
 -
 D3F83804-E9CE-4B03-A0BF-D2A1AF1F6A44.jpeg2.1 MB · Views: 18
 -
 AC748FFE-D2E9-4B5F-8533-8719F1BBC2D3.jpeg2 MB · Views: 19
You're way more committed than me right now.
Not sure about that, just been pissed about the motor and tranny, so now that they have arrived I need to get stuff out of the basement and on the truck as it's been way to long for some of the parts just sitting and waiting. Plus the wife may shit can them if I don't get them on the Willys!!!
gt1guy
Apparently a racist
Now there's some progress.
Well done Sir.
Well done Sir.
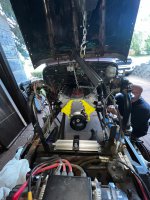
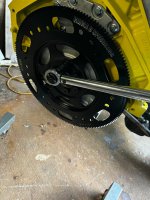
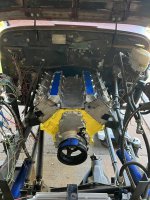
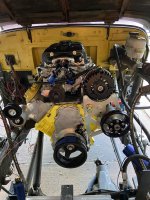
Little more progress— firewall cutout is working out better than I thought it would, so that’s nice. A little tight on the intake elbow & oil pressure sender. I’m not sure if that’s a GEN lV thing or if it’s the same for the GEN lll, so I may grab some fittings to move it a bit, but that’s a down the road thing at this point. Goat built power steering and alternator bracket requires me to make an adjustment to the fuel crossover with a couple of 90* AN elbows. Bought an ARP balancer bolt(not sure why I never did) and one of those flywheel lock down tools and got the bolt in and torqued. Also I have to route the rear steam line differently due to the blower, but that is probably because of the Summit Racing steam kit I bought and I had to grind a little bit off the front passenger side supercharger adapters to get the steam fitting to line up.
Attachments
Last edited:
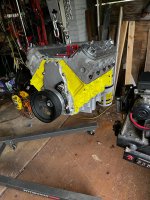
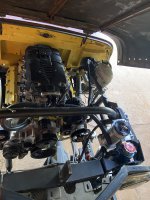
Little more progress— water pump and all pulleys are on. Mounted the power steering reservoir and Supercharger coolant reservoir hooked up what lines I could. I had to order more fittings. I have to make a decision on headers here shortly and get them ordered, so that I can do the exhaust and figure out the radiator lines to the bed. Still need to finish the fuel lines and Holley Terminator X max wiring, throttle body, throttle cable, and more.
Attachments
Last edited:
Fighting with the throttle pedal, throttle cable and throttle body for 4.5 hrs yesterday and I still have more work. Trying to bend the ‘92 Chevy pedal so that it works and then the LOKAR cable ends don’t mate up, so need to dig around the garage to see if I have some parts and then I can figure out throttle body mount and position. I did get the inner cooler plumbing done after I got tired of monkeying with the throttle stuff.
Hopefully later I will get time to work on it some more.
If anyone has some headers that they wouldn’t mind measuring the distance from head to how far they stick out would be awesome and tell me what primary size they are and if they are shorties, mid or long tube.
Hopefully later I will get time to work on it some more.
If anyone has some headers that they wouldn’t mind measuring the distance from head to how far they stick out would be awesome and tell me what primary size they are and if they are shorties, mid or long tube.
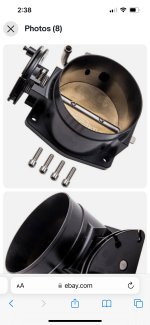
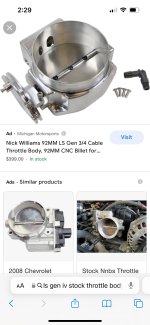
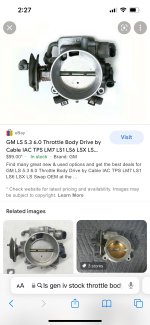
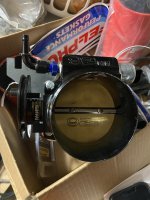
So last year I bought a g-plus 92mm throttle body after doing a bit of research(not enuff!!). Part of the issue with yesterday’s “way to long work on that part of the rig” is the end on the throttle cable won’t fit. It’s a hair to big, so maybe I drill it out. So this morning I do a bit more research and find that this has occurred often. Ok I decide to do some more reading about these throttle bodies and guys have had to port out the holes for the vacuum and the IAC, so damn now do I shelve this thing to sell later or get after it with the grinder? Also the vacuum tube has leaked on a lot of them. Why I didn’t come across this stuff last year is baffling but it did. Now, If you compare a gen lll 3 bolt stock throttle body to this 4 bolt G-Plus and others the ports are significantly larger on the stock one. I’m trying to find a pic of a stock 4 bolt throttle body, but so far I’m not having great success on my phone. So now I go and look at a Nick Williams throttle body and his ports are smaller than stock but look a tad larger that the G-Plus in the pics I’ve looked at. So now I’m thinking fuck it I’m porting this pig and I’m going to remove the vacuum tube and tap it for a threaded tube. Got some thinking to do.
Attachments
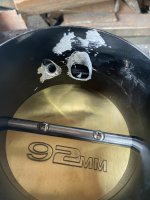
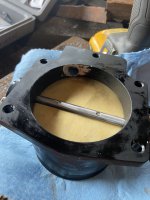
Ported that bitch like a starvin’ beaver and then I was able to pull the tube out by hand, so for sure it would've leaked. I had to tap it to ¼” cuz the hole was about. 1/32” to big for ⅛”. Drilled out the hole for the throttle cable and built a mount for the throttle body. So if this thing doesn't work, I'll buy a different IAC and TPS and slap those on or use the used ones I have to see if that helps. Again it's all about tuning these Chinese throttle bodies and porting has helped a lot of guys, so we shall see. One thing that I forgot to mention is that you need to loctite the blade screws on, as they're known to come loose and get sucked into the intake.
Attachments
Last edited:
So since it was raining I wasn’t able to do much, still working on the throttle pedal, but I did get the cable routed to the throttle body and I hacked on the brass keeper to make it fit a bit deeper into the throttle body, as it was only getting thru the outside hole and not into the inside hole. I thought it should go all the way through and into the inner hole for a more secure fit.
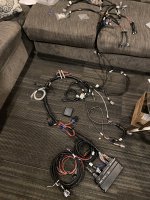
I also started to layout the Holley Terminator x max harness on the basement floor to double make sure I know where everything goes. If you look you will see two pens sitting on the red, green &blue wires that pop out of the harness. Those wires have me stumped right now and I have a flex fuel sensor & harness and alternator harness from Sloppy Mechanics on the rig right now that I’m not sure where they plug into, but again it was raining so I didn’t go out and look at the ends to see if they were bare wires or had ends on them. Hopefully today I can do that.
I also ordered some 1 ¾” Powergo headers to see if they will fit. If they don’t back they go and at least it might give me an idea of what I need.
Attachments
I believe the headers will work, but I need to get the driveshaft installed first to be sure and I have to make sure my steering shaft doesn’t bind up , because I had move it a bit to gain clearance. Now I have to source the collector flange so that I can run the exhaust.
Attachments
Wiring harness install commenced only to find out my LS Gen lll oil pressure sender and map sensor don’t have the matching connector. So off to the parts store and I get a different oil pressure sender. Evidently there was a change sometime in 99 or early 2000’s that in all my reading has never been mentioned.
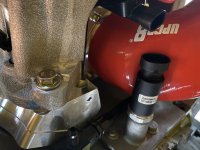
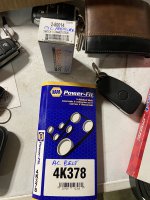
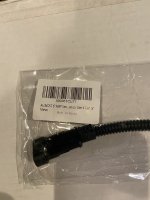
Of course I tried for probably 30 minutes to get the harness to plug in, before I dug the old harness and oil sender out. Only to find the old sensor didn’t match new oil sender. So now I’m stumped. I have a Holley Terminator x max harness with a plug that doesn’t match the new oil sender or the old oil sender & my old harness doesn’t match my old oil sender!!! The original engine builder gave me the wrong harness or the motor he sold me wasn’t the year he told me. Now I have a special socket to remove the oil sender but of course it won’t work because the supercharger has a sensor in the back that’s in the way. I don’t have a stubby 1 1/16” wrench either. I try quickly with a crescent wrench but My patience is gone. So that’s when I go to parts store to see if there’s an oil pressure sender that matches my Holley harness and to see if I can get a stubby wrench. Success was achieved on the oil sender but not on the stubby wrench. So I think to myself that a crescent wrench will have to be cut down or my 1 1/16” wrench. Once back home I cooled down and give the ol’ crescent wrench one more go before it gets hacked and by god I got the sensor loose. Out it comes and the new one is installed and because it way shorter the special socket works. So just another regular wtf day on the Willy’s!! I ordered the pigtail adapter for the 3 bar map sensor and it’s to be here tomorrow. Pics of the new wrong sensor on the motor & the part # for the correct oil sender that works with the Holley Harness. You can see the new old sensor has one blade, where as the new oil sender has 3 small blades and the connector is round and not oval. The old old oil sender has the oval connector and has 3 blades.
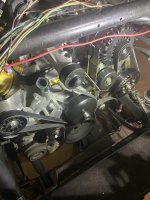
And par for the course, but not surprised my measurement for the belt came out to 101 ⅝” so I buy a 100 ⅜” belt, but it turns out it’s about 7-8” too long, so I’ll be at the parts stor soon for attempt’# 2 with the belt war.
Of course I tried for probably 30 minutes to get the harness to plug in, before I dug the old harness and oil sender out. Only to find the old sensor didn’t match new oil sender. So now I’m stumped. I have a Holley Terminator x max harness with a plug that doesn’t match the new oil sender or the old oil sender & my old harness doesn’t match my old oil sender!!! The original engine builder gave me the wrong harness or the motor he sold me wasn’t the year he told me. Now I have a special socket to remove the oil sender but of course it won’t work because the supercharger has a sensor in the back that’s in the way. I don’t have a stubby 1 1/16” wrench either. I try quickly with a crescent wrench but My patience is gone. So that’s when I go to parts store to see if there’s an oil pressure sender that matches my Holley harness and to see if I can get a stubby wrench. Success was achieved on the oil sender but not on the stubby wrench. So I think to myself that a crescent wrench will have to be cut down or my 1 1/16” wrench. Once back home I cooled down and give the ol’ crescent wrench one more go before it gets hacked and by god I got the sensor loose. Out it comes and the new one is installed and because it way shorter the special socket works. So just another regular wtf day on the Willy’s!! I ordered the pigtail adapter for the 3 bar map sensor and it’s to be here tomorrow. Pics of the new wrong sensor on the motor & the part # for the correct oil sender that works with the Holley Harness. You can see the new old sensor has one blade, where as the new oil sender has 3 small blades and the connector is round and not oval. The old old oil sender has the oval connector and has 3 blades.
And par for the course, but not surprised my measurement for the belt came out to 101 ⅝” so I buy a 100 ⅜” belt, but it turns out it’s about 7-8” too long, so I’ll be at the parts stor soon for attempt’# 2 with the belt war.
Attachments
LS who gave me the belt gave me the wrong size , so I got the 100” belt but I don’t like the routing, so I’m going to add another pulley and I got a couple longer belts to start over.
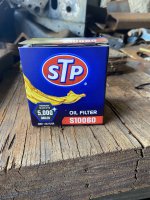
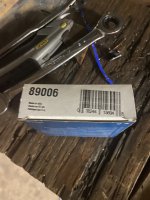
So I buy 3 oil filters a week or so ago, but they didn’t thread on, so I’m not sure if my first engine builder screwed me over or not by mixing up my parts when I got the oil pan back. So I go to the auto parts store and have them pull a couple oil filters to look at and lo-behold one of them looks just a tad larger, so I buy it. It worked, so who’d a thunk that there’s different thread sizes for LS oil filters but in my world there is.below is the oil filter that worked.
Added A pic of the stinkin oil pressure senders I was dealing with that were wrong.
Attachments
So once you adapt a GenlV to use Genlll knock sensors and add the 1 ¾” headers the oil dip stick needs some custom bending to clear the knock sensors and headers.
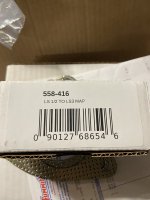
The 3 bar map sensor#12592525 from ZR1 motor will also require an adapter harness to use with the Holley Terminator x Max harness.I ordered one and it’s to be here today and once I confirm I got the correct one I’ll post the part #.
I also had to undo the harness for CTS & the Fuel Pressure wires to make them long enough to reach. Harness routing was from the back to the front, this also meant I had to route over the top of the M122 for some wires to reach.
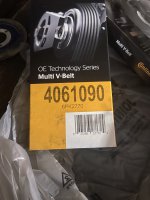
Got the extra pulley and another couple of belts and of course the 1st belt I bought would’ve worked had I kept it. 109” long. We will have to see how works once it’s up and running. The added pulley will require a bushing to fit the mm bolt. I don’t know if that’s a special part or not as it didn’t come with the pulley, but luckily I was able to steal off the old accessory bracket. Or you will have to get creative by making a SAE bushing fit a mm hole, because ACE Hardware has no mm bushings and I was set up to be creative, but that factory bushing saved me some time. I forgot to take a pic of it, but this was happening last night and Once I got it all bolted up and the belt routed I wasn’t going to take it back apart.
The 3 bar map sensor#12592525 from ZR1 motor will also require an adapter harness to use with the Holley Terminator x Max harness.I ordered one and it’s to be here today and once I confirm I got the correct one I’ll post the part #.
I also had to undo the harness for CTS & the Fuel Pressure wires to make them long enough to reach. Harness routing was from the back to the front, this also meant I had to route over the top of the M122 for some wires to reach.
Got the extra pulley and another couple of belts and of course the 1st belt I bought would’ve worked had I kept it. 109” long. We will have to see how works once it’s up and running. The added pulley will require a bushing to fit the mm bolt. I don’t know if that’s a special part or not as it didn’t come with the pulley, but luckily I was able to steal off the old accessory bracket. Or you will have to get creative by making a SAE bushing fit a mm hole, because ACE Hardware has no mm bushings and I was set up to be creative, but that factory bushing saved me some time. I forgot to take a pic of it, but this was happening last night and Once I got it all bolted up and the belt routed I wasn’t going to take it back apart.
Attachments
Last edited:
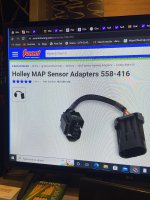
Well the adapter harness is wrong. On one end the plug is molded opposite of what it needs to so I ordered the Holley one hoping that it’s correct. This is the one I ordered from Amazon that doesn’t work.
Got the Tranny dip stick custom bent over pipes, bench and rockers to fit and finished the oil cooler lines and 99.5% of the fuel system. So now I can pour some oil into the motor and see if my little drill pump will prime the system with whatever I don't pour in, which I'm planning on only pouring a quart in to begin (already filled the oil filter), and I can add tranny fluid and put some coolant in the inner cooler system and check to see how the pump I bought works. Also mounted the Holley Terminator X Max, so wiring can commence on that.
Got the Tranny dip stick custom bent over pipes, bench and rockers to fit and finished the oil cooler lines and 99.5% of the fuel system. So now I can pour some oil into the motor and see if my little drill pump will prime the system with whatever I don't pour in, which I'm planning on only pouring a quart in to begin (already filled the oil filter), and I can add tranny fluid and put some coolant in the inner cooler system and check to see how the pump I bought works. Also mounted the Holley Terminator X Max, so wiring can commence on that.
Attachments
Last edited:
To mount the Holley Terminator x max computer I welded two 1/4" bolts to the inside of the dash and double nutted where I wanted it to sit and then slipped the computer onto the bolts and then put 7 washers on it to space the nut up so I could tighten them down, because I couldn't get a socket in the recessed space provided that a washer and bolt go into. I was going to leave it like that, but there's two more holes for mounting so I'm planning to take some threaded rod and bend it and weld it to the other bolts and do the same double nut and washer thing and then it will be super secure. It's probably ok as it is, but better to be safe than sorry. Pics will come once I get that done. I may come up with another idea once I'm looking at it again.
Well in post #377 I talk about my oil filter issue and the issue is that it looks like around 2007 the thread pitch changed from 3/4" x 16 to M22 x 1.5 and my aftermarket pan has the M22 x 1.5 thread pitch.
I have a leak between the tranny and t-case😩😩😩. Tried a quick separation and rtv sealant fix, but didn’t work. I’m pretty sure it’s between the t-case and gasket. So I’m gonna have to pull the t-case back farther and clean everything and reseal it with just rtv sealant.
Inner cooler coolant lines and pump are 100% and we did the pre-bleed of the power steering system. Also pumped in 3 quarts of oil to prime the system. I’ll add more once I get further along with the wiring. Working on the exhaust, but I ended up making my own flanges because no one seems to have anything in stock and I’ve ordered 2 sets and both weren’t correct. They’re made of ½” plate cuz it’s all I had that would work. I don’t believe those will warp!!
Inner cooler coolant lines and pump are 100% and we did the pre-bleed of the power steering system. Also pumped in 3 quarts of oil to prime the system. I’ll add more once I get further along with the wiring. Working on the exhaust, but I ended up making my own flanges because no one seems to have anything in stock and I’ve ordered 2 sets and both weren’t correct. They’re made of ½” plate cuz it’s all I had that would work. I don’t believe those will warp!!
T-Case re-seal attempt #2 completed, pending re-introduction of fluid to assess level of success. Fingers crossed cuz I had one spot at like 4-5 o'clock that was tough to get the rtv to since I only moved the case back about an inch to get access to clean and reapply sealant. Problem was the recessed bolt holes in the NWF black box, I guess I didn't enough rtv sealant behind the gasket. No gasket this time.
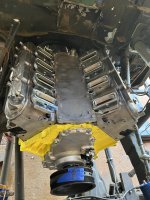
Fab of exhaust from headers to end of the mufflers is complete with O2 sensor and is ready for install after operation t-case leak inspection is completed. I made it in 2 pieces, cuz I'm not sure I could get it installed or removed in one piece and I was to amped up to get it done that I didn't even think of tacking it together to see if it would slide in one piece. I can still check it if I unbolt the down pipe, probably should do it since the splice is just past the O2 sensor and I'm not sure how well those stainless steel exhaust coupler work to seal up the connection at the coupling. I've only got like 1/4" clearance in 2-3 places so there's not much room to slip, slide, twist or angle it into place. I used a couple of shorty bullet glass pak mufflers, cuz again I wasn't sure where/how it would fit and they're cheap.
Next up is figuring out radiator/heater/steam lines routing back to the bed and what I can or can't use to make it work.
Tranny fluid reintroduction was initiated yesterday around 1:30pm and there was no leak when I quit tinkering at 7pm, so maybe it worked.
I think I'm going to have to use some sort of hose to do the radiator lines due to the snaking needed to get back to the bed. Now if I four link the front then maybe not, but 4 linking the front will need some thinking and time to get accomplished and time isn't in the plans at this moment. Now what hose is the question? AN is too expensive right now, so hydraulic hose or sandblast hose is what other's have used and I'm still researching to see if there's something else out that will work, so if anyone has any suggestions I'm all ears,
I think I'm going to have to use some sort of hose to do the radiator lines due to the snaking needed to get back to the bed. Now if I four link the front then maybe not, but 4 linking the front will need some thinking and time to get accomplished and time isn't in the plans at this moment. Now what hose is the question? AN is too expensive right now, so hydraulic hose or sandblast hose is what other's have used and I'm still researching to see if there's something else out that will work, so if anyone has any suggestions I'm all ears,
Electrical conduit is now leading the pack along with some plumbing couplings and I may buy a conduit bender, but I need to look at the routing to see if I can even get a bent piece(one bend at least) snaked in. Otherwise I have an inkling to try SPA hose, but it's rated to only -10, but with anti-freeze in it I think it would hold up to at least -20, but it'd be a guinea pig move on my part, because no one has mentioned it. Still have one place to call today that sells hoses, because my hydraulic hose place was a bust.
Found some hose, the guy tried to talk me out of of it saying it wouldn’t last because it would be somewhat unprotected & that it’s rubber and it won’t last like pipe. While it’s partially true it will be pretty well protected and I weighed the longevity based on having to use pipe with plumbing fittings (which means sharp bends or many rubber couplings) versus being able to snake the hose with way less fittings and better bends for flow. Here’s what I bought— 1 ¼” in size for both runs vs going with 1 ½” and 1 ¼”. It was $4.76 per foot.
I did a frame notch to help with the routing, but until I commence with snaking the hose in there I’m not 100% sure I can get 2 hoses thru it. It’s big enough, but it’s going to be tight due to the exhaust and needing to stay away from that. I’ll find out soon enough.
I did a frame notch to help with the routing, but until I commence with snaking the hose in there I’m not 100% sure I can get 2 hoses thru it. It’s big enough, but it’s going to be tight due to the exhaust and needing to stay away from that. I’ll find out soon enough.
Attachments
Radiator hoses, steam line, heater hoses all run, but I nicked the fuel return line, so now I have to replace it or splice it, but the hose isn't rated for
E-85, so I might as well replace it. I still have to secure them. I decided I better add a remote radiator fill otherwise it gets filled through the expansion tank and that I feel will take a lot of time, but if the part doesn't arrive in time I will un-do the top radiator hose and fill up as much as I can and then top it off thru the expansion tank. That 1 1/4" EPDM hose doesn't like to fit over 1 1/2" fittings and it took me about 2 hours (pig headed) to get it to fit over the temp port adapter that I need for the Intellitronix instrument panel, because I wanted that part done and I already had it, but damn that sucked. Silicone spray helped some, but still I could only get about 1" of the hose to expand enough to get it on the adapter, but it was enough for the clamps to go on.
Main fan wiring is done, but again needs secured and I have to run the trigger wires from the computer harness. I still have wires to be run and connected. Started back on the computer wiring and so it's getting close.
I will say that the heater hose routing is a pain and I had to buy the $46 dollar OEM fitting with hoses(didn't use the hoses) to make it work at the expansion tank, because the 3/4" heater hose runs from the water pump straight to the expansion tank and the 5/8" heater hose goes to the heater core and then out of the heater core to the expansion tank and the expansion tank has a 1" hose barb connection. To make it work any other way involved brass, galvanized and plastic fittings and would be bulky and ugly.
For the steam line connection at the expansion I had to do the galvanized and brass fitting thing to connect the steam line from the motor and the steam line port from the radiator cuz I couldn't find a fitting to do that. I painted it all black.
And the t-case is back to leaking again(1 week later) from where I had my suspicions. So it will have to come back apart and I'll have a 4th time to get it sealed up. It's a smaller leak than before, but still it sucks. And the rear pinion seal is leaking and why is beyond me, but it is, so that will need attention too, but that will be done later after all this other stuff and I get it running is the plan.
Last edited:
Decided to add the coolant--took 4 stops to find distilled water and then the leaks commenced after adding about 3 gallons. One was a fitting I forgot to tighten, so easy peasy, but there's coolant coming from the front and rear of the engine  and at first look I can't see where it's coming from, so I'm pretty perturbed and thinking is the head gasket got issues, is my block cracked, you know all the worst things that can be!!
 Ok so I'm looking and looking and I finally see one of the leaks coming from the passenger side front steam vent and it was the problem for both the rear engine leak and front engine leak. OK, so I believe in an earlier post I had mentioned that I needed to grind on the MackDaddyParts adapter to get the Summit Racing steam kit fitting to fit on the front passenger side, but I didn't grind it enough to get it the fitting to fit like it should. So I break out a file to attempt to get in there, but I might as well be trying to remove aluminum with my finger, cuz it's gonna take a long time to get it removed. Out comes the dremel and two bits later I'm making progress, but I can't get to part of of the adapter that needs to be hacked away, so out comes the air grinder and after about 4 shots with that I get the adapter machined to where I hope the fitting will seal up. So I install it and add coolant and as of this morning I see no leaks, so possible success. So I have one wire to connect for the computer, put some E-85 in the tank and filter it out just cuz it's been sitting for a year(well I'll make sure to uncork the fuel line to the pump first to see what comes out before adding the E-85), attack the t-case leak again, program the SD card for the flex fuel sensor reinstall it and then proceed with the initial set-up and see if the thing will start and run!! But that may still be a few days away. I still have some misc wires to run for lights and stuff, but none of that will prevent me from starting it and breaking in the motor. I won't be able to drive it until I get me spring rates figured out, unless I put the old springs back on it(that may happen due to anxiousness or if I have to wait for springs to show up). Anyway it's getting real close to being running and then see what happens and needs attention.
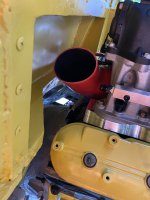
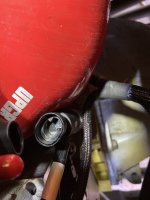
Pic of how much I had to remove to make the steam vent fitting fit. I'll get a better pic later when there's more light. Oh yea and it took me like 2 hours of getting it hacked out enough to fit. . Hack and test fit, hack and test fit, hack and test fit. I also ground down the side of the fitting to help. The fitting doesn't fit parallel to the front of the head and thus is why hacking had to take place.
and at first look I can't see where it's coming from, so I'm pretty perturbed and thinking is the head gasket got issues, is my block cracked, you know all the worst things that can be!! Ok so I'm looking and looking and I finally see one of the leaks coming from the passenger side front steam vent and it was the problem for both the rear engine leak and front engine leak. OK, so I believe in an earlier post I had mentioned that I needed to grind on the MackDaddyParts adapter to get the Summit Racing steam kit fitting to fit on the front passenger side, but I didn't grind it enough to get it the fitting to fit like it should. So I break out a file to attempt to get in there, but I might as well be trying to remove aluminum with my finger, cuz it's gonna take a long time to get it removed. Out comes the dremel and two bits later I'm making progress, but I can't get to part of of the adapter that needs to be hacked away, so out comes the air grinder and after about 4 shots with that I get the adapter machined to where I hope the fitting will seal up. So I install it and add coolant and as of this morning I see no leaks, so possible success. So I have one wire to connect for the computer, put some E-85 in the tank and filter it out just cuz it's been sitting for a year(well I'll make sure to uncork the fuel line to the pump first to see what comes out before adding the E-85), attack the t-case leak again, program the SD card for the flex fuel sensor reinstall it and then proceed with the initial set-up and see if the thing will start and run!! But that may still be a few days away. I still have some misc wires to run for lights and stuff, but none of that will prevent me from starting it and breaking in the motor. I won't be able to drive it until I get me spring rates figured out, unless I put the old springs back on it(that may happen due to anxiousness or if I have to wait for springs to show up). Anyway it's getting real close to being running and then see what happens and needs attention.Pic of how much I had to remove to make the steam vent fitting fit. I'll get a better pic later when there's more light. Oh yea and it took me like 2 hours of getting it hacked out enough to fit.
. Hack and test fit, hack and test fit, hack and test fit. I also ground down the side of the fitting to help. The fitting doesn't fit parallel to the front of the head and thus is why hacking had to take place.Attachments
Last edited:
I started it today— it ran for 3- 5 seconds and died— sounds good though. Ok so I have a leak in the passenger side fuel return line, so I make a new one and that fixed that's, but now I have at least one injector pouring fuel out of the rail on the driver side and at least one leaking on the passenger side it looks like. So tomorrow is see if I can figure out what’s going on and hopefully an o-ring has slipped or since I’m by myself could the fuel pressure be way to high. I’ll have a set of eyes tomorrow to see what the fuel pressure is and then get it set and see if that fixes it or is it fuel rail removal time. Happy but sad.
Last edited: