What's new

1990 Cherokee XJ Build

Either make a new tie rod with bends and normal joints, or cut a notch out of the sway bar mount to clear everything, and add some 3/16 plate or a half round of tube in there for clearance. Similar to guys notching the frame for steering at full bump.
Right on, I will see how much I have to cut out of those brackets before I can turn lock to lock, before I tear the whole thing apart…
 

Run it and see. I wouldn't put THAT much work into a turdy, and I'm a sorta kinda fan of them. It'll be a tradeoff between vague/scary steering and driveline vibrations. Either way, cruising 80 on the freeway isn't happening. :flipoff2:


Is it the tabs/sway bar mounts that are hitting, or the spring perch itself?
“Yes.”

Ha, it’s the sway bar mounts but even if I ground those flush with the spring perch, it would hit the perch. It’s gotta come in probably 3-4” for full steer…

If you look at the WJ perches, they don’t come forward off the axle as much, and they also are a full 2” taller than the XJ perches.

I know that guys have to modify tie rods when they do WJ knuckle swaps on XJ D30’s (I think it’s mandatory if you go OTK), but there aren’t a lot of “high clearance” tie rods that are actual WJ D30 length.

I guess I could run this tie rod UTK? I’ll have to flip it when I get home.
 
Disregard guys, I was wiggin’ out over nothing. I managed to cut the mounts just enough that it clears lock to lock now. I hated that I had to cut the front of the mount off, because I felt like that would really compromise the strength of the mount (especially side to side, the direction of the axle) so I used some leftover 3/16” weld coupons and made a new side for the mount.

I did the same thing on the track bar side, so I essentially had to “inset” the track bar about a half an inch. I hadn’t welded in the opposite side of the track bar mount yet, luckily, so I was able to keep the track bar mount the correct width, it’s just about 1/2” closer to the axle than OEM. (Doesn’t matter to me anyway, I am using the OTA track bar mount.)

Rockwood RunningProblem you guys were definitely right, I cranked it up to 145 amps and they look way better. Thank you! I’m gonna grind off some of the previous welds and re-do them, or just cap weld whatever I can. (Was finally able to fill my CO2 and my new Argon tank today. I wish that industrial supply stores weren’t ONLY open during business hours M-F… what, no one welds on the weekend!? 🤣 )

IMG_5472.jpeg
 

Attachments

  • IMG_5466.jpeg
    IMG_5466.jpeg
    1.4 MB · Views: 6
  • IMG_5467.jpeg
    IMG_5467.jpeg
    1.7 MB · Views: 5
  • IMG_5468.jpeg
    IMG_5468.jpeg
    1.5 MB · Views: 6
  • IMG_5469.jpeg
    IMG_5469.jpeg
    1.6 MB · Views: 4
  • IMG_5470.jpeg
    IMG_5470.jpeg
    1.7 MB · Views: 6
look at the welds on the tube, then look at the welds on your modification. They don’t look the same.

IMG_2216.jpeg
 

Attachments

  • IMG_2218.jpeg
    IMG_2218.jpeg
    1.3 MB · Views: 6
  • IMG_2215.jpeg
    IMG_2215.jpeg
    1.1 MB · Views: 6
look at the welds on the tube, then look at the welds on your modification. They don’t look the same.

IMG_2216.jpeg

Right, the wormy weld there on the bracket was from last week, when I didn’t have the settings turned up high enough. The other photo there is one that I did today, at 140-150 amps.

So, I’m going to grind off as much of the shitty welds as I can, and redo them. I definitely understand what you are saying about “cold” welds though.
 
So, I put the old D30 HP axle back in real quick, because the Rubicon girl I’m seeing came down this weekend to visit her parents for Mother’s Day, and I had talked her into meeting me at Hollister Hills. (She’s not really in the area very often.)

Previous axle went back in fine, I never fucked with the tie rod, drag link, or track bar so those all remained the same length, all I had to do was caster and pinion angle, I just guessed at it and it drove fine, no vibration.

I did put those Slyjacker 8” XJ springs in just to check them out. Went out to Hollister Hills on Saturday and Sunday, and Sunday afternoon I managed to tweak the coil springs to where they are making a nasty noise and rubbing against the track bar mount.

This was the only pic I took when I installed them, but they were seated fine (I thought?)
IMG_5545.jpeg

And then this is after:
IMG_5718.jpeg IMG_5719.jpeg IMG_5720.jpeg

What do you guys think happened here?

Obligatory “girl on top” pic:


F034BAF2-22A7-4AEF-95D4-7EF819947565.jpeg
 
I haven’t had much time in the last few days but I took a break from axle swap shit to try to fix my driver’s side window regulator that broke over the weekend.

After reading some 10 year old posts about fixes for them, it seemed like an awful lot of work, and then I noticed that no one makes replacements, and so OEM ones are like $150 online…

I bought an electric one on Amazon for $60 and swapped it in, just to see if it was possible. Shit, it lined right up, took me maybe 15 minutes. Put in new rivets and wired it to an On-Off-On switch that reverses polarity to the window motor, boom, I now have an electric window. I’ll probably do the passenger side as well. Even if the Chinese Amazon regulators only last a couple of years, it’s cheap and easy enough that it’s worth it.

Seems like a lot of the complaints from people with OEM power windows have to do with the fact that they are all wired in series, and either don’t have a big enough ground, or just can’t get enough juice to all four, so they get slow over time. I’d be wiring each door directly, so, don’t have that problem at all.

I’ll put the driver and passenger side window switches on the center console, that way you can reach both from the passenger seat, and I don’t have to hack up my door handles to put a switch in. Stoked to not have to unbuckle a four point harness every time I want to roll the passenger side down.

I also wired in weatherpack disconnects for both the window, and the speaker wire (I ran new 14g speaker wire throughout), so that if I decide to go doorless one day, that’s easy.
 

Attachments

  • IMG_5882.jpeg
    IMG_5882.jpeg
    1.8 MB · Views: 3
  • IMG_5884.jpeg
    IMG_5884.jpeg
    1.6 MB · Views: 2
Link to the motor or part number?
My passenger rear only goes down maybe 2/3 then bings and I’ve stopped messing with it because I don’t know how to fix it.

Also, details on wiring all four individually. I would love to copy your work if it gets extra power to the windows.


Why not a momentary switch instead of ON/Off/ON?

 
Yeah. My rear manual window regulartors have shit the bed. Replacements are NOS $3-400 jobs. If I can just shove an aftermarket regulator on them... Win.
 
Link to the motor or part number?
My passenger rear only goes down maybe 2/3 then bings and I’ve stopped messing with it because I don’t know how to fix it.

Also, details on wiring all four individually. I would love to copy your work if it gets extra power to the windows.


Why not a momentary switch instead of ON/Off/ON?


Window regulator: Amazon.com

(There's a Dorman model too, it's Dorman 741-538 but it's like $30 more. May be better quality, but, this one seemed fine tbh.)

Sorry yeah, it is a momentary switch, but it's also on/off/on in my head. I see what you're saying though.

1715977357009.png


I used these, just cause they match all my others.

Edit: Oh wow, they actually make the door switch for early-gen XJs too: https://www.amazon.com/Standard-Motor-Products-DS1231-Switch

It's a little pricy, but if you wanted it to look perfect, guess you could do it that way.
 
Yeah. My rear manual window regulartors have shit the bed. Replacements are NOS $3-400 jobs. If I can just shove an aftermarket regulator on them... Win.

Actually, the prices on the REAR manual regulators aren't bad at all:

I'm having a hard time finding REAR electric window regulators though. I wonder if the ones on the front would work with a little bit of convincing? They look pretty similar, but I haven't really dug around in the rear doors enough to know.
 
Last edited:
Also, details on wiring all four individually. I would love to copy your work if it gets extra power to the windows.

I have read about people putting relays into the door panels and wiring them into the windows, there's some write-ups about it. Aren't the OEM electric windows wired in series?

The details of mine are pretty simple, I just have an aftermarket fuse block up in my drivers side kick panel, I wired the window motor straight to that, and that switch. (I'll do the passenger one the same way.) I think the problem with the OEM ones is that they all are on the same circuit and don't get enough voltage, maybe check the voltage that it's actually getting when you hit the switch?

I don't have power locks or OEM power windows, so there aren't any wires going to my doors, but, the grommets and holes for them are all there.

1715979125961.png

1715979352953.png


The motors only have two wires (+/-), so you just need a switch that reverses polarity (or, that grounds one pin one way, and grounds the other pin the other way).

If I understand it correctly, the OEM wiring, to get to the right rear window for example, goes from the battery, to the driver's door switch, then the front passenger door, then the rear passenger door. So it's passing through an awful lot before it gets there.

I'm also starting with no OEM window wiring, and each window will only have one switch. (I haven't decided on how to do the rears yet) I just put the switches in the console though, so that driver and passenger can both reach them.
 
Last edited:
Actually, the prices on the REAR manual regulators aren't bad at all:

I'm having a hard time finding REAR electric window regulators though. I wonder if the ones on the front would work with a little bit of convincing? They look pretty similar, but I haven't really dug around in the rear doors enough to know.
1997 problems for me… Finding some has been unpossible since most 97+ had PW.
 
1997 problems for me… Finding some has been unpossible since most 97+ had PW.
Do you know what the difference is? I was just looking at the 97+ power regulators for the rear, I can find more of those than the pre-97s and they look similar.

Do you know if it’s like, something simple like just drilling a new hole? Or are they completely different? Trying to figure out if I can just make them work myself.
FuckifIknow… :flipoff2:
 
Have been really busy with work lately, but, got the axle painted yesterday.

I had it all worked out in my head that I was going to hit it with POR-15 and then top coat it blah blah blah.
Then I said man, I need to just get this thing swapped in there and stop taking so long.
So I googled what other people were painting their axles with, and a lot of people said Rustoleum Appliance Epoxy. It's actually pretty slick.

1716454523155.png

1716454553930.png
1716454582581.png


Hopefully I can get it done this weekend, but, I already know gf is gonna want to hang out all fucking weekend because it's a three day weekend... etc.

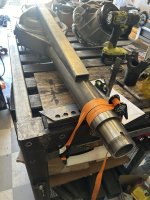
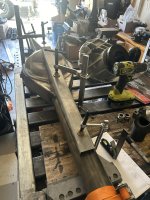
Edit: OH! How could I forget? I have been down an absolute rabbit hole reading about rear axles, so, ended up buying a full float Ford 9" housing, 62" WMS to WMS (the YJ axle up front is 63.5, so, I guess I can just run .75" spacers on each side, that's not so bad...) It's a 2.5" snout, Grand National. I've got some hubs on the way, and I'll be collecting parts for that thing on FB marketplace over the next few months. There are a huge amount of carriers/third members, gear sets, etc. I can get those on the cheap as they pop up. But, I couldn't find a sturdy looking 9" housing within 200 miles of me, and it will cost me $100+ in gas to go pick it up...

I really wanted to fab the housing myself, but once I priced out all the individual pieces, I would have spent 2x what I did on eBay, and, potentially ended up ruining it also. Plus I was already looking into buying a long piece of 1.5" round, ground and polished, dimensionally accurate, and then potentially printing my own pucks to turn it into an alignment/truing bar (the actual jigs/"professional truing bars" cost more than the housing itself), plus the axle tubes were going to cost me an arm and a leg (3.5" OD, .312" wall...), so, I figured I'd just leave the housing fab to the professionals...

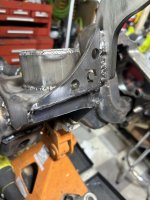
I did get a back brace though, and I'll end up trussing it and 4 linking it next, so, fun!
 
Last edited:


I had a 9 inch sitting around to swap up until I sold it and went to tons. It had a spool and I was thinking ‘I could carry a spare third member for driving the highway then swap at the trailhead.’ :homer:

Setting up gears is probably easier on a third member than anything.
 
Don't run spacers on the rear, it's better to have the front a little wider than the rear, helps with turning radius. Also, I dont think .75' wheel spacers exists, maybe those sketchy wheel shim things but definitely dont use those.
 
Agreed, those widths sound like they match up well, keep the rear as is.
 
Don't run spacers on the rear, it's better to have the front a little wider than the rear, helps with turning radius. Also, I dont think .75' wheel spacers exists, maybe those sketchy wheel shim things but definitely dont use those.

They exist, but they rely on pocketing in the wheel hub to clear the studs/lugs, and sometimes need the studs cut.

So, yeah, don't run them. :flipoff2:


I had a 9 inch sitting around to swap up until I sold it and went to tons. It had a spool and I was thinking ‘I could carry a spare third member for driving the highway then swap at the trailhead.’ :homer:

Setting up gears is probably easier on a third member than anything.

Yeah man, watching videos of guys setting up gears on the 9" third member looks like absolute cake compared to the D30's I've done two of now.

They exist, but they rely on pocketing in the wheel hub to clear the studs/lugs, and sometimes need the studs cut.

So, yeah, don't run them. :flipoff2:

I'm using Grand National 5x5 hubs, and they are essentially fuckin' Nascar hubs, the studs are 3" long, and 5/8 course thread... (Gonna press some reasonable length 1/2-20's in) I went this route because there is a huge market of dirt-cheap circle-track/dirt-track/racecar takeoffs on eBay, aftermarket/OEM parts are plentiful, and there are multiple mfg'ers of the style, some steel, some aluminum, some billet steel, etc. I've already ordered some steel hubs for way cheaper than retail, so I made money on the deal (this is how Jeep math works, right?)

When I said .75 spacers, I was thinking "shims" and not ones that actually use their own lugs/studs. I have plenty of stud length on the hubs, and I figured that it would be less risky than spacers/adapters that do actually use their own lugs/studs.

But, the .75" won't be noticeable anyway, so you guys are probably right and I should leave as is. It was the 4" difference with the WJ axle up front that I mostly was trying to account for (which the 9" does, almost.)

Right now I'm in fuckin parking brake hell though... The Strange Engineering full float hardware is so sexy, but it's insane $$$, I'm sort of trying to recreate it in a ghetto-fab way. Can't really use shoe-in-hat parking brake, I think I might use some single-piston GM calipers that have an integrated parking brake, that seems to be what everyone is including in the "Full Float Conversion Ford 9" kits, and they are pretty cheap.
 
Last edited:
Search Newb. :flipoff2:


Thanks man, whenever I get into a tight spot I always feel like I'm the only one dumb enough to have gotten myself here, so, no one else could have possibly already figured this out...

I did find the Wilwood electric parking brake kit, but it is stupid expensive. I do kind of like their little mechanical one though, they look sexy:
1716517918584.png

It never even occurred to me that it would be reasonable to fab something out of an OEM one, this is super interesting!
 
Couple of updates:

We’re building a full-floater Ford 9”.
IMG_6309.jpeg IMG_6310.jpeg

1997+ Rear Electric Window Regulators CAN be rigged to work in pre-1997 models! The mounting holes are slightly different, but the length of the up/down regulator motion, as well as the curvature, is perfect and essentially the same.

IMG_6259.jpeg

I popped the bracket off of my OEM 1990 Manual rear window regulator, and welded it on to the new (Dorman, but I’m sure any brand would work) 97+ electric window regulator. (Which I also removed the mounting bracket off of).

IMG_6263.jpeg

IMG_6339.jpeg

I needed the regulator to be inset into the door a little more than the 97+ models are, so just used some 1/4-20 bolts to attach it to the original window reg mounting holes, and used nuts as spacers.

IMG_6341.jpeg

The black hex bolt with the silver washer is holding the regulator (in one of the stock regulator mounting holes) as is that silver bolt about 6” to the left. (Yes, I fucked up drilling that hole twice, third times a charm.)

So, this regulator has 4 different spots that it is held to the door panel. The connection to the window itself is the same, and I’ve tested it and it works great!

Because I had manual rear windows and locks, I never actually had any wires going into the rear doors. I got some cheap wire boots (I think from an Alfa Romeo on Amazon) and drilled holes in the big flat body panel plugs.

IMG_6342.jpeg IMG_6343.jpeg

Used weatherpack quick disconnects in case I want to go doorless.

I also got those aluminum door panels from Turtle Labs. I’ll do a full review of them somewhere, but long story short, they were packaged and shipped very nicely, and they fit great. They included plastic body panel clips but I wanted something that looked a little more heavy duty. I used M6 nutserts and anodized aluminum dress up washers (with small rubber washers behind those, so they don’t scratch the powder coating on the door panels, and they look like this:

IMG_6344.jpeg IMG_6347.jpeg

I have to paint my door panels and door jambs now though for sure. So, will try to tackle that this week.
 
I’ll paint the arm rest/handle with that fabric/vinyl spray paint (which looks really good).

I’m a little split on these. Can’t decide if I prefer the OEM panels, or these. I’ve been needing to paint my doors and door jambs white, to match the exterior, so, I’ll do that and see how I feel I guess.
 

Attachments

  • IMG_6353.jpeg
    IMG_6353.jpeg
    1.8 MB · Views: 3
  • IMG_6350.jpeg
    IMG_6350.jpeg
    1.9 MB · Views: 3
FUUUUCK YEAH, last night I came up on 4, white, XJ doors, with wood grain door panels, power windows and locks, and in great condition with hardly any dings, for $100.

(Good thing I just spent ~$200 on power window regulators…)

But, I’m super pumped. This gives me door handles with the window switches in them, power lock switches, etc. I had bought a universal kit with a remote and solenoids, but I had read that it’s a bitch to fit aftermarket solenoids in the XJ doors, and now I don’t have to.

Plus, they are already off the Jeep which means painting them will be easy. I can get rid of some of my body dents, AND, the front doors have the vent windows! I don’t think this dude realized that those vent windows go for $300+ on eBay right now. I already have vent windows, but one of mine is missing the latch and it has always bugged me. Now I’ve got spare glass for every door window, and I can just rig up the OEM switches instead of having to use janky Nilight switches in my console.

Check these out, this was a steal. The panels just need a little cleaning up. I will probably end up going with the black aluminum panels, so, may sell this set if anyone wants.

In other news, I got the back brace on the 9” housing yesterday. Watched some videos, took my time, preloaded the fuck out of it, and when I was done, the axle tubes are exactly where they were originally, not 1/16” of flex.
 

Attachments

  • IMG_6503.jpeg
    IMG_6503.jpeg
    1.9 MB · Views: 2
  • IMG_6935.jpeg
    IMG_6935.jpeg
    2 MB · Views: 3
  • IMG_6959.jpeg
    IMG_6959.jpeg
    1.9 MB · Views: 3
  • IMG_6967.jpeg
    IMG_6967.jpeg
    2.3 MB · Views: 3
  • IMG_6966.jpeg
    IMG_6966.jpeg
    2.2 MB · Views: 3
  • IMG_6965.jpeg
    IMG_6965.jpeg
    2 MB · Views: 3
  • IMG_6500.jpeg
    IMG_6500.jpeg
    782.2 KB · Views: 3
  • IMG_6486.jpeg
    IMG_6486.jpeg
    1.8 MB · Views: 3
  • IMG_6489.jpeg
    IMG_6489.jpeg
    2 MB · Views: 3
Ironically I bought four MANUAL doors because the regulators in mine don’t have much power and manual windows work all the time. Mine are spray can truck bed liner black.


I think I have a vent window sitting on a shelf. $300 is retarded stupid money.
 
Last edited:
Ironically I bought four MANUAL doors because the regulators in mine don’t have much power and manual windows work all the time. Mine are spray can truck bed liner black.


I think I have a vent window sitting on a shelf. $300 is retarded stupid money.
Yeah I was thinking about you yesterday, because I still am going to need to figure out how to wire all this the best way possible, so I will do a write up on it because I haven’t seen one anywhere specifically about rewiring power doors in a previously manual XJ.

I haven’t checked everything out yet, but judging by the wiring harness coming out of the driver’s door, I don’t have a place to plug it into. All of the doors are essentially wired together in the power windows/lock model, and I can’t imagine Jeep just running all that wire and leaving it all unused in the manual version.

I also don’t think I’d have any of the remote lock/unlock hardware, on a completely manual car. So, I will probably use the “universal” kit that I got on Amazon, and try to wire the locks into that. The windows will just be a matter of figuring out what has continuity which each direction of the window switch is flipped, and go from there. I can still solve for the problem that you (and fl0w3n ) had both mentioned to me. He was wanting to potentially trade his electric stuff for manual stuff, which I am still down to do, except that my driver’s side manual window regulator has since started slipping and not working right, which is what started this whole “conversion project.”

I can make my own weatherpack plugs, I just need to figure out how to tie it all together and get power directly to each door, rather than in series.


IMG_6972.jpeg
 
I’m parting my 90 out now, you can have the window wiring harness or whatever. Just tell me where to cut or come here and cut it out yourself just how you want it lol
 
I’m parting my 90 out now, you can have the window wiring harness or whatever. Just tell me where to cut or come here and cut it out yourself just how you want it lol
Oh that would be fuckin tits. I’ll text you.
 
Top Back Refresh