What's new

The Jeffersons trailer

Speaking of wiring, I’ve been messing with that a bit too,
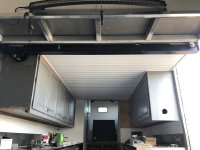
In the above pic you can see open access to the water heater,
Along with a void at the end of the upper cabinets,
Both these areas will be utilized for the wiring,
The lower water heat access panel was built, not only to cover the hole, but also to house the DC power converter / fuse panel.
724EF4D1-57A0-476D-9DE2-8CBCEE0415A7.jpeg


Since the conver was “pre-wired” with short wires, a couple terminal strips were added to the back side of the panel for easy hookup to the rest of the trailer wiring, when I get that part done.
75496D6E-802A-4DD8-ABA4-A9B3BC25B260.jpeg

And that’s about as far as that will go until installation & hookup.

Now the area in the upper cabinet was a result of where I had to cut the cabinets off to accommodate the stairs.
I figured this would be a good place for a switch/monitor panel,
After chopping on a piece of aluminum, & drilling a few holes, this is what I ended up with.
B23EDD88-2F40-4C0A-98DF-247FECF1654E.jpeg


Basically exterior light switches, awning/canopy control, heater/furnace control, water heater switch & monitor,
Interior light & water pump switches, generator start/stop,12 volt power point, & an analog volt gauge to see how the batteries are doing.
The back side of that was a good half day to stub out, but it’s ready to plug & play once the trailer is.

Also speaking of generators,
I had an 8kw Troybuilt (Briggs & Stratton powered) that I was going to modify to fit behind the left wheel box/inner fender,
But a friend of mine said he had an old Onan he would trade for the Troybuilt if I was interested,
He dropped it off so I could mess with it a bit.
F1535FD9-A59A-4D80-BE4C-FC73CC94BA3E.jpeg

This one is only 6.5kw, but it is considerably more heavy duty, runs lower RPM & is actually pretty quite compared to the Briggs powered unit. It is also designed to be in tight quarters, so a fan & ducting is integrated into the unit,
First order was a good scrubbing,
6809B1D5-019A-47B5-9355-D92079AEFB61.jpeg


Then got it running.
It needs a needle & seat, but runs pretty good, & makes 220 volts. I should have a carb kit here by next days off, then I can run it for a longer period of time & look into getting it mounted.
 
Quick update from this last days off,
I received the carb kit that I had ordered for the Onan, so I went through that, & while it was out of the way I adjusted the valve lash on the engine.
4F518EC4-1E4D-4CB2-A41D-C94E61679F24.jpeg

After reassembly I run the engine a bit, aside from an oil change & putting a few holes in the floor, I think it’s ready to go in the trailer.

Next up was pulling the batteries from the old crawler hauler (four 6 volt deep cycle golf cart batteries) & installing them under the lower level stairs with a master shutoff switch, no pics of that just yet,

Then after routing all the wiring I figured I would need, I got the converter/fuse panel wired & installed,
BEE83D52-CC0A-4D27-BDA0-FE12A8E4D573.jpeg


Probably to many solder-less/crimp connectors for my liking,
But this is a good place to burn up a bunch of my grade-b stock that I’ve had laying around for to many years. Stuff I’d never use on a build.

36511BEB-9618-4A8C-9D7A-8418D0CBEDE9.jpeg


Then finally, for the first time since dragging the trailer home, I was able to turn on a few lights.

71448FD4-D25B-4E4E-A6C3-D85280620A33.jpeg


Upstairs/bedroom
C9E6DC15-E531-4DFA-85FB-27E7D6D450EA.jpeg


Bathroom
FF51CF32-2CCF-484A-9292-D5158AF1935E.jpeg

FB423BAE-C025-4C1C-977C-D19B7160DFBF.jpeg


These two small LED lights in the cargo area are turned on from the bedroom upstairs, in case I want to get up & get something from the lower level without waking up the whole trailer.
BC747CD9-0B9E-4D89-81CF-206C43CF25F1.jpeg


There will be much better lighting installed for actual loading or working in the garage area.

Maybe get to that next days off.
 

Attachments

  • 08796640-E0C9-45B6-B66C-C23234E26E45.jpeg
    08796640-E0C9-45B6-B66C-C23234E26E45.jpeg
    1.2 MB · Views: 11
Another set of days off just went smoking by, & it doesn’t seem like near enough work got done.

With my first day off being beautiful weather & snow/cold forecasted the rest of the week, I figured it was a good time to put the generator in place,
But first I had to cut a few holes in the compartment floor for the cooling fan duct & exhaust, then drill the mounting holes,
Fortunately that compartment floor is now 2 piece & it was easy to pull out of the trailer for fitting,

Once the floor was complete I attempted to slide the generator in through the exterior access door, thinking this would be the best way to install a 300 lb generator by myself, Unfortunately it was just a tad to big to fit through the door,
That meant it had to go in from the top, & setting this thing down into a roughly 20” deep hole was going to require some tooling,

A couple clamps, 8ft of uni-strut, a uni-strut roller & a 500 lb rated chain come-along were all recruited for the job,
3716605F-4F18-420A-8E23-615DAA981F59.jpeg


Might have been pushing the limits of that unit-strut, but it got the job done

Simply rolled the generator up the ramp door on the hand truck, hoisted it up with the improvised over-head crane, slid it over the hole & lowered it into its new home.
26270C98-C6D7-4EDE-9C27-C3A50FC5BE61.jpeg

609246D8-11EA-4BAE-AD80-0C0D1F4E35B7.jpeg


The same day the generator was installed I stopped by the local tow yard & bought a second generator for parts.
26D2ED94-E5DD-45A2-B073-80C489F3D104.jpeg


I had actually called on the second generator right after getting the first one,
It is smaller (4kw) but uses a lot of the same parts, fuel pump, points, coil, air filter & ducting, but most importantly, & the main reason I got it was the electric choke parts that my 6.5kw was missing,
After getting the smaller generator home it looks to be in pretty good shape & might be worth getting it running when I get a minute.

With a generator now in place & crap weather setting in, I got back to work inside,

Most of the AC power is done & wired into the breaker box, with the exception of the Air conditioning unit, & the DC power converter/charger,
To run these two I am utilizing the original heavy gauge power wires that connected the trailer to the 20kw truck mounted generator that was used before I owned it,
These wires are 6 or 8 ga copper, they run full length of the trailer & are miserable to work with,
One problem was there is only 2 leads, (remember the original builder relied on the trailer chassis for the ground)
Luckily since I ran a whole new 7 wire light cord to the back of the trailer, I was able use an extra wire as a ground lead,

An 8 circuit terminal strip & a couple power lugs were used up front under the bench/bed,
DF0AF585-A0DA-4DCA-A3D0-B05673C0609C.jpeg


Still needs a little cleanup, but the top blue cord is 7 wire from the truck, the lower blue cord is 7 wire back out to the main trailer wiring that runs to the back of the trailer.
The SO cord zip tied to them is 10ga-4 which which provides AC power back around to the DC converter,
You can also see the the big AC power wires & air conditioning supply cord tied into the terminal strip.

This seems kind of complicated, but the DC converter requires a bit more amperage than I had wired for up the other side of the trailer,
To finish off this mess I’ll be building a false floor for that storage area so all the electrical will be protected

Being fairly confident that all my AC power wires had been safely connected, I hot-wire Harry’d a cord together & plugged the trailer into the shop.
5C4E973E-C704-4360-A3EF-2E0C74BBF94F.jpeg

Amazingly enough neither burnt down, & so far everything works,
I’ll wait until I have a proper cord & warmer weather to fire up the air conditioning ....
 
Continuing work in the back of the trailer I started tackling the air system.

Several months ago I bought a 20 gallon 2 cylinder compressor specifically for this project.
141A8D0B-19D3-48CE-9CBC-0517303415D4.jpeg


The plan was to permanently mount the unit in the trailer, preferably under the ramp floors like the generator,
That meant I had to chop up a brand new compressor,
But it is what it is,
The compressor/motor mount was cut off the tank & after some new mounting tabs it was reassemble & looks like it should fit nicely in the same compartment as the generator.
31CDE008-B63E-47DA-9CFE-2DBBA12F142A.jpeg


I was going to remove the tire, build new mounts, & put the tank under the floor on the other side of the trailer,
But I got to thinking, if I could utilize the existing air tanks on the trailer, that would save a lot of room,
The trailer air system already has 3 small tanks, combined they total right at the same 20 gallon capacity .

However plumbing all the tanks together was a whole different challenge,
Each tank is dedicated to a specific task,
One is supply air & used primarily for releasing the spring/park brake,
The second is the service brake tank & is used for just that,
The last one is simply for the air ride & supplies air to the load leveling valves.

The only line common to all three is the supply line through a check valve at each tank,

To actually have them tied together I had to plumb the service & spring brake tanks through valves so I could isolate them while in use in the road,
The air ride got a valve so I could shut the bags/leveling valves off,

Plus I needed a place to plumb in a check valve for incoming/feed air from the compressor, outgoing/supply air to the work hose, & a pressure switch to turn the compressor on/off,
After lots of fittings, Teflon tape, a few valves & some air line, this is the mess I ended up with.
F38EDD99-EDF9-4AA9-B1BB-1685D80788D8.jpeg
As complicated as it looks, operation is simple, open the lid, turn the compressor on, open the valves on the distribution block, close the valve on the pressure switch,


Maybe not as simple as just mounting the air tank, but it’s all in one place, & not raking up hardly any room.
FC87530E-A801-437D-BB0D-DAB05C0B35A1.jpeg


And that leaves this compartment almost completely open for other uses.
52C8B2EA-110A-4CB1-82D4-969899956A2E.jpeg


I say almost, I still need to fit a fuel tank for the generator in somewhere, & it will most likely go in this side.
Maybe get to that next days off, after plumbing the compressor into the system & wiring it up.
 
That's why we love these threads so much, brilliant use of those tanks and the extra free space.
:beer:
 
This is seriously badass.

The more I see nice trailer builds, the less I worry about DIY for one in the future. I can't stand how flimsy the consumer-grade campers are especially for the amount of money they sell for.
 
I only got to work on the trailer 3 of my 5 days off this week, so I tried to make the most of it,
Day one, I continued on the compressor plumbing & wiring, after a small test to confirm everything worked I’m calling the air system done,
It will get a longer hose on the reel later, but for now it’s done,
Next up was a fuel tank for the generator,
Since the wife was in Reno the day before, I had her stop by summit & grab a 12 gallon aluminum RCI fuel cell,
I didn’t care for the fuel pickup in the top of the tank, but that’s the reason for getting an aluminum one,
A few minutes on the lathe I had a weld in bung, & a few more minutes on the weld table & I had a bottom feed pickup,
6909C54B-0FED-4F16-82F0-0B59D5491B9A.jpeg


The ball valve will come in handy later if I need to pull the generator, or service the fuel filter,

Before mounting the fuel cell a couple hatch props were added to the access panels so I didn’t have to fight keeping them open anymore.
926B561E-0E2E-4543-933A-C85988176283.jpeg


Next a single strap is all that’s needed to keep the cell in place,
That wasn’t really planned, but it worked out well,
B901103D-6D8F-4560-80A2-3AEA07CE2401.jpeg


A couple sticks of 5/16 hard line & a fuel filter gets the fuel across to the generator, & pretty much finished up that part of the project.
I did run the trailer off the generator for about 30 min this weekend & it seems to run the air compressor, AC unit, & 12 volt power converter without any issues.

Day 2, while my wife worked on painting the stairs, I worked on finishing the stuff under the stairs, which mostly involved plumbing the water fill for the fresh water tank,
I did not get any pics, but that bit of plumbing is complete,

After the girls went home I worked on more lights, this time in the garage area,
The trailer originally had a few flush mount housings with a single 1156 bulb, I think these were just to keep the upper level from being pitch black if anyone ever needed up there,
The hole for the housings are the perfect diameter for a seal beam light, but the wall thickness does not provide enough depth to allow for the plug in the back of the light,
So,,, I trimmed a little off the light, then soldered the wires directly to the pins in the lights, giving me just enough room to fit them flush in the walls.
04A71C17-C80E-4EA1-A8A0-CAF987F2C370.jpeg

Kind of a lot of effor for lights that are basically just plugging holes,

For the main garage lighting I had a cheap 48” LED light bar that ended up getting mounted at the bottom of the rear upstairs wall, (back of the kitchen ceiling pointing towards the garage area)
193A4BC8-5C79-401D-AF3D-0F8A2BD46BAF.jpeg

Looking towards the back of the trailer from the kitchen area.
22E6CD77-9849-406F-B7F4-2612C129A7A6.jpeg


Day3 was spent mostly on the kitchen area ceiling, since it had a big gaping hole where the fluorescent lights used to be,
1E78436B-299B-4A4D-A9D4-5AE9DC196CC9.jpeg


The vinyl soffit material was carried all the way back to the jib/hoist beam,

The last 18” on the garage side of the beam got a strip of FRP board,
7F62FB67-B5BC-4B2A-820B-16F93EC0D55C.jpeg


You can also see the hangers for the strip curtain that will be hanging just behind the beam once the trailer is done,

Once it got dark again I started getting ideas on lighting the lounge area,
9D94579E-7A6E-4C9D-809A-0A2C6E422885.jpeg


Probably work on that more next week,
After those freshly painted stairs are set back in place.
 

Attachments

  • 6DBBAC7B-79DB-4C50-8BFC-194F8956D28D.jpeg
    6DBBAC7B-79DB-4C50-8BFC-194F8956D28D.jpeg
    1 MB · Views: 19
I know everyone likes pics, but I just didn’t get many this days off,
Stuff got accomplished, just not much pic worthy stuff,
Started with a little battery maintenance, I found it interesting distilled water has been a little challenging to get locally, maybe everyone around here is doing their pre apocalyptic tune up on their battery banks,
Anyway, continuing with maintenance type stuff, the Generator got an oil & filter change,
Then before setting the lower stairs back in place, I figured I better button up the drain plumbing on both the gray & black water tanks,
Originally the waste water dump valve was actually inside the trailer, the drain hose was hooked up & routes through an access door,
I didn’t really care for the thought of any dripping or mess being made inside the trailer, so the access was removed, then both tank drains & dump valves were located outside the trailer,
A removable aluminum panel was then fitted around the plumbing,
8BA87870-2C32-4DE4-8008-0FB06ECC85F2.jpeg


Next the remainder of the rubber floor mat & carpeting were removed from the lower level, followed by drilling all of the rivets out that hold the aluminum floor down, the holes were then drilled over sized & the floor panels were then fastened down with new 1/4 stainless steel rivets.

After dark more trim & lights were added to the upper lounge area.
5AB62E7F-1820-4299-8774-E3FC6BF1D435.jpeg


The next day it started warming up pretty quickly so I got the chance to test the AC,
While I had it running I figured I better put up the strip curtain,
The curtain actually makes quite a difference in temps between the front & back of the trailer,
I was also surprised at the noise differences the curtain made,

Already working on the lower level I figured it was a good time to get the lights done there as well.

Same method was used here as the upper lounge area. Aluminum channel with LED strip lights,

6F00EA12-35A9-4447-828F-1EF88DA893B8.jpeg


Here you can see the strip curtain & lower stairs back in place.
9C9DDF08-76E8-4848-AB9D-575E76C4BB01.jpeg


Even though it was way too soon for flooring, I had to lay some down in the lounge area, just to see how it was going to work out.


17CFA65E-4DCB-4531-8DE0-A72444492343.jpeg


The material is just a 3/4” thick foam workout mat that comes in 24” squares,
 
Almost seem pointless posting updates every days off at this point in the project,
5 days just flying by & such minimal visual progress,

I did get the rest of the exterior work lights wired, & the upper bedroom area flooring done.
1CD62383-EE19-4439-BEAF-1713E91CE019.jpeg


Next a little stainless from the old counter tops was cut up & repurposed to box in where I had previously extended to inner fender boxes,
A94940DE-ECBB-40B1-84F6-8DADC6A91500.jpeg


The driver side was left open for now, as I’m not 100% sure what will be stored there,

The passenger side however got a door built to completely box it in.
848AF414-6CCF-4282-9E39-F8FA3E1F8A67.jpeg


This side is home to the propane tanks,
5AF358AA-2C94-431F-A0F5-CB175826CDFF.jpeg


In the previous pics you can see a strip of E-track on top of each load deck/fender box,
These combined with a long strip of E-track mounted to the floor will be used to tie down the tires during transport,
Since the tires will end up spanning the full width of the trailer obviously something was needed between the fenders to tie the tires to,
But I wanted something removable to keep the walk way open while everything is unloaded,

Starting with a piece of 2” tube, one end was capped with a 2” cap that has a 1.25” register/stub machined on one end before welding it in,

The other end got a spring loaded 7075 aluminum plunger,
 
Last edited:
F654CC0F-DFAB-49D0-B7B7-33C8071E5D33.jpeg


A9366A09-AFFB-4BA1-8440-BD559B4776FD.jpeg


The 1.25” portion of the cap & plunger fit in the 1.25” holes previously cut in the tube caps that were used to block off the square tubing that the the fender extensions were made of,

Long story short, the tube clips in place between the inner fenders & will serve as a good place to tie down tires to.
8EE688F4-037F-41BE-BDED-2627469B9B29.jpeg


Next days off I’ll shoot for getting a loading winch mounted, & do a little trim work.
 
Still plugging away,

A few months ago my wife’s boss asked if I wanted a couple bumpers her husband had laying around the yard,
I didn’t have any use for them, but I told her I’d haul them off if she wanted,
As luck would have it one of the bumpers had a Warn M5000 bolted to it, after testing it the winch was set aside, now that I’m to that point in the project, a hinging winch plate was built & mounted to the floor, right between the inner fender boxes towards the front of the trailer,
The reason for a “hinged” mount was to try & keep the walk way open between the inner fenders, yet still be able to winch a rig in when needed.
Next the winch got bolted in & wired up from the battery that runs both the rear door winch, & the generator.
After that both the M5000 & the door winch got a couple cheapo eBay remote winch controls so they can be operated from about anywhere in or around the trailer.
All of that & the only pic I took was of the new synthetic rope I put on the M5000
A0B3F7F1-527F-4B04-A1ED-CCD9292712FD.jpeg


Another part of the project that I have been working on for months now, not physically, but in the back of my mind, is the transport wheels & tires,
Also a while back I had recentered a set of 20” steel wheels to fit the Axletech pattern, then mounted up a small set of ags.

99C2D1B5-A51A-4AF6-8A37-25E101E2CB88.jpeg


I did not make a huge effort in getting the back spacing perfect for fitting in the trailer I just welded the centers in where they fit in the shells good & I knew the tires would go through the door opening,
I figured once I could bolt them on the rig I would adjust with a spacer if needed,
Of course by the time I actually decided I could use an extra 1/2” the price of aluminum had gone through the roof,

So I’ve been watching for good deals on aluminum plate to have a set cut out on the water jet,
Or even a set damaged MRAP wheels,
There just hasn’t been anything cheap go by,
Just out of curiosity I reached out to John at Stazworks & asked if he ever had any waste parts go to scrap with the 335mm lug pattern, he replied that they do all the time since they work with the Hutchinson wheel shells pretty regularly, then asked what I needed,
Long story short, John figured it would be easier & cheaper for him to machine what I needed out of his waste/byproduct, rather than pay the shipping for enough scrap parts to machine what I needed myself,
I was hesitant but told him go ahead,
A week later a box showed up & four 1/2” thick axletech wheel spacers were inside, all for less than half of what enough 1/2” plate would have cost me.
FB586AB4-78D5-4741-96D7-6CE180A66181.jpeg


CD0925E7-4E26-457F-BD3A-9B9D7A377D98.jpeg

60B88064-A235-4FE2-B3F2-783DACFD6B28.jpeg


Now, as for why I needed a1/2” more width on the tires when everything would fit through the door way.

Without the spacers the lug studs of the axles would be the widest point,
A4C89140-174D-4F2F-AB11-0631122354B6.jpeg


With very little clearance from the studs to the interior walls of the trailer, I thought it might be a little easier on the walls if it was the sidewalls that rubbed first if there was ever any contact.

Which should be the case with the spacers installed.
5A1EE65A-0A64-4C5B-B594-D0B210F89BE8.jpeg
 
The project is really getting down to the little stuff.
Most of the trim is done inside now, when I get bored with that I move on to something else for a bit,

One of those small projects was some form of safety catch for the rear door latches,
The latch itself was built to actually snap into place, I doubt they’ll ever “pop open” & even if both of them somehow did, the winch is still going to hold the door closed,
But, just so there is some way to clip, pin, or lock the latch closed, a couple hasps were added,
Cheap & simple
11B9393F-FEDD-41B3-81D7-8506A6A987EE.jpeg

The double side got a little work too, ditching the original cam style latch & having to open both doors at once,
Now one door can stay closed, using the other for living quarters access,
Then when needed both doors can be opened like originally intended.
5A52AA89-B54F-4459-AC2E-D7A817791C5B.jpeg


Another project that got finished up was the sink cabinet, 1/8” aluminum was used to build a face & double doors to cover up & have access to that storage area,
A34658A3-14D8-4AF8-B7B7-26421B4A88AB.jpeg


3403DC53-06A9-40CC-95CE-352C49E233DD.jpeg


I also started the banner/flag collection on the upper walls in the garage area.
9FC66217-817E-4E89-B52B-700A5A57DE44.jpeg

71B528B6-C544-4F62-8AAB-E56A092551FD.jpeg


Then the fridge was installed & flooring done in the kitchen area.
A6E43CB8-5DB9-410A-B8BB-C76E4AE83CAC.jpeg
 
The double side got a little work too, ditching the original cam style latch & having to open both doors at once,
Now one door can stay closed, using the other for living quarters access,
Then when needed both doors can be opened like originally intended.
5A52AA89-B54F-4459-AC2E-D7A817791C5B.jpeg
So how does that work to open from the inside? I would think you would want an exit door that can't be locked from the outside so someone can't lock you in either as a prank or for some nefarious purpose.

Aaron Z
 
That bar/latch does not open from the inside,

The door that the swing bar is bolted to (on the left in the pic) is the door that is fixed closed, the system that holds it closed is in fact inside the trailer,

The door in the right will be used for regular access,

The swinging bar holds this door closed for while traveling.

When not traveling/at camp the swinging bar will be fully open, the lock/latch for that bar can be locked closed, so the bar can’t be latched.
Does that make sense, kind of hard to explain over text,

The double doors are design to open at the same time, so when the one on the left is fixed closed, the door on the right used for regular access has a bit of “friction” to open or close it, plenty to keep it closed at camp or anytime we’re going in & out regularly.
The swinging bar latch is just to keep that door closed while traveling, and will be locked open any other time.

If someone were to swing it closed even though it couldn’t be latched, all I’d have to do is unlatch the fixed door from the inside & push them both open.
 
Awesome progress as always and really coming together.

Did the weigh the trailer or have an idea of weight when you first got it? As a numbers nerd, would love to see a before and after weight.
 
I weighed the whole combination when I picked up the trailer.

(Truck)
Front axle 9250
Rear axle 15250

Trailer axles 22000

This was with a 20kw generator & air compressor loaded strait in the side doors,

I’m hoping I lost a few pounds overall in the remodel,
 
I weighed the whole combination when I picked up the trailer.

(Truck)
Front axle 9250
Rear axle 15250

Trailer axles 22000

This was with a 20kw generator & air compressor loaded strait in the side doors,

I’m hoping I lost a few pounds overall in the remodel,
Cool info to have!
 
Looking awesome! If you need custom cushions, Cushionsource.com made mine and they are great. Do sunbrella fabric etc too
 
I guess I’m down to playing with the little stuff now,
Fine tuning the generator, transferring our “stuff” from the old trailer to this one, & figuring out where everything is going to go.

With 48ft of big trailer behind the truck, I figured a rear view camera would be a good addition,
2906FEFB-9EC1-485E-8DB9-723B3BB9A5AB.jpeg

AD79961D-440E-4294-AFCF-6DDB62A83C05.jpeg


I’m sure it’ll need some fine tuning, but for now I have the camera adjusted so the red lines indicate where the door lands when open,
633F0D0B-1207-4AE4-9582-5A8C2824141B.jpeg


Next up was getting the rest of the small tires installed on the buggy, & ready for a test fit.
9A7FDAD2-CA1B-4975-B1FF-51F0C0D64F72.jpeg


Then four 54” MT claws were rolled in & strapped down.

A15521C5-1860-49BA-820C-25230582A32C.jpeg

2FF65CD3-DF11-4AEC-B9A9-2E2B66B83D37.jpeg


The width of the claws make it so I cannot fit a spare, however I would rarely run these tires away from home anyway. & if I did I could put a spare on the back of the Peterbilt,

The ags I normally run however, I can fit five in this place no problem.

Then finally after almost a year, I was able to load one of my rigs in this trailer.
492192E6-EA1D-4657-AFD3-BCE3E205FB2C.jpeg


59D77407-CE33-4870-8E4D-785EAD7D33C9.jpeg


It’s a pretty snug fit, but it goes in there.

The last couple of my days off were spent disassembling the old crawler hauler, I put the living quarters area back to a functioning travel trailer, I might have it traded off.
58CE0877-FAB6-4DC3-8C66-109D2E5A4E99.jpeg


And the big flatbed is going up for sale.
5AC42332-598C-4E41-9442-147496CC0BC0.jpeg


Next days off this project will get the last few finishing touches, then take it for a test tow, & hopefully be ready to go for the year.
 
Smart to adjust the camera to show where the door opens. I probably wouldn’t have thought of that until it was too late and had to move everything to unload.

Purely out of curiosity, how much does a wheel/tire combo weigh on the 54’s and the at tires?
 
I’d have to weigh them,
The MT claws on aluminum wheels are probably 300+
The ags on steel wheels are considerably heavier, maybe 350+ each.
 
I’d have to weigh them,
The MT claws on aluminum wheels are probably 300+
The ags on steel wheels are considerably heavier, maybe 350+ each.
That’s close enough weight wise for my curiosity unless you just run out of stuff to do around there and want to have a weighing party.
 
Top Back Refresh