What's new

Shop and Tools: Tips and Tricks

Stop using the cheese-grade drill bit in your hole saws, stuff a 1/4 inch grade 8 bolt in there instead. It won't bend at the first bindup.

Also, even if you keep the drill bit in the center of the hole saw, don't make your pilot hole with the saw attached. When the pilot bit breaks through and you smash the saw against whatever you're drilling, it'll fuck-off sidewards and wreck shit. (figured this one out a looooooong time ago, but still enjoy laughing at other people when they fuck up).

P6100708.jpg
Been doing this for decades, thought I put it in this thread at the other place. Showed guys at work and they were baffled too
 
So, easy outs came up in another thread.

You are most likely firmilliar with this style:


s%2F1%2F0466%2F8593%2Fproducts%2F1-IMG_6620_grande.jpg


Let me do you a favor....


Throw them out!


And pick up a set of Proto or similar square style.

These


ayimg.com%2Fimages%2Fg%2FWE4AAOSwqA9e0P~r%2Fs-l640.jpg


The problem with the spiral flute ones is that the more torque you put on them the more they expand the bolt into the hole causing more resistance/friction.

They basically make your stuck bolt stucker.


The straight flute type only expand the bolt as hard as you hammer them in, which should only be just enough to get it to bite. Its OK if it slips, that just puts a taper in the hole and gives it more meat to bite onto.

Plus you can sharpen them at least once before their trash.
 
I've had days where I've cycled through both kinds of those extractors with no luck. Good idea to have both kinds on hand. I've also made the pick style ones.

Do yourself a favor and throw all those away and learn how to tig:flipoff2:
 
gas weld something to it
works nearly every time
the trick is to get the broke off bit glowing hot, then don't be an impatient retard, let it cool off completely before you go and turn on it

we used acet in the torch at work, so I could do this
my cheap ass uses propane so I can't at home, gotta slum it with electric welders
been thinking about getting a little MC tank, just can't justify it sitting forever between uses (or it just plain being 100mi away whenever I need it)
 
Left hand drills get out about 70% of the stuff I mess with. I have square extractors and tend to reach for those first. Torx bits hammed in to a drilled hole make for decent extractors in a pinch.
A neat trick if you have a through hole is to drill through the bolt, then take the next size up and start drilling and jam it into the hole and make the drill screw into the bolt and drive it out the other side.

Milling tip.

If you need to make a few identical parts you can gang them up in the mill and save time.

The issue is that even parts of the exact same size will not hold uniformly.

For this, take a sheet of paper and fold it over 3/4” the entire length and soak it in WD40 and put it between the vice jaws and your parts.

Like this. You can see the WD squeezed out in the second pic.

550486AD-62F7-4E16-A9FC-C2F27058AC44.jpeg
360399D2-E0BA-45BD-BD28-9BC4776FA477.jpeg
 
This trick for making duplicate parts in the lathe I was using the other day will save you time and eliminate doing math.

Make your first part or use the part you’re copying then put it in the calipers.

Next zero your calipers to the part, then when you check your next part during the turning process you will have a direct read as to how much you need to take off.


Zeroing to the part.


1DDB50A8-33AE-4A20-BD38-A7950A82E77E.jpeg


Checking the part in process, shows I need to take .041 to bring it to size.


25273948-E19E-4110-839F-866C793A3675.jpeg


Now, you can always set your dials to zero. But often older machines like we’re usually don’t “Repeat” ie go back to the exact same place when the dial reads the same number. Just another tool for the mental toolbox.


Figured I’d show this also. When cutting brass, bronze or iron, make some kind of cover for your ways. These materials are extremely abrasive and when they get in your ways you’re fucked getting them out.

This is wear resistant Aluminum bronze and would play hell on the ways if it gets in.

F7A2E234-0232-4047-8855-5DDED23C33AC.jpeg
 
Last edited:
Good call on the chip catcher. I flat out HATE working with anything besides steel mainly due to the shavings. I'll also rig up a ghetto dust/chip collector with a shop vac if at all possible to reduce the mess.
 
What does adding the WD40 do?
When the paper is soaked with oil it swells and grips better as it has some squish to it, hence the oil being squeezed out in the one pic..

It also seems to last longer, Ive been using this piece for a couple of years where dry paper seems to crumble after a while.
 
I just discovered safety wire.

Finally got one of those dohickys for clamping using stainless safety wire. Bought mine from Aircraft Spruce up here in Canada, along with 4 lbs of stainless safety wire.

100% would recommend. Also nice that you can goober one together yourself out of little bits of scrap metal (see video below).

I definitely need practice making them look nice, as it's a pain to keep all the wires from crossing each other, especially when working in a shit spot.

Also of note is the fact that you don't need to rotate the tool to bend the wire (which is not possible in tight quarters). You can simply rotate the tool a little bit then keep bending tension as you loosen the tool (hard to explain, but happens naturally when it's in your hands).

P6180736.jpg
P6180743.jpg
P6180745.jpg


This one is the clamptite.
You can also easily make your own version out of scrap steel (skip to 5:14 in video to see one make from a flat bar and a piece of roundbar. (The rest of the video is also worth watching!)


 
Last edited:
Okay, now I need one of those safety wire clamping tools.

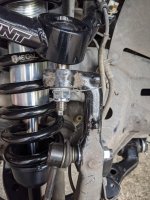
I just did some safety wire action on the bottom nut for a uniball stud. It was a big nylock, and the control arm company said to throw red threadlock on it. How about NOPE. Whipped out the safety wire pliers instead.
 

Attachments

  • PXL_20210612_195351785.jpg
    PXL_20210612_195351785.jpg
    2 MB · Views: 144
I swapped the 6’ power cord on my welder for a 25’ cord. I can now reach anywhere in the shop to weld instead of having to move the project closer or run an extension cord.
 
I swapped the 6’ power cord on my welder for a 25’ cord. I can now reach anywhere in the shop to weld instead of having to move the project closer or run an extension cord.
My extension just stays permanently plugged into the welder...has never been inconvenient, no different than a longer cord.
 
I just discovered safety wire.

Finally got one of those dohickys for clamping using stainless safety wire. Bought mine from Aircraft Spruce up here in Canada, along with 4 lbs of stainless safety wire.

100% would recommend. Also nice that you can goober one together yourself out of little bits of scrap metal (see video below).

I definitely need practice making them look nice, as it's a pain to keep all the wires from crossing each other, especially when working in a shit spot.

Also of note is the fact that you don't need to rotate the tool to bend the wire (which is not possible in tight quarters). You can simply rotate the tool a little bit then keep bending tension as you loosen the tool (hard to explain, but happens naturally when it's in your hands).

P6180736.jpg
P6180743.jpg
P6180745.jpg


This one is the clamptite.
You can also easily make your own version out of scrap steel (skip to 5:14 in video to see one make from a flat bar and a piece of roundbar. (The rest of the video is also worth watching!)


i use a bit of safety wire, but its a 'in a pinch' deal to use these methods. i own a clamptite but dont ever want to use it. safety wire of a couple different sizes is in every tool kit but wont ever replace a proper hose clamp.
 
I swapped the 6’ power cord on my welder for a 25’ cord. I can now reach anywhere in the shop to weld instead of having to move the project closer or run an extension cord.
I'm with you on that one, I have 30' cords on all of my shop equipment. Never search for an extension cord and fewer plugs/receptacles to buy:smokin:
 
I'm with you on that one, I have 30' cords on all of my shop equipment. Never search for an extension cord and fewer plugs/receptacles to buy:smokin:
Welcome to little italy, aka the spaghetti zone
where I keep all my tools

I like short cords on my shit, then they don't tangle and I'm using an extension cord 100% of the time anyways
circular saws in particular need a short enough cord that the plug body cannot catch on the edge of what you're cutting
drills get one just long enough that the key can reach the chuck when taped onto the cord
 
My extension just stays permanently plugged into the welder...has never been inconvenient, no different than a longer cord.

I'm with you on that one, I have 30' cords on all of my shop equipment. Never search for an extension cord and fewer plugs/receptacles to buy:smokin:


Tried to quote all three of you, but this board...


Something you might want to be aware of, they put short cords on for a reason. I went up one gauge when I made my cord due to the added resistance of the longer wire can cause a voltage drop.

For most of what we do it should not matter, but if your in a situation where youre needing to max out your machine it could cause issues.
 
Welcome to little italy, aka the spaghetti zone
where I keep all my tools

I like short cords on my shit, then they don't tangle and I'm using an extension cord 100% of the time anyways
circular saws in particular need a short enough cord that the plug body cannot catch on the edge of what you're cutting
drills get one just long enough that the key can reach the chuck when taped onto the cord
Saws need a cord short enough you cant cut it in two by accident.

Milwaukee realized this with their sawzall and made the power cord long enough to use, but it is also quick change if you do cut it off.:homer:
 
Tried to quote all three of you, but this board...


Something you might want to be aware of, they put short cords on for a reason. I went up one gauge when I made my cord due to the added resistance of the longer wire can cause a voltage drop.

For most of what we do it should not matter, but if your in a situation where youre needing to max out your machine it could cause issues.

My extension is a 25 foot 8 gauge cord, on a Miller 215....I think I'll be fine :)
 
My extension is a 25 foot 8 gauge cord, on a Miller 215....I think I'll be fine :)

A decade or so back I picked up a cheap Forney F225 buzzbox that came with a 25' 6 gauge extension cord. Pretty sure I've used that cord 3x as much as the welder itself.
 
All of my cords are sized appropriately. HD was out of 18 ga so I stepped up to 16, I just let them cool off once in a while:flipoff2:
 
All of my cords are sized appropriately. HD was out of 18 ga so I stepped up to 16, I just let them cool off once in a while:flipoff2:

I pretty much never use anything less than 12 gauge in the garage even for just 15 amp loads...I DJ'ed for the longest time so I have piles of 12 gauge cords. Really though, for the price, no point going anything less than at least a 14 gauge.
 
So... you guys are saying I should stop splicing lamp cords together for my welder?
Technically with enough of then macrame’d together you could have both form and function.

“Psst… why is he plugging the welder into the giant macrame owl?”.

“Because the plasma cutter is plugged into the three tiered plant hanger.”.
 
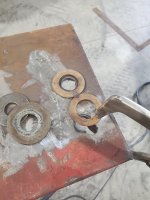
Was drilling holes in 3/8" last night, holes didn't have to be precise. Clamped a washer to the piece, centered where I wanted the hole, and traced the inside with the plasma. Ended up saving me a ton of time and effort.
 

Attachments

  • 20210622_174053.jpg
    20210622_174053.jpg
    1.4 MB · Views: 61
I pretty much never use anything less than 12 gauge in the garage even for just 15 amp loads...I DJ'ed for the longest time so I have piles of 12 gauge cords. Really though, for the price, no point going anything less than at least a 14 gauge.
I bought some nice USA-made 50' 12/3 extension cords at Costco for a killer deal. I hate cheap extension cords... I ended up just trashing all my old crappy twisted cords once I got 4 nice ones.

I also learned a great way to wrap cords to prevent the strands from twisting inside, I've been doing this for a couple years now and all my cords are in better shape because of it.


And then I hang the cords with velcro/hook straps like these (mine are generic ones from Home Depot, but same thing):

I was taught a similar technique by an old electrician I worked for out of high school.

That old dude screamed at me "Why do you insist on fucking up my power cords so bad!!!" Which left me speechless as I knew no other way other than wrapping them around my arm like the teenybopper I was.

Then he showed me the light and lookit that, the next day the cords were much easier to handle and the "New" way I learned was even faster.

Pretty much similar to what is in the vid, but I was taught to go a full two arms length, then join the loops. Spread your arms fully while holding the cable, then bring them together making about a 3' long loop.
 
Top Back Refresh