How to install the app on iOS
Follow along with the video below to see how to install our site as a web app on your home screen.
Note: This feature may not be available in some browsers.
You are using an out of date browser. It may not display this or other websites correctly.
You should upgrade or use an alternative browser.
You should upgrade or use an alternative browser.
Panzers: I break rocks thread
- Thread starter ThePanzerFuhrer
- Start date
- Joined
- Sep 9, 2021
- Member Number
- 4387
- Messages
- 3,418
Your luck is better than mine. I cant seem to run a hammer without breaking glass. Windows in that house wouldnt have made it
subybaja
E. Spengler
 : "Honey, I sure wish we had a back yard..."
Crimsen : "Hold my beer!"

Crimsen
Active member
Crimsen : "Hold my beer!"
HA, if only you knew. This was 2 years ago. We have 40 acres but i could barely turn around my pickup with 20’ trailer. Everything was sloped
here it is today. This is just a bit of cleanup to get an idea for the future house/shop. For reference, the treeline is basically the same.
[486]
ugh, that guy again?
Hey bud I was just thinking about you saying you needed to get a truck to run off waste oil when we were shooting the shit
any of your gensets got an IDI motor? IIRC big caterpillars had a lot of IDIs a lot later than any other major manus did... Maybe one of the light plants you run your water pumps on or something.
Pick one somewhat trashy one out and run it on 50:50 settled oil and diesel.
$5 a gallon it don't take long at all to pay off.
ThePanzerFuhrer
The Rock Breaker God
I have a fleet of 3406’s, N14’s, 371 on a water pump. I’m sure the 371 wouldn’t care one bit.Hey bud I was just thinking about you saying you needed to get a truck to run off waste oil when we were shooting the shit
any of your gensets got an IDI motor? IIRC big caterpillars had a lot of IDIs a lot later than any other major manus did... Maybe one of the light plants you run your water pumps on or something.
Pick one somewhat trashy one out and run it on 50:50 settled oil and diesel.
$5 a gallon it don't take long at all to pay off.
[486]
ugh, that guy again?
none of them is IDI sadly, nothing like a kubota or isuzu in one of the light plants?I have a fleet of 3406’s, N14’s, 371 on a water pump. I’m sure the 371 wouldn’t care one bit.
Detroits can be strange. They should run on trash fuel well because of how bad diesel was when they were new, but when they were new overhauls were also much more common...
I have seen a couple 71s get their rings stuck from running cooking oil, but that's probably from the normal amount of fuel you get running down the cylinder walls when you're running very low cetane fuel combined with the higher piston temperatures from the dry sleeves. Shitty veg oil turns into coke in the ring lands where petro-fuel just contaminates your engine oil.
with petroleum oil it shouldn't be an issue
[486]
ugh, that guy again?
oh right, the reason for the hardon for IDIs is that DI motors build up these little cones of coke from the injector nozzle holes, shielding the fuel from the air, I've seen them built up 3/8" long on one of my VW motors
you can knock these loose with severe intermittent overloading like you can do with an automotive application
the IDI motors don't really do this injector nozzle coking because of the simpler injection spray pattern and how violent the combustion chamber is in comparison
you can knock these loose with severe intermittent overloading like you can do with an automotive application
the IDI motors don't really do this injector nozzle coking because of the simpler injection spray pattern and how violent the combustion chamber is in comparison
rdr99
Red Skull Member
- Joined
- May 21, 2020
- Member Number
- 1063
- Messages
- 66
300 and 400 liner change done. 300 put up a fight, could not get the liner out, grabbed an old housing and put a new liner in it, just to get up and going. 300 liner was cracked, think it may have spun a little. How do you get the liners out? We can and have torched them out, but that sucks. Tried using the WA600 and pushing down on it. We do everything in the field. Somebody forgot that the headbolt on the 400 was left-hand thread, messed the threads up a little. What % manganese do you run? Think ours are 14%. Have you tried hard surfacing? Read an article on it. Now broke the shaft on the Pug mill, not sure we can get a new one, so that is great.
ThePanzerFuhrer
The Rock Breaker God
I just use a hydraulic hammer to get mine out. A couple hits and they fall right out.300 and 400 liner change done. 300 put up a fight, could not get the liner out, grabbed an old housing and put a new liner in it, just to get up and going. 300 liner was cracked, think it may have spun a little. How do you get the liners out? We can and have torched them out, but that sucks. Tried using the WA600 and pushing down on it. We do everything in the field. Somebody forgot that the headbolt on the 400 was left-hand thread, messed the threads up a little. What % manganese do you run? Think ours are 14%. Have you tried hard surfacing? Read an article on it. Now broke the shaft on the Pug mill, not sure we can get a new one, so that is great.
I make sure to coat the inside of the top shell with a thin layer of grease to help with this.
I have never done a hp cone so I cannot rally help you with that. The sandvik and eljay I can do with m eyes closed.
ThePanzerFuhrer
The Rock Breaker God
I run 18% manganese for my liners. My rock is stupid hard and abrasive. I can only get 50,000 ton on a 6000 liner.
I have never welded up a liner. I always wanted too, to put a layer of hardsurface on it so it allows the manganese to completely work harden before it starts to wear.
It’s a someday project welding up a liner beforehand. I should post the pictures I took of the sandvik(svedala or Allis) H6000 liner change I did last week. I can do a h6000 start to finish in 8 hours if I have my shit together and don’t fuck off. I have only done that once, usually I get distracted and it turns into a multi day affair.
I have never welded up a liner. I always wanted too, to put a layer of hardsurface on it so it allows the manganese to completely work harden before it starts to wear.
It’s a someday project welding up a liner beforehand. I should post the pictures I took of the sandvik(svedala or Allis) H6000 liner change I did last week. I can do a h6000 start to finish in 8 hours if I have my shit together and don’t fuck off.
I have only done that once, usually I get distracted and it turns into a multi day affair.Java230
???
- Joined
- Jul 15, 2020
- Member Number
- 2303
- Messages
- 1,247
I hope you power is fucking cheap. Holy shit.Prolly less than less than 10%. My big spread which would be small for a place like this continuously uses 450-500 Amps at 480volts. That’s 217kw per hour.
Edit:it's all genset isn't it

ThePanzerFuhrer
The Rock Breaker God
So I might as well do a liner change post for y’all.
The cone is a 2000 svedela H6000 cone. It’s based off the Allis Chamlers design. I call them Allis cones. These guys were designed and built in Appleton wi. Made especially for our hard as fuck rock.
The cool things about these cones is they have a top bushing. That means the machine uses the top spider arm as a fulcrum to generate a bazillion pounds of crushing pressure. This guys is not afraid of hard stone. These spider arms are also a pain because sometimes shit will get stuck on them and rock will not fall in the cone and make a mess. That means my ass has to go up top and knock it out with a 8’ bar. This spider arm also sucks for recycle as the rebar will be forever getting caught on it.
Another thing that’s neat about these machines is that they have a constant wear liner. Meaning they do not lose production between a new liner and a wire out one.
If you run a hp, eljay, or the dreaded jci cones you will have a wear curve of 100% at new to 60% productivity at the liners end. There are tricks to get better production at the end of the liners life but that’s a discussion for a different day.
I’m kinda disappointed I didn’t take as many photos as I should have but I have enough to tell the story.
This is the spider arm bushing. The rock gets fed directly on the top of this cover. It distributes the stone around the cone.
Step zero remove the hopper that’s on top of the cone. No pictures.
Step one is to remove the cover and dig out the magical grease. This is where the 3 gallons of the Castroil tribol 0 grease goes.


Step 2 loose the 24 massive bolts that hold the top shell to the bottom shell. They are torqued to whatever my biggest air gun will go too.

The top shell will get picked off with the crane so we can change the liner.

Once the top shell of off there is a ring under the liner that comes off. This just holds it up until the plastic pack can dry. The plastic pack does all the work.
Once down we find the excavator with the hammer and give it a half dozen hits to drop it out.

A good eye will notice this one has a filler ring in it. I run a medium or medium course liner in these cones as it has the best wear life to productivity ratio. Works well with what we do. If I was to use 2 cones on my plant I would then put a course liner in one and a medium fine in the other to maximize throughput.
The top side opening diameter determines the chamber design. A fine liner will have a small top opening where as a course liner will have a huge opening. What you are crushing reduction ratios ect will determine what liner your use.

Once the top shell liner is out we need to pop the mantle off next.
This is the shitty part. The mantle is held down with a huge ass nut, that’s tighten down to what ever the foot poundage is of two guys hitting a 24” in diameter nut with 20 pound sledges simultaneously is. It takes like 20 mins of pounding to get it where it stops moving.
Under the nut is a round rod that is call the torch ring. You would have zero chance of ever getting this nut off without this torch ring. You take a no4 tip on the actelyne torch and make a 1/4” wide cut through this bar to loosen the nut. The one pass nice and wide cut is the secret. If you don’t make it wide the slag touches and your fucked. The recutting attempt always seems to make it worse lol.
Here she is all loosened up.

Here is what the arbor looks like the liner sits on.

New liner ready to be re inserted. We put cawk around the mating edge to seal up for the plastic epoxy. This liner only touches the machine at the bottom 4”. It’s hollow the rest of the way to the top. We have a filler ring in this one so that we don’t need to use as much plastic pack to fill the void. It still takes like 17-19 pails to fill the liner and the mantle.

As mentioned above the inside of the chamber gets a light coat of grease so when we want to get it out it comes out. Without doing this your fucked. Max pictures to be continued ….
The cone is a 2000 svedela H6000 cone. It’s based off the Allis Chamlers design. I call them Allis cones. These guys were designed and built in Appleton wi. Made especially for our hard as fuck rock.
The cool things about these cones is they have a top bushing. That means the machine uses the top spider arm as a fulcrum to generate a bazillion pounds of crushing pressure. This guys is not afraid of hard stone. These spider arms are also a pain because sometimes shit will get stuck on them and rock will not fall in the cone and make a mess. That means my ass has to go up top and knock it out with a 8’ bar. This spider arm also sucks for recycle as the rebar will be forever getting caught on it.
Another thing that’s neat about these machines is that they have a constant wear liner. Meaning they do not lose production between a new liner and a wire out one.
If you run a hp, eljay, or the dreaded jci cones you will have a wear curve of 100% at new to 60% productivity at the liners end. There are tricks to get better production at the end of the liners life but that’s a discussion for a different day.
I’m kinda disappointed I didn’t take as many photos as I should have but I have enough to tell the story.
This is the spider arm bushing. The rock gets fed directly on the top of this cover. It distributes the stone around the cone.
Step zero remove the hopper that’s on top of the cone. No pictures.
Step one is to remove the cover and dig out the magical grease. This is where the 3 gallons of the Castroil tribol 0 grease goes.
Step 2 loose the 24 massive bolts that hold the top shell to the bottom shell. They are torqued to whatever my biggest air gun will go too
.The top shell will get picked off with the crane so we can change the liner.
Once the top shell of off there is a ring under the liner that comes off. This just holds it up until the plastic pack can dry. The plastic pack does all the work.
Once down we find the excavator with the hammer and give it a half dozen hits to drop it out.
A good eye will notice this one has a filler ring in it. I run a medium or medium course liner in these cones as it has the best wear life to productivity ratio. Works well with what we do. If I was to use 2 cones on my plant I would then put a course liner in one and a medium fine in the other to maximize throughput.
The top side opening diameter determines the chamber design. A fine liner will have a small top opening where as a course liner will have a huge opening. What you are crushing reduction ratios ect will determine what liner your use.
Once the top shell liner is out we need to pop the mantle off next.
This is the shitty part. The mantle is held down with a huge ass nut, that’s tighten down to what ever the foot poundage is of two guys hitting a 24” in diameter nut with 20 pound sledges simultaneously is. It takes like 20 mins of pounding to get it where it stops moving.
Under the nut is a round rod that is call the torch ring. You would have zero chance of ever getting this nut off without this torch ring. You take a no4 tip on the actelyne torch and make a 1/4” wide cut through this bar to loosen the nut. The one pass nice and wide cut is the secret. If you don’t make it wide the slag touches and your fucked. The recutting attempt always seems to make it worse lol.
Here she is all loosened up.
Here is what the arbor looks like the liner sits on.
New liner ready to be re inserted. We put cawk around the mating edge to seal up for the plastic epoxy. This liner only touches the machine at the bottom 4”. It’s hollow the rest of the way to the top. We have a filler ring in this one so that we don’t need to use as much plastic pack to fill the void. It still takes like 17-19 pails to fill the liner and the mantle.
As mentioned above the inside of the chamber gets a light coat of grease so when we want to get it out it comes out. Without doing this your fucked. Max pictures to be continued ….
ThePanzerFuhrer
The Rock Breaker God
Lol it’s not cheap. It burns 20-30 gallons of fuel a hour to run the 3412 to keep everything turning. The sound of a 3412 running is in my top 5 favorite soundI hope you power is fucking cheap. Holy shit.
Edit:it's all genset isn't it
ThePanzerFuhrer
The Rock Breaker God
We’ll my picture taking took a noise dive after this.
The mantle gets some hooks welded to it and lifted off with the crane. You can see in the picture the old vs the new. The shape is really close to the same hence the constant wear liner term.

This is the head center all greased up and ready for the new liner.

Once the liners are in and tightened down we start mixing the plastic backing. It gets poured behind the liner and mantle to fill the voids. If the voids were not filled the crushing action would crack the liners in minutes.
Once they are poured I took some measurements of the top shell bearing shaft sleeve and top shell bushing. They don’t get replaced until they are out of spec.
My 12-15” micrometer.

The bushing is about 350mm in diameter or 13.78” for us Americans.

Once the plastic is poured everything gets reassemble and back to work you go.
I should have taken more pictures but I was in a hurry and doing most of this by myself so I was making sure I wasn’t forgetting a step not taking pictures .
.
The mantle gets some hooks welded to it and lifted off with the crane. You can see in the picture the old vs the new. The shape is really close to the same hence the constant wear liner term.
This is the head center all greased up and ready for the new liner.
Once the liners are in and tightened down we start mixing the plastic backing. It gets poured behind the liner and mantle to fill the voids. If the voids were not filled the crushing action would crack the liners in minutes.
Once they are poured I took some measurements of the top shell bearing shaft sleeve and top shell bushing. They don’t get replaced until they are out of spec.
My 12-15” micrometer.
The bushing is about 350mm in diameter or 13.78” for us Americans.
Once the plastic is poured everything gets reassemble and back to work you go.
I should have taken more pictures but I was in a hurry and doing most of this by myself so I was making sure I wasn’t forgetting a step not taking pictures
.arse_sidewards
Contrary to my ass
Clamp the mig gun to the plasma table and let it eat?I have never welded up a liner. I always wanted too, to put a layer of hardsurface on it so it allows the manganese to completely work harden before it starts to wear.
ThePanzerFuhrer
The Rock Breaker God
Way too big for that. The small piece is 48” around and 36” tall big piece is 60” around and 40” tall. Would need a dedicated turntable with a mig gun feed.Clamp the mig gun to the plasma table and let it eat?
speed bump
Red Skull Member
For some reason there is something in the back of my head that says don't weld or hard face on the mantle and liner but I can't remember why.
If you decide to anyway an old vertical turning center that won't hold tolerance anymore would probably be tits for what you are doing.
If you decide to anyway an old vertical turning center that won't hold tolerance anymore would probably be tits for what you are doing.
VTL's usually go for scrap price or less. Nobody wants those anymore.For some reason there is something in the back of my head that says don't weld or hard face on the mantle and liner but I can't remember why.
If you decide to anyway an old vertical turning center that won't hold tolerance anymore would probably be tits for what you are doing.
ThePanzerFuhrer
The Rock Breaker God
Lifting hooks are a sketchy thing to weld on the liners, especially after they have been work hardened. Hard surface welding is not a big deal. Roll plant shells are manganese and they get welded up every 5-10,000 ton.For some reason there is something in the back of my head that says don't weld or hard face on the mantle and liner but I can't remember why.
If you decide to anyway an old vertical turning center that won't hold tolerance anymore would probably be tits for what you are doing.
Secret is the first pass should be a stainless wire then the hard surface on top. The stainless wire adheres to the manganese the best.
ThePanzerFuhrer
The Rock Breaker God
I need one that will swing 130”-140”. My Crusher repairs could use one that size.VTL's usually go for scrap price or less. Nobody wants those anymore.
Vtl vbm anything that size would work
speed bump
Red Skull Member
Lifting hooks are a sketchy thing to weld on the liners, especially after they have been work hardened. Hard surface welding is not a big deal. Roll plant shells are manganese and they get welded up every 5-10,000 ton.
Secret is the first pass should be a stainless wire then the hard surface on top. The stainless wire adheres to the manganese the best.
It was just related to cone crushers. We have an old Missouri Rogers HSI that with the old rotor we actually had a second shift mechanic who's primary job was to hard face the rotor and manganese hammers (I think they were doing 2-3 rolls of hard face a week).
rdr99
Red Skull Member
- Joined
- May 21, 2020
- Member Number
- 1063
- Messages
- 66
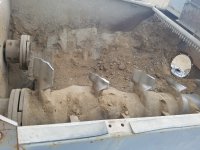
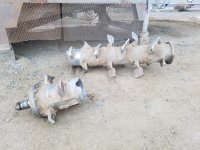
We start keeping a close watch on the 300 at about 400 hours, it will usually crack sometime around there. We do the 400 usually at the same time, because we have to rent a crane, and already have the plant down, though sometimes we bypass the 300 and just run the 400. Wish we had a hydraulic hammer, we don't even have an excavator. Broken Pug mill parts removed.
Attachments
ThePanzerFuhrer
The Rock Breaker God
Wow you don’t even have a excavator. That’s hard to fathom. Shit I have 5 excavators myself. 3 big ones 2 hammer hoes.We start keeping a close watch on the 300 at about 400 hours, it will usually crack sometime around there. We do the 400 usually at the same time, because we have to rent a crane, and already have the plant down, though sometimes we bypass the 300 and just run the 400. Wish we had a hydraulic hammer, we don't even have an excavator. Broken Pug mill parts removed.
So you need to make yourself a strong back to push the liners out. Take some 3/4 plate and make a c shape that can hook to top shell so you can put jacks between it and the liner. 2 20 ton jacks should push it out.
The dealer method for getting the liners out on the Allis machines is toss jacks between the spider arm and the liner and push it out. I use the hammer for everything because it’s quick.
ThePanzerFuhrer
The Rock Breaker God
That pug mill shaft is fucked no amount of welding will fix that. Just got wore thin. You probably should replace them both because I’m sure the other is not far behind.
A good weekend and you could fab up new ones yourself. Don’t look like they are none too precise.
rdr99 does that pug mill run dry or do you guys add water to it?
A good weekend and you could fab up new ones yourself. Don’t look like they are none too precise.
rdr99 does that pug mill run dry or do you guys add water to it?
speed bump
Red Skull Member
We start keeping a close watch on the 300 at about 400 hours, it will usually crack sometime around there. We do the 400 usually at the same time, because we have to rent a crane, and already have the plant down, though sometimes we bypass the 300 and just run the 400. Wish we had a hydraulic hammer, we don't even have an excavator. Broken Pug mill parts removed.
What do you run through your pug mill? They are definitely an item that everyone ignores until they are fucked which pisses me off to no end because instead of a simple repair you are doing shafts, paddles, bearings and then 2 months later gear boxes.
rdr99
Red Skull Member
- Joined
- May 21, 2020
- Member Number
- 1063
- Messages
- 66
The Pug mill has been patched, repaired, etc, just to make it last. We were going to pull it out next week for more repairs, only in the last year or so has it seen heavy use. We add water depending on what we are making(never pass up the chance to sell water). Currently making a special barrow mix for a competitor, had to get creative with some belts to make the mix without the pug mill. We had full intentions of making a new shaft or repairing what broke, but the bean counters said no, already have a set of blades for it. Most of what goes thru the pug mill is 1.5" minus and naturals.
[486]
ugh, that guy again?
Hey cement kiln speedy bumpy dude, I been reading up on the difference between cement and lime and hydraulic lime
Trying to get it right in my head but I'm kinda dumb when the words get real complex,
straight "non-hydraulic" lime is just calcium oxide, you can store it under water and it doesn't set until it is mixed with other minerals: these "pozzolans"
"hydraulic lime" and "cement" have varying amount and type of pozzolans mixed right in them so they will do the chemical cementing reaction when wet
so... "portland cement" isn't really anything magical, just a very carefully mixed blend of lime and these "pozzolans" right?
Could I buy hydrated lime at half the cost of cement and mix in some amount of powdered clay to supply the pozzolans to the party?
speed bump
Red Skull Member
Hey cement kiln speedy bumpy dude, I been reading up on the difference between cement and lime and hydraulic lime
Trying to get it right in my head but I'm kinda dumb when the words get real complex,
straight "non-hydraulic" lime is just calcium oxide, you can store it under water and it doesn't set until it is mixed with other minerals: these "pozzolans"
"hydraulic lime" and "cement" have varying amount and type of pozzolans mixed right in them so they will do the chemical cementing reaction when wet
so... "portland cement" isn't really anything magical, just a very carefully mixed blend of lime and these "pozzolans" right?
Could I buy hydrated lime at half the cost of cement and mix in some amount of powdered clay to supply the pozzolans to the party?
Hydrated lime is calcium hydroxide, Portland cement clinker is primarily calcium silicates and aluminates. You only form those Calcium silicates in the presence of a shit load of heat for an extended period of time and then a rapid cooling process to make the chemistry really happy. After you do that you still need to figure out how to grind it up and mix in the 3-5% gypsum at really fine consistency.
You could conceivably build a miniature process: find a lab ball mill, them do an old style batch kiln out of salvage fire brick, and buy a bunch of lab equipment to get it right. Or you could just form everything, make some friends, and have concrete delivered. Then use the 100s of hours saved to flip cars or work and be time and money ahead.