What's new

Dust Buggy

Thats still single sheer Chappy. Love this build hope to steal a bunch of ideas for the new buggy build.
WRONG, dual straps in single shear can be double shear. :homer:
I think it’s more likely for tabs or clevis’s to get ripped off tubes than the bolts to shear even on a single strap single shear setup.
Single shear of a 1/2” Grade 8 is 17K lbs. Most vendors list the straps at 10-15K lbs.
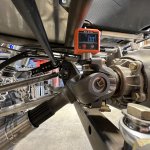
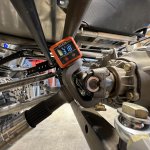
I got TMR clevis’s and dual shear tabs that I was going to use until I realized that they weren’t really needed for my setup so I made some tabs and used the TMR clevis blocks sideways. TMR now sells the blocks individually. I’m using them on the lower links for the front straps.
 
Last edited:
Ha, had to think about it for a bit, you are correct. The straps tabs but the axle/frame mounts in double shear no different than being a shock or link end. The strap not being a solid thing skewed my thinking. I accept my derp on that
 
Drivelines are in.
1410, Ram 2500 front slip and yoke.
This is at full droop, shocks extended, no straps.
Yoke at the T-case needed a good amount of clearancing.
Weird thing welding. The tacks kept cracking at the tube to end yoke so I switched to 312 rod and all was well.
FB7B0897-9D9C-4088-B64E-0CB34BF27720.jpeg

AF6193A4-BAAA-42F5-A210-48553DC55790.jpeg

CB66B63A-3128-4B7C-B29C-366808C8D060.jpeg
 

Attachments

  • 034F816D-A3E7-438D-A3D6-EB3523ECB6CF.jpeg
    034F816D-A3E7-438D-A3D6-EB3523ECB6CF.jpeg
    1.1 MB · Views: 11
  • FFB5D146-5E88-47CC-AC55-F0ED5733C548.jpeg
    FFB5D146-5E88-47CC-AC55-F0ED5733C548.jpeg
    1.1 MB · Views: 15
Doesn't look like I did much, but that's a good thing. Wiring should disappear as it is out of the way. Took apart the old wiring harness and reconfigured it for the new layout.
Reversed the intake manifold so locations and length changed for sensors and outputs.
Also removed the old fan, gauge, and auxiliary wires as they will be ran separately. Re-taped almost everything. FYI the engine harness tape is high temp TESA 51036. It looked really good for its age when taking off the old tape. The hydraulic fluid did make the adhesive gooey where it was saturated. But all the other spots where still like day one when it went on.

4C4BAE79-BD4A-40F0-88D7-7F90F6928A00.jpeg
 
Last edited:
Took a break from welding as it’s too hot in CA. Started on wiring, controls, gauges, and anything else that doesn’t involve heat and sweating all over tube creating rust.
Lots of thinking of where wires will be routed, fused, relayed, breakered, and switched.

C5C62693-5845-445D-A914-65D00B2B3D94.jpeg


FFEE925B-2E82-44D9-8127-F79408EEAA02.jpeg
 

Attachments

  • 107BE332-344B-4F90-8C16-DD377C434CB8.jpeg
    107BE332-344B-4F90-8C16-DD377C434CB8.jpeg
    2 MB · Views: 23
Last edited:
i agree on wiring, and i also have the hardest time trying to make it look correct. i actually suck at, it works and its easy to follow but dam looks like a kid thru a plate of spaghetti on the floor
 
Nice! Wiring is so underappreciated. Done right it just fades into the background and nobody notices. Done wrong it gives the whole project a half-assed appearance...

Would be a shame to hide something like that.

db959144604f314a7be43579e752dec5.jpg


Good wiring is like the cherry on the cake. Don't hide it. Show it.

But not everyone's handywork can be shown...

PS : This is from Tim Whitteridge, my skillset doesn't allow me to be at this level. Yet.

HYDRODYNAMIC : Sorry for the side track. Good to see progress on this rig !
 
Air tank and HiLift jack are in. They also double as protection for the radiator and fans. Jack mounts are 1” x .25 wall DOM with 1/2” grade 8 studs that will get a screw knob to hold it down. Air tank is a spun aluminum in 6” diameter. Stainless fittings and braided line from the Thomas compressor to dissipate heat.
Back deck was designed to fit a spare 40” laying down and still see over. I researched a lot of KOH footage and measured a lot of buggies to determine how to most efficiently carry a spare. So many spare mounts are after thoughts or add ons and get ripped apart. One video in particular was of all the buggies dropping down Backdoor and the rear tire and mounts hanging up on rocks and just trashing both. Those that didn’t were super high up in the air raising the COG. This was my compromise.
6506D9E4-B866-4A33-BDF9-B9DCE56A8A35.jpeg

1F4F314F-8011-425D-96F7-89B229F6CF62.jpeg

97193774-C437-4144-B17A-85656244DB32.jpeg

7975FEFF-DF81-47BF-B20C-66D4D9A36445.jpeg
 
The tire at that height looks like it will work great for viz. Are your rear seats mounted lower than the front? (Might be just a slightly different design.
 
The tire at that height looks like it will work great for viz. Are your rear seats mounted lower than the front? (Might be just a slightly different design.
The rear bench is a PRP Elite regular height. The fronts are PRP Comp High Backs +2 or +4 I'm not sure anymore.
Rear passenger heads will be over the height of the tire. More than likely I will not be carrying the tire around If I have access to a support trailer or vehicle. The rear deck was also designed to fit a full size ice chest or Milwaukee Packout coolers and boxes 4QTY or 8QTY if double stacked, whichever is more important for the voyage. More than likely it will be a small cooler and tool box. Haven't decided where to put a RotoPax or similar fuel storage, originally it was supposed to go right behind the rear bench headrests over the deck on the A tubes. Tire can also go on the roof for oVerLaNd glamping trips while keeping the deck for gear.
IMG_3088[1].JPG
 
Last edited:
While figuring out where to put area/side lights, I decided to pull the Q’s from the front and use them on the sides because of the beam profile. They are one off’s using a driving beam with a fog light lens. It makes for a super wide beam covering front to rear while still having a good balance of vertical focus that can send the beam out farther than a scene or diffused pattern.
For the front, I used two Q Series PRO with spot/flood combo pattern for far/mid distance and added a 20” E-Series PRO driving for mid/near distance as it has a wide beam profile. It also puts out 47,520 lumens while only being 20” wide.
Up top just under the roof line are another pair of ones offs 10” SR PRO Hyperspots, what makes them different is the PRO emitter version puts out 7,920 lumens per bar vs 3,750 lumens. The Hyperspot beam does get a little wider but with double the power it still goes as far or further while covering more area. The Hyperspots are the only light I would put up high as it has a sharp cut off to eliminate lighting up dust in front of your face, which ruins night vision adaptation which has a snowball effect. Less glare let’s you see further with less light. I tried to put most of the high power lights out front and down low to keep the flash back as low as possible. When I ran an overheard 50" spot/flood combo on the old buggy, I rarely ran it as the flash back was too much, most of the time I ran the 40" amber that was mounted down lower.

Also in are the front limit straps. TMR customs clevis mounts on the lower links and handmade tabs on the top. Set the 24” straps at 25.5” bolt to bolt for 1.5” of stretch. The shocks are 14" travel but I shortened the extension spacer so they can go to 15". That way I can let the strap stretch to 13.5" to 14" without worrying about a hard stop hammering the shock apart.

IMG_3106.JPG

IMG_3104.JPG


IMG_3099.JPG

IMG_3101.JPG
 
I like the mirrors... ordered some for Pinky.
 
Welded out most of the engine skid. Didn’t weld the bushing end as that will wait for disassembly time.
The engine only goes out the hood made sure the opening was big enough, that’s how it was installed. Then I added some hose tabs which will probably need to be modified to get the engine out but that is the plan for service.
1.75” .25 wall DOM beveled to a V and double passed.

799B0F5E-3BF2-40B9-B742-ECF9EB562787.jpeg


F391D798-6CD9-4BA8-9AC2-A5AFBD25EDAD.jpeg

76BE7FCB-3FCD-47ED-AC14-C8F806E23118.jpeg

AA98B43F-217D-42FF-BAB8-2B59FAAD3534.jpeg

F57EEB6D-1F35-4C19-B323-C2BD1737F22C.jpeg
 
I like the engine skid. How deep is your oil pan? It looks pretty deep.

Another question about your front limit straps. Are your links heat treated?
 
I like the engine skid. How deep is your oil pan? It looks pretty deep.

Another question about your front limit straps. Are your links heat treated?
Oil pan is a eBay special with trap door. Modded the stock truck pick up tube and some baffles to fit it all together. It holds 7 quarts. Welds on it we’re robot so quality was pretty good. Its steel so it can take a hit and dent and compared to the aluminum which can crack.


Links are not heat treated. 2.5”x.25” wall
 
Last edited:
Going to put a remote drain on the pan or just deal with the occasional mess? Unless those pictures make it look alot tighter than it is.
 
End is nearing because I am working on the thing I loath. Panels and tabs are the worst!
I'm sure I will probably die twice from the potential flames the make their way through the intake pipe and the firewall but I also do not want the intake to hit and rattle against the firewall. With some foil tape I could probably past tech inspection but I think it is good enough.

IMG_3602.JPG


IMG_3600.JPG


IMG_3601.JPG
 
Top Back Refresh