What's new

Dethmachinefab go fast buggy build.

You shouldn't have much plunge, you could get away with using non-plunging CV's. The gains aren't that great though as it only adds travel in droop.
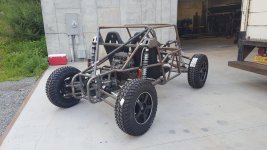
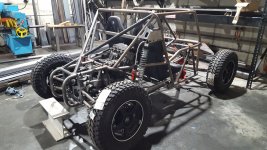
Seems like they bind up right at 25°. Any more travel in droop the geometry gets bad anyway with the short control links. I wish I did a different set up back there. Full droop I get into some positive camber, it starts to toe out and I just can't tune that out with the link position limitations from the chassis/sprocket. From ride to bump it works pretty good.

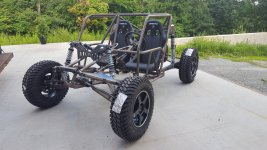
Front is sweet though basically no scrub droop to bump not one squeak from the tires.
 
25*? That's it? Are they race prept at all? A good prept 930 will run 28* all day long and max out at 32*.
 
Full droop I get into some positive camber, it starts to toe out and I just can't tune that out with the link position limitations from the chassis/sprocket. From ride to bump it works pretty good.

I wouldn't worry about dirty travel too much at full droop, it's rare that you'll have a situation where that tire is contributing much to traction. It'll be on the inside when cornering and if it's drooped after a jump or whatever it doesn't have much weight on it anyway. Positive camber on the outside tire is something to avoid but the inside one it isn't bad.

Sounds similar in behavior to my TTB front, it gets a little dirty at full droop but the tires are basically in the air at that point anyway. What it does regarding wheel recession/toe change/etc when landing is more important so if the geometry trends toward good stuff the closer you get to bump, is more what you'll feel when driving.
I've got a loading dock and just want to drive off it like all the cool kids :flipoff2:.

Yea, I'll probably strap it a bit to keep it in the best geometry range.
 
Shocks and springs ordered. Should see them June-July. The fox's were the shortest lead time. That's going to be a drag not having them quicker because most of the work I've got left need them involved. I guess if I wanted I can make some real good mock ups.
 
I'm told rear shocks are on the way, and fronts should be a week or two after. I can get this thing rolling soon and hopefully a bunch of motivation to finish comes with it.
 
Shock mount progress. It's being difficult getting the shock where it needs to be but I think I've got it figured out.
 

Attachments

  • 20210711_185057.jpg
    20210711_185057.jpg
    1.8 MB · Views: 59
  • 20210711_185037.jpg
    20210711_185037.jpg
    1.5 MB · Views: 59
  • 20210711_185012.jpg
    20210711_185012.jpg
    1.8 MB · Views: 61
Shocks are here. Took a little time to finish up the mounts, tacked them in place and put the shocks in to see how it sits. That cross bar between towers is just a temporary part to hold them square. I really want to keep working on it but I've got an annoying job to finish up and it's so hot and humid the shop floor is soaked. It's less than enjoyable to work on it.
 

Attachments

  • 20210717_163905.jpg
    20210717_163905.jpg
    1.8 MB · Views: 119
  • 20210717_170507.jpg
    20210717_170507.jpg
    1.9 MB · Views: 120
  • 20210717_170350.jpg
    20210717_170350.jpg
    1.9 MB · Views: 120
For something that light you can get away without them. Also, one that long is gonna be stretchy.
 
Started to work on a front shock tower. Not sure if i like it. Whatever I do I'll tie it into the lower rails somehow, and probably brace back to the cage.
 

Attachments

  • 20210723_211517.jpg
    20210723_211517.jpg
    2 MB · Views: 122
Should have just made it one piece to tie into the upper arm mounts. Bulkhead yo!

For sure, I wish I knew where everything was going to land so it could have been one part from bottom rails to shock bolts.
 
Junked that design and made it from one bent piece of 3/16". Clamped it in place so I could finally get the buggy on it its springs.
 

Attachments

  • 20210727_181459.jpg
    20210727_181459.jpg
    2 MB · Views: 117
  • 20210727_182057.jpg
    20210727_182057.jpg
    2.1 MB · Views: 111
3/16"? I would have gone .090 with weld washers on the shock holes.

And that would have been overkill. You should look at a Briggs built gen4 car sometime. Lots of .049 on them. Surprisingly they lived through stadium racing without issue.
 
3/16"? I would have gone .090 with weld washers on the shock holes.

And that would have been overkill. You should look at a Briggs built gen4 car sometime. Lots of .049 on them. Surprisingly they lived through stadium racing without issue.

All the suspension mount points are 3/16" and 1/8" on here, but with a decent amount of windowing and weight reduction where I think it's safe. .049, that be shim stock :laughing: 
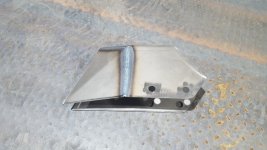
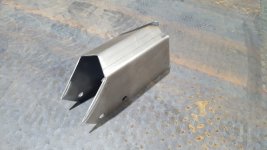
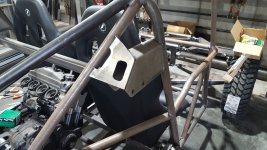
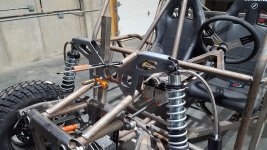
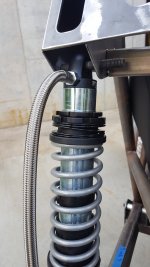
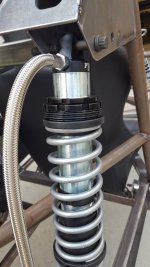
I plan on some weld washers on the rear shock towers, they are just 12g in the boxed part where the bolts are.
 
Also realized they put the tender slider upside down on one of the rear shocks. Bummer because it's between the crossover nuts and top nuts. They can only come off the top which would mean vent, remove resi hose, and recharge.
 

Attachments

  • 20210728_175917.jpg
    20210728_175917.jpg
    1.6 MB · Views: 43
  • 20210728_175911.jpg
    20210728_175911.jpg
    1.7 MB · Views: 45
Shock tower braced back to the cage corner, and the front floor/firewall support tubes run up to the bottom of the tower to tie everything together. I've not decided on if the area in front of the shock tower is going to be the radiator or fuel tank, but leaning fuel tank.

20210801_145549.jpg
 
20210808_152017.jpg

20210808_170813.jpg


Worked on a fuel tank. I'm happy with the fit of the lower half, locks right into the taper of the upper arm brackets where it will sit on rubber. I'll be making a new tank slanting the front/top to make it look better with the filler at the rear. Caps just sitting on top here. Finish will be nice clean sheet and not the da sander. Volume is a bit more than 5.5 gal. Probably going to widen it over the tubes on the sides to gain another gal or so.
 
20210810_184747.jpg

20210810_184804.jpg


Changed it again, and made it in two parts. Welded it out and it was a pain. Cleaned but still was getting evidence of contamination. Used my htp221. It is a great welder but I love an older transformer machine for aluminum, they seem to wet out nicer and not as finicky about stuff.
 
20210812_185608.jpg


Spent two days on and off between making a shifter and wasting time and metal on trying to figure out the best way to pick up two engine mounting points that run down to the lower frame rails. 4 mock up ideas and they all sucked.

I wasn't sure how I wanted to build the shifter, i decided clutch lever on it like a micro sprint. It pivots on bronze bushings running on a shoulder bolt. Real comfortable spot clost to the wheel. To get the motion back to the engine was either a 3 link/2 bellcrank linkage or a shifter cable. I ordered a cable, hopefully it does the trick.
 
20210814_162551.jpg

20210814_164110.jpg
20210814_162954.jpg


Shift cable and linkage are done. Works good. Ordered a clutch cable that I should be able to make work. Also got that front engine mount sorted and tacked in place.
 
Top Back Refresh