WoodburyZuk
Well-known member
- Joined
- May 24, 2021
- Member Number
- 3939
- Messages
- 255
So sweet.
Follow along with the video below to see how to install our site as a web app on your home screen.
Note: This feature may not be available in some browsers.
I need to make one for my camper. 😎
I did this to put the windshield into my CJ frame, but other-way-around from what it sounds like you're talking about. Glass into rubber gasket inside groove, dishsoap the crap out of the outside groove and rope, rope around (in) outside groove, push glass and rubber against windshield frame, work rope out of groove through windshield hole in frame slowly working gasket into place. Slick, but took every bit of a family of four who didn't know what they were doing, to put a CJ windshield in.Out of curiosity, did you use the rope trick when installing your back glass? I have never done it, but from what I understand that is the easiest way to install window glass into a rubber gasketed frame.
Essentially you stuff a piece of light rope such as paracord or maybe a little heavier into the slot, then stick the glass in on top of it so that the glass holds it down and one of the ends comes out from under the glass.
Then you pull up on the rope so that the rope forces the gasket to come up and let the window go down into its place, then the live over the gasket drops back down on top of the glass.
Good idea.Get a digital rear view mirror and mount the camera to the back of the cab and keep it on. It'll feel natural to glance up at it and the wide angle will help cover the blind spots.
Good idea.
When you're 100% done, you should find a similar-vintage stock Bronco and park nose-to-nose for some pics!
And, you MUST get hold of that Irate flag and do some poser shots for the site! irate4x4 Event Flag. I don't know about the Hammers background, but your rig can definitely give Austin's competition on coolness!
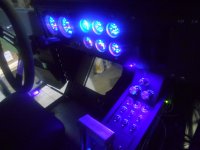
Pretty awesome!Tale of the switch labels.
So all of my switches are aircraft “breaker switches”. I have used these before on several aircraft. It’s nice not to have any fuses. If it blows, you can just switch it back on. If it blows again right away, you know you have something to fix. After you fix it, just reset it again.
Anyways, I needed to label them and I decided to do it the same way I did it on aircraft. I went to a trophy shop and had engraved plastic “dials” made. It’s just simple black plastic that is white underneath. When they engrave it, the white shows through. Well, I had them make a whole bunch for all the switches. Then I got thinking I might as well get the same style for the knob controls. (HVAC fan and wipers) I installed them all and it looked great.
Later, I was thinking about how to light them. First I got a blue LED light bar that I could mount over my head. It looked cool, but it made too much light. So looking on the net, I found LED “black“ lights. I immediately had flashbacks to my teen age years With dark room, bright posters and blue smoke. Lol. I though they would light the dials and keep the glare down, so I ordered a roll of “tape light”.
First I tested them on my overhead switches. I made a long hooded strip of light to shine over my head to the long strip of switches. They gave No glare and a nice purple glow to the labels. I had a small group of switches on the center console, so I made a small strip under the dash to shine on them.
Well, when I turned them on, I got a surprise. The little switch labels were purple, but the two HVAC labels were lit with an electric glow. (More flashbacks) They were supposed to be cut from the same material and they looked the same in daylight. Once I saw that, I had to have all the labels recut with the new material.
The trophy shop said they had lots of the stuff and cut me a new set. The place is an hour away and when I got home with the new set, I had to try them right away. Well damb, they don’t glow. I called them back and they said they thought it was the same stuff. So I wired up a black light and drove back there to see what they had in inventory. Nothing glowed. The guy said they only get the stuff from two places and he will order a sheet from each. While we were talking he remembered that he had a black light in the back.
Anyways, to make a long story short, ……to late. I got the correct labels installed. I know the pic sucks, but I assure you, it looks cool. There is no purple haze in real life, just bright switch labels.

Very interesting.🤔Would love to hear more road driving impressions with your setup.
Also, if you're trying to cut the low frequency engine drone from the cab, the absolute best thing you can do is line the panels surrounding the engine with mass loaded vinyl.
Your typical insulation/sound dampener will do very little for the low frequency stuff. I found this out a couple years back. You can get MLV from many online places. I used 1/4" thick stuff that was (i believe) 2lbs/ft. It's heavy, but it works.
I have “killmat” on the engine side of the floor. There will be carpet inside. Not installed yet. The walls inside are covered with 1/2” thick foam rubber. The main thing I’m hearing is the valve clatter that 4BTs are famous for. I like it to be famous on the outside.Would love to hear more road driving impressions with your setup.
Also, if you're trying to cut the low frequency engine drone from the cab, the absolute best thing you can do is line the panels surrounding the engine with mass loaded vinyl.
Your typical insulation/sound dampener will do very little for the low frequency stuff. I found this out a couple years back. You can get MLV from many online places. I used 1/4" thick stuff that was (i believe) 2lbs/ft. It's heavy, but it works.
You could inquire with Off Road Only, as their are ride system has pre set button for ride height, curb height and I think Off road hiehgt.- not sure if theirs can do it on the fly, but Theyd know if that is possible, or if theirs does it. Probably wont give away the tech, but might point you to helpful info.What air bags are you running on your suspension?
I'm currently developing an air ride control system as part of my CTIS controller. It will have an option to automatically lower the vehicle once a set speed is surpassed, then raise back up below that speed. Might be of use on your build.
My system is all mechanical. I can raise or lower each bag from the drivers seat, but it’s not as easy as it sounds. You don’t have any reference when you are in the seat. I usually end up go around with a tape measure to get the whole truck level and at the correct height. My airbags are made by Firestone. I believe they are for big rigs.
Valve leaking through the body on the side that's leaning?