I would just try to cycle the rear and see what it does.
How to install the app on iOS
Follow along with the video below to see how to install our site as a web app on your home screen.
Note: This feature may not be available in some browsers.
You are using an out of date browser. It may not display this or other websites correctly.
You should upgrade or use an alternative browser.
You should upgrade or use an alternative browser.
I'm lazy and I don't want to bolt everything together and then find I have to take it apart, to have it lengthened, so at this point I'll be heading to the driveshaft shop after work and will see what he says and then make a plan for the next moves.
Dropped the driveshafts off to get modded--I may have them by Thursday or Friday unless the rear is 1/4" wall and that could throw a wrench into the timing. I should know tomorrow once he takes it apart. He thought around $200 give or take for both shafts. For peace of mind I decided it was the best option for now. I'll shorten the other shaft myself at some point, but I need to figure out if I have to move the carrier bearing mount or not to decide which one of the two-piece front shafts I'll shorten. The two-piece helps in some clearance issues at the oil pan on one hand but it's very close to the tranny plug on the other, whereas the one piece is close on both, but since it's smaller diameter I may have more clearance at the tranny plug, but I'll know when I get it back and toss it up there and look at it. In the back of my head this is something that will get looked at in the future, but for now I can get it back on the road and work out kinks.
Last edited:
The amount of time it takes to do some of the simplest things just boggles my mind. Case in point, I need to add to the lines that go from the NP205 to the catch can, so how long can that take? An hour, sure, well hold on there pardner, you is WRONG. I'm into it 2.5 + .5 hrs at Home Depot and I'm still not done!!
Since now the t-case has moved 1 3/4" I have room to adjust the plumbing for better future drain and re-fill, so I ditch the galv fittings from the fill port and drain plug, which was a 1/2" galv street 45* and 4" nipple and 1/2" coupling for each and am now reducing directly to 3/8" pipe. So off the drain port is a 1/2" to 3/8" bushing, close nipple, tee, plug(one side for drain), nipple, 90, 3/8" mip/3/8" barb(need to buy this), piece of 3/8" hose(for fluid level ck) to a 3/8" barb /3/8" mip 90, 3/8" to 1/2 bushing, 1/2" coupling(need to buy) and 1/2" mip to 1/2" barb. So I need to buy 2 things after spending $120 or so in brass fittings hoping I had everything, some of what I bought will be returned. For the fill port I reduced with a 1/2" to 3/8" bushing, 2 1/2" nipple, 90, 4" nipple, tee with plug(fill port), nipple, 90, 3/8" to 1/2" bushing, 1/2" mip to 1/2" barb. The fill side is completed. I decided to reduce to 3/8" cuz the brass fittings are smaller and cheaper than going with 1/2" brass and galv pipe is ugly, not that you see it, but the main reason is the size.
Since now the t-case has moved 1 3/4" I have room to adjust the plumbing for better future drain and re-fill, so I ditch the galv fittings from the fill port and drain plug, which was a 1/2" galv street 45* and 4" nipple and 1/2" coupling for each and am now reducing directly to 3/8" pipe. So off the drain port is a 1/2" to 3/8" bushing, close nipple, tee, plug(one side for drain), nipple, 90, 3/8" mip/3/8" barb(need to buy this), piece of 3/8" hose(for fluid level ck) to a 3/8" barb /3/8" mip 90, 3/8" to 1/2 bushing, 1/2" coupling(need to buy) and 1/2" mip to 1/2" barb. So I need to buy 2 things after spending $120 or so in brass fittings hoping I had everything, some of what I bought will be returned. For the fill port I reduced with a 1/2" to 3/8" bushing, 2 1/2" nipple, 90, 4" nipple, tee with plug(fill port), nipple, 90, 3/8" to 1/2" bushing, 1/2" mip to 1/2" barb. The fill side is completed. I decided to reduce to 3/8" cuz the brass fittings are smaller and cheaper than going with 1/2" brass and galv pipe is ugly, not that you see it, but the main reason is the size.
That sucks
Drive shafts are ready, so that's good news. Should be back on the road in some form by Sunday at the latest if everything works as it should. I did think of something the other night and that's the shift linkage and if it's set up correctly. I never checked it for some reason(excitement, in a hurry, stupidity) and just slammed it together, so I need to check that before the rear driveshaft goes in to make it will shift into hi and lo.
gt1guy
Apparently a racist
That sucks
I don't know. Sounds about normal for these damn things.
For some reason, it seems it's all supposed to be a soul sucking nightmare.
Ain't that the damn truthI don't know. Sounds about normal for these damn things.
For some reason, it seems it's all supposed to be a soul sucking nightmare.
Fuck me Agnes, was changing the fill port from 1/2" pipe to 3/8" not a good call!! It took me 3 hrs to fill the t-case with one gallon of gear oil. In the beginning, it wasn't too bad but once the fluid got to the top of the 90 coming off the transfer case did things take a turn for the worse and then as the fill pipe got fuller and fuller things slowed down and I mean slowed down to a negative crawl or pump in this case. And then as the level got to within an inch of the fill tee it got even worse. But it's got fluid in it now and I was able to start the truck and check for leaks and there were none, so that's good. I did notice that when the truck is running and in gear the level gets sucked down about 1.5-2", so I'm wondering if I should relocate the fill tee and add more. Right now the level is pretty much to the mid-point of the front output shaft. Seems that's what I've read it needs to be when a NP205 is clocked flat.
Tonight I'll modify my rear link arm mount for a bit more clearance for the rear driveshaft & tighten the 8 bolts that hold the mount to the frame and whatever else I can get done that consists of: modifying the Magnum box mount, modifying the NP205 rear mount, zip tie up loose lines, install rear driveshaft, install rear link arms, install front driveshaft or work on modifying the front two-piece drive shaft and making a new mount for it possibly and install belly pans. I'm sure I'll probably only get the link arm mount done as that's how it goes, big plans and small results!!
I did shift the magnum box when it wasn't running and it shifted as far as I can tell only a test drive or putting it on jack stands will be the real test.
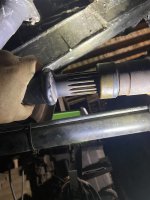
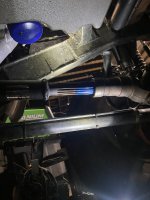
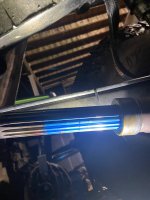
Skid plates are the only thing left, but the front driveshaft has got me scratching the ol’ noggin. At ride height I have about 2.5” of shaft engagement before it separates itself. Pics are the shaft fully compressed, then ride height and then fully extended right before it separates. It looks like it’s about centered, but I need to measure it to see if that’s the case. So maybe it’s ok, but for some reason I don’t have the warm fuzzy feeling that it’s good enough for the rocks. This was the reason I opted for my home built 2 piece originally and I will build it to work so it can be a spare or the other one will be the spare. I will have to break out my suspension jack and test this single driveshaft before I build the 2 piece, but I’m not sure I’ll get to it until Thanksgiving cuz I need to get ready for our deer hunting trip.
Attachments
Found this about driveshafts:
It's all in the geometry, you are working in triangles. A drive shaft shop will have you do some simple measurements under the vehicle to figure it out. It helps to know how many inches the suspension can compress and extend from ride height (with all the weight on the vehicle). The ratio of compression/extension versus the total will tell you approximately how much of the working length of the yoke should be exposed at ride height.
Say you have 6" of compression and 10" of extension at ride height. Of the total compression is 6/16 or 3/8 of total travel. The extension would be 10/16 or 5/8 of total travel. If you have 2 inches of slip available you would set it at 3/8 x 2 or 3/4" away from bottoming out at ride height. You may want to hedge with a little more room for full bumpstop compression, because jacking your driveshaft into the t-case from a hard hit is bad ju-ju. It helps to know the working length of the slip-yoke, but I don't know that I have ever seen that measurement on any documentation I have ever read. That must be the drive shaft shop "magic".
Obviously, I have over simplified this because true hotchkiss leaf spring suspension or a typical link suspension locates the axle in an arc, my example above assumes travel in the vertical plane only.
Question is how true is the above? Need to research some more to see what others say.
WaterH
Well-known member
Are you going to have limit straps?Skid plates are the only thing left, but the front driveshaft has got me scratching the ol’ noggin. At ride height I have about 2.5” of shaft engagement before it separates itself. Pics are the shaft fully compressed, then ride height and then fully extended right before it separates. It looks like it’s about centered, but I need to measure it to see if that’s the case. So maybe it’s ok, but for some reason I don’t have the warm fuzzy feeling that it’s good enough for the rocks. This was the reason I opted for my home built 2 piece originally and I will build it to work so it can be a spare or the other one will be the spare. I will have to break out my suspension jack and test this single driveshaft before I build the 2 piece, but I’m not sure I’ll get to it until Thanksgiving cuz I need to get ready for our deer hunting trip.
I found my original driveshaft measurements:
The original rear drivshaft at ride ht was 40 5/8" and at droop it was 41 1/2", so it extends 7/8" from ride ht and the new measurement is 42 1/4" . I have no issue with the new rear driveshaft as it looks like it did originally, but even so, the new droop dimension should be 43 1/8". So the rule in the last post doesn't seem to equate because it stated 5/8" extension would be needed and it's a 1/4" off. It's close though.
The original front driveshaft was 48 3/16" long and 49 1/2" at full droop. Droop extension is 1 5/16".Tthe new driveshaft length is 47", so if I add 1 1/4" that means I'll be 48 1/4" long at full droop and it will have 1 1/4" spline engagement. It just doesn't seem that's enough. Again the math in the previous post doesn't match up.
Drove it tonight, but it's not shifting from 2nd to 3rd like it did before, so either I don't have enough fluid, although I thought I put the same amount back in that I drained, but I could be off a quart or so and I'll need to check all the electrical connections and just look things over. To check the fluid I need to raise the rear to get it level. Regardless all of this is going to have to wait until after deer season unless I happen to get some time between packing the trailer and truck, fililng up gas cans and food shopping the next couple of days.
Last edited:
Ok, I'm back, in fact, I've been back since a week ago, but I got the truck jacked up and that was about it. Then on Saturday I added more tranny fluid and took it for a test drive. It still didn't shift like it did before and then I went to threading the speed sensor out to see if that would help. I did that a couple of times and it seemed better(may be my imagination), but again not like it did before the ORD mag box transplant. So I decided to see what LOW is like in the ORD mag box and stupid me I was in LOW the whole time and when I shifted into what turned out to be HIGH(it was the reverse pattern of the NWF black box and for some reason I thought it was the same) it seemed to do better. And then I parked it. It's been raining the last 2 days so I've not been able to test drive it and I want to thread the speed sensor back in to see if I can get it dialed in.
On another note, if you remember I had bought a cheap notepad to act as my Holley Screen, since the 3.5" handheld keeps going haywire, but it's a bit of a pain to keep turning on and get it working and I've not even tried to use it for a while, so I made a deal with my wife. I told her I'm buying the Holley 7" screen and if she wanted to fund some of it that will be my Christmas present. It's on sale right now, but of course it's back-ordered, but I'm tired of having to jack around with the 3.5" screen and the notepad, so the trigger was pulled. Now it just to wait and see when it comes in.
I'm going to relocate my air to water innercooler also as I'm pretty sure it's restricting airflow through the radiator. I just don't like the 208-215 running temp, although talking with Bebop he said it's no issue, but it bugs me, so I want to see if I can improve it. Of course it's getting colder, so projects will slow way down.
So the hunt was a bust. Hiked 11 miles in two days and just saw does and small bucks on the run. It was way too warm and we spent the first day mostly sneaking through the woods, but it was way too noisy and they spooked. The second day we went into the Sandhills and didn't see a thing until we got back to the woods, but that was only 2 deer and they were moving. We had 14 of the 22 campsites filled where we were, so factor in hunters walking into our shooting lanes when we did sit and glass didn't help. And the coup-de-gras was a tree fell 15 minutes after we moved our tent, trailer and generator cuz I knew it was going to fall, but didn't expect it would fall where it did. We got lucky, as we watched it and then scrambled to get all of stuff moved when it fell and got hung up in a tree and gave us enough time before it hit the ground. This tree was broken at the trunk and leaning 60* into another tree facing North. I figured it would fall North. The wind was blowing from the East and it unlodged the tree and it stood upright and didn't fall to the North, it just stood there. I then decided to hustle and move the truck. And then right after that it fell into a small tree 30' to the SOUTH-EAST and now was leaning at 45* if not more, how it didn't snap that tree and take out our tent and trailer was lucky for my son and I. So the scramble began, get the trailer moved, move the generator, get to the tent and start hauling stuff out of the tent while the wind was dead, but then run out of the tent when the wind picked up, which was like a 30 second on and off ordeal. Small branches were falling on the tent, but luckily nothing punctured it! We got it all moved and then more and bigger tree branches started breaking and falling. One that was about 3" round fell right where our tent was and then the tree fell EAST right where the generator and trailer was. Branches flew and they would've hit the truck. We did have a camper also, but 3 guys left the day before and took it with them or that would've taken a hit also. My son said "fuck this, let's go", so we did. The tree destroyed a metal table, hit the campsite BBQ, which was stout and did a number on it. Crazy.
gt1guy
Apparently a racist
Good thing it wasn't at night and you were sleeping.
Yea, that would've not been good! Still can't believe it fell 90* from the way it was leaning into that other tree. Had we not retrurned from checking out another area or had we decided to go out and get sunburned it wouldn't have been good either, but luck was with us in that dept, just not in the hunting dept.
Holley 7" screen is to arrive today, maybe just maybe I can start to install it and maybe get it installed in the next couple of days.
I also ordered some 1.75" tube connectors from Barnes to incorporate into the front stinger/engine cage for future removal if needed.
I also need to remove the windshield wiper and redo the wiring connection, because I didn't solder it on or crimp it on like I should've(not sure why I didn't or maybe I did crimp it on but not with enough oomph), cuz I knocked it off and it's a major pain to put back on and I think it can just fall off with a good jolt.
Also got the 2nd battery to install and the skid plates and a few other odds and ends to tidy things up, but really the Holley and windshield wiper are first priorities so that I can get out and do some good test driving and start to drive it to work and back to work out any new and lingering kinks. Oh yea and I want to move the innercooler too as one of the main things on my list right now.
The windshield wiper re-wiring is completed, but I still want to upgrade the upgrade by using the wiper motor from the '92 Chevy. It's gonna take some ciphering to see if it can be done and now I have no real super rush on it unless I get overly frustrated with the performance of the current setup.
I took out the water-to-air intercooler to see if the idling temp would go down like I thought/hoped it would. Well, that was a bust as it only changed 2 degrees, so I'll put it back in and have to figure something else out if I want to get the temps down. I had seen a video of a guy who used an electric water pump from a BMW or something that flowed like the Meziere but only cost like $100 bucks I would just have to knock out the impellers from a water pump to use it. We shall see if I decide to attempt this or not, but it will be a spring/summer/fall project as I really need to get some miles on this thing.
The Holley screen arrived so I'll be tinkering with getting that installed here in the near future.
The water-to-air intercooler has been shoved back in. I turned on the headlights and hit the floor dimmer switch and thought something was weird, but I forgot that sometimes the dimmer switch will kill the headlights, but if you hit it again they come on, but they do dim and go too bright. So I then decided to just check on the tail lights and wow no tail lights now. Brake lights work and I didn't test the blinkers(not sure why  ), so now I have to diagnose that issue. Maybe this is a sign to shorten the bed like I kind of want and kind of don't want to do. Nah this will happen later if at all.
), so now I have to diagnose that issue. Maybe this is a sign to shorten the bed like I kind of want and kind of don't want to do. Nah this will happen later if at all.Tail lights are working. I'm not 100% sure, what was wrong, but I think the switch had rotated and was grounding itself out or something. The tail lights would work in the parking light mode, so I took off my access panel and saw that it had rotated and when I rotated it back they worked. So I put some lock-tite on the threads and really cinched down the nuts, so we shall see.
I removed the notebook I had tried for the Holley guage pod and hooked up the 7" Holley Digital Dash and only a couple of guages worked and it said it wasn't campatible with the ECU, so I think I have to update the firmware and then see what happens. It makes no sense that the tach would work perfectly and a couple of different guages, although they weren't reading correctly, but none of the other guages would work and I wasn't able to adjust things either. Fingers crossed that tomorrow I can get some time to monkey around with it more and get it working and then figure out how to mount it.
I'm also going to up the idle to see where it starts to make a difference in the cooling temp at idle. I'm hoping that 50-100 higher will do it, but again we shall see. Problem is the 3.5" Holley screen won't let me access the idle settings to do it, so hopefully the firmware update for the 7" screen will get me access to do this.
gt1guy
Apparently a racist
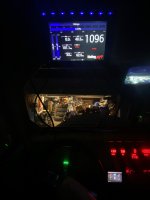
I got the 7” Holley Digital Dash installed and I just need to tidy up the wiring.
Very cool. Are those 10 dots at the bottom of the screen the number of pages of info you can scroll through?
Were the A/F's reading correctly in that picture? Left bank looks crazy rich.
Yea, the 10 dots are for 10 different gauge layouts and you can customize them.
To be honest I'm not sure if everything is reading correctly or not. I need to do a lot of reading on this thing and there were no instructions besides a quick start guide. The only things I was able to verify so far that are reading correctly are the RPMs and water temp. I hope the AF readings are askew, but maybe not, got some figgerin' out to do for sure. 2 things that have plagued me from the initial install of the Holley Terminator X Max are that it doesn't fire off right away when starting it from a cold start and it will die once or twice before it stays running and the IAC position % is off, unless after it's running for a couple of minutes I turn it off and start it back up, it then reads correctly. So the hard start may be due to the left and right banks being so out of sync? The IAC thing is puzzling and to be honest, I've just lived with it so that I can work on other things, but this winter will see a lot of investigation happening to get it dialed in.
To be honest I'm not sure if everything is reading correctly or not. I need to do a lot of reading on this thing and there were no instructions besides a quick start guide. The only things I was able to verify so far that are reading correctly are the RPMs and water temp. I hope the AF readings are askew, but maybe not, got some figgerin' out to do for sure. 2 things that have plagued me from the initial install of the Holley Terminator X Max are that it doesn't fire off right away when starting it from a cold start and it will die once or twice before it stays running and the IAC position % is off, unless after it's running for a couple of minutes I turn it off and start it back up, it then reads correctly. So the hard start may be due to the left and right banks being so out of sync? The IAC thing is puzzling and to be honest, I've just lived with it so that I can work on other things, but this winter will see a lot of investigation happening to get it dialed in.
gt1guy
Apparently a racist
The AF's , at least the left bank must not be reading correctly. I don't think a 0.9AFR would even fire and you would easily smell gas.
gt1guy
Apparently a racist
It just hit me that I only have one O2 sensor so that has to be why the AFR is off from bank to bank? Or am I out in left field here? The Holley Terminator x Max only requires one.
That would certainly explain it.
