What's new

1990 Cherokee XJ Build

Mittnz

Red Skull Member
Joined
Mar 6, 2024
Member Number
7579
Messages
134
Loc
Bay Area, CA
I guess I will start a build thread. Preface: I am an idiot and I don't know shit about Jeeps, but, in the last 8 months of owning this Jeep, I have learned a ton, learned how to weld, basically turned a whole garage into a fab shop, and wasted a fuck ton of money and time. Please feel free to tell me what I'm doing wrong.

Come watch as I ruin my credit, injure myself, and lose a girlfriend or two over this Jeep!

Jeep IG: @
yourexlovesmyXJ

Dear diary....

In September '23 I hit what I am calling the "I should buy a lifted 4x4!" phase of my entering-mid-life-crisis. After a pretty nasty breakup, and needing to find something new to dump time and money into, that wouldn't fuck me over in the end, I was looking at Ford Rangers, thinking I'd lift one and put some big tires on it and take it to Hollister Hills and beat the shit out of it. (I live like 15 minutes from Hollister Hills, so, hit me up if anyone ever wants to meet up or needs any help!) But, people out here are batshit insane as far as truck pricing goes, and it would have cost me over 10 grand to build what I was looking for.

So, knowing absolutely fuck all about Jeeps, I ended up getting a 1990 XJ off of Craigslist. The guy had put a decent amount of work into it, he just had his first kid and it sounds like he was having to sell off some toys.

1712093413290.png


This is her on day 1. He had some Rough Country 4.5" lift leaf springs, and lift shackles on the rear, Stinkyfab 3-link long arm kit, and Rubicon Express 7.5" springs up front.
He also had put the RockHard 4x4 bolt-in sport cage in it, as well as Corbeau seats up front, and 4 point harnesses.

Because I am an impulse-buy idiot, I didn't really know much about what I was getting myself into, and the more I dug into it, the more I wanted to redo a lot of the stuff the previous owner had done. But, the more I appreciated a lot of the effort and time he had put into a lot of stuff. (For example, it's a Renix, and he had already done a majority of the Cruiser54 Renix Bible tips, etc.)

First thing I wanted to do was get rid of the first-gen front clip, freshen up the paint a little bit, and get rid of all the 90's chrome. I had never painted a car, and I didn't really want it to look rattle-canned, so I figured this was a good time to learn. After watching a couple hours of youtube videos, I bought some Harbor Freight HVLP guns, and a ton of sand paper, and went to town. Got the 97+ front clip, and fenders, off of eBay (aftermarket chinese brand, they don't fit perfect, but they were dirt cheap.)

1712093986736.png
1712094039234.png


Bought some 5 mil plastic sheeting on Amazon, and a little exhaust fan to put under the garage door, and went ham.

1712096104541.png
1712096118305.png


I got all my paint from Speedokote on eBay (and I think some from their website) it's good quality, good price, would recommend. I originally planned to do gloss black, but, after some test sprays it was WAY too glossy, almost a mirror, and this thing has so many dents and dings in it (plus is going to get dirty) that I went with white instead, with a 2K clearcoat.

1712096256177.png
1712096278277.png
1712096303212.png


I went with some LED 5x7 headlights, and also got the LED side marker/turn signals, from Amazon I think. I put 96+ mirrors on (they have bigger mirrors than the old style, and they bolt right up. I also pulled all of the metal trim off from around the windshield, as well as all of the windows, and stripped all the old paint off, and hit that with black enamel spraypaint. Much cleaner than the ugly old chrome.)

1712096487077.png
1712096520479.png

(My GSXR, also pictured...)

Bought new 96+ door handles on eBay as well, they look much better than chrome, and also bolt right on.

List of stuff I have done so far, that will be archived in this thread:

  • Replaced stereo with a single-din "floating screen" 8" touchscreen head unit, looks GREAT and really helps modernize it, which is what I'm going for.
  • Installed back-up camera. (I can't see shit behind me with that spare tire where it is.)
  • Relocated license plate from standard rear deck spot, to the spare tire. (Didn't really want to get pulled over for having my plate completely blocked by the tire, and cops around here are assholes.)
  • Replaced door speakers with 6.5" and put 6x9's in the rear deck. Wired amplifiers, and redid all of the speaker wire with 12 gauge oxygen free copper. Installed voltmeter in one of the rocker switch holes to keep an eye on battery level.
  • Re-did gauge faces with new ones from Azzy's Design Works, replaced all the cluster bulbs with LED's, painted the back of the cluster face gloss white (to reflect more light onto gauges), it looks great at night!
  • Installed light bar and pillar pods. (pillar pods not pictured)
  • Experienced Jeep "death wobble" for the first time, which started when I was on my way back from trails 90 miles from home. Had to limp home on the back roads at about 25mph. Ended up replacing steering box, pitman arm, and nut. This also resolved all my steering play, which made it hard to control.
  • Repainted the whole thing (minus door jambs and engine bay), did vinyl pinstripes as well.
  • Somehow screwed up installing a lunchbox locker in my D30 front axle, TWICE. Currently back to open diff but have a Powertrax Grip Pro sitting in my garage, just waiting for bearing puller.
  • Replaced leaking passenger-side inner axle seal on D30.
  • Replaced leaf springs and shackles. When I bought it, it had 4" rough country springs on it but the rear bushings were SHOT, and the shackle angle was all borked. So I looked into replacing the bushings, saw how much work it was going to be, and decided to just upgrade to 4" Rusty's leaf springs and adjustable shackles, much better.
  • Replaced tail lights with all-metal housings and LED lights. Wasn't sure how I'd like them, but they actually look really good at night.
  • Installed Bilstein 5100's all around (not in picture).
  • Installed an add'l (push) Mishimoto auxiliary fan in front of radiator, on a toggle switch. (Previous guy removed the AC unfortunately, but, means I have a bunch of space with no AC condenser.)
  • Installed molle panels on rear quarter-windows, left and right.
  • Taken the door panels off probably 10x. Repainted arm rests with that Rustoleum vinyl/fabric paint, it's pretty cool!
  • Wired in an auxiliary 12V 100Ah LifePo4 battery in the back, with a DC-to-DC charger w/ "reverse charging". I can run all of my accessories off of the LifePo and never worry about draining my starter battery. If my starter battery every dies, I can recharge it via the LifePo.
  • Installed Smittybuilt door armor. (Fender armor and flares were done by the last guy)
  • Swapped to newer-gen side mirrors. Thank god, the other ones were so small they were useless.
  • Mounted hi-lift jack mounts on roof with nutserts (not pictured)
  • Repainted chrome roof rack to matte black, reinstalled. (not pictured)
  • Replaced battery, fuel pressure regulator, various sensors. Replaced PRNDL bezel, and light. Replaced battery hold-down w/ Dirtbound one. Replaced fuel injectors.
  • Installed a $15 Amazon "train horn" (the guy before me removed the horns for some reason, and I needed a way to let people know when I was coming around corners on trails/back-roads). I have an aftermarket NRG steering wheel (w/ quick disconnect) that the guy before me put in, and so can't use the regular horn button, but I put an arcade button in the dash.
  • Installed a PA. Mounted speaker under hood where the airbox used to be, tons of space there now with the THOR cowl intake. It's got sirens too... and it's LOUD.
  • Stripped (with a grinding wheel) all the metal window trim of the old faded black paint, and repainted with matte black. Putting that fucking trim back on was the most frustrating out of all of the stuff I have done to this XJ so far.
  • Found woodgrain dash panel from a Country edition at a junk yard yesterday! Scored for $30!
  • Replaced nearly all window seals.
  • Installed GPS wired directly to battery, that also has an internal lithium battery so I can find the Jeep even when it's not running. (Really don't want to get this thing stolen...)
  • Installed AffordableOffroad's rear window exterior molle-panel w/ 2 rotopax mounted on it. (Not pictured)
  • Dug myself into an insane amount of "Paypal Pay In 4" debt.
  • Learned a ton about this car, this engine, etc. (Never had a Jeep before. I can change my own oil and brakes and do gaskets and stuff, but haven't ever done most of the Jeep stuff.)
  • Beat the shit out of my hands and wrists, cuts everywhere, also permanent dirt/grease under my fingernails.
  • Stained pretty much every pair of jeans I own with gear oil and god knows what else.
  • Fixed parking brake, previous owner had just done a parking brake delete (I used mid-90's passenger-side YJ cables, if I remember right?)
  • Rear disc brake conversion on the C8.25
  • Welded on rear frame stiffeners
  • Installed Dirtbound front and rear bumpers
I will document all this stuff, provide resources for anyone looking to do the same, and as many pics as I can find.

(Hit image attachment limit, continued in next post)
 
Last edited:
The clearcoat ended up a little bit orange-peely, but, for having never painted a car before, and using a $30 Harbor Freight HVLP gun and the cheapest paint I could find, I am thrilled with it. (Maaco wanted like $2,000 to just do one shot single-stage white, that was without body work even...) I still haven't done the engine compartment, or door jambs, and I keep saying I will do them some day, but, whatever.

Now that she was looking pretty, I wanted to put a locker in the front. Previous owner had swapped in a C8.25 rear axle, and put a lunchbox locker in, but the front (D30) he left alone. I bought a PowerTrax LockRight, watched another YouTube video, and cracked open my first ever diff.

1712096870766.png
1712096893085.png
1712096914818.png


Oh, also, I should mention that this D30 has the retarded CAD housing, but the previous owner converted to a one-piece axle, and installed a CAD delete block-off plate. However (and I have done a good amount of research on this) there is no double-lip seal that will fit in the passenger side of a D30 w/ CAD. There are a handful of obscure NAPA seals that will work, but everyone has the same issue, they seem to leak within a couple thousand miles, mine have lasted even less. The passenger side axle seal was leaking when I bought it, so, while I was in here, I replaced that seal. (There are some guys that dremel this out, to accept the same size seal as the driver's side seal. I've considered doing that, but I also feel like I would end up fucking up the whole thing, so, I haven't bothered.)

1712097273020.png


I then reinstalled everything, and realized that something was terribly wrong, because I couldn't steer the fucking Jeep and it sounded like shit was binding just turning the front wheels in my driveway. When I eventually got it out of the driveway, I drove around my neighborhood, and had to make a 3 point turn, just to turn left at an intersection... people kept saying "oh that's just how lockers work in the front." No, this was like, unsafe...

So I opened the diff back up, I somehow sheared one of the pins in the LockRight... I ordered a rebuild kit (with new pins and springs) and reinstalled everything, this time I actually checked all of the clearances that the LockRight manual said to check, and AGAIN, had the same problem. I don't know if the locker itself was bad, or if this diff is bent, or wtf is going on, but after the third time of opening this thing up, I got frustrated and said fuck it, and bought a PowerTrax GripPro Limited Slip locker lol.

1712097395690.png
1712097445828.png


I used the same shims that were in the original carrier (I think I ended up taking 1 thou off one side in the end, don't remember which). Keep in mind I have never done any gear meshing, I just watched a ton of videos on it, and sent a bunch of pics to my mechanic buddy (as well as some FB groups) and everyone said "fuck it, I'd run it." She hasn't exploded yet...

1712097544943.png
1712097560691.png


Figured I'd open up the rear diff and fuck around in there a bit...

1712097641107.png


When I did, I found that THREE of the ring gear bolts had been sheared off and ground into glitter, my diff fluid looked like the bottom of a stripper's bathtub... Plus, the remaining ring gear bolts were barely even finger tight. I mean this thing was literally just flopping around, and what's insane is that I had taken it to Clear Creek BLM, and also Hollister Hills once or twice, and somehow had no issue. So, I'm sure gear meshing is important and all, but if I was able to wheel up a mountain with a ring gear in a rear diff that was literally flopping around on the carrier, I'm thinking that some slop isn't too big of a deal...

So, got all new ring gear bolts from Yukon, and put this ring gear back on, torqued to spec, and adjusted backlash and bearing pre-load to spec. Wow, no more loud "clunk" when I shift from P to R...

(I'm at work but will continue this post shortly, there's a whooooole lot more)
 
So after replacing all the ring gear bolts, I had to fix the parking brake. The previous owner just left the E-brake cable off after he did the lift. I ended up using 2 passenger side YJ cables, which were plenty long, but had to use some threaded rod to extend the adjuster/equalizer a bit.

1712787776010.png


Front Door XJ speakers are 5.25", but there's plenty of room in the door panel for 6.5's, just gotta get out the dremel.

1712787859316.png

1712787876370.png


I also ended up putting 6x9's in the rear hatch. This is super easy, since it's fiberglass. Basically just start cutting, there are many other threads about this with good pics.

Because I have the Corbeau seats up on big brackets, there's about 9" of clearance underneath the seats, not used for anything. I got 2 shallow mount 8" subs and some MDF and busted out the table saw and made some quick custom boxes:
1712788781530.png
1712788816308.png

1712789019116.png

1712788797615.png


1712788159393.png


Scored this cheap CarPlay touchscreen from Boss on eBay for like $150 new, it fits perfect even underneath the dash, because the head unit articulates and can be raised/lowered/swiveled. I don't have AC anyway, so don't really need to fuck with the dash controls much.

The door speakers are DS18 PRO-ZT6's (Water Resistant) and the rear speakers are the PRO-ZT6x9's. All powered by a DS18 4000 watt amp tucked under the rear passenger seat. The DS18 stuff isn't particularly amazing, but for the price, it's loud and sounds good enough to be put in an off-road vehicle. I also have a 10" sub in the rear.

Previous owner took out the rear seat, and seatbelts. I got a new seat from a pick-n-pull, but didn't want to deal with seat belts, so put 4-points in. RockHard 4x4 makes a "rear harness bar" for the XJ sport cage, but they want like $300 for it, plus shipping...

I ended up fabbing my own out of some eBay 1.75" roll bar clamps, and a "universal" harness bar that is made for ricers. I don't have a tube bender that could do these bends, so this universal bar worked out totally perfect.

Total cost was like $130.

Link to Harness Bar: Amazon.com (There are 100 places online to buy this, they seem to just all be generic, and about the same width.)

1712788521879.png

Yes, I know these welds are terrible, don't care, they will hold.

1712788617148.png
 
When I got the thing, the rear shackle angle was all fucked off, and they were rubbing. Also, the leaf spring bushings on the passenger side were shot to hell. They were Rough Country 4.5" springs, and from what I read, they use the same size bushings as OEM springs. Replacing the bushings seemed to be a pain, so I ended up getting new Rusty's XJ 5" leafs and boomerang shackles that wouldn't rub with these shackle relocation brackets.

1712789181428.png

(Note the shot out bushing)

1712789262857.png


1712789424240.png

1712789468188.png


Did these in an afternoon, everything went in totally smooth, no issues. Ride quality is great.

1712789543052.png


Had a bunch of steering play when I first bought it, which left like a huge dead spot in the middle of the wheel, so to make minor corrections while driving in a straight line, I had to turn the wheel 30 degrees each direction like a bus driver lol.

1712789662039.png


The pitman arm and sector shaft were kind of wallered out, and the nut was actually stripped, so I couldn't tighten the pitman arm up any higher onto the sector shaft. I ended up replacing the gear box. Which sucks because I think the box itself was probably fine...

New Bilstein 5100's all around:
1712789994723.png
1712790045772.png

(This was before I had replaced the leafs actually)
 

Attachments

  • 1712789348795.png
    1712789348795.png
    77.3 KB · Views: 5
Previous owner had put some really nice DirtBound rock sliders on it, and I love them, but, he just sort of drilled holes into the "frame" and made some self-tapping bolts. I'm sure it held fine, but after taking these things off and on a few times, it was a total pain trying to figure out which bolt fit in which hole (the sizes weren't all consistent) and some of the holes were just stripped out.

So I got some big ass 1/2-13 weld nut/bungs and welded those in to the frame (and frame stiffeners/crossmember).

1712790326122.png

1712790367588.png


Go easy on my welding, it's a little bit better now than it was back then... but not by much.

Completely stripped the previous paint off of the rock sliders:
1712790417541.png


2K Epoxy Primer:

1712790436062.png

1712790456918.png

And then I hit them with Raptor Coating (which I have gone through a whole lot of...)

1712790717055.png


I read 10 different guides to do the ZJ rear disc conversion on my C8.25 but ended up just buying the complete kit from Crown. It was a little more expensive, but, I'm glad I did because I didn't have to dick with it too much, and it works great.

1712790813839.png

1712790842972.png

1712790889152.png


Thing stops more like a car now, and less like a boat...


Oh I also bought I what I THOUGHT were the correct rear axles, based on what I was told (27 spline) but it turns out he had put 29 splines in, with a 29 spline locker in the rear. So, I did the whole axle swap, and got the C clips back in, turned the rear hubs a bit and just heard click click click... Had to take the fuckin locker apart again, dig the C clips out, and swap the old axles back in. I have Chromoly 29 spline rear axles on the way right now, but if anyone wants to buy a set of brand new 27 spline C8.25 rear axles, let me know!
 
So, I really liked the Dirtbound Hi-Line Cut and Fold rear bumper. I should have bought the DIY version, but I didn't have a welder at the time when I bought it. It took 8 weeks to fab and finally get.

In the pictures on the site, the hitch receiver kind of sticks out of the bumper a little bit, there is a lip all the way around it:
1712791536194.png


But, when I got mine, they had welded the hitch receiver so far into the bumper, that it basically just a big flush hole.

1712791576973.png


(Coated in Raptor Liner)

Because I have my spare tire on a hitch carrier (not the best play, I know, but it works for now), and these are 35's, in order to be able to close the hatch, I have to pull the spare tire itself a bit back away from the back hatch. So, the farther back you pull it, the more leverage the weight of the spare tire has, which was causing the bumper to flex, even if I just wiggled the spare tire with my hands. I'm sure on a trail or even just daily driving, it would have flexed even more, and eventually just warped the bumper or worse.

I ended up basically cutting the hitch receiver out of the bumper, and welding another longer, stronger one in, to help support the tongue weight of the spare tire (or anything else I put back there. I have a Honda Grom that I want to load in a hitch carrier some day.)

1712791754378.png


I also cut off the dinky 1/2" clevis mounts and welded on some big-boy 1" mounts.

1712791815142.png


This was also the day that I finally filled a CO2 tank, and made the switch from 110v flux core wire, to 220v solid core wire. Holy shit, what a difference. I wasn't even welding before on 110, I was basically just soldering.

I'm still practicing and getting better, but, the above pic is one of my best welds to date. (Have been welding for ~3 months now, completely self taught except for like YouTube videos and people talking shit to me online.)

1712791926154.png


1712792025423.png

I also reinforced the rear of the receiver with some add'l 1/4" plate, and ugly welds.


I also built the fab/fixture table in these pictures, myself. That was one of my first welding projects. I needed a table that I could put something in a vice, and smack the shit out of it, without breaking anything. All of my other workbenches are plastic/wood, so I built a ~350lb metal fab table, and it has come in handy so many times with this Jeep shit.

1712792113869.png

1712792134159.png


1712792352704.png


I wanted to do the whole thing in the fixture-table plate with the fixturing holes, but god damn that stuff is expensive. So I ended up getting one of the little "fab wings" from Certiflat. Super nice, easy to build too.

Keep in mind this table is really one of the first things I ever welded in my entire life.
 
Love this build. Switching my sons xj to newer front clip with eBay shit too. And will paint it ourselves. Thanks for details on mirrors and handles I wouldn’t have thought of that.
 
Having seen this in person now I can say the home brew paint job came out great. It probably looks as good or even better than my factory 1990 white paint
 
Someone on NAXJA might want those chromo 27 splines.

Start saving now for your jk axle swap.
 
Someone on NAXJA might want those chromo 27 splines.

Start saving now for your jk axle swap.

I bought fl0w3n 's front WJ D30 and have been regearing that and welding on all the XJ brackets. It's almost ready to swap, just need to repaint.

Regeared to 4.56 to match the rear:
1713237914211.png

1713237982153.png

1713238000483.png

1713238275902.png


I have the stupid CAD axle and I was looking for a D30 housing that didn't have that CAD and then planning on doing a WJ knuckle swap, but found his on FB marketplace (completely by chance) with RCV's and the Ecto locker, and dual-piston calipers, so it worked out cherry.

I have new Skyjacker 8" dual rate long-travel springs to go with this axle too, and I'm going to finish the front frame stiffeners that the last guy didn't.

1713238214184.png

1713238319783.png


I also have these brand new 17" Rocktrix wheels in WJ 5x5 bolt pattern that I am excited to use. (Will soon have a set of 15" 35x12.5x15 on 5x4.5 Pro-Comp steelies [pictured in all the pics above] that are basically brand new for sale.)
Love this build. Switching my sons xj to newer front clip with eBay shit too. And will paint it ourselves. Thanks for details on mirrors and handles I wouldn’t have thought of that.

Thanks dude! This is the exact one I bought (the cheapest I could find that had all these parts): Header Panel Grille Headlight Door Park & corner Lights For 97-01 Jeep Cherokee | eBay BUT, these guys are idiots and they ship the grille in a big cardboard box with ZERO void-fill, so the first one they sent was completely snapped in half, I made them re-send it, the second one they sent, they again didn't use any padding at all, and the top half of it was cracked in half, but I ended up just asking them for a refund and then I used some epoxy to fix it. Unfortunately it separated again and there's a hairline crack that you can see through the paint, but, whatever.

Also, you will want to save/re-use most of the hardware from the old front clip, especially the little plastic things that the screws go into, I heard Jeep doesn't even make those anywhere and they are a pain to source. (You can 3D print them though, I have the files, so, if you can't find some other solution, let me know and I will print you some for free.) Also the headlight aiming screw things, you'll need to re-use. Pretty much all the hardware is the same.

Here's the fenders I bought: Fender Kit For 1998-2001 Jeep Cherokee Front Driver and Passenger Side | eBay

It's pretty plug and play, it all bolts right up. The main pain in the ass is the antenna though, I could NOT find a new OEM antenna for sale anywhere, when I did find the OEM parts, Chrysler/Mopar/whoever wanted like $30 for the antenna bolt (I forget the actual name of this part. The Stanchion or something?) The 1996+ antenna mounts completely differently to the fender. I ended up just buying a stubby antenna and screwing it on and drilling some holes in the fender and put a couple tiny bolts through to hold it in. It looks fine, don't know if it works, I have Apple CarPlay so I've never even bothered testing it.

EDIT: It's the "Escutcheon", and the cap nut, they want like $35 a piece for these two parts.
1713303273909.png

1713303611120.png


Now I remember, I got the "Estucheon" piece from pick-n-pull, but I just used a couple little black bolts to attach it to the fender, rather than the whole antenna nut from underneath.


1713238800570.png
1713238824254.png


There's so much more that I have done to this Jeep, just haven't put the pics up.
 
Last edited:
1713238990465.png

Managed to get pinion preload basically perfect, but it took a 6' cheater bar to do it...
1713239395600.png


This table came in handy for sure, and I'm so glad that I am doing this on a bench instead of under a Jeep.


1713239060318.png


I also got fl0w3n 's steering setup, which I stripped and just dropped off w/ my powder coat guy this morning. Going Tiffany Blue on it to match my Grom.

1713239138802.png


I think that with my 8" lift and OTK steering, I'd be better off with an OTA track bar, so I got a Rusty's adjustable OTA track bar, and will just weld that bracket on when I get the rest of the stuff on that axle. I've definitely never done an axle swap in my life, I'm just watching videos and reading old forum posts. It should theoretically all be the same placement as my XJ D30 axle and brackets, just have an extra 2" WMS to WMS on each side. The good news is that I have my XJ axle to compare everything to, so I'm not doing it completely blind.

Can you guys tell that I'm not married and have no kids? :D
 
If you two make it up to Renofest let me know. I’ll drag my shitbox out of the driveway. I don’t know much about trails, but I know I have people to help tow me out if you’re there.
 
Axle seals: has anyone tried running these:


Cleaning the fuck out of the inside of long side tube, and just treating it like a rear axle where the gear oil ends up in the tube...? You'd need to continue checking level, and I assume you'd still need the inner axle seal to keep the bearing lubed, but at least it won't stink up your driveway.
I have those, but all of my axles are tubed/sleeved and so the inner diameter does not allow them to fit.
I've read a lot of mixed reviews on those things, there is eternal debate on the forums about them.

I guess the cons are, and I tend to agree, if dirt/water DOES get in, it's just going to trap it in there. And then also, you'd never know if you did have a leaky axle seal. If you lived somewhere with a lot of mud/clay, it might make sense, but, I'm leaving mine open.
 
If you two make it up to Renofest let me know. I’ll drag my shitbox out of the driveway. I don’t know much about trails, but I know I have people to help tow me out if you’re there.
I'd love to check it out, but my biggest problem is that I'd probably need to trailer the XJ, because if I break anything, I'm fucked and can't get home.
 
:lmao: Making good progress
Lol, I had a gf when I started this fucking project... she got too jealous of the XJ.

1713302681694.png


Part of the transcript from the last 2-minute long rant voicemail she left me:
1713302067816.png


Now I have way more money, time to myself, and a sick XJ. Just need to burn some sage in the front seat to get rid of that negative energy. Trust me, this was a win!
 
NRG quick release:

1713303808532.png


My console swap:
1713303917383.png


Ever since I bought the thing, it was kind of a pain to turn the key, sometimes the ignition would even turn without the key in it... So, I replaced the ignition cylinder, which I did NOT realize that you have to take half the fuckin column apart, when I started that.

I also replaced the turn signal stalk and the switch that is in there, just since I knew I'd be in there.

1713304125251.png

1713304160139.png


Plenty of videos and guides on how to fish this thing through the column, but, the best way to do it, IMO, is to just use a small pick to pop these pins out of the connector. Then you can feed just the wires through, without the big plastic plug connector, then pop the pins back in once it's through the column. I'm sure I'm not the first person to think of this, but I didn't see anyone else suggest it.

1713304282874.png


Previous owner put in (I think) a JK/WJ brake booster, and deleted the wiper washer tank. This wasn't gonna work for me, the first time I took it to Hollister Hills and had dirt on my windshield and couldn't see, I popped the hood and realized it had no tank... This was a $20 "universal" one from Amazon, that I wired into the existing wiper wires under the hood, and then ran the lines into the cowl and to the sprayers.

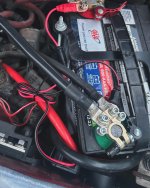
Also note the bus bar installed on the left, to minimize the amount of shit I have hanging off my battery.

1713304432477.png


Previous owner re-did the headliner, which I appreciate, but, took out the dome/overhead lights, and ALL under-dash footwell lights, so I put some cheap LED bars in there that I can dim/change color, wired them to one of the toggles on the console. They aren't as bright as they look in this image, and red is easiest at night for the eyes to adjust to. Really it was just a pain because if you dropped something at your feet, at night, you'd never find it.

1713304635190.png


I didn't like the stinger up front, so got a new Dirtbound front bumper, with the pre-runner hoop. But... now that it's on, I kind of miss the stinger...

1713304717635.png


Getting way better with Raptorliner texture :)


Oh yeah, I should probably also mention, I found another Renix 4.0L on FB Marketplace for dirt cheap, so, brought that home. Embarrassed to admit, but, I really don't know dick about engines. Electronics I can do all day, suspension/axle/drivetrain stuff is easy enough, brakes/oil/maintenance I do on all my cars, but anything passed like, the valve cover gasket, is all black magic to me. So, I'm going to rebuild this 4.0 (maybe to a stroker, haven't decided yet) and then I'll have it ready to swap whenever this one blows up. (It's got 240k on it, and I know with my luck it will throw a rod the day after I 4-link the rear...)

1713305148695.png
 
I have those, but all of my axles are tubed/sleeved and so the inner diameter does not allow them to fit.
I've read a lot of mixed reviews on those things, there is eternal debate on the forums about them.

I guess the cons are, and I tend to agree, if dirt/water DOES get in, it's just going to trap it in there. And then also, you'd never know if you did have a leaky axle seal. If you lived somewhere with a lot of mud/clay, it might make sense, but, I'm leaving mine open.
Yeah yeah, fine. Only answer left is…

TONZ :flipoff2:


Also: plenty of women like doing dumb shit in cars. You’ll find one… Probabmayble
 
Lol, I had a gf when I started this fucking project... she got too jealous of the XJ.

1713302681694.png


Part of the transcript from the last 2-minute long rant voicemail she left me:
1713302067816.png


Now I have way more money, time to myself, and a sick XJ. Just need to burn some sage in the front seat to get rid of that negative energy. Trust me, this was a win!
You’re smarter man than most. I work with a guy who is life long bachelor. Happy as hell. Does what he wants when he wants more money than most.
 
You’re smarter man than most. I work with a guy who is life long bachelor. Happy as hell. Does what he wants when he wants more money than most.
Currently dating a girl with a 2019 Rubicon, trying to convince her to take it off the pavement and meet me at Hollister Hills ;)

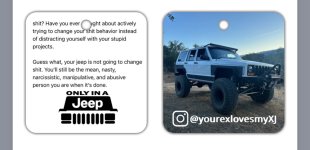
All about finding the right one I guess. Might print that screenshot out and turn it into one of those custom air fresheners lmao.
 
Currently dating a girl with a 2019 Rubicon, trying to convince her to take it off the pavement and meet me at Hollister Hills ;)

All about finding the right one I guess. Might print that screenshot out and turn it into one of those custom air fresheners lmao.
Get a prenup!! Because poor people can’t afford to give half.
 
Having seen this in person now I can say the home brew paint job came out great. It probably looks as good or even better than my factory 1990 white paint
Let me know if you ever want to paint yours, I have hundreds of $ of sandpaper, a DA sander, and everything else you need for that project, just sitting here. Plus HVLP guns and easily enough primer and clearcoat to do a couple more XJs, that I will never use, you can have as much of it as you need.
 
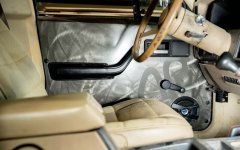
IMG_4525.jpeg


Fuuuuuuck, turtlelabs didn’t used to make these for the 84-96, a few months ago. Hhnnngggg.

These are next!
 

Attachments

  • IMG_4526.jpeg
    IMG_4526.jpeg
    239.6 KB · Views: 3
  • IMG_4527.jpeg
    IMG_4527.jpeg
    224.7 KB · Views: 4
IMG_4525.jpeg


Fuuuuuuck, turtlelabs didn’t used to make these for the 84-96, a few months ago. Hhnnngggg.

These are next!
I need these in my life. I keep thinking about buying sheet metal to make my own, and they’d end up something like this but way less appealing.
 
Won’t they rattle or transmit heat or something?

Listing: Aluminum Door Panels - Fits: 84 -96 Jeep XJ Cherokee - Raw Aluminum | eBay

This price is for a set of four (4) door panels.

Require for install:

- Remove factory door cards
- Remove armrest, map pocket from factory door card
- Remove factory door latch handle and assembly
- Reinstall factory components on the aluminum door card
- Reinstall door card with provided 8mm body clips

Door Panel Options:
Finish:
- Raw Aluminum
- Though we show images of the panels powder coated, these will be an unfinished aluminum, prepped with heavy burrs removed from the manufacturing process. It is typical for this finish to show some flaws and finger prints. Great if you prefer to coat or wrap them yourself. We also offer them in a powder coat finish, check out our store!

Manual or Power Windows: We can cut the panels to your window configuration.

Map Pocket: We can include holes to install the map pocket, or you may choose to omit them.

Speaker Size: (Speaker holes may need to be modified to fit your particular speaker arrangement, since aftermarket speaker designs widely vary in size. We cut the speaker holes to fit the factory 5.25" speakers. We can also cut them larger if you contact us about custom sizing.

Mounting:
- We provide 8mm body panel clips for install. If mounting holes do not align perfectly, this is intentional. Use a screwdriver, or similar, in any body clip mounting hole to align the hole, while also "preloading" the upper portion of the door panel in the weather strip, in order to prevent vibrating.

Notes: Our speaker holes may need to be modified for your speaker size and/or shape. Since there are so many different speaker configurations, we could not test these panels to be compatible with every speaker in existence. Armrest, door latch, speakers and window cranks not included.


———-


Seems like they just have a bunch of clips where the stock clips are. I don’t know why they’d rattle? You’d still have the door handle and lever screws holding the card to the door, plus the clips all around, plus the speakers holding it tight.
 
She sounds fun.


You know what they say, crazy girls are wild because the grip they lose on reality goes straight to their…

She’s probably found her next victim, cause my phone has been pretty quiet lately. I wasted two years there. She is fun in the way that partying shitfaced in Las Vegas is “fun,” you never really know what’s gonna happen next, one minute you’re in a penthouse suite and the next thing you remember, you woke up in an alley with no shoes on. But, at a certain point, you really should just lay down and give up before you end up in jail.

IMG_4556.jpeg

In the meantime I made some fun air fresheners out of it, I’ll pass them out whenever we all get together next. She got the house, the dog, and everything else after we split, but I have a sick XJ and every weekend I get to relax in the garage while I listen to music, drink white claw, and tackle some new project, without anyone in my ear upset that I’m taking too long, or spending too much money, or whatever.
 
Last edited:
Top Back Refresh