What's that frame for?
How to install the app on iOS
Follow along with the video below to see how to install our site as a web app on your home screen.
Note: This feature may not be available in some browsers.
You are using an out of date browser. It may not display this or other websites correctly.
You should upgrade or use an alternative browser.
You should upgrade or use an alternative browser.
1989 Jeep Cherokee 1 ton swap
- Thread starter RunningProblem
- Start date
-
- Tags
- jeep
RunningProblem
Well-known member
- Joined
- Sep 12, 2020
- Member Number
- 2860
- Messages
- 2,456
I see a good spot to check my limit straps.
FordFascist
Ford Bigot
My CJ-5 that I need to build.What's that frame for?
I see a good spot to check my limit straps.
I have a forklift. Laziness has its rewards.
RunningProblem
Well-known member
- Joined
- Sep 12, 2020
- Member Number
- 2860
- Messages
- 2,456
Fixed some brake line stuff. FordFascist came over and pointed some things out I was overlooking like ‘your brake lines will get ripped off by your tires’ and ‘your cooling issue could be a fluid problem.’ Amazingly helpful and I’m greatful for the info.
I went the ‘quick and easy because maybe this will work’ way instead of the other way we discussed because I could try this without buying more stuff. It might work.

 Previous photos show the slider was resting on the stop nuts. He instead you knew how the ride was while driving and told me it should be an inch apart. It’s currently 2 because I added a full inch of preload.
4” shaft showing now instead of 5. Less roll while turning too.

Brake tab location test 1. We’d discussed moving it in front of the shock tower.

Ruffstuff reservoir mounts. I don’t know if this will clear bigger and wider tires. I overwelded these.

I forced my alignment. I was about 3/16 to OUT. I made the angle iron level, measured 10” from those two studs and used identical tape measures to get the alignment. Yes I bought tape measures with fractional markings on it. It required less thinking at this moment. Thinking made it wrong the first time.
So now I just need limit strap, bump stops and a front drive shaft, I THINK, to be 100% ready to wheel.
I went the ‘quick and easy because maybe this will work’ way instead of the other way we discussed because I could try this without buying more stuff. It might work.
Previous photos show the slider was resting on the stop nuts. He instead you knew how the ride was while driving and told me it should be an inch apart. It’s currently 2 because I added a full inch of preload.4” shaft showing now instead of 5. Less roll while turning too.
Brake tab location test 1. We’d discussed moving it in front of the shock tower.
Ruffstuff reservoir mounts. I don’t know if this will clear bigger and wider tires. I overwelded these.
I forced my alignment. I was about 3/16 to OUT. I made the angle iron level, measured 10” from those two studs and used identical tape measures to get the alignment. Yes I bought tape measures with fractional markings on it. It required less thinking at this moment. Thinking made it wrong the first time.
So now I just need limit strap, bump stops and a front drive shaft, I THINK, to be 100% ready to wheel.
RunningProblem
Well-known member
- Joined
- Sep 12, 2020
- Member Number
- 2860
- Messages
- 2,456
Picked up a front driveshaft locally today. 2 1/2” tube and it JUST BARELY clears the transfer case linkage. I have an Adams 1350 front output yoke.
Today I learned a Dana 60 from a 1989 F350 has a 1330 yoke. It’s a ‘1330 Ford’ to be exact. It has two different size caps and uses u bolts with nuts and lock washers. I couldn’t understand why nothing worked. I’m now thinking the rear was also a 1330 Ford and wasn’t drilled out or oddball. I just didn’t know what it was and a friend figured it out when I talked to him about it. I can find a pair of U Bolts locally according to the internet so I’m going to give it a try late tomorrow.
Yoke. Zip ties were for holding the drive shaft in place while I moved the Jeep out of the garage. The orange dot is because I like to eat paste.

New front driveshaft. 1330 Ford axle size. 1350 transfer case side. Not sure how long it is.
The water bottle is a run I did earlier this year. 4:45:45 total time. My groin has never hurt as much before or since that day. Good race. Frog cupcakes at the finish. It’s amazing.

Today I learned a Dana 60 from a 1989 F350 has a 1330 yoke. It’s a ‘1330 Ford’ to be exact. It has two different size caps and uses u bolts with nuts and lock washers. I couldn’t understand why nothing worked. I’m now thinking the rear was also a 1330 Ford and wasn’t drilled out or oddball. I just didn’t know what it was and a friend figured it out when I talked to him about it. I can find a pair of U Bolts locally according to the internet so I’m going to give it a try late tomorrow.
Yoke. Zip ties were for holding the drive shaft in place while I moved the Jeep out of the garage. The orange dot is because I like to eat paste.
New front driveshaft. 1330 Ford axle size. 1350 transfer case side. Not sure how long it is.
The water bottle is a run I did earlier this year. 4:45:45 total time. My groin has never hurt as much before or since that day. Good race. Frog cupcakes at the finish. It’s amazing.
RunningProblem
Well-known member
- Joined
- Sep 12, 2020
- Member Number
- 2860
- Messages
- 2,456
Here is what I’m trying tomorrow
Spicer 2-94-58x U bolt kit.
Spicer 2-94-58x U bolt kit.
RunningProblem
Well-known member
- Joined
- Sep 12, 2020
- Member Number
- 2860
- Messages
- 2,456
1330 u joint U bolt nonsense. Torqued to ‘yeah that feels too tight for what it is.’

RunningProblem
Well-known member
- Joined
- Sep 12, 2020
- Member Number
- 2860
- Messages
- 2,456
Something resembling a bump stop Mount bracket. It’s ghetto fabulous and it’s 3/16” thick. Not enough room for simple die coolness.
Just a quick mock up. The actual width hasn’t been determined. I’m pretty sure I could make it another 1/2” sided.
In this photo it’s 2 1/2” wide measured outside to outside.
The bump stop can is 2 3/4” wide.
The fake beer can is the same size as the top of the bump stop can.

Just a quick mock up. The actual width hasn’t been determined. I’m pretty sure I could make it another 1/2” sided.
In this photo it’s 2 1/2” wide measured outside to outside.
The bump stop can is 2 3/4” wide.
The fake beer can is the same size as the top of the bump stop can.
RunningProblem
Well-known member
- Joined
- Sep 12, 2020
- Member Number
- 2860
- Messages
- 2,456
driver side bump stop in. I can fit a finger, the skinny way, between the coilover and the can.

The bump sits just below the track bar when fully compressed. I will need to make a platform up from the axle.


I should have welded this before installing it. It looks good for welding it exactly where it sits this photo. The backside looks comparable, and was just as fun.

The bump sits just below the track bar when fully compressed. I will need to make a platform up from the axle.
I should have welded this before installing it. It looks good for welding it exactly where it sits this photo. The backside looks comparable, and was just as fun.
RunningProblem
Well-known member
- Joined
- Sep 12, 2020
- Member Number
- 2860
- Messages
- 2,456
This took way too long for what it is. An L bracket with a 45 degree cut. The unibody isn’t flat and my welds on the stiffener aren’t professional level.
I made another one of these today. It also took way too long. They need to be tacked onto the bump stop can, tacked to the jeep, and burned in when it’s all done.

I made another one of these today. It also took way too long. They need to be tacked onto the bump stop can, tacked to the jeep, and burned in when it’s all done.
RunningProblem
Well-known member
- Joined
- Sep 12, 2020
- Member Number
- 2860
- Messages
- 2,456
Learned a new thing late last night.

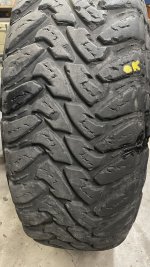
Strap the wheel to a floor Jack, and you can use it to break the inner bead. This is a 40” toyo on Trailready beadlock. The scrape mark on the inside of the rim were there before I removed it. I probably offended a few people using pry bars on aluminum beadlocks to pull the wheel out of the tire.

Strap the wheel to a floor Jack, and you can use it to break the inner bead. This is a 40” toyo on Trailready beadlock. The scrape mark on the inside of the rim were there before I removed it. I probably offended a few people using pry bars on aluminum beadlocks to pull the wheel out of the tire.
arse_sidewards
Contrary to everything
- Joined
- May 19, 2020
- Member Number
- 71
- Messages
- 7,818
Ballsy doing that with a 1" big box store strap. 
RunningProblem
Well-known member
- Joined
- Sep 12, 2020
- Member Number
- 2860
- Messages
- 2,456
Ballsy would be doing it with the cheap ass ones from harbor freight. These have a 1,000 pound working load limit according to the strap.Ballsy doing that with a 1" big box store strap.
edit: link to what I used. Normally $20. Currently $10. I should think about buying another set to keep until these break.
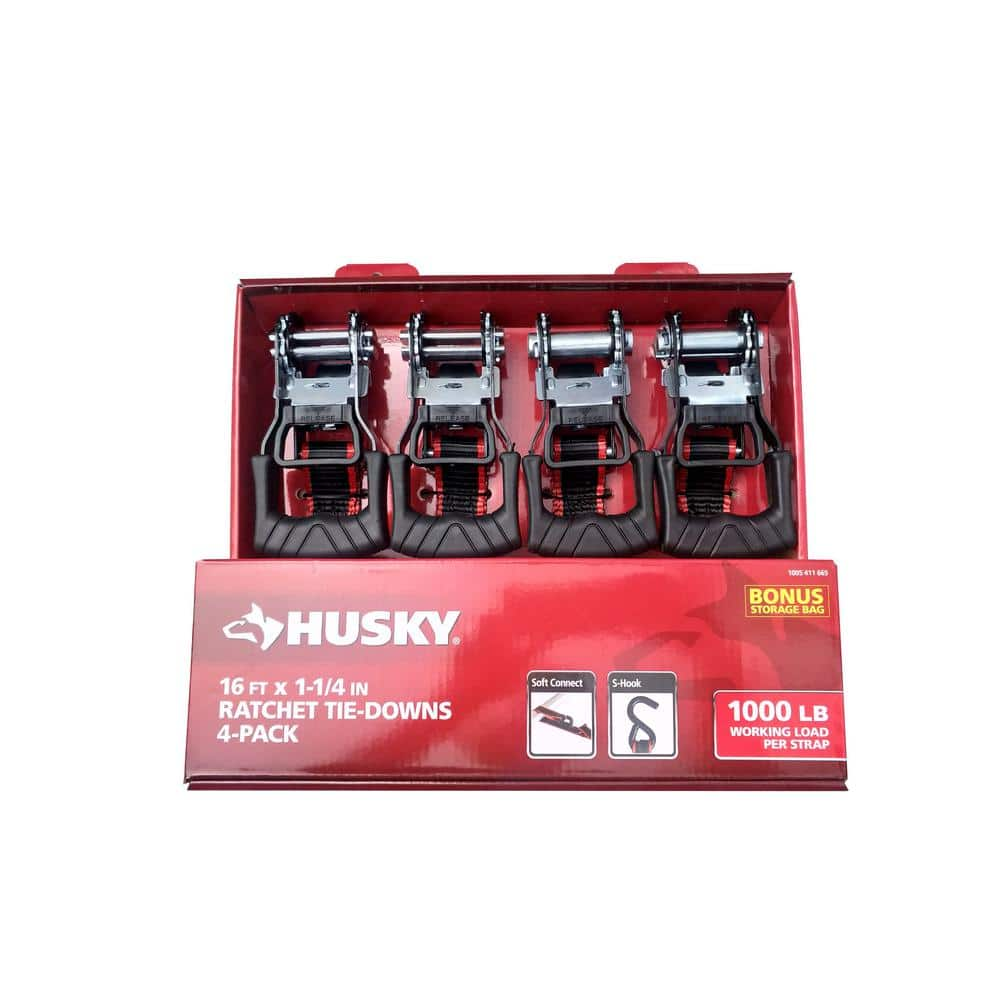
Husky 16 ft. 1.25 in. Ratchet Tie-Down Straps with S-Hook (4-Pack) FH0836E - The Home Depot
Each Ratchet Tie-Down features a ratchet style fastener with soft loop design, working load limit of 1000 lbs. break strength of 3000 lbs. The 16 ft. long strap is perfect for personal or industrial use.
www.homedepot.com
Last edited:
RunningProblem
Well-known member
- Joined
- Sep 12, 2020
- Member Number
- 2860
- Messages
- 2,456
Awesome. I’m undpsure why you dropped in here to say this.I like my HF straps.
RunningProblem
Well-known member
- Joined
- Sep 12, 2020
- Member Number
- 2860
- Messages
- 2,456
Passenger side bump can mounted up. The welds you can’t seem actually DO look better. I should have welded the outside vertical down instead of trying to look cool and do it horizontally. Oh well. It’s burned in extra good.
After making this one I realized I COULD have made a flat piece off the bottom of the unibody with it dropping down towards the axle.

After making this one I realized I COULD have made a flat piece off the bottom of the unibody with it dropping down towards the axle.
RunningProblem
Well-known member
- Joined
- Sep 12, 2020
- Member Number
- 2860
- Messages
- 2,456
Well this bit me in the ass. The welds on the inside of the photo above were so hot and got so much penetration the bump stop won’t slid into place. I get to file it down and it’s really hard to see the area from a comfortable position.
RunningProblem
Well-known member
- Joined
- Sep 12, 2020
- Member Number
- 2860
- Messages
- 2,456
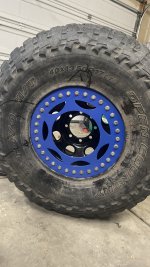
Beadlocks are fun. 
At 20 ft lbs all the way around (internet says 12-15th) the wheels leak between the tire and the rim. This probably explains the bead seal on the inside portion of the rim.

FordFascist helped me mount up a bent wheel. Apparently The valve core is supposed to be removed when attempting to rapidly expand air inside the tire to seat an inner bead. Why didn’t anyone tell me? More importantly…why didn’t FordFascist ask before practically popping my ear drum off by getting the inner head to seat?
At 20 ft lbs all the way around (internet says 12-15th) the wheels leak between the tire and the rim. This probably explains the bead seal on the inside portion of the rim.
FordFascist helped me mount up a bent wheel. Apparently The valve core is supposed to be removed when attempting to rapidly expand air inside the tire to seat an inner bead. Why didn’t anyone tell me? More importantly…why didn’t FordFascist ask before practically popping my ear drum off by getting the inner head to seat?
RunningProblem
Well-known member
- Joined
- Sep 12, 2020
- Member Number
- 2860
- Messages
- 2,456
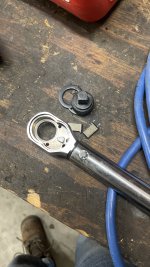
One tire fully mounted, ‘balanced’ and not leaking. Torqued to 20 ft lbs them ‘as tight as it needs to be to stop leaking. Shortly before THAT point the finest Pittsburgh 3/8 torque wrench I had broke. Convenient timing. I wanted to go inside anyways.
Attachments
RunningProblem
Well-known member
- Joined
- Sep 12, 2020
- Member Number
- 2860
- Messages
- 2,456
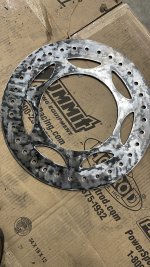
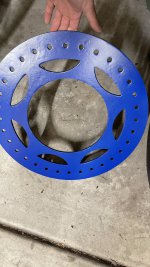
(Two) Rock rings (spray) painted. I think the previous owner never removed any mill scale before powder coating them red. I was told at least three times not to powder coat them so I went with Rustoleum blue. Matches the hubs I did a shitty job prepping.
Attachments
RunningProblem
Well-known member
- Joined
- Sep 12, 2020
- Member Number
- 2860
- Messages
- 2,456
When applied properly torque works. 15-20 ft lbs works to stop leaks if you don’t rush it, and you make sure EVERYTHING is torqued. About four times. Which is why people hate bead locks.
The first few times I tried to rush this and it ended with more headaches than doing it right the first time.
The first few times I tried to rush this and it ended with more headaches than doing it right the first time.
Attachments
Weren't we texting that day? Why didn't you askWhy didn’t anyone tell me?


Rockwood
Well-known member
- Joined
- May 27, 2020
- Member Number
- 1588
- Messages
- 344
Naw hoss, it's safer using weak straps. More stored energy when it eventually assplodes in your face if you use stronger shit.Ballsy doing that with a 1" big box store strap.
RunningProblem
Well-known member
- Joined
- Sep 12, 2020
- Member Number
- 2860
- Messages
- 2,456
All y’all were texting. I was trying to explode a fellow member’s shop. I wasn’t texting until after.Weren't we texting that day? Why didn't you ask
You should have been asking questions, you would have seemed super smart with four brains working on your problemAll y’all were texting. I was trying to explode a fellow member’s shop. I wasn’t texting until after.
Oh yeah and quit going out and meeting us in real life, eventually one of us is going to be a serial killerAll y’all were texting. I was trying to explode a fellow member’s shop. I wasn’t texting until after.
.RunningProblem
Well-known member
- Joined
- Sep 12, 2020
- Member Number
- 2860
- Messages
- 2,456
internal thinking noisesOh yeah and quit going out and meeting us in real life, eventually one of us is going to be a serial killer
Cancel…all..dates…with…pool…boy.
RunningProblem
Well-known member
- Joined
- Sep 12, 2020
- Member Number
- 2860
- Messages
- 2,456
Overpenetrated weld corrected.
I tried a cylinder hone and it didn’t work to my satisfaction so I bought Ryobi’s rotory tool. After trying the 60 drug I switched to the stone which made this go much faster.

Thinking about it seconds after taking this photo I should have painted behind the bump stop, and the can, and the bracket, before tightening this all up.

I tried a cylinder hone and it didn’t work to my satisfaction so I bought Ryobi’s rotory tool. After trying the 60 drug I switched to the stone which made this go much faster.
Thinking about it seconds after taking this photo I should have painted behind the bump stop, and the can, and the bracket, before tightening this all up.
RunningProblem
Well-known member
- Joined
- Sep 12, 2020
- Member Number
- 2860
- Messages
- 2,456
I’m going to need to trim a bit. This shit isn’t as bolt on as YouTube makes it look.

