How to install the app on iOS
Follow along with the video below to see how to install our site as a web app on your home screen.
Note: This feature may not be available in some browsers.
You are using an out of date browser. It may not display this or other websites correctly.
You should upgrade or use an alternative browser.
You should upgrade or use an alternative browser.
1989 Jeep Cherokee 1 ton swap
- Thread starter RunningProblem
- Start date
-
- Tags
- jeep
RunningProblem
Well-known member
- Joined
- Sep 12, 2020
- Member Number
- 2860
- Messages
- 2,455
I tried some green thread lock and it still leaks. Cleaned up the threads on the outside of the insert and it’s slowly leaking out of somewhere. Possibly the bleeder now and I can’t make it any tighter. Hopefully I didn’t thread lock the bleeder screw in there. Maybe I should have pulled the caliper off and done this on a bench instead of with brake fluid everywhere. 
RunningProblem
Well-known member
- Joined
- Sep 12, 2020
- Member Number
- 2860
- Messages
- 2,455
I wiped it off with a shop towel. So no. Not really.
RunningProblem
Well-known member
- Joined
- Sep 12, 2020
- Member Number
- 2860
- Messages
- 2,455
My brake line is long enough. At least on the driver side. I bought a new caliper for the passenger side. I think the $30 remanded Carson unit was screwed from the beginning. When I try to bleed it I can feel the bleeder screw wiggle. The Napa unit bled no problem first time. Lesson learned. Napa parts are worth the money. They work. I bought another one for the driver side. It’s only money, and even if I could return these to summit racing (2 years old) the restock fee would make it not worth my time.
I can order limit strap brackets then measure for limit straps.
I spray painted everything with a cheap primer so it doesn't rust.
The other side needs a longer hard line. Maybe I'll ghetto fab an extension with a bunch of fittings and spare line.
I found the air intake bolts. Maybe I'll figure out the intake and vacuum lines tomorrow.
The spray paint I put on the link bars and truss is pealing/flaking. Maybe I should have flap discd the tube before painting.
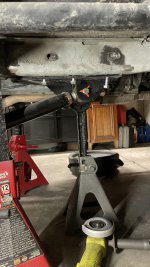
This is about 1 inch from full droop. I have the Jack stands under the tie rod.
I'd like to take the track bar, tie rod, and drag link off to clean them up then paint them.
I still should patch up the clearance I made in the fenders. I should also test fit some 40s on the rear.
I want to powder coat the top k rings for my beadlocks then I can try mounting 40s again. They're really worn and probably should be replaced instead of mounted. Maybe I'll remember to throw in balance beads.
I need to charge up the coilovers. I could maybe install them with springs using my 2 ton hoist if I need more lift. Maybe I'll be ghetto and use CO2. Maybe they're okay without a charge for street.
I need to make the intake. This means a run to Summit for an air filter and some rubber hose to a barbed T. Something extra classy so all the vacuum lines are actually connected.
I need to install the battery.
I think the 'NEED' list would make it drivable on 35s.

I can order limit strap brackets then measure for limit straps.
I spray painted everything with a cheap primer so it doesn't rust.
The other side needs a longer hard line. Maybe I'll ghetto fab an extension with a bunch of fittings and spare line.
I found the air intake bolts. Maybe I'll figure out the intake and vacuum lines tomorrow.
The spray paint I put on the link bars and truss is pealing/flaking. Maybe I should have flap discd the tube before painting.
This is about 1 inch from full droop. I have the Jack stands under the tie rod.
I'd like to take the track bar, tie rod, and drag link off to clean them up then paint them.
I still should patch up the clearance I made in the fenders. I should also test fit some 40s on the rear.
I want to powder coat the top k rings for my beadlocks then I can try mounting 40s again. They're really worn and probably should be replaced instead of mounted. Maybe I'll remember to throw in balance beads.
I need to charge up the coilovers. I could maybe install them with springs using my 2 ton hoist if I need more lift. Maybe I'll be ghetto and use CO2. Maybe they're okay without a charge for street.
I need to make the intake. This means a run to Summit for an air filter and some rubber hose to a barbed T. Something extra classy so all the vacuum lines are actually connected.
I need to install the battery.
I think the 'NEED' list would make it drivable on 35s.
RunningProblem
Well-known member
- Joined
- Sep 12, 2020
- Member Number
- 2860
- Messages
- 2,455
I made the new inner fender filler piece for what I had to cut out for big tires. Hopefully I did this right and maybe I will tax weld it into place. I do t have the 40s (38s) mounted anymore to test it. I just squared off the opening.
This took me about 3 hours on a Tuesday night. I’ll probably spend another hour making it look prettier and grinding down those welds as best I can.
This is what you’ll see looking I got he wheel well. I overwelded the FUCK out of this. Half for experience welding thin metal. Half because I like welding.

This is what you would see looking into the engine bay with the driver tire to your right.

This took me about 3 hours on a Tuesday night. I’ll probably spend another hour making it look prettier and grinding down those welds as best I can.
This is what you’ll see looking I got he wheel well. I overwelded the FUCK out of this. Half for experience welding thin metal. Half because I like welding.
This is what you would see looking into the engine bay with the driver tire to your right.
Last edited:
RunningProblem
Well-known member
- Joined
- Sep 12, 2020
- Member Number
- 2860
- Messages
- 2,455
Tire clearance finalized.
This is how it will look from inside the engine bay looking to the driver side tire.

This is how it will be installed in the photos below.

Mostly welded in. I went over some spots and filled it in.

Flap disc 120 grit so I don’t just remove all my weld.

Prime then paint. Coastal Gray from Home Depot. It doesn’t match the jeep as I expected.


Inside the engine bay. Amazing welds on some thin sheet metal seeing as how I did this left handed.

I don’t know why I only have to do this on one side. Maybe the axle isn’t centered. Maybe my steering wasn’t centered. Maybe it’s just weird.

This is how it will look from inside the engine bay looking to the driver side tire.
This is how it will be installed in the photos below.
Mostly welded in. I went over some spots and filled it in.
Flap disc 120 grit so I don’t just remove all my weld.
Prime then paint. Coastal Gray from Home Depot. It doesn’t match the jeep as I expected.
Inside the engine bay. Amazing welds on some thin sheet metal seeing as how I did this left handed.
I don’t know why I only have to do this on one side. Maybe the axle isn’t centered. Maybe my steering wasn’t centered. Maybe it’s just weird.
arse_sidewards
Contrary to everything
- Joined
- May 19, 2020
- Member Number
- 71
- Messages
- 7,827
Imagine having a rig clean enough to mark the heads of bolts. 
RunningProblem
Well-known member
- Joined
- Sep 12, 2020
- Member Number
- 2860
- Messages
- 2,455
I don’t have to imagine.Imagine having a rig clean enough to mark the heads of bolts.

RunningProblem
Well-known member
- Joined
- Sep 12, 2020
- Member Number
- 2860
- Messages
- 2,455
Patched up a big hole the jeep had behind the rear passenger door. Not easy welding sheet metal when you’re using 0.035 wire and 1/16 steel.
No before photo.

Not only did I spray paint (Rustoleum) over the existing rust, I used painters tape to try and smooth out the streaks created by spraying so much it ram.

No before photo.
Not only did I spray paint (Rustoleum) over the existing rust, I used painters tape to try and smooth out the streaks created by spraying so much it ram.
FordFascist
Ford Bigot
Try .023" wire. Way easier. I have a reel of it just for sheet metal.Patched up a big hole the jeep had behind the rear passenger door. Not easy welding sheet metal when you’re using 0.035 wire and 1/16 steel.
No before photo.
Not only did I spray paint (Rustoleum) over the existing rust, I used painters tape to try and smooth out the streaks created by spraying so much it ram.
RunningProblem
Well-known member
- Joined
- Sep 12, 2020
- Member Number
- 2860
- Messages
- 2,455
Oh NOW you tell me you have some wire I can use.Try .023" wire. Way easier. I have a reel of it just for sheet metal.
I consider going and buying some just to have for sheet metal. I was lazy and used what I had.
RunningProblem
Well-known member
- Joined
- Sep 12, 2020
- Member Number
- 2860
- Messages
- 2,455
RunningProblem
Well-known member
- Joined
- Sep 12, 2020
- Member Number
- 2860
- Messages
- 2,455
Moar weldz

I need to wire wheel this one a bit.
Crossmember welder in.

I need to wire wheel this one a bit.
Crossmember welder in.
RunningProblem
Well-known member
- Joined
- Sep 12, 2020
- Member Number
- 2860
- Messages
- 2,455
I missed a spot and realized this is necessary. The Rusty’s 3 link kit is a 5 piece design. The transmission crossmember is one piece, and each side has two pieces. One holds the crossmember to the unibody with the factory bolts, and the next piece provides more support to THAT piece and wraps around the outside of the unibody. It was all held in by the 8.8 grade bolts until it was welded in.
All I welded in was the outer clamp. On the passenger side I torqued everything down, and I’m glad I did, but what I need to do is weld the piece mounting the transmission crossmember to the unibody….to the unibody.
Photo shows crossmember/unibody part not welded on the right, and the wrap around piece on the left. The hole above the N is where the crooked bolt is. Not sure how THAT happened other than ‘everything shifted when you unbolted it’ because everything went in straight last time I put it together. I think.
FordFascist
Ford Bigot
Ways to improve the vertical welding / mixed thickness:Moar weldz
I need to wire wheel this one a bit.
Crossmember welder in.
- Turn the wire speed down
- Smaller diameter wire (.030")
- Half-moon welding motion
- Smaller welds and move around (1-2")
RunningProblem
Well-known member
- Joined
- Sep 12, 2020
- Member Number
- 2860
- Messages
- 2,455
Damn. I was actually thinking MORE wire speed was the answer. Every time I think less is more I tell myself it’s the opposite. I appreciate the input. I will try it for the overhead fillet weld (wow SOMEONE wants to show off what they learned in class) I still have to do on both sides.Ways to improve the vertical welding / mixed thickness:
It's really hard to weld to that unibody any other way.
- Turn the wire speed down
- Smaller diameter wire (.030")
- Half-moon welding motion
- Smaller welds and move around (1-2")
Unibody is plated with stiffeners. It’s 3/16 thick so no fear of burning through.
chaplinfj60
Well-known member
this will sound funny and no disrespect intended. welding in fuck up weird angles and different thickness can be bitch but here are a few things that have helped me
put a clean lens in,
position so your dominate eye can have a good view,
get comfortable, prop up something to put your arm on to steady the hand some.
weld down hill, its e70s and you can weld it down hill and that will help with the heat some,
stop and let shit cool
and clean clean clean the rusty metal
RunningProblem
Well-known member
- Joined
- Sep 12, 2020
- Member Number
- 2860
- Messages
- 2,455
chaplinfj60 no disrespect taken. I know most people jump into build threads to help, or learn. Just tryin to document as much as possible in case someone else wants to one ton swap a 1989 cherokee with a Rusty’s 3 link instead of a better full link front and rear kit.
The ‘stop and let shit cool’ definitely helped. I realized I have all the time in the world to get it down.
Downhill looks prettier. Uphill gets better penetration. It’s a balance.
Clean for sure. This ‘weld through primer’ shit SUUUUUUUCKS.
I do need to buy a new lens cover.
Being small (5’8”) and having this up on Jack stands works well. I also try to prop myself up so I don’t burn my hands with the heat. The welding has improved/gotten worse/improved over time on this. Under that downhill weld is probably a 1/8” gap I couldn’t make any better.
chaplinfj60
Well-known member
you have done fine for sure. i am telling you the lens thing has helped me more than anything else. its amazing what can happen if you can see the puddle. maybe even changing the shade helps some.chaplinfj60 no disrespect taken. I know most people jump into build threads to help, or learn. Just tryin to document as much as possible in case someone else wants to one ton swap a 1989 cherokee with a Rusty’s 3 link instead of a better full link front and rear kit.
The ‘stop and let shit cool’ definitely helped. I realized I have all the time in the world to get it down.
Downhill looks prettier. Uphill gets better penetration. It’s a balance.
Clean for sure. This ‘weld through primer’ shit SUUUUUUUCKS.
I do need to buy a new lens cover.
Being small (5’8”) and having this up on Jack stands works well. I also try to prop myself up so I don’t burn my hands with the heat. The welding has improved/gotten worse/improved over time on this. Under that downhill weld is probably a 1/8” gap I couldn’t make any better.

RunningProblem
Well-known member
- Joined
- Sep 12, 2020
- Member Number
- 2860
- Messages
- 2,455
I have one of those fancy 11-13 lenses with auto darkening and a lot of excuses. It might even be able to have a cheater Lena’s in there but I’m not that old. Yet.
chaplinfj60
Well-known member
cheater lens suck balls. here is why, sometimes what you working on is close, sometimes its a little further away so never get the same picture twice, my fix was i ordered off the amazon some cheater safety glasses i wear under the helmet. fixed that issue hahahahI have one of those fancy 11-13 lenses with auto darkening and a lot of excuses. It might even be able to have a cheater Lena’s in there but I’m not that old. Yet.
FordFascist
Ford Bigot
Damn. I was actually thinking MORE wire speed was the answer. Every time I think less is more I tell myself it’s the opposite. I appreciate the input. I will try it for the overhead fillet weld (wow SOMEONE wants to show off what they learned in class) I still have to do on both sides.
Unibody is plated with stiffeners. It’s 3/16 thick so no fear of burning through.
Yes, it's somewhat counter intuitive to weld off-angle on a MIG. I would also advise dropping a voltage setting as well if you are going true overhead.
Having a flame proof beanie, safety glasses and ear plugs are also a must off angle. I've had an errant piece of spatter land in my ear before and it scared me enough to run ear plugs.
X2 on weld through primer sucking. Weld through primer is really for spot welds, not MIG. You can get away with it on flux core, but solid core wire hates the shit out of it.
RunningProblem
Well-known member
- Joined
- Sep 12, 2020
- Member Number
- 2860
- Messages
- 2,455
The flameproof beanie/welding hat has definitely earned its keep. I also weld with full long sleeves, but wearing jeans with massive holes in the knees. I learned early on how being comfortable can make a difference. I also have to make sure not to death grip the torch. It isn’t a rattle snake.
I had a piece of grease/metal removed from my eye last year. Safety glasses are worn more frequently now. Even under the welding helmet with safety lenses.
I had a piece of grease/metal removed from my eye last year. Safety glasses are worn more frequently now. Even under the welding helmet with safety lenses.
JunKU
Newb
Great work, we appreciate you sharing. Ill echo the welding, .035 is a bitch when it comes to thin stuff. I run .030 and I feel like I can barley weld the body panels on my junk, clean lens and playing with the shade dial help, I seem to always turn the knob when I'm crawling under the jeep, always fun to start a weld on, grind🤦 Also, three link frt and leafs rear is tried and true.👍
Rockwood
Well-known member
- Joined
- May 27, 2020
- Member Number
- 1588
- Messages
- 339
If you're above 35, some 1.25 power cheaters from the drug store help a lot as well.
LOL, I've heard that sizzle sound. It's disconcerting. Doc looked in my ear and said "oh, you weld without earplugs." Yeah yeah...Yes, it's somewhat counter intuitive to weld off-angle on a MIG. I would also advise dropping a voltage setting as well if you are going true overhead.
Having a flame proof beanie, safety glasses and ear plugs are also a must off angle. I've had an errant piece of spatter land in my ear before and it scared me enough to run ear plugs.
X2 on weld through primer sucking. Weld through primer is really for spot welds, not MIG. You can get away with it on flux core, but solid core wire hates the shit out of it.
RunningProblem
Well-known member
- Joined
- Sep 12, 2020
- Member Number
- 2860
- Messages
- 2,455
Coilover in

Passenger side full droop.

Driver side full droop. Something seems to be different.

Passenger side full droop.
Driver side full droop. Something seems to be different.
Mattygwheeler
Well-known member
- Joined
- May 21, 2020
- Member Number
- 1036
- Messages
- 213
Yah, when your pass side is flexed out the track bar shifts the axle to the driver side..A longer more parallel track bar will help with thisDriver side full droop. Something seems to be different.
RunningProblem
Well-known member
- Joined
- Sep 12, 2020
- Member Number
- 2860
- Messages
- 2,455
Needs a front drive shaft, bump stops installed, brake line tabs to hold the brake lines in place, and limit straps.
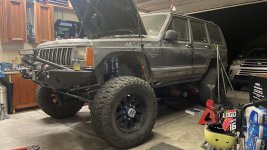
It’s on its own weight and I could drive it to the nearest poser spot after a stop for some gas.
Bottom of the front blinker is 38”.
It’s on 35s in the photo.
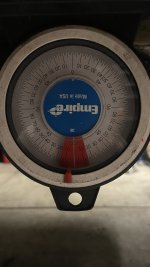
Lower link mount is just over 21” off the ground, the transmission crossmember is perfectly level at 5” of uptravel and 1/2” preload.
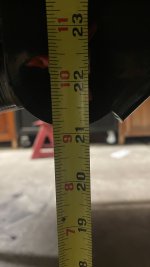
Bottom of the unibody rails are just over 23 1/2”.
This feels successful.
It’s on its own weight and I could drive it to the nearest poser spot after a stop for some gas.
Bottom of the front blinker is 38”.
It’s on 35s in the photo.
Lower link mount is just over 21” off the ground, the transmission crossmember is perfectly level at 5” of uptravel and 1/2” preload.
Bottom of the unibody rails are just over 23 1/2”.
This feels successful.
Attachments

RunningProblem
Well-known member
- Joined
- Sep 12, 2020
- Member Number
- 2860
- Messages
- 2,455
I took it to the gas station. Brakes are spongy, steering was almost completely empty of fluid and also had tons of play, it could use some sway bars, but I drove it out of the garage.