What's new

1973 Travelall 1010 - Slammed Family Cruiser Build.

And my new puke tank showed up. Amazingly nice for how cheap it was. Factory one is just huge and hideous. $23 literally in stainless. https://amzn.to/32IcpgR

48726603086_52ee9cd75d_b.jpg

First I love this build!

Second, you have no idea how much this helped me, I have this on one of my cars and was unsure which line needed to be connected to the radiator, I guessed now I will go check it and see if I got them right or not.
 
Second start....

https://www.youtube.com/watch?v=chgY...ature=youtu.be


So it runs! And sounds pretty damn good too IMO.

But the key still wont start it.

Annnnd My fuel filler is no good. It just doesn't take fuel.

Its pretty flat, filling with just a gas can was too fast. It filled the filler tube and took awhile to run down into the tank. I am using the OE Ford roll over valve, its a 3/8" line for vent. Too small? Its just to atmosphere, but I figured it was factory it ought to work....

Also since the tank is technically "sideways" vs how it would have been installed, it took 5 ish gallons for the fuel pump to be able to even get fuel, I thought it would have been in the low spot in the bottom of the tank, but who knows. I did bent the bottom jacking it up also. Maybe it was just first fill anf the sock needs some soaking to drop?


Ill take any input on tanks.... I am about to either go back to stock, cut the valence for a filler at the tailgate, or cut the floor out and drop a fuel cell in.....


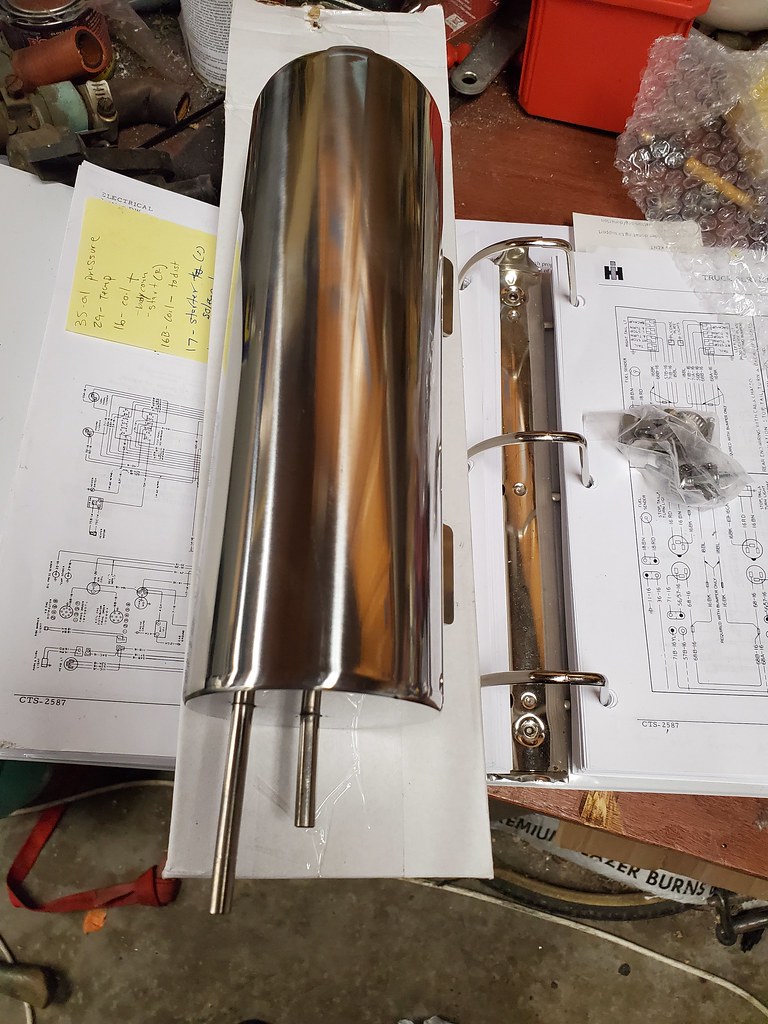
Filler going into the tank (after fixing many leaks...

48880150616_26e51c088b_b.jpg


Most ghetto map sensor install? :D I just wanted to make it make noises.....

48880148801_52ed02b886_b.jpg


range office today, but a couple hours on the ferry and I have a new fender. The looks you get are quite something walking on with a fender!

48881947426_25d13d98e1_b.jpg


New trans gasket! This the "the one" according to the mopar guys. Reusable..... It's hard plastic with rubber gaskets built in.

RTV or trust it??


1570984079_20191012_174718_mmthumb.jpg


Got new belts that mostly fit....

Started the truck, shut down and the fan comes flying off..... Like everything else the PO touched it was finger tight....


Sooo I may have been rushing.... Went to top off the trans to see if it was still leaking. Grabbed what I thought was a bit of a quart of teams fluid. I forgot I used that bottle to bleed the fuel system.....


Soooo how bad is a few oz of gas in trans fluid???? I dropped the pan, can I just let it flash off a few days? Just a hint of gas stink.


Fliter looks new at least.

1572316554_20191028_191934_mmthumb.jpg


Sooo to recap list night, got all the belts and hoses on. Filled the cooling system and started it up! Wanted to get things warm and see if the trans worked.

Still need to figure out where the other side of the heater core is supposed to go.... 3/4" bolt plug :D

48985494566_e259076edf_b.jpg


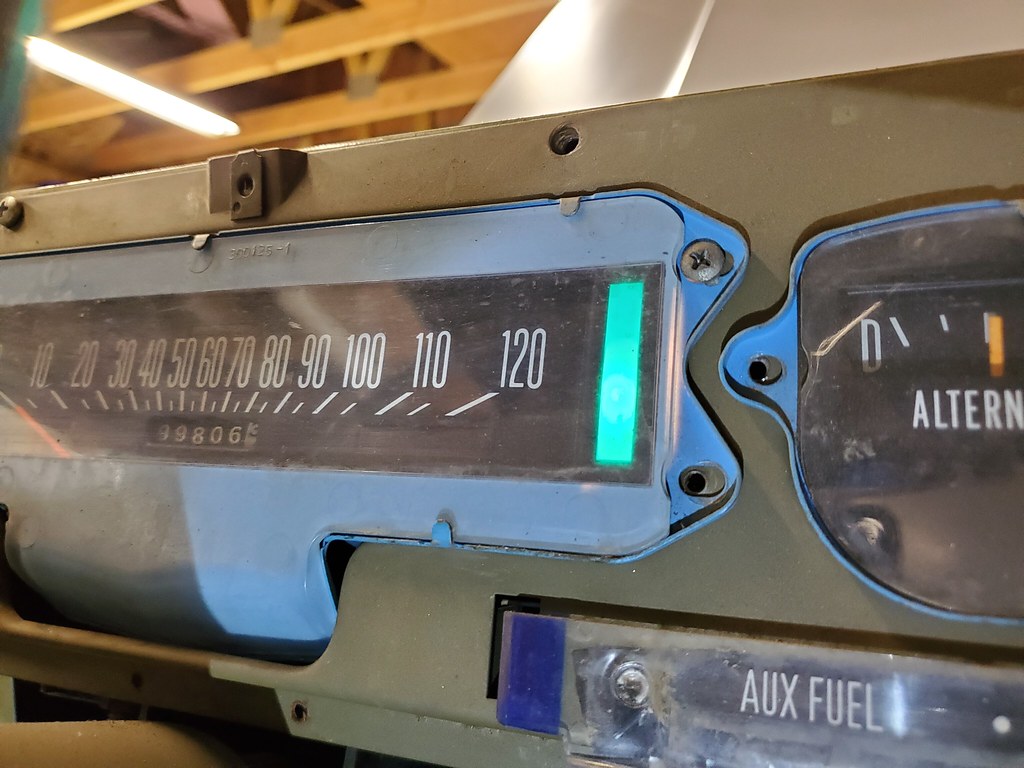
Wheels move both ways!

https://www.youtube.com/watch?v=-4RX...ature=youtu.be

Timing is off, way rich or both, it shoots flames

https://www.youtube.com/watch?v=6RHN...ature=youtu.be


Then I saw this one.......

https://www.youtube.com/watch?v=b9_I...ature=youtu.be


UGH.
 
Well there's your problem..... WP has a hole in it.

49013696006_811a371b87_b.jpg


Not great on the inside either.

49013901427_50973d62a1_b.jpg


But I was able to drop the fan down and out of the way and get the old one out.

49013901842_476d28b4d4_b.jpg


New one ready to go.

49013696356_537ae8240e_b.jpg


Backed out of the garage, and back into the garage under its own power!! Still have an oil leak. Not sure where its coming from yet. But it moves! Timing was miles off. Might be better now, but not sure, I couldn't see the timing light outside in the sun.... It sounds better now.... Also got the boat moved outside for winter, so I actaully have some room in the garage to work now!


https://www.youtube.com/embed/0B52BC4yN1U?rel=0

wAAACH5BAEKAAAALAAAAAABAAEAAAICRAEAOw==
 
Been way too long since I have done anything! So I had an hour free, and attacked the new/used fender.


One big dent right where the backing plate is.... Will try stud puller.

49592653532_88453cd311_b.jpg


Someone mounted something here...

49592653522_184735f9de_b.jpg


But an hour later and its almost done.

49592409026_20d1b4f809_b.jpg


Also started some bondo on the side, but forgot to take pics. Ordered more sandpaper, and wheels :D


Bondo on. (yes my garage is still a mess...)

49594937042_3bcfd16d5d_b.jpg


Blast with 8"DA. Guide coat.

49594937382_50ebfa9501_b.jpg


Longboarded. Looks like they are all low still, have bare metal, paint, then bondo showing.... This is going to be an interesting trade off between time of older worn paper vs cost of fresh sandpaper.

49594936532_f85c1bec9e_b.jpg
[/url


hit the spots on the door a bit later.
49596893631_2461a7b45e_b.jpg


Shoved the truck towards the center of the garage a bit more. And picked up a couple of 8' LED strips. Needed more light, the old fixtures I have are old florescents, and half working.....

49617579853_9a853ecaf6_b.jpg


A friend who used to do body work cam over. Helped me with technique a bit, got some more sanding done on the door, another coat on the front door and some hammer time. I am going to need a lot more bondo.

49617579923_e4bf64b3c1_b.jpg
 
Second light installed. First coat on the drivers side is done.

49623621122_e139fd4bb3_b.jpg


Pass side gets coat number 2

49623349641_fc68438102_b.jpg


Broke a bunch of studs trying to get the dent out of the fender....

49623350196_32d7061057_b.jpg


Blocked with 80 grit, a couple highs and lows still, bu getting much better. I fell like there is a bit oh a high still but I cant quite tell

49628160136_f249b3d7e9_b.jpg


I added more over the areas where the bare metal was coming through. May not have been enough, but that was a bitch to sand all the high spots I made last time....

The wheel well is a mess. It was hit and repaired at one point, so I'm having to reshape the whole thing.

16" durablock showed up, and the 30 is due in today.


1583607303_20200306_142135_mmthumb.jpg


Pretty sure these are miles off from the factory.....


Sanded the coat seen above, took some closer pictures. Still lots of lows it seems. Used the 16" durablock, maybe thats part of it.

49631851348_f3b2da223e_b.jpg


49632639147_2ee9e32658_b.jpg


49632638837_a2f409594f_b.jpg


Annnnnd this is gonna burn thru some paper.

49631850068_a1bcc53b3c_b.jpg
 
Love this build. i dont know if you ever figured out the light next to the speedo. that is right blinker and is likely indicative of a bad or stuck switch behind the steering wheel. they are problematic.
 
Love this build. i dont know if you ever figured out the light next to the speedo. that is right blinker and is likely indicative of a bad or stuck switch behind the steering wheel. they are problematic.

Perhaps it's stuck as well or the other bulb is burned out, but as soon as I put the hazard switch down, the light went off. I figured no bulbs connected meant the flasher relay didn't work. Not enough draw
 
Either I'm doing something way wrong or this thing is crazy wavy. Third coat shows a ton of lows still???


1583962088_20200311_142505_mmthumb.jpg


Might as well sand more off right?

49649345693_16a901c024_b.jpg


Then started on the Driver side.... And I am out of bondo pretty much.

49649346883_6bf46405ac_b.jpg


Wheels came in
They look massive!! Hopefully they fit!!

49653054381_673ff3da44_b.jpg


this is ridiculous. Blocked it out again.... I think? More filler?!?!

49652705958_5b543dd468_k.jpg


Found a few mins today and got the pass quarter skimmed.


1585531406_20200329_151108_mmthumb.jpg


Quarter was skimmed. Now I have it blocked with 80.

Still low spots?! Or do I take more off and I haven't hit highs except at the body line and door jamb.

1585695205_20200331_154751_mmthumb.jpg


1585695130_20200331_154756_mmthumb.jpg


Gallon 1 of filler done.

Wasn't quite enough to skim the drivers door. Opened new can and did drivers rear door. May try to get Drivers fender on today. Need to shoot primer on the pass one still....

49724492751_3fae37f8c3_h.jpg
 
I mean I know nothing about body work but how to fuck it up but I would say you are doing it right?
I can't imagine a Scout or any IH body panel was built with Chip Foose level of straightness.
 
I mean I know nothing about body work but how to fuck it up but I would say you are doing it right?
I can't imagine a Scout or any IH body panel was built with Chip Foose level of straightness.

I know nothing about body work either! But I'm making it up as I go!
 
White roof, medium gray body is where I am heading.

1.5 Gal filler in.

Pass skimmed.

49725558148_65b0b4dbb2_h.jpg


Drivers Skimmed.

49725557788_488a9bb518_h.jpg


Drivers fendder back on!

49726417082_a8b5a86080_h.jpg


Pass ready for welding.

49726416447_2ffbb2f3d3_h.jpg


Hood, which looked nice and flat, less one dent..... After getting touched with a block.... Facepalm.

49726103766_0096e63a20_h.jpg


I was using the body line as a high reference point. I think I am actually filling TO it.

I don't have a bare spot, but I need to figure out how much that body line normally "sticks up"?


49727053663_fd2de65770_h.jpg


49727916767_cd71aa75b4_h.jpg


Here is a before picture....

48669277616_0c9eb7ce24_h.jpg


Had to go to the shop for some company paperwork, welder is there so I took the new fender with me.

1585952497_20200402_101239_mmthumb.jpg


1585952525_20200402_101733_mmthumb.jpg


1585952553_20200402_101740_mmthumb.jpg


OK had an hour to dig back into sanding today!

Threw tape on the body line, worked great to not hit it, I could feel the tape, not so great after I hit it a bunch and couldn't peel it off without it being tiny pieces.....

Went to town like I had way to much filler on. I do. I was totally filling to the body line as I was kinda using it as a "high", took a lot off without big highs coming thru.

49770774963_90fa86bb93_h.jpg


49771307116_1dc3309bcc_h.jpg


Wheel well is kicking my ass. I cant get it shaped right..... It was in a wreck and a body shop there at some point....

49770773663_d19dfc328a_h.jpg


These three got whacked with a hammer. Will throw another quikc coat on them and keep going. I want to get epoxy on this thing ASAP.

49770787268_8f2e1a9969_h.jpg
 
Ok calling this one done for now, a high is coming out in the middle so I stopped.


Wheel well may need some more work.... Idk.

What I learned. I put WAY to much mud on. Yeah I covered the panel.... But didn't 'skim' it thin enough.

1586907286_20200414_154615_mmthumb.jpg


Started on the upper driver's door. I got the mud on thinner, and it's going much better.

1586958214_20200414_164651_mmthumb.jpg


Took the 8"da to the stuff further back..... It's thick.


Started on the ceiling.... Need to have a ceiling to have walls. Using tyvek.

1586995273_img_20200415_164459_350_mmthumb.jpg


And time! Still have a couple lights to deal with, but ceiling is done!

1587067261_20200416_124259_mmthumb.jpg
 
But I got this done! 3m pps cups fit my HF gun..... Super handy

1587091195_20200416_145602_mmthumb.jpg


Dust Midigation done! Wall around the fridge/storage rack.

49797878086_04e7bd6c13_b.jpg


Plastic down the other side.

49797331638_352f666ca0_b.jpg


Back to sanding!


Got donated a box of bends, a couple mufflers and a bunch of straight tube.... 2.5". Should I dare try to make my own exhaust with only 12" under the car??? Mufflers might be on the loud side too.... Thoughts on side exit right in front of rear wheels?


49803425392_cbf89eaef7_h.jpg
 
Nice work for a rookie body man. keep at it looks like you are making good progress.

Thanks! Making it up as I go along... We are almost to real time now....

Bottom Half of the door is much worse....

1587510520_20200421_151450_mmthumb.jpg


Got a solid 1.5 hrs sanding in.

Drivers door ready for one more coat.

49806861578_b4f6d35e2f_h.jpg


Drivers rear door as well.

49806863153_83948f9ebe_h.jpg


Both need a really thin coat in a few spots and I am calling them done.


One panel at a time! Ready for second coat I think. Pretty close!
1587673172_20200423_131836_mmthumb.jpg


It's yellow again

1587682789_20200423_154914_mmthumb.jpg


Got the other fender hung, it doesn't seem to fit as well as the old one, but its in a little better shape.

49813916612_0815096abd_h.jpg


a little better.....

49813606891_a030294845_h.jpg


Got things in another layer....

49813606461_591d703d1d_h.jpg
 
Got another couple hours in yesterday. These two doors are getting close. I am having to "rebuild" the body line on both, a bit of a new challenge. Accident damage on both.

I think this is about ready for another light coat.

49831558138_026e33fc1a_h.jpg


Need to take off more in the circle,and carefully try to work up a body line there.

49833661237_f7d50ea83a_h.jpg


49832401102_5c40f6d78e_h.jpg


And I thought this panel looked flat
cry_smile.png


1588206792_20200429_164533_mmthumb.jpg


Wife went for a run, I got 50 min in. Hood blocked. Put a little glazing putty on spots....


1588296731_20200430_174914_mmthumb.jpg


Tried dry guide coat. Way better than the spray paint.....but don't use too much to start!

1588371234_20200501_142710_mmthumb.jpg


Goodies showed up!

1588382931_img_20200501_181916_839_mmthumb.jpg


One panel at a time.....

1588431812_20200501_145428_mmthumb.jpg
 
I'm thinking another thin coat on these type spots

1588443030_20200502_110939_mmthumb.jpg


Really liking the dry guide coat. I put too much on, and it still gums up a little, but way easier for me to read.


1588714452_20200505_141012_mmthumb.jpg


Sand it off, add more on.... I'm just about out of 80 grit....


1588727777_20200505_174000_mmthumb.jpg


More sanding.... Drivers side is all hit with 150. A few spots hit will glaze.

49868428496_0dedc81a82_h.jpg


Pass side got lots more filler

49867984928_4208dfa908_h.jpg


49867984893_a822f2e12b_h.jpg


Test fender with filler

49867894718_c56e110177_h.jpg


OK test fender....

I didn't sand it quite as well as the truck (still some edges, was more worried about bondo vs bare metal paint differences). I can definately see the bondo, its duller, like paint absorbed more.

This is the area painted.

49871913377_81bfd92540_h.jpg


49871906402_f4706056dc_h.jpg


49871906327_44c056d63b_h.jpg


Can definitely see the texture diff here

49871922162_98ff04d207_h.jpg


Just need a second coat? Its also just rattle can paint


Primered the lower section

1588975396_20200508_145720_mmthumb.jpg
shot color over it all

1588975437_20200508_145934_mmthumb.jpg


Well primer and paint, really didn't do much to hide the filler... Hopefully epoxy does a much better job.

49886869741_752181c72e_b.jpg

Had a half day at home today. Cleaned the garage. It's almost workable again.

Week after next I have time to get back at it. Half hour a day after work is the goal.

1593887668_20200704_112920_mmthumb.jpg


Got a solid 3 hours in today! Thanks Wifey!

Starting point

1594587873_20200712_095910_mmthumb.jpg


Blocked after guiding it all. A few lows, and some highs I made lows.... Wheel well is killing me.

1594587989_20200712_105502_mmthumb.jpg


1594588028_20200712_105510_mmthumb.jpg


Hit a few more spots.

1594587932_20200712_113432_mmthumb.jpg


Then back door!

1594588060_20200712_120253_mmthumb.jpg


I'd put money on someone having a trailer hooked up and dropping the tailgate
teeth_smile.png


1594588107_20200712_120255_mmthumb.jpg


Ok just need to sand the pesky fender.... It needed more.

Then scuff the roof and rockers, then clean clean clean and shoot some high build!

1594782355_20200714_194613_mmthumb.jpg


1594782326_20200714_194624_mmthumb.jpg
 
Alright! Sanded the fender. Got two more coats in it.... It's funky.

Leaf blower was taken to garage. It's cleaner ish. Need to get new kitchen table into kitchen....


1594955155_20200716_194801_mmthumb.jpg


1594955202_20200716_194806_mmthumb.jpg


1594955232_20200716_194812_mmthumb.jpg
 
Now we are pretty much real time. I got distracted replumbing the air in my garage.... Was not happy with how it sprayed last time.... I can post all that if interested :lmao:
 

OK then. Im doing it wrong and probably going to kill a bus full of nuns, so dont do this.

But previously my system was all 3/8" rubber hose. When I was painting, every time I let off the trigger the hose would swell and the pressure would spike. Super annoying.

So in come this shit. All 3/4" pex.

Here is the fun part. Its a leftover from a past project that has been kicking around the shop. Its a drain heat recovery pipe, but I think it will work great as a cooling section. Its 40lbs of copper. I have seen lots of manifolds build onto the wall after the compressor in air builds, this is kinda just one wrapped up in a big pipe. 3/4" copper slits into 4 3/8" ish pieces wrapped around a 3" tube. I am replubing it all in 3/4" which I am finding is probably crazy overkill, because I have to neck down for the quick connects, but whatever.... :D

50133889261_e367f2ac3a_b.jpg


Line coming from the compressor outside. It will have a low point drain there also.

50140577306_5fefc34523_b.jpg


Adapters sweated onto the heat exchanger.

50140032238_4fe1660c77_b.jpg


First of many fittings. I may need a drain there too. Clear pip so we can find out though. And yes I realize this isn't normal air line pipe..... But I think it will be fine. Time will tell.

50140811997_453b16e399_b.jpg


Leader and drain point for the compressor. 3/4" might have been overkill
embarrassed_smile.png


50167161872_bd2923f58a_b.jpg


Drain fitting at the cooler pipe. Looking at the "filter/water trap" I think the pipe will probably get most of the water condensed back out.... so I bypassed the filter for the line running to the hose reel on the other side of the garage. So I have the option of running thru both or just using the hose reel.

50167161937_2f2e310760_b.jpg


All plumbed up. kinda.... I ran out of pipe. And need a few more fittings.... I burned thru 60' of pipe in my little garage already!

50167161627_45e9387ce9_b.jpg


Well fuck me for trying to clean the water trap... The seal had swelled and it's leaking now.... Ugh. Put rtv one it. Oh well it was 30 years or more old.....

OK after a two week(??) sidetrack of the air system, its done. 3/4" line everywhere. Reg on back wall, hose reel with full pressure up front.

50181709933_15b0cf52b6_b.jpg


50182508412_6486b961d6_b.jpg


1

This fitting failing started this whole ordeal.... Whole system leaked down 100psi since Thursday. I may chase that.... I think its the drain on the compressor.

50182251396_747b065753_b.jpg


Sanded the problem spot on the fender. I think its still got a little wave in it, but I'm calling it good enough for now.

50182633822_b1fcfdb624_b.jpg
 
Looks good!

PEX A is perfect for airlines and that after cooler should work well. For the heavy use days, a fan blasting on it will cool it down. Painting it flat black will help too. Post a review after some use.

I spent bank setting up an after cooler, Hayden 1299 with 2 600cfm fans. All of my tools travel for work so I need to stay compact with all of the cages. If I was set up in a shop I’d build a wall mounted pex setup too.

Yeah all my googling said it should be fine. And man I love working with it. We will see, if anything it will probably be the plastic T closet to the compressor that blows. And that's outside the shop walls.

So far it "seems" like I have better flow. Running a 1/2" air hose, but still have the 1/4" ID QD's on there, so if anything I could swap those. Blowing the shop out, compressor ran for 5 mins solid, and I couldn't feel any more than ambient on the cooler. I did toy with the idea of a fan if needed.
 
Why do you have the quick connect before the hose reel?
I would think you would get better flow by pulling it out and using a shutoff and a tee with one side going to the QD and one to the reel.
If thats going to be used for aint, I would probbaly also throw in a drop leg just to see if you get anything.

Aaron Z

Probably would flow better wo/ it.... Always had one there so I put one back... And paint is a bigger hose off the reg/filter. That's just for tires, tools etc
 
woah, that copper cooling coil looks pretty sweet. I see a sticker on there, so I assume you purchased it somewhere? Where did you get it?

I'd love to have some copper cooling to get rid of some water (my water separators only seem to work so well), and I don't have room on a wall anywhere to run a "wall of copper pipes" up and down up and down.

Would love to know how well that works.
 
Top Back Refresh