What's new

1968 Ford F-250 Prerunner Build

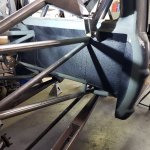
OK so today started making the panels for the rear firewall. Got the outer 2 made and welded in place. On the inside of this to hide the cut edge of the cab I will be putting about a 1" piece of plate welded to cab and then angled piece to finish the look and make both layers of the cab solid to the cage.

20211013_163157.jpg
20211013_163147.jpg
20211013_163206.jpg
 
Sorry will take a couple photos tomorrow but no real updates besides picking up my stage 3 built 4L80E from the trans shop. I went camping mon-wed and then thursday was getting products made to attend the leduc offroad swapmeet this morning.
 
OK got the trans back from build built with billet stuff inside of it, 300M input shaft and deleted the VSS since it's manual shifting now. Also tore down the np205 t-case and gonna grind the shift rails tomorrow and while it's all apart wire wheeled it clean and painted it to match the transmission. Will have the aluminum pieces will be raw aluminum but should look good under there. The motor will be black to not distract the eye too much when staring at the shocks and the turbo. Also picked up both driveshafts from the local shop who built them. Front is a 1350CV shaft and rear is a 1410 shaft.

20211025_160841.jpg
20211025_160837.jpg
20211025_161930.jpg
20211025_162248.jpg
 
Ok got the np205 tore down and shift rails modified for twin stick and the jb custom fab items installed on the t-case. Took tearing down t case 2x to get it to work properly but i got it and works like a charm now and all new seals and gaskets.
20211027_121001.jpg
20211027_120956.jpg
 
OK I had some people ask what adapter and such I used to mate this Ford NP205 to the GM 4l80E Transmission. Now I started with a 2wd 4L80E, I had to cut around 2.5" off the output shaft AND i had to jb weld a small hole in a tiny freeze plug on back of transmission since it has a small hole to lube the output seal for when it slips it doesnt get damaged BUT this case runs gear oil so I didn't want any ATF leaking out of the adapter housing. I used a ford NP205 and swapped input shaft to the GM 32 spline one. Now I used a ford NP205 clocking ring that has 2 sets of threaded studs to rotate it in 2 different postions flat or flatter. Now here is where I got lucky. Since ford uses a non symmetrical 6 bolt pattern I had to use 3 threaded holes to clock it up a little bit AND 3 holes to clock it up a lot more, BUT i didn't install the very bottom bolt since it wouldn't work with the transmission mount as well. And this made the 6 bolt pattern fit the GM T-case adapter housing, Dorman Part # 926-891 . Now to mate these together I drilled out the 6 bolt holes that would go to the transfer case. I then screwed the studs through the adapter and it was still tight on some of the holes so doing this the threads on the studs scratched the edges of the adapter. Then I used a carbide burr on my air grinder to make them smooth and it would slide right on after some clearing for shift fork and such. Now you can see in above photo that the adapter had to be clearanced for the rear shift fork. It also had to be clearanced for the big nut holding the center shaft in the t-case too. I attached some photos of that below. Now the shifter I using is a JC Custom Fabrication Cable shifter and it didnt require much more clearance since it uses a piece of .120 wall tubing over the shift rail. I also had to install that and the bolt in upside down AND i ground the top edge of the hex a slight bit to clearance the adapter housing. All in all I am happy with how it all fit AND from the 6 bolt tailhousing flange on t-case to center of rear u-joint is only 15.5" so it is super short as well which helped on this single cab truck.
20211027_120856.jpg
s-l500.jpg
20211027_120915.jpg
20211027_120902.jpg
20211027_120905.jpg
20211027_120910.jpg
20211027_131936.jpg
20211027_131933.jpg
 
OK overall length of the 4l80E and the Ford NP 205 from bellhousing to the rear yoke is 41 3/4" Long which may be some good info for a jeep with a superduty D60 driver drop front axle.
 
What are you doing for manual control on the 4l80? I've seen the Jakes Performance manual control box but do not see a lot of manual valvebodies for 4l80's.
 
Yeah I used it years ago. Basically the plug you have to supply 12+ to and this supplies the ground to different solenoids to make it shift. Then a ground to lockup torque converter to lock that thing up too which will be nice with a 4000 stall on it
 
OK got some nice seam sealer on all the welds/seams on the firewall area and then on the front firewall and under the cab on bottom of floor board got a nice coat of some etching primer. That will dry tonight and in the next week or so I will spray it all with raptor liner after I mask the tubes and cowl good so not spray that with the raptor liner. Trying to get all this stuff wrapped up so when my motor is done end of next month I can drop it in place for the last time. gonna weld a few zip tie tabs onto the engine cage for various wires/vaccum lines to attach to and then that will all get primered as well. Once my axle shafts get finished machining I will make my mockup axles so I can finalize the radius arms with the window on pass side for axle shaft to go through and then remove the whole front end to finish weld/paint all that before reassembly.

20211030_155951.jpg
20211030_155939.jpg
 
It’s looking great!
I’ve read about the 4L80 to Ford NP205 before. It was good to see the steps you to to achieve the union.
 
Ok got the raptor liner all sprayed and took off the masking tape/paper. Also got my axles from the machine shop so I can make some mock up axles. Now that u have mock up axles I can build the radius arms since the pass radius arm will have a window in it for the axle shaft to pass through. Will get the radius arms tacked up tomorrow then once off the truck I will plate and gusset them really good and strong.

20211102_161846.jpg
20211102_161841.jpg
 

Attachments

  • 20211102_161831.jpg
    20211102_161831.jpg
    1.6 MB · Views: 26
Yeah. Motor should be done around the end of the month so gotta get stuff done before then so once that's back I can start putting it back together and then finish up the back end as well as mount the all fiberglass.
 
Ok since I got the axle from the machine shop I can make some good mockup axles with sleeved tubing. I got that done and then onto radius arms. The pass radius arm needs a window in it for the axle to pass through. Has to be fairly big for the 1.5" axle to pass through since if one beam up bump and one droop it swings down or up and forward and backwards when cycling as well. But got it all figured out. Going to throw a lot of internal bracing on this one since that's a weak point BUT having the outer tube to end of knuckle helps a lot to handle the loads. Once that was mocked up I removed the whole front end from the truck so I can finish boxing it in and weld it all up to get ready for paint and final install.


20211103_162452.jpg
20211103_162448.jpg
20211103_162442.jpg
20211103_162436.jpg
20211103_154751.jpg
20211103_154749.jpg
20211103_154741.jpg
20211103_154737.jpg
 
OK spend this afternoon getting the radius arm plated and internal gusseted. Put lots of internal angled gussets from the .250 wall tube to the bottom 3/16" plate. Boxed in the window for the axle to pass through As well as plated the bottom of the kicker tube under coil over mounts to the main radius are tube/plating as well.Anywhere the internal gussets touched the bottom plate I cut slots and welded that to it as well to ever prevent it from buckling if it bends at all, the bottom of the bent window also has a internal plate to keep it from bending in if it acts like a skid plate. All plating on these are 3/16" AND it added quite a bit of weight to it, probably weighs in at 50-60lbs now but shouldn't bend at all. Tomorrow I am heading to Barstow for the weekend for a Clean Dezert event but next thing to finish these up before welding is to box in the coil over shock tabs.

20211104_135856.jpg
20211104_135857.jpg
20211104_135859.jpg
20211104_170852.jpg
20211104_170857.jpg
20211104_170901.jpg
20211104_170904.jpg
20211104_170909.jpg
20211104_171644.jpg
20211104_171647.jpg
 
Think they warped at all? That much welding on a beam, I would figure you'd set up a fixture before welding to keep the mount points in place.
 
The tabs on the back of the beams aren't welded yet and I will bolt the radius arm back up before welded those in the final position and mock it back up under the truck. I don't think they have warped but it is a lot of welded so I will clamp them to my 1" thick welding table to prevent warping as much as possible when welding them up.
 
Think they warped at all? That much welding on a beam, I would figure you'd set up a fixture before welding to keep the mount points in place.
It's not like bearings run in it like a rear axle. Warping is primarily a fit-up problem for TTB suspensions. As long as it can be bolted up easily enough to satisfy him it's fine.
 
It's not like bearings run in it like a rear axle. Warping is primarily a fit-up problem for TTB suspensions. As long as it can be bolted up easily enough to satisfy him it's fine.

Yeah that is correct and I am not going to weld the tabs onto the beams fully until the radius arms are welded fully since if they warp any that would make them not fit in those 2 mounts between tabs since they are solid with no bushing to flex.
 
Nice work on the firewalls! Definitely a pretty unique task with doing toob work on a bodied rig! :smokin:
 
Thanks. Haven't done this style of build before but always figured it would be easier to build and weld stuff if it was all removed and it wasn't too bad really and would've been cheap if metal didn't go up so much since beginning of the year
 
OK got a customer's XJ finished up with new track bar mount and track bar to fix the steering issues when going to a WJ knuckle. Got back on the radius arms. Got the driver side lower boxed in, internal gussets and at the same point as the passenger arm. I will weld up both of these and then make sure the mounts on the beams are still in the correct spots incase they warp a little bit or anything, so they will bolt up no problem. Also I added some height to the radius arms right where the coilover tube intersects to add some more internal strength and such to prevent any future problems. Also I will be adding a doubler plate on the coilover holes to prevent any deflection and fix the mis cut/re drilled hole for that.

20211111_171306.jpg
20211111_171303.jpg
20211111_171255.jpg
20211111_171246.jpg
 
Top Back Refresh