What's new

Rep builds a bunch of old Fords

Why have an 18 gallon tank when you can have a 38 gallon one? Let's go!

This is a Spectra tank, part number F26E. Fits right into the frame rail, and comes with longer hardware to reuse the original gas tank straps:
198644308.jpg


I modified the original sending unit to reach another 6" down to the bottom of the new tank, and then replaced the original float arm with a longer one from a bronco sending unit, altho i had to change the shape of it to get it to display accurately, while also being able to fit it thru the hole in the tank
610625071_orig.jpg


Sorry i dont have better pics but this is when i broke the lens on my camera. Extended using 5/16 & 3/8 stainless tubing and swagelok fittings, and i made a brace between the pickup and return so it was a little stiffer.

That said, the tank is installed!
319811201.jpg


139808749.jpg


It fits in there nicely and despite being bigger than the bronco tank, doesnt hang down as far:
324488813.jpg


This would be the end of the mods for the swap, except dump bed. Seems theres some aluminum in the way:
270786326.jpg


I had to notch the aluminum frame rail to make room for the filler neck. I also removed the coupling and extension hose to shorten up the filler neck a few inches, and then built a hangar to support the neck:
403411878.jpg


...and the finished product!
818823214.jpg


128.jpg
 
Last edited:
With that done ive moved my attention to the rear of the truck.

First up, reinstall trailer hitch:
129.jpg


I need to come up with some sort of bumper, to hold my license plate, reverse lights and trailer plug.

The bumper i built after doing the dump bed conversion years ago was built around the stock 8' bed, but with the longer 9' bed, it doesnt stick out anymore. This isnt even where it would be, it would be further up, and further in towards the gas tank
133.jpg


It looks like theres alot of room for a bumper, but because the bed tilts it gets complicated.
135.jpg


136.jpg


My original plan was a piece of 8" plate bolted to the bed/hinge. It would fit a license plate and a pair of reverse lights, barely
138.jpg


You can see when it tilts, how close it would come to the gas tank
139.jpg


So then i thought about something bigger, but something thats fixed to the trailer hitch/frame
140.jpg


Version #2 moves the lights up, which makes room for the trailer plug
141.jpg


Either way it would be tucked in tight under the bed
142.jpg


I kind of like this method, i think it looks better to have something robust fill in the gap above the hitch, and it allows me to build something substantial to serve as protection for the gas tank. I think i like having the air gap around it, so id have to make tabs that extend out and down towards the hitch, and then possibly to the corners of the rear-most frame xmember, but that also reduces just how strong it would be. i guess i could make the tabs out of something beefy like 3/8, or build reinforced 1/4" tabs. Not sure. SO this is where im at now, trying to figure out what i want to build.
 
Last edited:
Theres also a 38 gallon tank from a Superduty thatll swap in place of the stock front 16 gallon tank. Just in case you need 76 gallons of fuel :grinpimp:

I dont think im doing that though. I need a place to put the pump & tank for my water/methanol injection setup, so i think im going to put them where the front tank goes. So putting the 38 gallon tank in the rear gets me slightly more fuel than the stock dual tank setup, but frees up a lot of space between the frame rails for my water tank. That's the current plan, anyways.
76 gallons would be awesome, getting fuel 3x a month would be neat.

Until it came time to not be driving so much, then it'd suck.

What's the part number for the front tank? That'd be a sweet option from a weight load perspective compared to the large rear tank, even though that is the "easy/common" choice
 
Its a poly tank for a '06 SD with the 6.0. Im not sure of the p/n. Its a lot of work to swap one in compared to the F26E for the rear:

Yeah i think 50+ gallons of fuel would be too much for me, as i only put a few thousand miles a year on this truck. As it sits right now, the front tank is full of summer fuel.
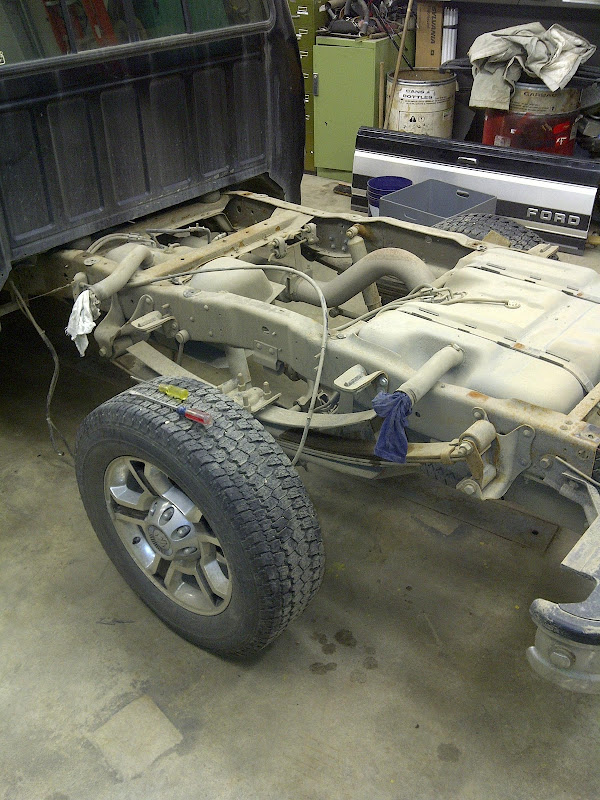
A couple more months and it will be in season again. :flipoff2:
 
Th recap: The next part of the project is lighting. I need to wire up the bed, but i also need a place to put my license plate, trailer plug and reverse lights
267362636.jpg


I spent some time staring at that space, and started thinking about just building a panel to house my lights & plate, similar to what a traditional dump truck might have
584044658_orig.jpg


Mocking up in steel:
204646820.jpg


590896615.jpg


Brand new Ford wedgelock pins.....
235791392.jpg


...means i can rewire a new trailer 7-way, to plug directly into the truck's harness
334415760.jpg


...and this gray 8-pin connector is the plug for the original bed's tailllights. The plan is to rewire the bed lights to plug directly into this using some more wedgelock pins and connectors
623886519.jpg


Running wires
617956180.jpg


...and with all wires ran, the panel is now installed! The panel bolts in, so i can remove it if i need access to the back of the tank, or the wiring harness
788113643_orig.jpg


With the bed done & wired id like to get the truck inspected (as i have work piling up that i need it for), but after 15 years, the Banks exhaust i had on here was falling apart and had been patched back together multiple times. Well finally the muffler rotted out and broke:
364831572.jpg


As a quick fix, i just eliminated it and threw an elbow on there so i could drive it to the exhaust shop
400435468.jpg


318245461.jpg


Its a total brodozer look and i hate it, but it was sufficient to drive to the exhaust shop to get a proper exhaust made anyway

285642723.jpg


So now ive got 4" stainless all the way from the downpipe to the tip, along with a new stainless muffler as well
516845496.jpg


892005692.jpg


Nice and quiet, for a 4" pipe anyways.

So from there it was just a matter of stopping and filling up the rear tank, so next week i can finally drop the front tank out of the frame rails
382552931.jpg


I bet you didnt think this would fit, but it totally does, and with room to spare:
680512901.jpg


And the new rear tank holds an honest 38 gallons
856795908.jpg


Its way out of inspection (was due in august), and i still need to get my water/methanol injection reinstalled, but at least she's a driver once more!
155942406.jpg
 
Thanks, im digging it, now to see how useful its going to be! I used the Super Duty to go on a scrap run right before i yanked the bed off of it for mine, and being able to basically just push the pile right off the side of the truck was pretty cool :laughing:
 
Is that hard mounted the whole length? Gonna be crack city in not too long.
 
No, because dump bed. Only mounted in the back. Up front there are 4 guides (2 on each side) to catch the bed when it comes down and make sure it stays centered on the frame.

115.jpg
 
You went on a scrap run and didn't use the dump? Weak. :lmao:
 
Nono, the Superduty wasnt a dump bed. I have 100% gone on scrap runs with the 96 and used the dump though :grinpimp: The crane operators usually get a kick out of it :laughing:
 
Haven't tried. I'm guessing I could. The tailgate has 2 piece cables so I can lay it down like a normal gate, or let it fold all the way down like the bed sides, which should be useful when dumping the bed. I could probably build some form of latch to hold the sides in place so they didn't move while driving and it would work.

Stuff in toolbox stay put ok?
I had built steel dividers to make 3 sections in the toolbox, and the left third of it was consumed by my water tank & pump for the water/meth injection. I thought I had pics but apparently not. So yeah everything stayed in place. With the aluminum bed I'm doing away with toolbox entirely. It was just a place to store my straps, chains and hitches, and that stuff lives in my shed now. Still have to reinstall the water tank and injection pump though, which I'm going to start on next week.
 
Haven't tried. I'm guessing I could. The tailgate has 2 piece cables so I can lay it down like a normal gate, or let it fold all the way down like the bed sides, which should be useful when dumping the bed. I could probably build some form of latch to hold the sides in place so they didn't move while driving and it would work.


I had built steel dividers to make 3 sections in the toolbox, and the left third of it was consumed by my water tank & pump for the water/meth injection. I thought I had pics but apparently not. So yeah everything stayed in place. With the aluminum bed I'm doing away with toolbox entirely. It was just a place to store my straps, chains and hitches, and that stuff lives in my shed now. Still have to reinstall the water tank and injection pump though, which I'm going to start on next week.
Please post pics on that. I guess it’s real simple.
 
For the dividers? Best i can do is this, from the original water/methanol install:
25.jpg


basically just made 2 panels out of .125 plate that bolted into the box.

The water tank was secured in a frame that bolted into the box
18.jpg


It got used a lot, and nothing in the toolbox ever got damaged
046.jpg


After almost 20 years the toolbox was beat, so it stayed in the bed and got sold with the SD:
068.jpg
 
Last edited:
Made a bit of a goofup, seems i designed my sending unit float arm to occupy the same space as the tank rollover vent, so the gauge would only read 3/4 full. So back out it came!
583935412.jpg


Pulled the rollover valve out, and you can see the problem:
565229837.jpg


this was a simple fix though, i just added a bend to the swing arm to move it over and away from the rollover valve:
862099000.jpg


...and as a finishing touch for the bed, i removed the original 'unleaded fuel only' sticker, and replaced with a new one:
565629675.jpg
 
Its time to reinstall the water/methanol injection in the F250!
805886315.jpg


Originally the system was installed in the tool box where it was safe and out of harms way:
906444490.jpg


But this time, with the aluminum dump bed i dont want the tank in the bed anymore, so i need to come up with a new place for it. So since we swapped the 38 gallon tank in place of the rear tank, that means that technically i dont need the front tank anymore. So, out it came!
370522696.jpg


This frees up a ton of space to install my 12 gallon tank:
494353916.jpg


Im sure this is going to spur some debate, but really, i just dont need 50+ gallons of fuel in the truck. Hell, it took me driving the truck over 200 miles just to get the new rear tank below a half tank so i could pull the sending unit to fix the float! So i think ill be ok with just the rear 38 gallon tank.

I took the original fuel lines and made a stubby line to connect the two ports on the diverter valve, so i cant accidentally dump fuel under the truck. This will suffice for now, until i do the e-fuel conversion later this year
721651359.jpg


Mocking things up, this is the plan for the water tank location:
871809788.jpg


320062596.jpg


It looks like its sticking way up but its not too bad. In its current temporary place its flush with the bottom of the frame rail and clears the bottom of the bed, so this will work, altho i think im going to lower it an inch or two, just for some extra clearance. Now to get a hangar designed and built. Of course its supposed to rain every day for the next week or so, so ill get to it when i get to it.
 
So i used the truck to haul some some stuff for the garage last week
003.jpg

:lmao:

It cracks me up, the bed is so big a 4*8 sheet of pegboard gets lost in there :laughing:

With the tire stood up in the corner though, it got me thinking about building a tire carrier. Originally the bed came with a simple tire carrier in that corner:
001.jpg


002.jpg


...and with my 35" spare:
004.jpg


005.jpg


I both love and hate it. Aesthetically i like it. But having it there means even when i fold the driver side down, theres still a tire there partially blocking access from loading on that side. But then i think, how often am i going to be loading something so big, from that side, that the tire will still be in the way? And at that point, i can always just load from the passenger side. So im still thinking of putting the tire carrier mount there. Thoughts/opinions?
 
Back on the water/methanol injection, im working on getting the tank mounted:
694917225.jpg


I started making a bunch of straps to suspend the tank in the frame:
423556178_orig.jpg


...and then:
509652982_orig.jpg


224565948_orig.jpg


400515015.jpg


So with 7 brackets all bent up, i grabbed a piece of scrap steel sheet and made side shields, and a lower panel, to keep road debris from hitting the tank
239440328.jpg


718957332.jpg


...with that done, it was time to reinstall the tank and hangar!

572729787.jpg


434968186.jpg


This shows the feed line from the sump in the tank, to the failsafe solenoid:
689828522.jpg


Ultimately, i decided to mount the pump in the underside of this xmember:
655668365.jpg


..and with the pump mounted and plumbed, its time to start on the wiring.

This is the original harness i ran down the frame years ago, with a wedgelock connector on the end so i could plug in the extension harness:
568900698_orig.jpg


...and this is the extension harness. Originally the harness ran up the bulkhead of the bed, but with the dump bed conversion done years later i had to make an extension harness to run down to the end of the frame rail and then double back along the underside of the bed. Well, with the new tank location we wont be needing this anymore:
215587529.jpg


...and this is the wiring harness that was inside the toolbox under the water tank. With the new pump & tank locations, now is the perfect time to take this apart, clean it up, and lay it out a bit nicer
567868745.jpg


So now its time to dig into my 10-15 year old wiring diagrams, reverse engineer this system, and clean up the wiring!
642375372.jpg
 
Aint that the truth! I followed CoolingMists color code when i first wired it up, and that includes 2 orange and 2 green wires. The two orange are easy, theyre both just +12, but the two greens cant be mixed up. So thankfully i had all my diagrams (as i pinned out the plugs when i drew them) otherwise i would have been tracing wires yesterday :laughing:

I actually have probably half of the wiring done already, but it started raining last night and isnt supposed to stop until tomorrow, so ill probably finish the wiring and test/prime the system monday.
 
Top Back Refresh