Hey guys,
this is my first build so figured I would post the progress.
OLD setup pre Sept 2022
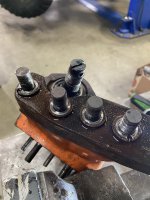
Picked up this 02 Tacoma (103k miles on the 3.4) with a 3 link and a d44 (5.38s, Reid knuckles with ARB and Yukon Chromo shafts), stock rear axle (5.29s, elocker) on chevy 63s with an auto trans for a deal. I thought I would just need to redo the front links, that snowballed into rebuilding the whole truck. Truck looked like Ray Charles welded everything on it blindfolded. Huge thanks to my buddies colinsmithslo and @Pedaltodd for all the help along the way
I sourced all parts from PolyPerformance
Current setup Sept 2022 to present:
Axles 2005 Ford F250 with factory 3.73 gears
Steering:
ram: PSC-SC2200K
hose kit: PSC-HK2015
Resi: PSC-SR146K-6-12
pump: PSC-SP1200X-6-12 (drill out upper bolt hole on pump)
pump bracket: TRG-301077-KIT
pulley: PSC-PP2456
adapter for pump to go to -6, -12 feed: PSC-SF06 and PSC-SF07
Front Specs:
Fox 2.0 air bumps:
Fox 2.5x12" coilovers with DSC adjusters:
Custom 3 link using:
Synergy Manufacturing Double adjusters:
PolyP Johnny joint kits:
Synergy Dual Durometer bushings:
PolyP 3 link brackets:
PolyP limit straps
Fk Heims for steering
Links are all 2" DOM
Rear:
Chevy 63s
homemade hangers
vato zone shocks for now
Sitting on 15" steelies with the 2.5" backspace on 37" Iroks (Old setup)
40x13.5x17 procomp MT2s
Raceline Monster beadlocks 4.75" backspace
Gears Revolution 5.38s
REV-D60-538RT
REV-F10.25-538L
REV-K35-2034
REV-K35-2046
Stock Auto trans with an old frontrange crossmember
T100 Booster (orillys) BH2 532791
T100 1 ton Master Cylinder 1 1/16" bore from Rock Auto Part number: Centric 13044722 (130.44722), or Dorman M390149
2WD Radiator (rock auto) OSC 1778
Radiator Hose (rock auto) GATES 22120
homemade sliders and rear bumper that were on the truck
front bumper is a marlin bumper off a second gen pickup (or so I was told)
Pics will be in order of build progression, bare with me as I figure out this thread thing
One ton Build starts on page 4


this is my first build so figured I would post the progress.
OLD setup pre Sept 2022
Picked up this 02 Tacoma (103k miles on the 3.4) with a 3 link and a d44 (5.38s, Reid knuckles with ARB and Yukon Chromo shafts), stock rear axle (5.29s, elocker) on chevy 63s with an auto trans for a deal. I thought I would just need to redo the front links, that snowballed into rebuilding the whole truck. Truck looked like Ray Charles welded everything on it blindfolded. Huge thanks to my buddies colinsmithslo and @Pedaltodd for all the help along the way
I sourced all parts from PolyPerformance
Current setup Sept 2022 to present:
Axles 2005 Ford F250 with factory 3.73 gears
Steering:
ram: PSC-SC2200K
hose kit: PSC-HK2015
Resi: PSC-SR146K-6-12
pump: PSC-SP1200X-6-12 (drill out upper bolt hole on pump)
pump bracket: TRG-301077-KIT
pulley: PSC-PP2456
adapter for pump to go to -6, -12 feed: PSC-SF06 and PSC-SF07
Front Specs:
Fox 2.0 air bumps:
Fox 2.5x12" coilovers with DSC adjusters:
Custom 3 link using:
Synergy Manufacturing Double adjusters:
PolyP Johnny joint kits:
Synergy Dual Durometer bushings:
PolyP 3 link brackets:
PolyP limit straps
Fk Heims for steering
Links are all 2" DOM
Rear:
Chevy 63s
homemade hangers
vato zone shocks for now
Sitting on 15" steelies with the 2.5" backspace on 37" Iroks (Old setup)
40x13.5x17 procomp MT2s
Raceline Monster beadlocks 4.75" backspace
Gears Revolution 5.38s
REV-D60-538RT
REV-F10.25-538L
REV-K35-2034
REV-K35-2046
Stock Auto trans with an old frontrange crossmember
T100 Booster (orillys) BH2 532791
T100 1 ton Master Cylinder 1 1/16" bore from Rock Auto Part number: Centric 13044722 (130.44722), or Dorman M390149
2WD Radiator (rock auto) OSC 1778
Radiator Hose (rock auto) GATES 22120
homemade sliders and rear bumper that were on the truck
front bumper is a marlin bumper off a second gen pickup (or so I was told)
Pics will be in order of build progression, bare with me as I figure out this thread thing
One ton Build starts on page 4
Last edited: