What's new

MCI 102-C3 coach to RV - Electrical System

CarterKaft said,
JNHEscher said:
I don't run recaps, but yeah, a shredded tire will destroy a lot. I'm cutting out all the flimsy stuff and beefing the tubs up with thicker stainless. I was going to use the OE fiberglass tubs as templates for the steel shop to bend some stainless sheet from. After feeling sick and sitting in the bus for a few hours, staring at the battery and inverter placement while waiting for my wife to return from Pueblo, I thought I'd be better off making some hinged plate tubs. Flailing tire tread would otherwise be aiming for $3K worth of electronics.​
I didn't really want to even bring it up for fear of jinxing you but I know if it were mine I would wreck that out first trip, my luck blows lately.

Some extra steel in those areas would really help.
 
CarterKaft said:
I didn't really want to even bring it up for fear of jinxing you but I know if it were mine I would wreck that out first trip, my luck blows lately.

Some extra steel in those areas would really help.​
Nah, good to bring any concern up. I have so much going on right now that I could always use reminders.

In two weeksish, we're moving to a well-used trailer with a detached garage off the beaten path in Fort Garland. Half the rent and the owner is totally cool with us parking the bus right next to it to work on it all we want. There's a pile of work to do before I can hobble it up the back roads to this place, but damn, the freedom to step out of the house and into the bus at any hour is going to save us.
 
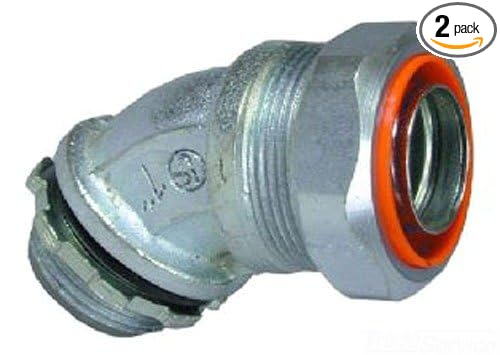
Needed a 45° pass-through for the flex conduit. The junction/outlet boxes over the water tank and tool bays are on the other side of the panel that the rest are mounted in. I like drilling the cover plate screw holes out in one pull elbow so that two can be sandwiched together. Makes a really clean pass and provides an extra port on each side.

287.jpg
 
A picture of it fully assembled will make more sense. This passes a wire run through a panel at 45 degrees to the panel.
 
Snapped pics of the process. Mind you, I've always done this on a floor-standing drill press with sturdy fixtures. This Harbor Freight benchtop unit makes the drilling like shooting blind.

Ream out the threads and take it all the way through. Flip the fitting over and use an appropriately sized pilot-tip drill bit to countersink the hole for a screw head and run it deep enough so the screw head will clear the conduit. It's very simple and effective.

Once I mark where I want these to mount and drill the screw holes, I cut a hole in the panel to match the ID of the elbow opening. Sandwich the panel between the two elbows and done. Clean 45 degree double pass and a fish tape zips right through them without snagging.

288.jpg
289.jpg
290.jpg
291.jpg
292.jpg
 
aczlan said,

Very cool (and I might have to steal the idea some day), but I am still seeing 4 connections, each separated by 90 degrees. Where are you getting 45 degrees from?

Aaron Z
 
Elwenil said,

I believe he is sandwiching a panel between them. So if these are the conduit pieces: < > and this: | is the panel, you end up with something like this: >|< So instead of the conduit passing straight through at a 90° to the panel, it can be angled up or down at 45°. It's an overly complicated way to get something that is already made for many types of conduit.

41FejfBHRPL._PIbundle-2,TopRight,0,0_SX500SY355SH20_.jpg
 
The result. Pic of my slide hammer handle through the two pull elbows. This is where the 45 degrees is. Unlike two 45 degree fittings that create an "S" curve that can jam a fish tape, this makes a straight pass.

Got this installed and realized I forgot my bag of liquid-tite fittings. Not too far off from pulling wires back through.

293.jpg
294.jpg
295.jpg
 
bigun said,

Well DUH! I kept looking at it as you were holding the two fittings against each other trying to figure out how 4 90* gave you a 45*! As my dad would say "the light bulbed" In my case the candle tried to flicker to life.
 
LOL. I could tell there was confusion all around. Figured waiting until I could post a picture of the final outcome would be better than my chicken scratch drawings.
 
For sure. Kinda feel like I'm overloading the thread with pictures, but pictures are invaluable for builds like this. I've been getting some push to start vlogging the progress because of the immense curiosity people have had.

Turns out I did have the bag of fittings here. Probably the last shot for the night. My conduit snake.

296.jpg
 
Short day with limited productivity. Trying to determine the best way to route wiring in and out of the center chase so that it enters into a box I'll be building that recesses below the batteries and allows the battery tray to roll out without interfering.

Pulled the passenger blower motor out of the sand to check it out. A few weeks ago, when my dad and I were sorting out the copper pile, he asked me what my plan was for the two motors sitting there. I told him what I could out of them at the scrap yard, but that I was reluctant to toss them away because I had the feeling that I would think of a need for them and regret discarding them.

We stared at these for a few seconds and then both thought that this twin shaft motor could be a bench grinder that hooks directly to the DC power on the bus. Why not? I've held onto it, tossing this idea around here and there. I think I'll do so and add it to my workspace in the bay.

Knocked a ton of carbon brush crumbles out of it. I'll replace those and the bearings. Clean up the shafts and easily run 8" wheels on it at 2900rpm. The DC power in the bay will be switched and I'll run this off a foot pedal.

297.jpg
298.jpg
 
Should do the job. It's a torque monster. Wonder what I should build with the single-shaft motor.
 
I searched high and low for a single-gang, 1", 5-port outdoor box. Electrical gets a little frustrating when it takes just the right combination of keywords to find what you want. I finally came up with these a few nights ago and any order over $50 shipped free, so we got ten. Topaz WDB15100X. Now I can shoot a vertical conduit off a 12-volt box to connect to the breaker box in the hallway.

301.jpg
 
bigun said,

You can uses a uni bit to drill into the side of the box then use a nut on the inside to secure the fitting
 
bigun said:
You can uses a uni bit to drill into the side of the box then use a nut on the inside to secure the fitting​
I was very close to doing so. Alas, I found these boxes to save me the effort.
 
Yup. Me, my wife, and several of her friends entered to increase our odds. We didn't win the first Battle Born giveaway through ENTV. Would be sweet to win this pair. We need two more to hold enough power to be operational.

We're still waiting on the keys to our next rental. I'm waiting until we've moved so I can place the solar panel order because the truck will be able to pull up next to our driveway. We were also delayed because of the Spring Fire closing highway 160 and several other large fires causing road closures.
 
Dunno what's going on with the uploader link. It's been dead for at least a week. I have some semi-interesting pictures to post since getting back to work on the bus.

The 120-volt conduit run is almost complete and I've torn out everything that was in the driver's junction box. He'll of a lot of wires to sift through and eliminate.
 
Gonna try to get you guys caught up on what's transpired over the last couple weeks. Mainly an overview.

Junction box placement for routing to and from the battery bank is getting wrapped up. If I were to follow code more strictly, I need to run inputs and outputs in their own conduits. I think I have just enough room to sneak some more in so that I don't have stuff like 00 and 18 gauge mixed together.

My dad and I wrestled the driver's junction box. Dismantled the main board, pulled more useless wires and got a few things ready to trace. I decided on a junction/outlet box in the driver's junction box so that I have an access point available there and can go ahead with pulling the factory wiring through.

Third is the new location for the fuel tank. I'll be adding some bracing to accommodate the weight. I was going to have it shoved to the rear, but even with the battery tray on that side clearing the tank when rolled out, I still wouldn't have much room at all to mess with the batteries while they hung over top of the tank. Placing the tank at the front of the bay worked out really well.
306.jpg
307.jpg
308.jpg
309.jpg
310.jpg
 
Finally fiddled with the battery tracks today. I'm ditching the ball bearings because there won't be nearly enough to support the load over the length of the rails. Instead, I ordered a 12" length of 3/4" delrin to drill and part on the lathe to make some rollers. I'll use some 3/8" stainless rod I have for the pins that will get tacked to the bottom rail. The roller parts total $7.17 which is far cheaper than delrin radial ball bearings.

If I get the opportunity tomorrow, I'll pick apart the rest of the rails in preparation for welding them together. Should be a sweet setup once done.
311.jpg
312.jpg
313.jpg
 
Delrin rod came in and I headed straight to the lathe with it. Ran a couple test pieces then had enough for two sets of seven. I need to ream the ID's a little. The OD is a tad over 3/4" which is perfect and I cut them just over 9/16" wide. The total battery weight on these will be 180 pounds.

319.jpg
 
Top Back Refresh