Lil'John
Former #278
Title kind of states the purpose of this thread: gathering helpful/expert hints for newbies that are attempting a Dana 60 gear setup.
I've got a few areas I'm hoping to cover. I'm not intending to cover step by step how to do it.
Needed tools outside of normal sockets and wrenches:
micrometer - measuring shims
magnetic dial indicator - measuring backlash
inch pound wrench
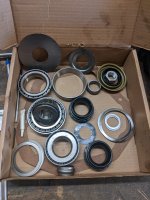
Parts:
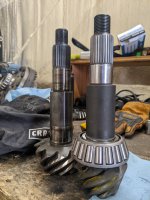
Pinion bearing preload:
The semi-hint I read for this is if the backlash is too little, shims need to be moved from the flange side to opposite. Too much backlash required shims to get moved to the flange side.
Are there any other helpful hints?
In my specific case, I doing a 1992 Dodge D60 front. I'm using a Yukon master install kit with a brand new open carrier. I'm installing used Dana/Spicer 5.86 gears. I'll be using a Spartan locker.
I've got a few areas I'm hoping to cover. I'm not intending to cover step by step how to do it.
Needed tools outside of normal sockets and wrenches:
micrometer - measuring shims
magnetic dial indicator - measuring backlash
inch pound wrench
Parts:
- Is there a recommended master install kit? I've heard that Yukon uses Timken bearings which is highly recommended.
- Is there a point at which a full master kit isn't needed and just a bearing kit could be used? One axle done so plenty of left over shims.
- Use a set of old bearings and make setup bearings. For the carrier, you want to grind the inside of the bearings so they slide on/off the carrier. For the pinion, it depends upon where the inside shims are.
- Pinion bearing preload - adding/removing shims until 8-10 in/lbs for used bearings or 17-30 in/lbs for new bearings (verify numbers)
- Carrier bearing preload - adding shims between carrier and bearing until carrier requires a little effort to "seat"
- Carrier backlash - distance ring gear moves while pinion doesn't move (better description??) 6-10 thousands of an inch using dial indicator
- Reading gear pattern - this is painting ring gear and reading pattern. Adjusting pinion depth then checking backlash then rereading.
Pinion bearing preload:
- My understanding is once this is established, the amount of shims should not be touched. In reading the gear pattern, the shims will be shuffled between sides; move 5 thousands from one end to the other.
- Is there a recommended starting shim for pinion stickout? I never saw a recommended starting point.
- Should I use an old pinion nut for everything? It sounds like a lot of zipping the nut on and off... my understanding is the pinion nut is a metal lock nut which should be single use.
- The recommended hint I saw for this was to get this number using the carrier without the ring gear installed.
- My understanding is once this is established, the amount of shims should not be touched. In reading the gear pattern, the shims will be shuffled between sides; move 5 thousands from one end to the other.
- Another hint I read that was once the gear pattern was acceptable, shims were added between the race and bearing cap. I don't recall the magic number. Does someone know the amount of shim for each side? I want to say it was something like fifteen thousands for each side. I have read that this final preload was virtually impossible to screwup and to just "pound" as large a shim in as possible.
- Is there a recommendation for how to split the shims while working this up? A fixed amount on the flange side?
The semi-hint I read for this is if the backlash is too little, shims need to be moved from the flange side to opposite. Too much backlash required shims to get moved to the flange side.
Are there any other helpful hints?
In my specific case, I doing a 1992 Dodge D60 front. I'm using a Yukon master install kit with a brand new open carrier. I'm installing used Dana/Spicer 5.86 gears. I'll be using a Spartan locker.
Last edited:
 Guess that bearing just gets pressed and left.