It's the Baileigh BR18E-36 36" throat. I will never buy another piece of their equipment. It's absolute garbage. I've had to fix it at least half a dozen times. I would buy the mittler bros 24" if I had to do it again. It runs ok now, but I've had to take the gearbox, motor, rollers and tension mechanism apart for repair, some of them multiple times. Support was garbage so I just fixed it myself. Still need to strip it and weld stiffener plates to it. It spreads the jaws with 22ga. Supposed to be rated for 18ga.What are you using for a bead roller? $200 Amazon special or something better?
How to install the app on iOS
Follow along with the video below to see how to install our site as a web app on your home screen.
Note: This feature may not be available in some browsers.
You are using an out of date browser. It may not display this or other websites correctly.
You should upgrade or use an alternative browser.
You should upgrade or use an alternative browser.
WaterH
Well-known member
I think they are all like that. I had to modify mine to make it work. The only ones that work right out the box cost ten times as much.It's the Baileigh BR18E-36 36" throat. I will never buy another piece of their equipment. It's absolute garbage. I've had to fix it at least half a dozen times. I would buy the mittler bros 24" if I had to do it again. It runs ok now, but I've had to take the gearbox, motor, rollers and tension mechanism apart for repair, some of them multiple times. Support was garbage so I just fixed it myself. Still need to strip it and weld stiffener plates to it. It spreads the jaws with 22ga. Supposed to be rated for 18ga.
So I got a little time in today on Judy. Started by pulling the windshield, so I could cut and weld the cage separators (to pull the dash for service without having to pull the cage) .
 cage pieces cut out, here you can see the pass throughs in the dash and stub ends for additional shear load.Had to throw a ratchet strap on because it sprung a little when I cut it. Not bad, but I'll have to bar it back into place.
 cage separators welded in.
 makes everything really nice to service.

Attachments
Then I decided since I had the tig machine out, to go ahead and make the anti intrusion bars for the cage and get them tacked in. I like the look.

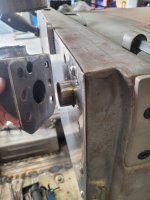
 then the dash and the column came back out, so i can cut and prep for the last portion of the floor and firewall replacement. Here you can also see the front cage feet and how they passthrough the dash and tie to the firewall for the engine cage. Thats a big hole to patch since i pushed the Drivetrain back 3 inches compared to standard placement.

Working on a little sheet metal today. Just more trans tunnel firewall sections.
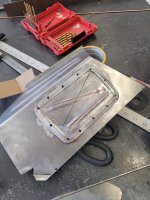
 this cut out and eventual access panel will be so i can easily (relatively) access the back of the engine for trans bolt removal and other sensors if the need arises, since its stuffed so far under the cowl.
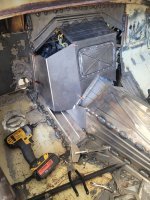
 as you can see, there's a few things that somewhat easy access will be appreciated.
 I will also make a couple access panels on the side plates so I can easily get to the plugs and the header bolts. Yes, it's like cheating. No, I don't want to play mechanic yoga if I don't have to any more.
Opiebennett
XJ_Ranger
I think lots of folks overlook servicing the car. Planning ahead on stuff like this is more than a good idea. Coming along nicely.
lt1yj
Well-known member
- Joined
- Jul 6, 2020
- Member Number
- 2258
- Messages
- 213
So I got a little time in today on Judy. Started by pulling the windshield, so I could cut and weld the cage separators (to pull the dash for service without having to pull the cage) .cage pieces cut out, here you can see the pass throughs in the dash and stub ends for additional shear load.Had to throw a ratchet strap on because it sprung a little when I cut it. Not bad, but I'll have to bar it back into place.cage separators welded in.makes everything really nice to service.
First off I want to say I like this build. Lots of thought went into this to get this clean of a result so far.
Are you sure about the removeable cage dash connection?
The tube adapters rely on the shear strength of two small bolts to handle a front impact on the A pillar. Is there enough shear area to handle a big impact? If those small bolts shear from a front impact the A pillar is coming rearward into the seating area.
You are correct. I am not using this as a competition rig, on purpose and certain things have been built specifically so I can't change my mind later. It won't pass tech.The connections are staggered so that a typical side load roll will hold those connections in place due to orientation. If a severe endo roll or frontal impact occurs at high speed, it would have to generate a crazy amount of force on the engine cage and frame tie ins before things started folding. Even the front fenders will eventually be tied to the cage. Also, none of the additional gussets have been put in (since I can't until the cage is fully welded out, so there's a lot of stiffening yet to occur).First off I want to say I like this build. Lots of thought went into this to get this clean of a result so far.
Are you sure about the removeable cage dash connection?
The tube adapters rely on the shear strength of two small bolts to handle a front impact on the A pillar. Is there enough shear area to handle a big impact? If those small bolts shear from a front impact the A pillar is coming rearward into the seating area.
I do hear what your concerns are and it's one of the most reinforced areas of the cage. I also experienced a high speed double barrel roll with that style cage connector in place. Cage failed and those joints didn't separate. So I'm betting my life on them.
Sooooooo...... lots of layout and ten million 10-24 rivnuts later, I'm partially through building the firewall. I made a couple access panels to get to the back of the engine, the header bolts, and the rear plugs. A pain to add the panels since it doubled my build time on the panels, but makes it convenient for access.


 ,
,

Attachments
But in all fairness, I think it's turning out nicely so far. I'll end up having to cut away other pre-made portions of the floor where the new panels tie in, but that will give me more room for exhaust anyway.


Rockwood
An Ape
Technically, it’s the shear strength of those bolts after their clamping force is overcome. I expect it’s plenty for recreational use.First off I want to say I like this build. Lots of thought went into this to get this clean of a result so far.
Are you sure about the removeable cage dash connection?
The tube adapters rely on the shear strength of two small bolts to handle a front impact on the A pillar. Is there enough shear area to handle a big impact? If those small bolts shear from a front impact the A pillar is coming rearward into the seating area.
WaterH
Well-known member
Looks like way too many screws to hold those little panels. It’s not a real structural part there. It looks good though.
Definitely too many screws. But I tend to skew towards aircraft type panels. So that's where I ended up.Looks like way too many screws to hold those little panels. It’s not a real structural part there. It looks good though.
Had a little time and squeezed in another panel after work. Everything prepped and ready for welding. A few odd shaped filler panels and the floor is finally done.


JunKU
Newb
Just read the whole thread, great work. I'll be keeping an eye on this one for sure. Thanks for sharing!
Thanks. Appreciate the kind words.Just read the whole thread, great work. I'll be keeping an eye on this one for sure. Thanks for sharing!
On the flat portion below the left hand access panel. It's drive by wire with the 6.0. Plus I moved myself back quite a bit when I stretched the doors. It definitely is an area of concern, but I'll cross that bridge when I come to it. Which is shortly.Is there room for pedals? If that's the hole for the steering column, where is the gas pedal going to sit?
SoylentGreen
Piracy for fun and profit
This is really awesome work and an enjoyable read. A super long CJ-5 with your level of workmanship is gonna turn some heads!
Thanks for the kind words. I appreciate it.This is really awesome work and an enjoyable read. A super long CJ-5 with your level of workmanship is gonna turn some heads!
17? Panels to finish the trans tunnel. Not perfect by any means, but I'm happy. Access panels turned out nice and there's decent room behind them to work. I finally have a complete body (even though I'm going to have to cut into the rear wheel wells to install the coilovers and then recover with sheet metal).


Opiebennett
XJ_Ranger
Nice! A little seam sealer, and a little paint, and good to go!
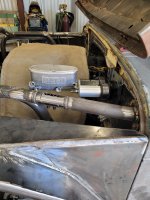
Little more progress today. Got the hydroboost and master installed, got the gas pedal installed. Will need to z-link the gas pedal to get the pedal farther away and closer to the floor. Had to cut and turn my engine cage bar (it fit with the Ford master cylinder, but the reservoir hit the hood). Seating position is good. One more step. Ordered a ford brake pedal for ease of assembly.


Attachments
Last edited:
Thanks. I appreciate it.Super cool build!
Too high and too far away from the firewall, but its where I wanted to mount it so it could be pulled out of the way easily with that service panel. Oops, I cut the pedal off.
 so i'm making a metal Z extension with a rod to pull it closer to the floor and nearer to the firewall.


 turned out pretty decent
 10-24 button heads on one side, riv nuts (not riveted) inserted through the other to act as pinch bolts so if the pedal ever fails, i can buy another one off the shelf, cut it in the same spot, drill two holes and be rolling again.


 full throttle does not touch the firewall. Not sure if i want to put a swivel hanging pedal on it, or do a traditional cj/early fsj floor mount pedal. Thoughts?

Thanks. I just keep plugging away.Hell ya! Looks great!

WaterH
Well-known member
Not sure if i want to put a swivel hanging pedal on it, or do a traditional cj/early fsj floor mount pedal. Thoughts?
My 74’ VW Beetle has a wheel or roller on it. I’ve never seen one before and not sure if it’s stock, but I’m amazed how much I like it. It’s about 2” in diameter (and wide) and it rolls up and down every shoe. You might consider it. I have to admit, I probably wouldn’t install it on an automatic, but for a stick, it’s a blast. I’m trying to figure out how to put one on my Delorean.