If you can stick weld it won't take you long to pick up the feel of it. Do it, add to your skillset and talents. Definitely more time consuming, but sometimes easier without all the clean up associated with Mig.Progress is looking good.
I so would love to learn to TIG and my welder will do it, but it seems so time consuming vs mig, but it sure looks awesome when done and like you said no splatter to deal with!! Maybe this winter I'll dive into doing this.
How to install the app on iOS
Follow along with the video below to see how to install our site as a web app on your home screen.
Note: This feature may not be available in some browsers.
You are using an out of date browser. It may not display this or other websites correctly.
You should upgrade or use an alternative browser.
You should upgrade or use an alternative browser.
Just still doing cage work. Memorial weekend was spent at lake Mohave with friends and family and I've done a little work to it, but not ready to post pics yet until I get the entire rest of the cage tacked up. So you have to hold your horses and wait.been like a 100yrs since I diddled with stick welding, but I'm gonna try and give it a whirl this winter---now enough with that, wha't s going on with your project
Alright, a little cage work. The X braces, even though they look cool, they're not just for looks. The tie in below the bottom of the X is where the rear coilover is going to tie in to and I wanted to transfer the load through the cage all the way into the roof. Rear fastback family cage section is tied in. All triangulated. Still have to finish the roof braces, but its my wife's birthday and if I work on it all day this will be my last post because I'll be dead. She's a good sport though. About time to head to the brewery and see some friends and drink some beers. Hope y'all are having a good weekend.


Almost all the braces tacked in, with nice tight gaps. Should be pretty stout after I tie it through the dash to the engine cage. Looks like I'm going to need a few more stick of 1.75x.120 though. I'm almost out.


JR74CJ5
Knucklehead
Looking great man! I have a 74 CJ5 - been thinking of a custom stretched rebuild myself - really like how yours is coming along.
Cheers!
Cheers!
Thanks! it's been a ton of work with still so much to go, but in the end I believe it will be a much better platform than the cj5 was to begin with. Do it if you want it, but make sure you're committed to the end result. That's why I started mine basically from nothing, so I wouldn't tear apart a running vehicle for years and end up changing almost every part anyway.Looking great man! I have a 74 CJ5 - been thinking of a custom stretched rebuild myself - really like how yours is coming along.
Cheers!
Completed the A pillar floor tie ins tonight. Thank God I didn't put the engine or trans tunnel in yet! Made a very convenient access hole to measure and weld from. Now you all can see how I have the shear stubs that pass through the dash into thos stanchions, then tied to the floor and through the firewall to the engine cage. Only downside is I'll have to locate my battery elsewhere. Bummer.


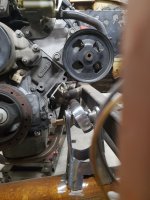
Dana 300 with clocking ring ended up perfect. Trimmed the stock output shaft on the trans, bolted on the advance adapter (not terribly impressed with the quality of the adapter itself) and got it temporarily installed. Hopefully next week I can tack up the motor mounts and get the drivetrain stabbed in. Plenty of room for trans pan clearance. Keeping the stock dana 300 output yoke, but it does appear I have enough room to go to a 1350. I will likely have to run a front carrier bearing, to keep everything near the motor and trans solidly mounted as I want the front Driveshaft, stubs and hubs to act as my fuses.


Well it was exciting for a minute. Thought for sure I was going to be able to get the motor mounts tacked in today. No luck. Ran out of build time and I'm going to have to cut a bunch more floor/trans tunnel/toolbox. More than I was hoping for with that extra door stretch. Really thanking myself for that extra 2" width on the frame. With no exhaust manifolds I can drop the engine out the bottom or take it out the top. Hoping to get it mounted next week.


gt1guy
Apparently a racist
Looking good. Now I understand the whole deal with the a-pillar bars. That's pretty slick.
Hard to describe with just words and no visual. Thanks. Coming along.Looking good. Now I understand the whole deal with the a-pillar bars. That's pretty slick.
No, that was sitting level and back towards the firewall as far as I want to take it, but about 2-2.5" low. That's why I have to cut more floor. Sitting level now, everything is below the frame, the AC compressor, the alternator, the trans pan. By raising it, everything but the oil pan and a little bit of the transfer case is tucked up tight. And I get the added benefit of clearing the AC compressor lines without notching the frame and a whole ¼ inch of clearance on each side.Yea, super slick on the a-pillar bars.
Do you have to notch the frame a tad for the A/C comp?
And it's in. Tacked in anyway. Everything worked out. Cut a portion of the toolbox out, slid Everything to where I need to run and made the motor mounts. Tucked tight against the firewall and about 3" further back than a stock firewall would have allowed. Clearance on Everything looks really good, especially for the radiator, trans cooler and condenser. Not quite as flat on the bottom as I was hoping. Should have run a6" belly section on the frame instead of 4".


A few more from today. It's in and supporting It's own weight. A lot more to do, but a big step forward.


gt1guy
Apparently a racist
Tight fit. I don't think those bushing in a tube engine mounts allow much movement though. That's a good thing.
I'm in the same boat, with the same mounts. I think it would be tough to get 1/4" of movement out of them.
I'm in the same boat, with the same mounts. I think it would be tough to get 1/4" of movement out of them.
That's what I'm thinking. I couldn't get a 1/4" with the floor jack, so I doubt it will have an issue with torque. Maybe over time. and I have plnty of room elsewhere to relocate the alternator and compressor if needed.Tight fit. I don't think those bushing in a tube engine mounts allow much movement though. That's a good thing.
I'm in the same boat, with the same mounts. I think it would be tough to get 1/4" of movement out of them.
Shitpost! You can't tell but I finish welded the cage I have in place so far, and had the kids help me finish both the mini bikes today. Then they didn't want to ride them.... really fuckin bummed about that.


Not much to report on mine. Been busy with kids and start of the school year. Tacked some cross bars in for seat mounts. Have to move one  . Oh well. Maybe more progress soon.


. Oh well. Maybe more progress soon.What fuel filler are you using? I have been looking for one just like that for my scout project to mount beneath the tail light.Not much to report on mine. Been busy with kids and start of the school year. Tacked some cross bars in for seat mounts. Have to move one
That is a factory early cj filler cut out. It's pretty large though. 8.25" wide x 9.625" tall. It may fit below the tail light on an 800, but it may not. Good luck!What fuel filler are you using? I have been looking for one just like that for my scout project to mount beneath the tail light.
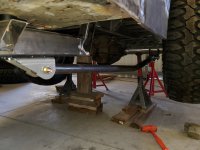
Finally got to make a little progress. Had to cut 5" out of my jack stands to get the jeep down close to ride height, then did a little precarious balancing with the axle and wrestled it into place at full stuff. Started the lower trailing arms (what idiot builds a jeep with trophy truck stuff?) Did the primary bends and welded the bungs into place. Then tacked the lower arms in. Still have to sheet them for coilovers, but that will come after I get the upper arms tacked in and check my geometry. I ended up with 44" lowers! Gotta love that stretch. Should feel really stable at speed. Looks gnarly at full stuff and fills the wheel wells out nicely. Looks like I'm going to have to cut into the sheet metal to squeeze the coils in (that's a bummer, my inner rear fenders won't be as stock looking as I'd hoped). But thems the breaks, kid. Should have the uppers in later this week.


Attachments
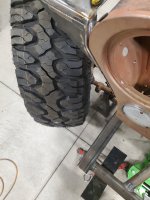
Got the rear links in and it's actually sitting on a rear suspension finally. I have some adjustments to make, but I have a starting point. Put the steering box in today and threw the front axle under it, then threw the tires on so I could check clearances (and so I could see it with four wheels on it, I'm stoked).


Yay! I finally get to post stuff on my never-ending build. 1 step forward, 2 steps back. But at least it's actually sitting (kinda) on all 4 wheels. Got to toss the front links in today.
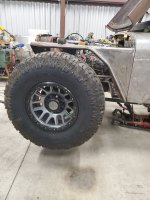
Ended up at 116" wheelbase with 163" OAL. Wheelbase of a JKU and shorter than a jk 2 door, and a helluva lot better looking
Still have to run the links through the calculator and see if I need to play with the setup more, bit definitely happy with how it looks and fits. Had to yank my alternator and ac compressor off the motor and will have to do top mounts to clear the upper link and the driveshaft. Hopefully squeeze in a little more time on it over the holidays. Would like to get the coilover hoops done, and the engine cage sorted so I can yank the front axle back out, build the truss and weld it out, then prep the new high steer knuckles, and rebuild the rest of it. Ugh.