What's new

A wolf in Jeeps clothing - Goatbuilt 1200 LJ/TJ Chassis build

Here it is in the Goatbuilt booth, sitting next to Ian Johnsons LJ kit. I was lucky enough to go wheeling with him for a day. It got the juices flowing!
IMG_20200205_215344.jpg


IMG_20200203_162339.jpg


IMG_20200206_152153.jpg


IMG_20200206_152135.jpg


IMG_20200206_151733.jpg
 
Nice work! Do you know what the bare chassis w/ skid plates weighs?
I think with the skid plates and engine cross member its right around 700 lbs.

Ian's rig had the following:
spider9s
iron block ls
th400
atlas 2 speed
42" reds
20" trailreadys

His rig scaled at 4744 wet with tools and spares.
 
Back from KOH and the fun begins. I fit the front interior and fire wall. With the chassis design, suspension design, space contraints with the TJ tub, and size of the drivetrain, things get tight fast.

IMG_20200411_211105.jpg


IMG_20200411_221400_01.jpg


IMG_20200412_110027.jpg


IMG_20200412_110036.jpg


IMG_20200412_150246.jpg
 
Found a new jeep tub, windshield, hood, and grill, with a title, so I snagged that. The maroon tub was for mock up, and was in really tough shape. Once I got the red tub fit, it was time to finalize the hood and grill. This process took longer than I care to admit.

The rocker tube is 2X3X.188 wall tubing with a bunch of holes. There are two nut plates that go inside of that tube; One for the aluminum rocker panel, and one for the top flange of the boat side skid plate. The rocker panel clamps the lower portion of the body in place, and the corner armor clamps the rear of the body in place.

IMG_20200417_104308.jpg


IMG_20200418_173520.jpg


Oh, the joys of grinding.....

IMG_20200419_135326_01.jpg


IMG_20200419_202118.jpg


IMG_20200419_221639_01.jpg


IMG_20200423_191151.jpg


IMG_20200423_191154.jpg
 
The factory HVAC will not fit. I am sure with some modifications, it could. Maybe.

The rear seat is something I think is pretty slick. I figure more often than not, I am going to not have passengers, but there may be instances where I want to toss in a back seat. I started thinking about how lame it's going to be bolting in a seat and all the harnesses every time I want to install/remove it. I modeled up a rear seat pan that is going to work slick.

REAR SEAT MOUNT ASSEMBLY.JPG


(need to redo the crotch strap orintation. I need to turn the tabs 90 degrees)

REAR SEAT MOUNT ASSEMBLY1.JPG


REAR SEAT MOUNT ASSEMBLY2.JPG


This pan is going to capture the four seat mounting points, and all six lower harness mounts ( crotch strap x 2, hip belts x4). I also welded 4 - 7/16 nuts to the bottom of the pan. There are flanges welded to the frame rails under the aluminum that have the same bolt pattern as the seat pan. A few 7/16 bolts from the bottom (accessible with an impact), and the rear seat is loose. 4 3/8-16 bolts for the harness bar, and the whole seat and harness mess is out. Should be slick.

PXL_20210326_194012965.jpg


PXL_20210326_194016894.jpg


My plan then is to make a cargo rack that will have the same bolt pattern. Take the seat out and have my trail rack bolted in and secure.
 
Love the seat pan Idea!! Bolting the rear seat in my old buggy was never fun.....so it was never in it.
 
For the rear harness bar, I wanted something clean and removable. I also didn't want to have a massive flange or ID tube clamp sticking out like a sore thumb when the rear seat was removed. I hesitantly drilled 4 - 3/4" holes through the chassis tubes, and sleeved it with .750X.156 DOM tubing. Drilling the holes was nerve wracking, let me tell you.

PXL_20210423_010517233.MP.jpg


PXL_20210423_010509353.jpg


PXL_20210423_010459292.jpg


Anway, with out too much drama, it's in and fitting nice. The harness bar is 1.5X.120 DOM, and the bolt flange started out as a piece of 2.25X.120 DOM. I just need to order some shorter bolts, then I can cross one more thing off the list!
 
Drilling the holes was nerve wracking, let me tell you.

Did you use a notcher to make the holes? I have done that a few times, just mount the notcher on the rig, with appropriate sized hole saw for slug. Measure 82 times, make sure it's all square and let'er eat.
 
Nope. I can't be bothered to do things the correct way. Had a few beers and busted out the step drill. I did drill a hole through both walls before I step drilled it to 3/4. I have decided to adopt a new mind set for the rest of the build. Good enough. They aren't prefect, but they are good enough.
 
At this point in the build, I had a lot of the big ticket items purchased. Axles, shocks, links, brakes, wheels, tires, trans, and transfer case we here and paid for. The engine was the next big one.

I pulled the trigger on a crate engine!! Let me preface this by saying that my entire life I have lived within my means, drive/drove shitty cheap cars, don't have expensive clothes, or ever had a car that was newer than 10 years old. This is going to be my first new vehicle, and it will be paid off when it's done.

BUDGET PERFORMER BLENDS BEST OF LS ENGINE FAMILY
Chevrolet Performance engineers have developed the LS364/450 as a value-driven foundation for hot rod builders and enthusiasts looking to give their earlier LS-powered vehicles a high-performance shot in the arm.
Starting with a strong, economical iron cylinder block and durable rotating assembly, the LS 6.0L features the high-lift LS6 camshaft and the deep-breathing LS3 aluminum cylinder heads. It’s a strong combination with exceptional horsepower and a broad torque band. It is also fuel injection-capable, using production-based components offered in this catalog.
The LS364/450 is designed with the early-style 24X crankshaft and 1X camshaft sensors, enabling easier retro-fit installation in early LS-powered vehicles, including 1998–2002 Camaros, C5 Corvettes, 1999–2006 full-size trucks and SUVs, and other LS vehicles.
We offer the LS364/450 exclusively as a long-block assembly, without the induction system, ignition system or front-end accessory drive system, allowing builders to transfer components from their early LS-powered vehicle or complete a custom build with the components of their choice. An intake manifold that matches the LS3/L92-style rectangular intake ports is required.
No matter which vehicle you drop the LS364/450 into, its combination of horsepower and value will push your project vehicle to the next level of performance!


IMG_20200601_105856.jpg


00100lrPORTRAIT_00100_BURST20200602174742900_COVER.jpg


00000IMG_00000_BURST20200602174758017_COVER.jpg


IMG_20200712_200051.jpg


IMG_20200712_200107.jpg


IMG_20200712_200128.jpg


I am using a set of stock LS3 camaro exhaust manifolds, LS3 intake and DBW throttle body, LS3 waterpump and tensioner, Goatbuilt 4400 bracket with PSC CBR pump and pulley, and a badass mechman alternator. I can go into more details about the components, but for REAL tech please see the following threads:

HERE

and

HERE
 
If anyone is curious about the heater core bypass hose, here is the part no, and the amount I had to cut off.

IMG_20200712_133704.jpg


At this point I started mocking up the exhaust. This is the Goatbuilt Ibex exhaust kit, and it uses the same engine mounts, and subframe, so it should fit. The boatside tubes are a little different, as is the front seat mount section. It gets really tight near the exit at the rear of the subframe. If I add a flex pipe near the manifold, do you think I could get away with solid mounting the muffler and exhaust tip?

I also needed to relocate the oil pressure sending unit, as it would have interefered with the interior panels.

IMG_20200721_210809.jpg


IMG_20200721_210757.jpg


Since the LS3 intake is a returnless style, I am using a filter/regulator off a corvette. It is a compact unit that should be easy to replace if needed. I made a mount out of .080 AL to secure the filter near the fuel tank. I am using a modified TJ sending unit with the regulator bypassed and a 255LPH walbro pump. I am trying to come up with a clean solution to have the return enter the fuel pump can like it does on the LS truck pumps. Has anyone done this before?

IMG_20200718_175715.jpg


IMG_20200718_175811.jpg


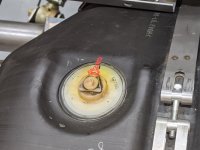
One last question, the fuel tank vent nipple is broken on this tank, and is not a replaceable component. Any ideas on a fix?
 
Do you drill out the whole fitting, like a 1.00" diameter hole? Then use a big washer or something? My mind can only come up with ghetto solutions.

Is it the white-ish plastic part on the left side of the last pic?

It looks like the nipple was coming out 90° horizontally. I would try carefully drilling and tapping the hole for something like a 1/8NPT thread, and running a barb fitting to the hose size you need. The hole would only need to be like 1/4" deep at most.

Edit: like this:
 

Attachments

  • IMG_20200718_175811~2.jpg
    IMG_20200718_175811~2.jpg
    296.2 KB · Views: 53
Last edited:
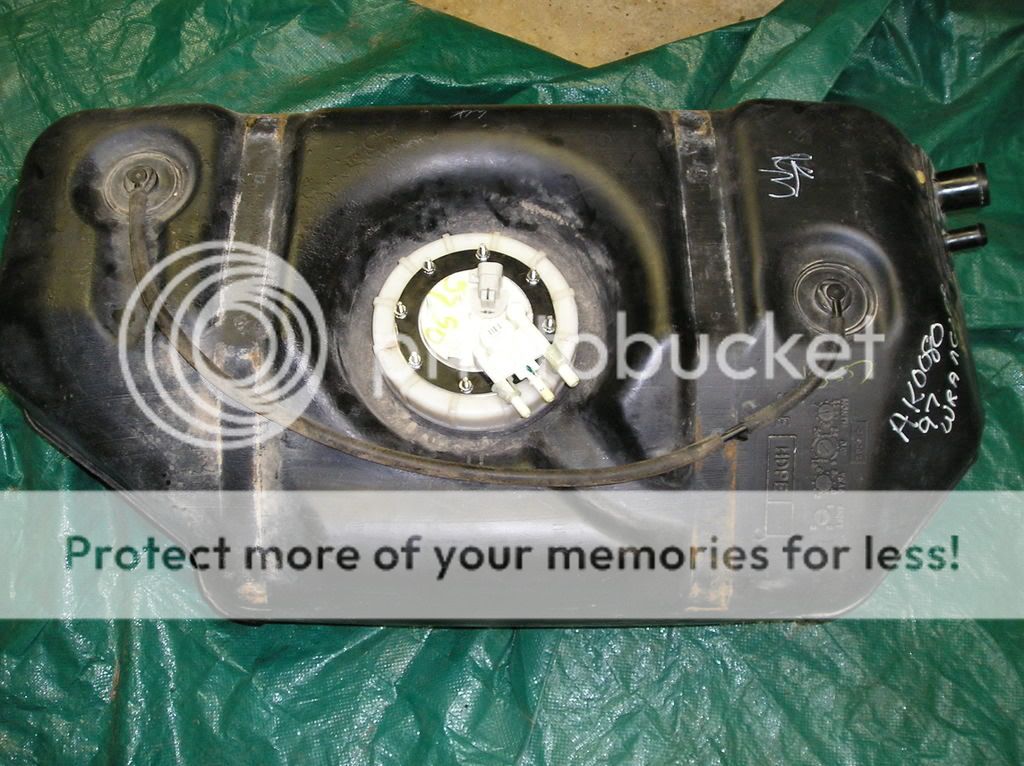
The only issue I see with something like that, is I think there is a roll over valve or something in there. The triangle on top has something going on inside of it. I think the whole boss on the top might need to be removed. I have a few tanks floating around, I just kinda wanted to fix this one and keep the others as spares.

Is it the white-ish plastic part on the left side of the last pic?

It looks like the nipple was coming out 90° horizontally. I would try carefully drilling and tapping the hole for something like a 1/8NPT thread, and running a barb fitting to the hose size you need. The hole would only need to be like 1/4" deep at most.

Edit: like this:
That has potential. However, the plastic is 24 years old and pretty brittle. I am not sure it would work, but it is worth trying first before I take a hole saw to it.
 
Epoxy the hole shut and add a AN8 bulkhead somewhere else ?

Edit : Add 2 bulkheads, one for vent and one for return.
 
Doesn't the TJ tank have two vents that are teed together outside the tank? Epoxy the broken one shut and use the other as a vent?
 
The bigger the vent the easier it is to fill up. Don't go small on vent size.
 
The bigger the vent the easier it is to fill up. Don't go small on vent size.
The factory vent was .25" OD, and tiny ID. Do you think dual -6 would be adequate? Or go straight to -8? These will be routed to a catch can with ROV.
 
One single vent will be easier to route, less fittings, simpler, less problems etc.

So yeah, I'd go with a single AN8 and be happy.

Also,
AN6 = 3/8 ID = 0.11in2 area
Dual AN6 = 0.22in2 area
An8 = 1/2 ID = 0.2in2 area

Close enough I'd say
 
I would throw that stock fuel tank in the dumpster and drop in a GB fuel tank. Make a 2005 truck pump plate so you can use the in tank filter regulator and have a returnless system. You can also put your Walbro 225 pump into the stock housing for more output.
Make a new aluminum tank cover I assume a little bit taller and a bolt in riser kit for the existing side panels. Keep the same tank skid.
 
One single vent will be easier to route, less fittings, simpler, less problems etc.

So yeah, I'd go with a single AN8 and be happy.

Also,
AN6 = 3/8 ID = 0.11in2 area
Dual AN6 = 0.22in2 area
An8 = 1/2 ID = 0.2in2 area

Close enough I'd say


There are two vents from the factory. One on the driver side, one on the pass side.

IMG_20200410_172252.jpg


I would throw that stock fuel tank in the dumpster and drop in a GB fuel tank. Make a 2005 truck pump plate so you can use the in tank filter regulator and have a returnless system. You can also put your Walbro 225 pump into the stock housing for more output.
Make a new aluminum tank cover I assume a little bit taller and a bolt in riser kit for the existing side panels. Keep the same tank skid.

Why do you say that? I already have all the parts (minus bulkhead fittings) to get my tank and sending unit/pump assembly into the factory tank. That would also cut into my rear cargo area.

EDIT: Using our cell would make it very hard to install a clean remote fill.
 
I haven't done it yet, but my plan is to put a 2005 truck pump in a TJ tank, similar to how this guy did it:

A huge advantage is that if you ever decided that 19 gallons isn't enough, the big Genright tank is an easy swap.

I also like the fuel filler coming out at an angle, so it isn't in the cargo area.

Edit: Genright tank is $1800-$1900, but seems like the right path for a build of this caliber, it's just money.
26 gal: 26 Gal Gas Tank for Tracer Susp w/7" Stretch
31.5 gal: Jeep LJ Safari Gas Tank & Skid Plate (31.5 Gal)
 
Last edited:
Why do you say that? I already have all the parts (minus bulkhead fittings) to get my tank and sending unit/pump assembly into the factory tank. That would also cut into my rear cargo area.

EDIT: Using our cell would make it very hard to install a clean remote fill.

it seems a bit ridiculous to reuse a stock fuel tank given the quality of the build. if it dimensionally checks all the boxes, id be building a fab'd replacement. simplifies a lot of items all in one shot.

vent size isnt a big deal unless you plan on racing and refueling in a timely matter is a big deal.
 
vent size isnt a big deal unless you plan on racing and refueling in a timely matter is a big deal.

Nothing more annoying than sitting at the pump with the damn thing clicking every 5 sec because the vent is too small.
Not even talking about trying to fill it with a jerrycan and the tank doesn't accept more fuel and shoots it back at you.

I have no problems with the stock tank provided that it's protected properly.

There are two vents from the factory. One on the driver side, one on the pass side.

IMG_20200410_172252.jpg

You could use a 90 degree bulkhead fitting for lower profile and place it wherever you'd like.

31yUdbo5akL._AC_.jpg
 
I haven't done it yet, but my plan is to put a 2005 truck pump in a TJ tank, similar to how this guy did it:

A huge advantage is that if you ever decided that 19 gallons isn't enough, the big Genright tank is an easy swap.

I also like the fuel filler coming out at an angle, so it isn't in the cargo area.

Edit: Genright tank is $1800-$1900, but seems like the right path for a build of this caliber, it's just money.
26 gal: 26 Gal Gas Tank for Tracer Susp w/7" Stretch
31.5 gal: Jeep LJ Safari Gas Tank & Skid Plate (31.5 Gal)

Thanks for the info. I will look at the LS truck pump in the TJ tank.

I figure I should get 20-25 MPG with the 450hp 6.0 and over drive trans. That should net me 320-475 miles per tank @ 19 gallons.


it seems a bit ridiculous to reuse a stock fuel tank given the quality of the build. if it dimensionally checks all the boxes, id be building a fab'd replacement. simplifies a lot of items all in one shot.

vent size isnt a big deal unless you plan on racing and refueling in a timely matter is a big deal.
Do you think a fabbed aluminum tank would be more reliable? I don't think so, at least from what I have seen online. I have never owned a fabbed tank, so I have no first hand experiance. What items does it simplify? Not arguing, just trying to see where you are coming from.

Nothing more annoying than sitting at the pump with the damn thing clicking every 5 sec because the vent is too small.
Not even talking about trying to fill it with a jerrycan and the tank doesn't accept more fuel and shoots it back at you.

I have no problems with the stock tank provided that it's protected properly.


You could use a 90 degree bulkhead fitting for lower profile and place it wherever you'd like.

31yUdbo5akL._AC_.jpg
I like that idea. What would you do to seal the current vents? Some of that fuel tank repair epoxy?

Josh
 
Top Back Refresh