What's new

95 S10 2wd to V8 1 ton 4wd

Skinny

Well-known member
Joined
Feb 28, 2023
Member Number
6236
Messages
272
Hey Iraters...new to the site.

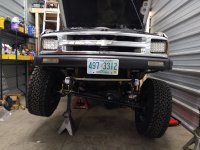
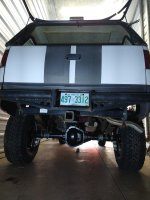
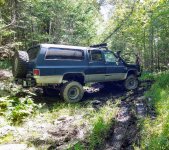
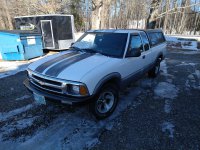
Figure I would post some stuff up. 95 S10 TBI 4.3 2wd general beater truck. Bought it a little over a year ago. Shortly after it overheated and something went poof. Being that my interest in fixing a 4.3 is almost zero I decided it needed to go to Stage 1.

Stage 1 V8 power....more power agh agh agh

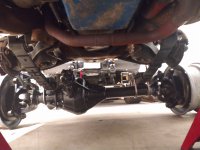
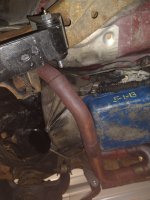
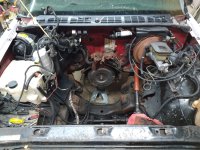
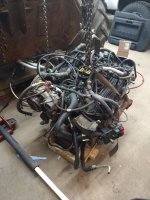
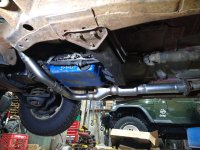
Found a TBI 5.7 with a quarter million miles on it for $500. Swapped that in, recalibrated the PROM, pushed the radiator under the support, and fab'd up an exhaust. Potentially the easiest swap on planet Earth.

So now it drives like should have from the factory. Even has functioning AC. Well till the pancake garbage blew a seal.
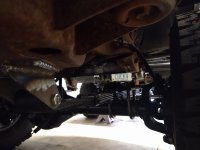
On to Stage 2...
 

Attachments

  • IMG_20220116_135351953.jpg
    IMG_20220116_135351953.jpg
    5.1 MB · Views: 262
  • IMG_20220213_132537429.jpg
    IMG_20220213_132537429.jpg
    4 MB · Views: 57
  • IMG_20220126_185538605.jpg
    IMG_20220126_185538605.jpg
    1.9 MB · Views: 60
  • IMG_20220315_183717088.jpg
    IMG_20220315_183717088.jpg
    3.9 MB · Views: 61
  • IMG_20220315_180732903.jpg
    IMG_20220315_180732903.jpg
    3.7 MB · Views: 64
  • IMG_20220220_145954624.jpg
    IMG_20220220_145954624.jpg
    4.5 MB · Views: 62
Last edited:
Stage 2 Axle Prep

My friend's kid gave me a Super Duty Dana 60 at the right price of Free99.

I am narrowing the axles so I don't look like a BroDozer in NH. Even though the Sterling would have been free as well I decided to go Dana 60 out back due to the better aftermarket support.

So off to the junkyard, got a rear end from an E350. Gotta love that smooth bottom end on the HD.

The front axle I sleeved because I didn't want to get into the C and welding cast. This is also a junkyard build on a giant budget so the slug cost me $50 to get machined.

Rear axle I'm spending more money on and doing a Mark Williams unit bearing full float setup.
 

Attachments

  • IMG_20220506_195147404.jpg
    IMG_20220506_195147404.jpg
    2 MB · Views: 61
  • IMG_20221113_100606853.jpg
    IMG_20221113_100606853.jpg
    3.6 MB · Views: 64
  • IMG_20221111_185139777.jpg
    IMG_20221111_185139777.jpg
    3.4 MB · Views: 56
Moser cut my long side down, great price, fast turn around, good communication. Great company to deal with.

I took like 8" out of the long side. That put me down to 30" perch to perch. In case I destroy this truck this axle will bolt into a YJ or fit any normal sized small truck. Sorry JK minivan losers...

I believe it's 63" WMS to WMS. I put it a few inches wider then factory Jeep so I don't need heavy offset wheels but not too wide so my tires stick out.

For now it's 3.73 factory shafts. I'm going to run 33s the first go round. I want to get it running and wheeling before I step up to bigger tires and go through the diffs.
 

Attachments

  • IMG_20230310_172815391.jpg
    IMG_20230310_172815391.jpg
    1.8 MB · Views: 62
  • IMG_20230310_172954013.jpg
    IMG_20230310_172954013.jpg
    3.2 MB · Views: 62
  • IMG_20230310_172809159.jpg
    IMG_20230310_172809159.jpg
    3.5 MB · Views: 66
  • IMG_20221231_122941387.jpg
    IMG_20221231_122941387.jpg
    3.8 MB · Views: 54
  • IMG_20221202_192610058.jpg
    IMG_20221202_192610058.jpg
    3.5 MB · Views: 53
  • IMG_20221115_185843044.jpg
    IMG_20221115_185843044.jpg
    1.3 MB · Views: 52
Last edited:
The rear axle I cut so it's an inch narrower then the front. I'm no engineer and I don't drive a train but I believe the Ackerman angle needs a slightly narrower rear axle for it to track through a turn.

Something about the steering arm angle intersecting the rear axle. Blah Blah Blah

Used the Mark Williams cups to get it done. I picked up the $800 axle jig at Home Depot 🤣

The proof will be putting the truck on an alignment rack but the squares lined up in all dimensions after tapping the cups so I feel like it did something. And feelings matter...

I'm going to use the factory 99-04 front brakes out back because they clear 16" wheels. Also note that the hub dimension on the rear is larger then the fronts so no rear rotor is going to work on a unit bearing without machining or a spacer.

This means my only option for a parking brake is on the tcase or finding a mechanical caliper that will clear a monster 1.5" wide rotor.

I think I'm going to work on adding a third matching caliper. Then use a single circuit master that is actuated off the parking brake cable with a bell crank.

I know it's not 100% mechanical but I can't find anything specifically calling that out in the NH state inspection book. It just has to be separately derived from the service brakes which technically it would be.
 

Attachments

  • IMG_20221204_112836767.jpg
    IMG_20221204_112836767.jpg
    3.7 MB · Views: 60
  • IMG_20221211_101201785.jpg
    IMG_20221211_101201785.jpg
    3 MB · Views: 54
  • IMG_20221211_101327450.jpg
    IMG_20221211_101327450.jpg
    3.3 MB · Views: 58
  • IMG_20221206_183349555.jpg
    IMG_20221206_183349555.jpg
    3.2 MB · Views: 61
  • IMG_20230106_175738368.jpg
    IMG_20230106_175738368.jpg
    1.3 MB · Views: 54
Last edited:
Was able to get it dressed up ready for mockup tomorrow. I think I'm going with shackles up front.

Two major issues. One, the frame on this truck is terrible to work with and I'm not chopping it out. The arch and how it widens out as you go back make packaging really difficult.

I also want to stay as low as possible and use flat stock YJ springs. I think since they are flat a front shackle will be best. That also gives me preferred mounting at the front frame horn without having to use a big drop down SAS hanger.

Also frees up some room for the steering. Not sure where it is all going to land but that's the game plan so far. I'm not a big fan of how the standard S10 SAS kits look as far as the geometry and the shackle hanger.
 

Attachments

  • IMG_20230311_174232948.jpg
    IMG_20230311_174232948.jpg
    3.7 MB · Views: 38
  • IMG_20230311_174220070.jpg
    IMG_20230311_174220070.jpg
    3.7 MB · Views: 38
Nice work, lots of good budget ideas here. Looking forward to see how it turns out because I feel similar about most s10 SAS I see
 
Ok today was mockup day. I tried a rear shackle setup just to see how it would end up. Spring arch was getting steep around 10 degrees. Steering is tight because the spring hanger is so close to the frame. Rear shackles do hang down quite a bit because they don't go through the frame like a Yota.

I think a front drop hanger would solve a lot of that but then you are getting taller and defeating the point.

I didn't care for this setup.
 

Attachments

  • IMG_20230312_114605261_MP.jpg
    IMG_20230312_114605261_MP.jpg
    6.5 MB · Views: 40
  • IMG_20230312_114649985.jpg
    IMG_20230312_114649985.jpg
    2.4 MB · Views: 42
  • IMG_20230312_114620773.jpg
    IMG_20230312_114620773.jpg
    2.8 MB · Views: 39
Last edited:
Front shackle setup I feel works better at this height with these springs. Factory YJ springs, zero lift, heavier spring rate. They are 22 and 3/4" from perch to both eyes which is 56 1/2" total length when flat.

That puts the hanger on the arch of the frame in a nice flat area with good contact. Shouldn't need to put any additional material here.

The front shackle will need a little out boarding which is no biggie. Good clearance with steering. Slightly less then 5 degrees on the perch which should give me a good point if I need to shim a few in either direction.

It also pushes the axle far enough forward to have a nice drag link angle if I use an Astro box with a flat pitman arm.

I think this is where I'm going to land.
 

Attachments

  • IMG_20230312_110227980.jpg
    IMG_20230312_110227980.jpg
    2.9 MB · Views: 43
  • IMG_20230312_120522749.jpg
    IMG_20230312_120522749.jpg
    2.4 MB · Views: 42
  • IMG_20230312_120330627.jpg
    IMG_20230312_120330627.jpg
    2.8 MB · Views: 46
  • IMG_20230312_110521380.jpg
    IMG_20230312_110521380.jpg
    2.8 MB · Views: 50
  • IMG_20230312_110446071.jpg
    IMG_20230312_110446071.jpg
    2.8 MB · Views: 45
  • IMG_20230312_110421647.jpg
    IMG_20230312_110421647.jpg
    2 MB · Views: 45
  • IMG_20230312_110400572.jpg
    IMG_20230312_110400572.jpg
    966.6 KB · Views: 42
Nice build :)

I am doing the same suspension, only I found 4.5" YJ leafs (RE) used but free.

I used some Ruff Stuff brackets on mine.

20221226_152754.jpg


Current issue is steering. It seems I have to move the box forward a few inches. With a ZJ dropped pitman arm, the axle centered in the wheelwell and stock box location the drag link section of the XJ stock steering (I am using a HP30 plan to run 33-35s) at ride height/straight the steering middle joint contacts the tie rod section.

Using an Astro van flat pitman arm, it all clears again. I dont like the upward angle of it that way though.
 
I wonder if you use a high steer arm on the passenger side only that would get the drag link directly above the tie rod and get you the clearance you need without messing with the box location.

Any pics of your winch mounting?
 
Any pics of your winch mounting?
I will see If I can find some. I had an old Warn winch plate laying around.

It fit inbetween the frame rails after modifying the frame horns where they curved up. Then I welded it in. It isnt 100% done yet, I am still going to run two gussetts underneath triangulated to the frame for added support.
 
I wonder if you use a high steer arm on the passenger side only that would get the drag link directly above the tie rod and get you the clearance you need without messing with the box location.
I like that idea, thanks!
 
Here is some axle porn...

I couldn't find any writeups on using the Super Duty unit bearing to narrow a rear axle. I watched the videos from the vendors but they really just showed the parts.

Cut the axle tubes, weld the cup on, measure, reassemble. Pretty easy stuff.

The Mark Williams EZ axle kit is very high quality, easy to install, and they were great to work with.

So you are looking at a Dana 60HD from an Econoline narrowed to 61". Will be working on the brakes soon.
 

Attachments

  • IMG_20230316_180203808.jpg
    IMG_20230316_180203808.jpg
    1.1 MB · Views: 42
  • IMG_20230316_181655401.jpg
    IMG_20230316_181655401.jpg
    1.1 MB · Views: 40
  • IMG_20230316_182132458.jpg
    IMG_20230316_182132458.jpg
    1.4 MB · Views: 45
  • IMG_20230316_182931055.jpg
    IMG_20230316_182931055.jpg
    1.4 MB · Views: 46
  • IMG_20230316_185227772.jpg
    IMG_20230316_185227772.jpg
    1.2 MB · Views: 43
Thanks guys

Yeah his stuff is pretty tit. I'm very happy with all of his stuff.

Working on the rear brakes. Really the only options are going high dollar with separate hat and rotor bits or stock.

I decided that stock is super beefy although heavy. Cheap so that's where I'm at. Only issue is the rotor thickness is 1.5" so there is no mechanical caliper for the parking brake. So that means I'm going with a drive line brake at some point.

The unit bearing which off the top of my head is 129mm both 99-94 and 05+ which DOES NOT interchange with a factory rear rotor. So you are stuck running a front rotor. Note that 05+ DO NOT fit a 16" wheel.
 

Attachments

  • IMG_20230328_183823636.jpg
    IMG_20230328_183823636.jpg
    1.3 MB · Views: 34
  • IMG_20230328_175934832.jpg
    IMG_20230328_175934832.jpg
    1.2 MB · Views: 34
  • IMG_20230328_175952643~2.jpg
    IMG_20230328_175952643~2.jpg
    1.8 MB · Views: 33
Made some progress...

The frame is being held up with jackstands so the front is at full droop right now as I get things tacked in and centered.
 

Attachments

  • IMG_20230902_153313869.jpg
    IMG_20230902_153313869.jpg
    1.2 MB · Views: 26
  • IMG_20230905_193301540.jpg
    IMG_20230905_193301540.jpg
    3.6 MB · Views: 25
  • IMG_20230905_193228661.jpg
    IMG_20230905_193228661.jpg
    2.9 MB · Views: 24
  • IMG_20230902_183204831.jpg
    IMG_20230902_183204831.jpg
    5.9 MB · Views: 24
  • IMG_20230902_183134554.jpg
    IMG_20230902_183134554.jpg
    2.7 MB · Views: 23
  • IMG_20230902_182415907.jpg
    IMG_20230902_182415907.jpg
    3.1 MB · Views: 20
  • IMG_20230902_155849239.jpg
    IMG_20230902_155849239.jpg
    1.7 MB · Views: 25
Got WonTons sitting on the ground. Pretty happy with shackle angle, spring placement, ride height, etc.
 

Attachments

  • IMG_20230912_173923791.jpg
    IMG_20230912_173923791.jpg
    3 MB · Views: 24
  • IMG_20230912_173931622.jpg
    IMG_20230912_173931622.jpg
    2.6 MB · Views: 26
  • IMG_20230912_173859212.jpg
    IMG_20230912_173859212.jpg
    3.1 MB · Views: 18
  • IMG_20230912_174007536.jpg
    IMG_20230912_174007536.jpg
    2.3 MB · Views: 19
Mind sharing what it cost for moser to cut the shafts down?
 
Mind sharing what it cost for moser to cut the shafts down?
$85 to cut it
$65 to ship back

I think it cost me roughly the same to send it out. So a little over $200.

That was to respline a bare long side shaft.
 
This is gonna be a sweet S10.

Do you have a build thread for the “CUCK V” or Square Body in the background?
 
Thanks man!

The CUCV build is on steel soldiers. There is also a ton of other threads started by me for the 4L80 swap, AC installation, and other various shit.


Unfortunately the Burb doesn't have a build thread. It started as a 2wd 350 C2500. It is now an 8.1 4L80 205 with CUCV axles. I'm building it to look like the Dante's Peak Suburban except it's blue instead.
 

Attachments

  • IMG_20220903_142800663_HDR~2.jpg
    IMG_20220903_142800663_HDR~2.jpg
    3.6 MB · Views: 10
Sweet, thanks for the link. I haven’t been on SS in so long.. Burb looks sweet too
 
Sweet, thanks for the link. I haven’t been on SS in so long.. Burb looks sweet too
Neither have I. I used to post all the time. Then it seemed like members started to get some pretty thin skin over anything that was counter to what they say followed up with a temp ban.

There is a lot of useful information on that site but I no longer contribute. I don't have much time for retarded riff raff anymore.

Thanks!

This build doesn't seem to get much traffic. I guess V8 S10's on narrowed 1 tons is boring now🤣

I'll keep posting.
 
I hear ya. That’s why I stopped checking that forum. Plus the mods didn’t like my username.. Sorry for the derail.

Keep us updated, this build is Rad!
 
Last edited:
Top Back Refresh