What's new

1984 K20 Dana 60 swap and suspension

Snapchat-1642474515.jpg


Snapchat-1125301512.jpg


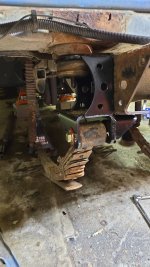
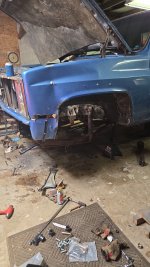
Poor old truck has gone on the backburner since I started autocrossing the Camaro, but it's winter now so I'll try to make some progress. Finally got the bumper pulled to start working on rivets. 4 different cutting tools later and I'm going to have to buy an air hammer, no way around it. Need some new body mounts for the core support but I don't want to wait on any either.
 
Fuck me those rivets are the bane of my existence. Borrowed a buddies air hammer but I'm fuckin dumb and bought too small of a compressor so it won't keep up. Flap wheeled the backside of them off but they won't budge. Moved the body mount nut and wedged a prybar in between the frame and core support, then started hammering various chisels in to try to spread it.

Finished up my workbench built out of a youth ATV crate, so by the time I got to the truck I was already a little tired. Started swinging my 4lb sledge at the chisels and managed to get a finger so I called it a night.

Snapchat-1345929135.jpg


Kind of proud of my cheap ass bench. I know particle board sucks but I was smart about mounting my vice (minus not realizing I was too close to the edge to make the 4th reinforcement work).

20231217_185426.jpg

20231217_185433.jpg
 
Pricey for possibly a one time use for you but I reckons this will make them to come out with ease (and rivet embedded in your wall).

Theyre what techs use to cut factory rivets off ball joints or to press them out, or to press out control arm bushings and press in new one on-vehicle.

They’re nicknamed “big nasty”

Astro Pneumatic Tool 4980 0.498" Shank Super Duty Air Hammer/Riveter Amazon.com
 
Last edited:
I'm borrowing a coworkers slightly bigger Bluepoint one. If that doesn't do it I'll have to order that one.
 
Ive cut out thousands of rivits on gm frames.

When possible sloting the rivit head take 90% of the fight out of them and somehow makes them pop out a lot easier.

I wont even touch the shit cheap hammersn gimmie my snapon big dog every time. Even with a shit aircomp they work 10x better than the cp cheapies on good aircomps.

And yes, youll find plenty of uses for it.
 
Even with a shit aircomp they work 10x better than the cp cheapies on good aircomps.
I’ll like to add that there are two “cp”.

Central Pneumatic is crappy for air tools. Harbor Freight’s brand. Their oiled air compressors aren’t that bad however.

Chicago Pneumatic is good reputable brand. Their big nasty part# is CP717, Astro brand is a clone of it for little less money (part# 4980 as linked above).

And yeah air hammers don’t need that much air flow. They just need pressure.
 
Borrowed my coworkers Blue Point and what a difference. Can only get 2 rivets before the compressor cycles but it just chews them right off. Managed to get the passengers side hanger off, forgot to move the car before getting filthy so I'll wait till tomorrow when it's warmer to finish the driver's side.
 
I cut two or three slots in the heads with a cutoff wheel and the air hammer pops them right off.
 
I cut two or three slots in the heads with a cutoff wheel and the air hammer pops them right off.
I'll try that on the other side. I was just relieved to finally get the fucker off. Snap on guy will be at the shop today, going to have to price that air hammer. I don't know how often I'll honestly use it but I hate having to borrow tools. I really need to refresh the D60 and I'll have a bunch of steering shit that I'm sure it'll come in handy for.
 
I use a plasma and a air hammer, works 100% of the time, first time :flipoff2:

Then again, we've also done 1" rivets on a Paccar frame.
I mean, we were talking about 1 ton truck frame rivets in a home garage, but if we want to pull it out and measure I used 3" Hougen cutters on a 3ph hydraulic powered mag drill to core case studs, but I'm not sure how that help OP :flipoff2:
 
I mean, we were talking about 1 ton truck frame rivets in a home garage, but if we want to pull it out and measure I used 3" Hougen cutters on a 3ph hydraulic powered mag drill to core case studs, but I'm not sure how that help OP :flipoff2:
We are :flipoff2:

Then we also talked about a Peterbuilt frame in the home garage driveway.

I have an old assed mag drill too.
 
Got off my ass and got back to it for a little while last night. Want to at least have it back on its wheels soon. Had to borrow a bur bit from a coworker so I can install the new rear spring hanger eyes for the front, the hole in the frame wasn't quite big enough.
 

Attachments

  • Snapchat-844650432.jpg
    Snapchat-844650432.jpg
    1.3 MB · Views: 3
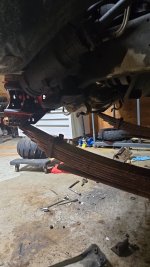
Hey guys, dumb ? I have 2 sets of shackles, short and long. Pretty sure the short ones go on the front but I'm not sure. Got the passengers front spring hung.
Snapchat-352915762.jpg
 
Hey guys, dumb ? I have 2 sets of shackles, short and long. Pretty sure the short ones go on the front but I'm not sure. Got the passengers front spring hung.
I kinda remember that you might need to play with the front axle shackle length when installing that kit with longer springs.
 
typically the front and rear shackles don't interchange.
With the B52 kit you're putting rear springs on the front so they'll all be the same. I'll get both sides mocked up with the short shackles on the front, gotta shit some hardware, and see how it goes.
 
they don't connect to the frame the same. the front shackles go around the frame. the back is different. thats what I mean.
 
Ahh I gotcha, yeah I'm just going to have to tinker. DIY4X's site finally went down so any semblance of instructions I could piece together is long gone and I'm short some hardware. That's okay though, I'll figure it out somehow.
 
Ahh I gotcha, yeah I'm just going to have to tinker. DIY4X's site finally went down so any semblance of instructions I could piece together is long gone and I'm short some hardware. That's okay though, I'll figure it out somehow.
This is what I ended up buying. I haven't installed it yet :homer: and can't remember how I came up with this list of parts :shaking:.
1000044451.jpg

I'll check for paper instructions, guidelines.
 
Thank you! I've had mine for well over a year and never did anything with it so this is entirely my fault lol.
 
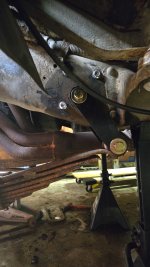
Eyeballed the shackles, these seem to be the 6". Both sides of the front done, I'm going to break down the leaf packs after work tomorrow and then maybe slide the axle in there.
 

Attachments

  • Snapchat-2013417662.jpg
    Snapchat-2013417662.jpg
    1.5 MB · Views: 3
  • Snapchat-679780332.jpg
    Snapchat-679780332.jpg
    1.2 MB · Views: 3
  • Snapchat-1635586262.jpg
    Snapchat-1635586262.jpg
    1.4 MB · Views: 2
Now that I'm looking at them, they don't seem right. Once they've got weight on them it seems like they'll touch the frame.
 
The front hanger can be mounted in 2 positions. Is it mounted in the forward set of holes? Those are 52s right? Not the 56s I sold you? I couldn’t make 56s work. Diy4x has/had a video where he said he likes to run 6 inch shackles with 52s.
 
Top Back Refresh