What's new

1968 Ford F-250 Prerunner Build

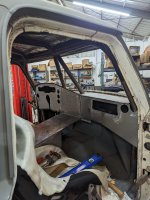
Yeah this has definitely been a long project for me. I got this truck in a trade in 2014. Never driven the truck or even heard a motor run in the truck. This project is turning out better than I imagined and thought it would even become when I started on it back then. Snowball was created but I'm gonna finish this thing and drive it this year and as soon as possible as well.
 
Yeah using a ton of RAM board for templates and a whole roll of masking tape to mock everything up.

Got tabs welded onto floor for center console. Made center dash piece and last face piece of the dash. Waiting on my samples for the dash marine vinyl so I can know how much space that takes for when I wrap the panels so I can weld up more tabs to make the face of the dash fully removable and bolt in. Then layout where gauges, rest of AC vents, shifter, radio, intercom etc so I can cut holes for everything. Need to finish sanding the weld seam above the column where I put the 2 pieces together around the column. Half the dash is removed but here's a couple pics.
PXL_20230114_012155353.jpg
PXL_20230114_012200438.jpg
 
Just gotta say, fucking solid work as always.

Hard to tell, is it press brake work or bead roller work you're putting into this? The bends and contours are super clean.
 
The round edge is some 1/4" round stock and have a small 18" wide harbor freight sheet metal brake. I have a bead roller and am going to use it for where the gauge panel and center panel meet up so they will sit somewhat flush instead of on top of each other so noticably
 
If I could make a request, show us your setups when you're forming this stuff.

The very limited amount of sheet metal forming I've attempted has been with modest tooling. Showing your process without tens of thousands of dollars of sheet metal forming tools (like many yt channels) would give all of us ideas on how to get to your level with what we have on hand.

Keep it up man. Love watching your work.
 
I'm done with a lot of the sheet metal work on this dash but I'll spend some time taking videos for the finishing of the dash and doing bottom edge round stock and all of that. I also have to cut and bend the panels that go between console and the dash around 4x4 shifter and cover the AC which won't be easy but I'll make it work and look good.
 
Ok not much progress today since I ran some errands to get more supplies for tomorrow. I spent way too much time cutting out the gauges cluster opening which was tricky because it had 6 1/8" bolt holes that needed to be inside the opening. So I drilled those holes and then drilled more holes on either side of that so when I used hole saw for ends and cutoff wheel, and body saw to cut it out the tabs wouldn't be cut and be strong to hold everything in place. Then played out the top holes to secure this to the dash and drilled those holes and holes on the top flanges. Once the top tabs are in place and everything is bolted up I will drill the overlapping holes so I can install rivnuts on the bottom tab. I the welded some 1/4" round stock on bottom lip so it will be all finished looking once I wrap the entire dash and all panels. Also once it's all welded and bolted together I will reinstall the AC evaporator and make the front side panels of console to finish that all off. The pass side cover panel will be a little tricky since it needs to not be a straight 90 in order to cover the complete AC and have room to hook up all the hoses. Stay tuned that will be completed next week. I also filmed some of this today so I'll put together a rushed video from half way to finish to show you the process and limited knowledge and sheet metal tools I have to finish this job.

PXL_20230114_214213891.jpg
PXL_20230114_222407904.MP.jpg
PXL_20230114_224121588.jpg
PXL_20230114_224127597.jpg
PXL_20230114_224132578.jpg
PXL_20230114_224143901.jpg
PXL_20230114_224153451.jpg
PXL_20230114_231755200.jpg
PXL_20230114_232204219.jpg
PXL_20230114_232209595.jpg
 
Nice work. Dashes suck. I ended up redoing mine out of stainless since I'm apparently a masochisy and I hate myself. I've got a long way to go before instrument's go in though.
 
More work on the dash. Pass side tabs were easy since I could reach around from bottom to tack tabs on back side. Driver side note so much. Got 2 tabs tacked and than made a guide with holes in same spots so I could tack other tabs in place. Did that and refit dash piece and was all good. Installed and removed the dash pieces like 10 times per piece to drill holes or trim a bit more where needed. Got it all in place and reinstalled so I can do front sides of center console next.
PXL_20230115_231113660.jpg
PXL_20230115_231056785.jpg
 

Attachments

  • PXL_20230115_231113660.jpg
    PXL_20230115_231113660.jpg
    2.6 MB · Views: 4
Last edited:
Man that's turning out nice.

Seriously fucking nice. What makes it bad ass for me is how he makes all this shit. It looks pro, but uses shit we all have to do it. Work benches, random pipes, a few hammers, and a shit ton of skill. Well, we don't all have a shit ton of skill, I def don't, lol. One can dream.

We can all learn a lot from this guy Tommy.

Edit: not trying to suck his dick too fucking hard, but real craftsmanship documented on a forum is hard to come by these days.
 
Last edited:
Seriously fucking nice. What makes it bad ass for me is how he makes all this shit. It looks pro, but uses shit we all have to do it. Work benches, random pipes, a few hammers, and a shit ton of skill. Well, we don't all have a shit ton of skill, I def don't, lol. One can dream.

We can all learn a lot from this guy Tommy.
I cheat when I can, since I have a finger brake and a bead roller, but you'd be surprised how often you end up just having to hammer something out anyway because it's odd shaped.
 
I cheat when I can, since I have a finger brake and a bead roller, but you'd be surprised how often you end up just having to hammer something out anyway because it's odd shaped.
I've been there. Building the interstate piping for my compound setup was a serious fuckin lesson. So was/is body work, consoles, and trim panels I've done thus far. Pretty much everything in sheet metal I've ever done.

I need to get a finger brake.

Tommy makes me want to rip out my dash and attempt to remake it in sheet metal.
Do it!
 
My finger brake is cutting angle iron to length, clamping to edge of my welding table and then using rubber mallet to get bent close, then finish it with my flat faced small body hammer I got from harbor freight. No progress today but I did install a eastwood table to my woodward fab bead roller. I have some 1 1/2" x .250 box tube welded to the side to stiffen it up and had to notch that for the table to fit but I got it on and in place and should make my life much easier with doing larger panels.
 
Storage compartment, glove box type setup in center console as well as the solve function 8 and 12 switch pros mounts. I could've mounted them with drilling holes and bolting them down but I like the look of these and give the edge of them a finished look in my eyes. Glove box is made same as I've done it in the past, ramboard heavy cardboard, staples on flanged edges and duct tape around outside, finished inside with spray paint. Should work well since my 50s and 60s Chevy trucks glove boxes were constructed in a similar fashion
PXL_20230128_000949207.jpg
PXL_20230128_000953709.jpg
 

Attachments

  • PXL_20230128_000953709.jpg
    PXL_20230128_000953709.jpg
    2.9 MB · Views: 2
Well the mob. Armor style mount for my 2019, Samsung 10.1 tablet came in and I need to make a revision slightly to the front plate so I can access the power port easier. I also countersunk the mounting holes and mounted a ram mount to the back so I can use this tablet mount in my other vehicle easily. The outside for corner holes are free to have the bolt go through on the tablet mount and I used rivnuts to bolt this to the dash of the Ford. I also used a 90° USB-C adapter for power outlet so that is easy to access from rear of tablet mount and no exposed wires when bolted to the dash of my Ford. I made one extra of these with no rib nuts or anything. Just quarter inch holes through that I would sell for $75 shipped for the 2 laser cut plates if anyone's interested and wants a tablet mount for an Android tablet since not everyone does Apple products like myself.

PXL_20230128_222557195.jpg
PXL_20230128_221736104.jpg
PXL_20230128_221837959.jpg
PXL_20230128_221841233.jpg
PXL_20230128_222417435.jpg
PXL_20230128_221825154.jpg
PXL_20230128_222423415.jpg
PXL_20230128_222420507.jpg
PXL_20230128_222559646.jpg
 
Defrosting duct holes cut and cleco in place. They will attach with same counter sunk Allen bolts that the dash uses . More holes drilled along with made bracket for vent for floor ducting to hook into. Got it all in primer. Gonna paint it all black before wrapping it with spray adhesive and marine vinyl.

PXL_20230201_222135114.jpg
PXL_20230201_222233310.MP.jpg
 

Attachments

  • PXL_20230201_222233310.MP.jpg
    PXL_20230201_222233310.MP.jpg
    4.7 MB · Views: 5
  • PXL_20230201_222135114.jpg
    PXL_20230201_222135114.jpg
    2.2 MB · Views: 7
Ok so no photo worthy updates but one and I didn't take photos of that. Mounted oil accumulator and plumbed in that and oil cooler lines. I also decided to remount trans cooler and batteries which means I needed to remount fuel cell. The cell I have is just too wide and long for my chassis setup so getting a new fuel cell to fix that and also going to get a larger cell. So chopped off rear of backhalf to try and make it work but didn't want cell being 7" behind the back of bedsides. So while waiting for new cell to show up I got it all ready to reinstall. I also am finalizing trans mount, plumb brake lines and going to regear the rear axle while nothing is in the way. I'll make a thread of gear setup questions. I've done it before but never a D70 only a 9" and GM 14 bolt, which are easy because spanners for adjusting backlash and shins for pinion bearing depth.

PXL_20230317_175015282.jpg
PXL_20230317_175022402.jpg
PXL_20230317_205412067.jpg
PXL_20230318_234604714.jpg
 
Worked with my Dad and got my parents 1950 GMC Panel Truck driving and out of the shop for now. Made front and rear bumper brackets, both bumpers were rears, as well as some rear tail light brackets since this only came with the single light on back door and no turn signals, which I got wired into this now too. So I'm back to work on this thing. Started rebuilding the rear fuel cell cradle behind the axle. The middle tube that's below the fuel cell is to house my sway bar. The front diagonal tubes down to lowest tube will have mount for my large trans cooler. Behind that will be the fuel tank I'm going to have my brother make, since he's a pro and has made fuel tanks for lots of vehicles over the years.
PXL_20230626_012147851.jpg
PXL_20230626_012201147.jpg
PXL_20230626_012210532.jpg
PXL_20230621_222835578.jpg
PXL_20230621_222844767.jpg
PXL_20230622_223129821.jpg
PXL_20230624_002837368.MP.jpg
PXL_20230625_210726411.jpg
 
Top Back Refresh