How to install the app on iOS
Follow along with the video below to see how to install our site as a web app on your home screen.
Note: This feature may not be available in some browsers.
You are using an out of date browser. It may not display this or other websites correctly.
You should upgrade or use an alternative browser.
You should upgrade or use an alternative browser.
Shop and Tools: Tips and Tricks
- Thread starter Muckin_Slusher
- Start date
Brad
Jackass
How well does that hold up to hot weld spatter? I don’t like the open handle area. I’ve knelt down and there was a rock in that open spot. Didn’t think to check HF though. I was at HD for Black FridayDon't forget the HF cheapskate edition

Clb
another toyota from P.R.K
Someone needs a pocket knife
bgaidan
Red Skull Member
- Joined
- Jul 18, 2020
- Member Number
- 2322
- Messages
- 2,972
How well does that hold up to hot weld spatter? I don’t like the open handle area. I’ve knelt down and there was a rock in that open spot. Didn’t think to check HF though. I was at HD for Black Friday
I can't imagine any of them hold up very well to spatter. By design, they're made to be soft on the knees. Any coating or surfacing that would hold up to spatter would probably less than ideal for comfort.
I have a chunk of heavy packing foam that I use for a kneeling pad....it was free and works pretty well.

How well does that hold up to hot weld spatter? I don’t like the open handle area. I’ve knelt down and there was a rock in that open spot. Didn’t think to check HF though. I was at HD for Black Friday
5-6 yrs mostly stick welding with large spatter.
Gots_a_sol
Red Skull Member
Or just spend a few more dollars and get a leather one (which I think was posted in this thread earlier
Tillman 563-1224 1' X 2' Cowhide Split Leather Welders Kneeling Pad Tillman 563-1224 1' X 2' Cowhide Split Leather Welders Kneeling Pad: Amazon.com: Tools & Home Improvement
Tillman 563-1224 1' X 2' Cowhide Split Leather Welders Kneeling Pad Tillman 563-1224 1' X 2' Cowhide Split Leather Welders Kneeling Pad: Amazon.com: Tools & Home Improvement
Muckin_Slusher
****
I needed to bend some flatbar, so welded a couple pins 5/8 inch apart for a bending fixture.
WIsh I had searched online first. These are adjustable and mix/match since they're on two separate angle irons.


WIsh I had searched online first. These are adjustable and mix/match since they're on two separate angle irons.
Muckin_Slusher
****
Finally got around to mounting a hitch on the little piece of bank vault I brought home.
Nice to have an outside vise.
Still have to mount another, smaller vise on a taller hitch so I don't have to stoop. This was just the goofy hitch vise I had laying around. I also used the receiver that came with it. I think it's malleable cast iron, but it drilled making nice long curls (not dust) and welded nicely with preheat.
Firstram
Red Skull Member
Absolutely brilliant! I'll be copying the fuck out of this, thanks!I needed to bend some flatbar, so welded a couple pins 5/8 inch apart for a bending fixture.
WIsh I had searched online first. These are adjustable and mix/match since they're on two separate angle irons.
Muckin_Slusher
****
Not really a tip or trick, but I wanted to save this somewhere. Looks pretty straightforward to build.
Muckin_Slusher
****
Buddy gave me a costco power strip. Decided to weld it under the welding table facing down. It's not as bad as it sounds plugging stuff in.
I like how the receptacles will stay clean because gravity, and also how the tool cords won't bend/fatigue over time. Yes, eventually the receptacles will get tired enough to not hold the plugs in, but that also means they would start melting at that point so should be changed anyway. This one's got enough spares that I'll never need to swap out.
Didn't trust the little plastic mounting tabs so I bent some 1/8x1 straps.
Not really a tip or trick, but I wanted to save this somewhere. Looks pretty straightforward to build.
Well that's interesting.
When the dude was reefing on that flat stock in the first clip, I had a brief moment of fear that it would shoot out upwards because it has no vertical retention.
Overall it looks really useful and extremely flexible/modular/customizable for small materials. Someone making decorative gates or something similar could make good use of it.
arse_sidewards
Contrary to everything
- Joined
- May 19, 2020
- Member Number
- 71
- Messages
- 7,943
Just bend the tabs on the plugs.. Yes, eventually the receptacles will get tired enough to not hold the plugs in
Muckin_Slusher
****
chaplinfj60
Well-known member
i keep mine in another container so i can pick that one up and not spread the shit to my hands right away.Anyone have a good tip for preventing anti-seize from getting everywhere the moment one looks at the container?
TTMotorsports
Red Skull Member
I get antiseize everywhere once when I fill a plastic syringe to apply directly into bolt shanks and onto threads right before but gets installed or into nut before threading on. Way cleaner than using the brush in the cap.
TrikeKid
Junk Hoarder
Anyone have a good tip for preventing anti-seize from getting everywhere the moment one looks at the container?
If using a normal brush/can style I usually set the brush up out of the container some and rub the bolt across it then IMMEDIATELY install said bolt. Wear nitrile gloves and toss them as soon as you're done touching anti-seize.
- Joined
- Sep 9, 2021
- Member Number
- 4387
- Messages
- 2,891
Anyone have a good tip for preventing anti-seize from getting everywhere the moment one looks at the container?
Nope
Practice wrenching with a white shirt on. It's amazing how clean you can stay if you just pay attention to the shit on your hands.Anyone have a good tip for preventing anti-seize from getting everywhere the moment one looks at the container?
Had a mentor as a kid that always wrenched with a white shirt. It really made an impact on me and now I constantly shake my head at dirty dingy mechanics and greasy ass tools.
rockota
white collar hillbilly
- Joined
- May 28, 2020
- Member Number
- 1642
- Messages
- 3,650
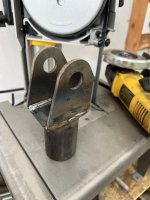
I hate dealing with coil springs... especially coil spring compressors.
Almost two decades ago, I changed springs on my 03 Tundra using a 20 ton press with zero safety in mind. I just put the bottom of the strut eye on the press pin and hoped it didn't kill me.
Have to change the springs in the Tacoma tomorrow, so I finally built this little adapter. Scrap 1.75" DOM, 1/8 plate and a shock tab. The 1.5" ID is perfect for around the pin. Should hold the spring eye in place on the pin, while the arbor and press base holds the other side in place.
Should know tomorrow if this is easier than borrowing compressors.
Attachments
I hate dealing with coil springs... especially coil spring compressors.
Almost two decades ago, I changed springs on my 03 Tundra using a 20 ton press with zero safety in mind. I just put the bottom of the strut eye on the press pin and hoped it didn't kill me.
Have to change the springs in the Tacoma tomorrow, so I finally built this little adapter. Scrap 1.75" DOM, 1/8 plate and a shock tab. The 1.5" ID is perfect for around the pin. Should hold the spring eye in place on the pin, while the arbor and press base holds the other side in place.
Should know tomorrow if this is easier than borrowing compressors.
Dibs on your stuff.

How are you anchoring the top plate against the arbor? I bet you can clamp the arbor plates in place and just center the top plate between them. The studs will be a potential issue though.
rockota
white collar hillbilly
- Joined
- May 28, 2020
- Member Number
- 1642
- Messages
- 3,650
Dibs on your stuff.
How are you anchoring the top plate against the arbor? I bet you can clamp the arbor plates in place and just center the top plate between them. The studs will be a potential issue though.
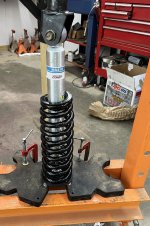
Yeah. Clamp the arbors in place is the plan.
665.0coupe
Red Skull Member
Take some pictures of your setup if you don't mind. I did one Tacoma strut a couple days ago with 3 hf spring compressors. What a pain. I still have the other one to do.Yeah. Clamp the arbors in place is the plan.
rockota
white collar hillbilly
- Joined
- May 28, 2020
- Member Number
- 1642
- Messages
- 3,650
Never going back to spring compressors... This is stupid simple. Changing a spring could be a 20 minute job start to finish with a 19mm ratchet box wrench... I don't have one, so it took longer.Take some pictures of your setup if you don't mind. I did one Tacoma strut a couple days ago with 3 hf spring compressors. What a pain. I still have the other one to do.
Ideal would be a thick laser cut bottom plate that puts all the pressure on the top hat vs the studs, but for how often I've had to change springs (3x in 20 years), this works fine.
Only issue I had is the spacing between the press adjustment is off just a tad for this job. So I added a 1" spacer inside the top tube, which worked perfect.
Edit: 20 minutes from putting truck on jacks. My truck doesn’t have a front sway bar, so I don’t have to struggle with the removal/install. Just loosen the limit straps and 4 bolts.
Attachments

Last edited:
clodhopper
Get off my lawn, punk!
DWT is setting up a new box…
clodhopper
Get off my lawn, punk!
It isnt about being forced, it is about wanting to offer praise to the snapon gods.