What's new

One Ton Cherokee Chief Build

Oak

Member
Joined
Aug 6, 2020
Member Number
2537
Messages
23
Loc
TX
Attempting to transfer the highlights of my FSJ build from another spot so I have somewhere to update occasionally. I suspect someday the other forum and all its glorious content will be wiped from the internets

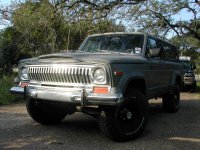
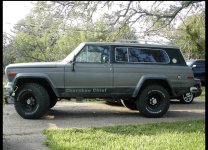
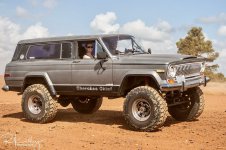
I bought this ‘78 Cherokee for $1800 in 2007 sight unseen while I was working in the oil field in BFE Kazakhstan. I had an ‘81 on 38”s at the time that had been severely abused, not a straight panel on it. Or windows or complete floors. I had a mild affection for FSJ’s and it was time for a fresh start.

I was working nights so I called a buddy who lived in the area to check out my 1978 Craigslist find.

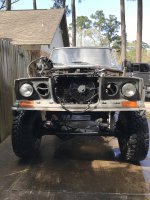
Straight body, check!
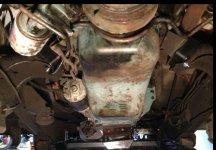
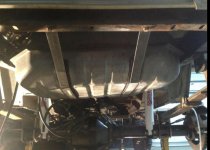
Minimal rust, check!
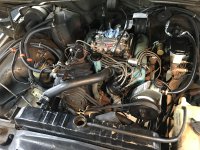
Mechanically sound, check!

I wired him the money, stopped through on the next flight home and drove it 4 hrs back to Austin without it skipping a beat. Rocked it as-is for a couple years before moving to Houston and parking it in the garage where it sat in various stages of dis-assembly.

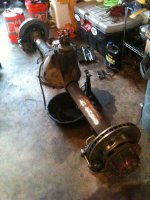
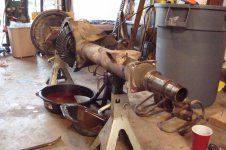
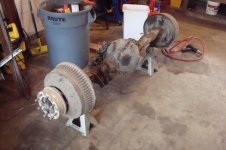
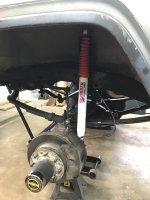
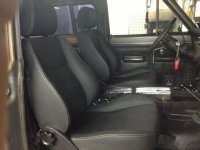
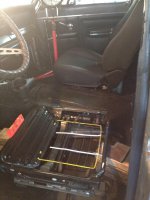
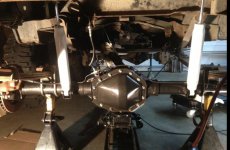
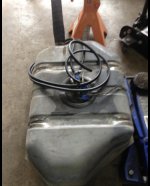
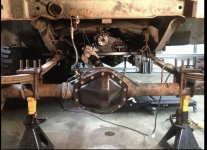
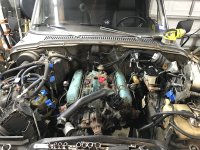
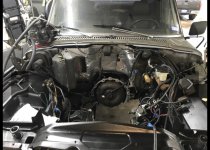
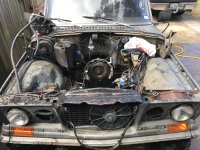
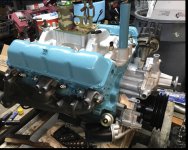
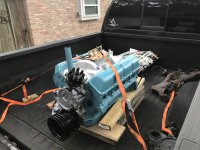
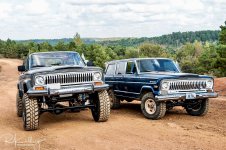
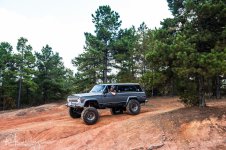
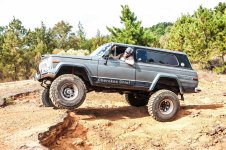
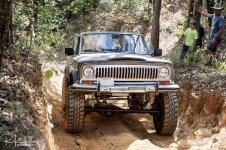
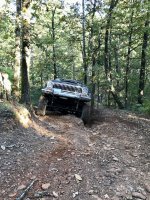
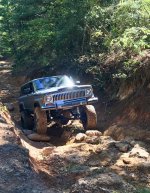
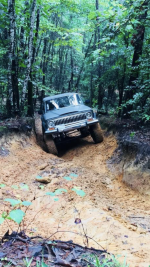
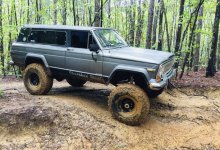
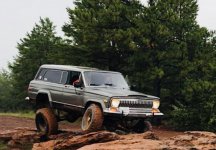
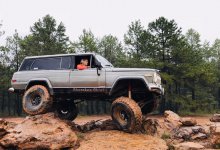
I wasn’t doing anything ground breaking with the build. The goal was a beefy drivetrain that would handle most of what I could throw at it on the trail and still get around town while keeping the classic look. Something the wife and I can load the dog up in and drag to the mountains for wheeling / camping excursions.

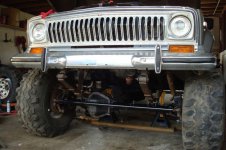
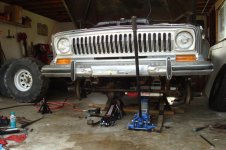
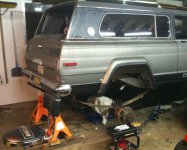
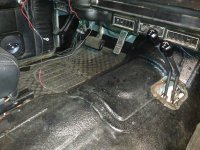
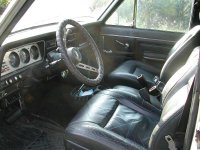
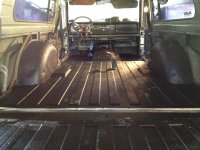
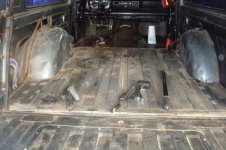
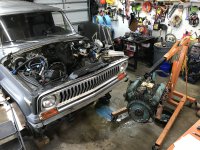
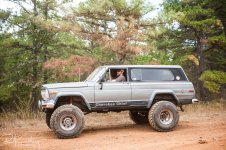
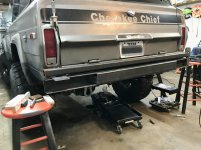
When I brought it home:
 

Attachments

  • D603D98B-4936-4224-85C6-B385811FCDA8.jpeg
    D603D98B-4936-4224-85C6-B385811FCDA8.jpeg
    108.1 KB · Views: 144
  • EB0824E6-59EE-4B17-9095-7C2ED2FFB021.jpeg
    EB0824E6-59EE-4B17-9095-7C2ED2FFB021.jpeg
    201.5 KB · Views: 34
First up, axles. Scored a CUCV starter kit someone else had already tinkered with.
D60/14B, 4.56s, Detroits, 35 spline chromo outers, plate diff cover, etc. I disc’d the rear and stuffed em under.
 

Attachments

  • A26B4C4F-1C2A-451D-B36F-75067226B545.jpeg
    A26B4C4F-1C2A-451D-B36F-75067226B545.jpeg
    75.9 KB · Views: 25
  • EB6577C3-E9C8-4193-8ABE-5026AD5803E1.jpeg
    EB6577C3-E9C8-4193-8ABE-5026AD5803E1.jpeg
    61.5 KB · Views: 21
  • 4F3230E7-39E7-4FB7-83D7-7FEFD179EB22.jpeg
    4F3230E7-39E7-4FB7-83D7-7FEFD179EB22.jpeg
    68.8 KB · Views: 20
  • A7DAE96D-55AD-431E-BE98-BDB83AE3E5CD.jpeg
    A7DAE96D-55AD-431E-BE98-BDB83AE3E5CD.jpeg
    58.2 KB · Views: 23
  • 031038F3-7832-4E99-BDA1-4CE892B1A1A0.jpeg
    031038F3-7832-4E99-BDA1-4CE892B1A1A0.jpeg
    72.4 KB · Views: 24
  • 5AD713D3-8072-47CD-8ADE-6A632DE738EB.jpeg
    5AD713D3-8072-47CD-8ADE-6A632DE738EB.jpeg
    57 KB · Views: 25
  • 67300F2C-B2A2-441B-9B0F-7CDFE16187B7.jpeg
    67300F2C-B2A2-441B-9B0F-7CDFE16187B7.jpeg
    73.8 KB · Views: 25
After pondering links briefly I decided to stick with leafs. Because geometry sucks.

Did the 63” chevy junkyard leaf thing inboarded rear, after a couple tries to get the axle centered when loaded.

SOA front with ford shock towers and the longest shocks I could find.
 

Attachments

  • 501B31AC-735F-4358-B44F-C23A882C11ED.jpeg
    501B31AC-735F-4358-B44F-C23A882C11ED.jpeg
    1.2 MB · Views: 36
  • E3CD6E54-26B6-40F2-8B39-38C0447AD6A4.jpeg
    E3CD6E54-26B6-40F2-8B39-38C0447AD6A4.jpeg
    72.7 KB · Views: 32
  • D17A6FE4-19E3-45EF-BF1E-E6672BB39FD9.jpeg
    D17A6FE4-19E3-45EF-BF1E-E6672BB39FD9.jpeg
    74.9 KB · Views: 32
  • 0B6A00D9-2A92-4825-9E08-A404A5279642.jpeg
    0B6A00D9-2A92-4825-9E08-A404A5279642.jpeg
    56.4 KB · Views: 30
  • 632B414F-B0F8-4C6D-947F-FF6069E39026.jpeg
    632B414F-B0F8-4C6D-947F-FF6069E39026.jpeg
    57.1 KB · Views: 35
Next up, transfer cases. Ended up going with 203/205 doubler mated via NWF.

Did a tear down of both cases and replaced all questionable components while the TH400 was getting a tail shaft swaparoo and full rebuild.

Once all clean and buttoned, a bit of booty fab for a front crossmember to support AMCs offset trans bellhousing bolt pattern. Fucking engineers.

The rear 205 support I bought a plate kit from a vendor who’s name escapes me.

It should hold.
 

Attachments

  • 80E2B034-F2BF-4D3D-B264-793F4B506A71.jpeg
    80E2B034-F2BF-4D3D-B264-793F4B506A71.jpeg
    62.8 KB · Views: 29
  • EFAE1CBC-A735-4A0F-BE2D-382BF744F362.jpeg
    EFAE1CBC-A735-4A0F-BE2D-382BF744F362.jpeg
    53.4 KB · Views: 33
  • CD774A83-90BE-4C89-B559-1B80FE5A0653.jpeg
    CD774A83-90BE-4C89-B559-1B80FE5A0653.jpeg
    92.4 KB · Views: 32
  • 62E7BBA8-2264-48A6-9232-3ECC80E157E3.jpeg
    62E7BBA8-2264-48A6-9232-3ECC80E157E3.jpeg
    88.2 KB · Views: 30
  • D54BD853-7764-4674-BF48-1492C60839FD.jpeg
    D54BD853-7764-4674-BF48-1492C60839FD.jpeg
    57.6 KB · Views: 29
  • 29C9E2EE-A32E-4C1A-B4C8-EAC409233430.jpeg
    29C9E2EE-A32E-4C1A-B4C8-EAC409233430.jpeg
    88.9 KB · Views: 28
  • 213964BC-0985-4927-9099-F0E6BCC750EC.jpeg
    213964BC-0985-4927-9099-F0E6BCC750EC.jpeg
    64.3 KB · Views: 24
  • 0676303B-0640-4DF2-AAAF-453623473B33.jpeg
    0676303B-0640-4DF2-AAAF-453623473B33.jpeg
    85.7 KB · Views: 22
  • 3904EDA5-4778-499A-819E-409321D613F4.jpeg
    3904EDA5-4778-499A-819E-409321D613F4.jpeg
    81.6 KB · Views: 33
Last edited:
Now shifters. Had to get creative to avoid hacking up the floor. Made some brackets and mini links to get 2 sticks thru the factory hole. The range box shifter is routed via cable to a knob on the dash under the A/C controls. Latter still needs a bit of work as the cable is still sticky.
 

Attachments

  • E1620628-1626-41B8-911E-EE56D1113754.jpeg
    E1620628-1626-41B8-911E-EE56D1113754.jpeg
    139.7 KB · Views: 27
  • 67D8D473-8474-4F77-BC57-67D3732CFDE8.jpeg
    67D8D473-8474-4F77-BC57-67D3732CFDE8.jpeg
    172.5 KB · Views: 30
  • 1528F5B3-525B-4EE7-9910-BBB169279E3A.jpeg
    1528F5B3-525B-4EE7-9910-BBB169279E3A.jpeg
    167.8 KB · Views: 29
  • 54CBF504-DE7B-40C9-AEB2-1EF07F6BA7B1.jpeg
    54CBF504-DE7B-40C9-AEB2-1EF07F6BA7B1.jpeg
    101.9 KB · Views: 29
  • B60734CF-3AF1-4FA8-9F77-0EAD29F5B0C2.jpeg
    B60734CF-3AF1-4FA8-9F77-0EAD29F5B0C2.jpeg
    76.1 KB · Views: 27
  • 56845E71-D5E0-4693-80AE-70C03AEC033D.jpeg
    56845E71-D5E0-4693-80AE-70C03AEC033D.jpeg
    68.5 KB · Views: 27
  • 3E2A3158-7277-49D4-91E0-CB00A9D9F870.jpeg
    3E2A3158-7277-49D4-91E0-CB00A9D9F870.jpeg
    79.3 KB · Views: 30
  • 354DD644-2A5E-48A3-B53E-BE5DDC271F86.jpeg
    354DD644-2A5E-48A3-B53E-BE5DDC271F86.jpeg
    80.8 KB · Views: 28
  • 1F6454CC-3632-4A9B-A677-ECB1CA0A2C18.jpeg
    1F6454CC-3632-4A9B-A677-ECB1CA0A2C18.jpeg
    81.2 KB · Views: 29
Next up is seats. The non folding caddy seats the PO installed had to go. After diving half the yards in houston I found a set from a totaled 2000 something Land Rover Freelander. They fit the bill as low profile fold forward buckets, no cloth. The seat bases took a ton of hacking to fit but shit they’re comfy and they look cool 😎
 

Attachments

  • 19B1BD94-0911-4003-9565-A75C50008985.jpeg
    19B1BD94-0911-4003-9565-A75C50008985.jpeg
    65.3 KB · Views: 41
  • 3E09F87A-C80A-4D46-9CC4-09C7C70128B2.jpeg
    3E09F87A-C80A-4D46-9CC4-09C7C70128B2.jpeg
    54.5 KB · Views: 35
  • 1E5617D1-7C89-49F3-8ECD-C88479D3A9EC.jpeg
    1E5617D1-7C89-49F3-8ECD-C88479D3A9EC.jpeg
    76.8 KB · Views: 35
  • 6E63E012-A528-4431-A587-3D0003D000E7.jpeg
    6E63E012-A528-4431-A587-3D0003D000E7.jpeg
    58.7 KB · Views: 34
  • CBCB9228-CA24-4A47-9AF9-DA0666079463.jpeg
    CBCB9228-CA24-4A47-9AF9-DA0666079463.jpeg
    57.1 KB · Views: 39
  • 35BDA151-BC08-4BC4-8615-790BEF19B2AA.jpeg
    35BDA151-BC08-4BC4-8615-790BEF19B2AA.jpeg
    78.1 KB · Views: 43
Got a rust free 80 sitting next to garage waiting for a spot in line. Not nearly as clean as yours but only got $800 in it and a "supposed" fresh rebuild 360

It always amazes me how good these AMCs sound with open headers!
 
Ive always loved the ways these lookes with lifts and tires. very cool build
Thanks! I do still get the occasional “nice bronco” when I’m out running around town 🤣🙄

Got a rust free 80 sitting next to garage waiting for a spot in line. Not nearly as clean as yours but only got $800 in it and a "supposed" fresh rebuild 360

It always amazes me how good these AMCs sound with open headers!
Right on! Deals like that are getting hard to come by on these old rigs. Especially ones that aren’t orange and flaky. They do sound cool 😎
 
At some point the carpet came up and DIY Herculiner went down on the tub. There was a little rust under the passenger floor board, but otherwise pretty damn clean!
 

Attachments

  • BA1DD86E-27D8-4FB5-95B3-48B7CC839D63.jpeg
    BA1DD86E-27D8-4FB5-95B3-48B7CC839D63.jpeg
    101.9 KB · Views: 25
  • C1DFD17E-11C8-4417-93A1-E6DD425CB192.jpeg
    C1DFD17E-11C8-4417-93A1-E6DD425CB192.jpeg
    79.8 KB · Views: 22
  • 59106D44-BD8F-4933-9079-0A51DE3A7944.jpeg
    59106D44-BD8F-4933-9079-0A51DE3A7944.jpeg
    68.7 KB · Views: 21
At this point it was a marathon of sorting out misc odds and ends to get the jeep ready to roll. This took a while because of the aforementioned shitty work travel schedule.

-Rear axle got dolled up, brake lines run, new shocks.
- 20 gallon blazer tank went in since the old coffin tank was a no-go with the doubler.
-New poly motor mounts to go along with the new poly tranny x’member mounts.
-Front braided brake lines from ORD
-hydroboost conversion with larger GM master cylinder,
-PSC power steering pump to run the HB setup and steering ram, with 2pass cooler. local shop tapped the factory gear box for the hydro assist.
-New Tom Woods shafts, 1350 CV rear and 1350 standard front with super flex joint
-new exhaust to clear various new drivetrain obstacles
-picked up a set of military 37”s to roll around on
 

Attachments

  • D4047C4C-7982-432E-A075-1DD13A97D491.jpeg
    D4047C4C-7982-432E-A075-1DD13A97D491.jpeg
    1.4 MB · Views: 29
  • 1003F3E9-6B66-4A63-BF9D-16874DA42217.jpeg
    1003F3E9-6B66-4A63-BF9D-16874DA42217.jpeg
    110.4 KB · Views: 30
  • DECB635F-C65A-40B9-9551-6B6CAA71D6D4.jpeg
    DECB635F-C65A-40B9-9551-6B6CAA71D6D4.jpeg
    91.6 KB · Views: 30
  • A89ACD50-01FB-46E3-AA4F-AC5BDA9BE559.jpeg
    A89ACD50-01FB-46E3-AA4F-AC5BDA9BE559.jpeg
    101.2 KB · Views: 26
  • CF76F911-5A8C-4A82-A56E-DC403C469988.jpeg
    CF76F911-5A8C-4A82-A56E-DC403C469988.jpeg
    120 KB · Views: 28
  • FED2C418-E953-47A7-9095-8F45A59331C7.jpeg
    FED2C418-E953-47A7-9095-8F45A59331C7.jpeg
    127.7 KB · Views: 30
I finally get jeep on the road and get to enjoy it for a few months before the ol AMC gave up the ghost. Was doing 60 on an overpass when the #6 piston went boom.

I decided to rebuild it instead of swapping something much more reliable and fuel efficient in its place… 🤔

I pulled the 360 the following weekend and took it to a local machinist for the full work up. Turns out I had a cracked head too so I had to hunt one of those down..
 

Attachments

  • 37D149EE-FF71-463D-AE89-3EA07F9DD891.jpeg
    37D149EE-FF71-463D-AE89-3EA07F9DD891.jpeg
    1 MB · Views: 22
  • BC5CA254-919A-46D9-A29B-C4464BB04CD5.jpeg
    BC5CA254-919A-46D9-A29B-C4464BB04CD5.jpeg
    1.6 MB · Views: 21
  • A6C43CF2-A96C-4DE9-AFB7-29F3AEBB4FF2.jpeg
    A6C43CF2-A96C-4DE9-AFB7-29F3AEBB4FF2.jpeg
    1.2 MB · Views: 28
  • CC1F85E4-6A60-4D46-9B96-C73BABB38EB1.jpeg
    CC1F85E4-6A60-4D46-9B96-C73BABB38EB1.jpeg
    1.5 MB · Views: 24
  • 40F4BC5E-23A7-431F-9469-BA1DD4D8AFD8.jpeg
    40F4BC5E-23A7-431F-9469-BA1DD4D8AFD8.jpeg
    1.7 MB · Views: 24
  • 08DCE62F-27BB-4E6B-80AB-6E0534ADA22C.jpeg
    08DCE62F-27BB-4E6B-80AB-6E0534ADA22C.jpeg
    1.5 MB · Views: 23
In a few weeks I had my fresh AMC back in a bright shade of pointiac blue. 🧐
You see, some might think I lean purist for sticking it out with AMC at an opportune time to jump on the LS bandwagon, but the paint color proves the decision as strictly a matter of convenience. I didn’t want to start a new drivetrain swap after I just had gotten it back on the road, and I didn’t want to hunt down a can of AMC blue.

In any case I didn’t go nuts with the rebuild: comp cams XE262H and edelbrock performer intake. It needed .040 bore, crank and head work, new timing cover and oil pump.

I did spend an afternoon cleaning up the engine bay before dropping my shiny blue motor back in. 😎
 

Attachments

  • 1E094E9B-4837-4F7E-9679-84F55EBCEBC6.jpeg
    1E094E9B-4837-4F7E-9679-84F55EBCEBC6.jpeg
    134.2 KB · Views: 28
  • BF7C0278-24D1-4DC5-BAE2-E7C1EBC8223E.jpeg
    BF7C0278-24D1-4DC5-BAE2-E7C1EBC8223E.jpeg
    2.1 MB · Views: 23
  • 82B1B5BA-8AC4-4565-A430-821541B9DB02.jpeg
    82B1B5BA-8AC4-4565-A430-821541B9DB02.jpeg
    1.8 MB · Views: 25
  • 0DC1F4FF-7B27-42B9-BA02-097D2B13406D.jpeg
    0DC1F4FF-7B27-42B9-BA02-097D2B13406D.jpeg
    128.6 KB · Views: 25
  • 0BDF901E-BD7B-4E44-9CA2-78262209ABA8.jpeg
    0BDF901E-BD7B-4E44-9CA2-78262209ABA8.jpeg
    1.2 MB · Views: 26
Last edited:
All back together. Went with FITech 600 for fuel delivery and an external walbro pump. A few other accessories included TFI ignition stuff for hotter spark, new plugs/wires, upgraded water pump, aluminum radiator, etc.
 

Attachments

  • 1981F4B7-4B44-48DD-97B5-CE06F5A68D26.jpeg
    1981F4B7-4B44-48DD-97B5-CE06F5A68D26.jpeg
    790.4 KB · Views: 24
  • E4FAD4C0-F5A0-49FC-9F51-B122CB7515F7.jpeg
    E4FAD4C0-F5A0-49FC-9F51-B122CB7515F7.jpeg
    941.8 KB · Views: 25
Somewhere along the way an asshole named Harvey dumped 50+ inches of rain on our bayou city putting our neighborhood under water. Fortunately the jeep was drivable at the time and we were able to shuttle ourselves, several neighbors, neighbor’s neighbors and their pets to safety. Turns out you can squeeze a lot of bodies in with the seat folded up.

This was a turning point in my wife’s
relationship with the chief. After almost 10 years, she was finally a fan. All it cost me was a set of rear leafs and $120K in damage to our home. Insurance covered the larger expense thankfully. 😅

Just a couple pics of that shitshow before loading up.
 

Attachments

  • 26BFF4F6-6310-4B11-B9F5-E328DE5DAB3D.jpeg
    26BFF4F6-6310-4B11-B9F5-E328DE5DAB3D.jpeg
    75.8 KB · Views: 42
  • C7ECF47C-13A3-400D-9EAF-EE797C8B2401.jpeg
    C7ECF47C-13A3-400D-9EAF-EE797C8B2401.jpeg
    64.2 KB · Views: 46
So I hit the pause button on jeep wrenching in the hurricane aftermath, but we were able to squeeze in a shakedown run to Barnwell with some other FSJ folks.

The chief performed well other than running hot while crawling and having to shut it down to cool periodically. Likely an air flow problem, and a larger fan + a shroud helped some after the fact. However it wasn’t until I eventually went electric that the overheat issue went away 100%.

Some pics from one of the guys in our group who had a fancy camera. He also had baddass twin turbo LS wagoneer. 😎
 

Attachments

  • DAB5B423-78B7-423A-BF94-78850EB5C07F.jpeg
    DAB5B423-78B7-423A-BF94-78850EB5C07F.jpeg
    515.6 KB · Views: 45
  • EEBDC512-87B0-46E8-9AEC-5CD17805F61D.jpeg
    EEBDC512-87B0-46E8-9AEC-5CD17805F61D.jpeg
    448.6 KB · Views: 44
  • 6F359917-4DC1-422C-B1E1-4ED7DBF05F48.jpeg
    6F359917-4DC1-422C-B1E1-4ED7DBF05F48.jpeg
    404.4 KB · Views: 45
  • F5E500FE-4B22-40C4-99F5-27D2A9F562D7.jpeg
    F5E500FE-4B22-40C4-99F5-27D2A9F562D7.jpeg
    617.9 KB · Views: 44
  • 1D81B8EF-B027-4A34-B1BC-99DA607292B0.jpeg
    1D81B8EF-B027-4A34-B1BC-99DA607292B0.jpeg
    637.5 KB · Views: 46
  • 7352638C-6C65-4429-B531-F394C3FE01CC.jpeg
    7352638C-6C65-4429-B531-F394C3FE01CC.jpeg
    585 KB · Views: 46
A few pics from other runs. The 2nd set of junkyard leafs performed well.

Here I determined sliders and bumpers were needed after a lower panel monkeyfucked a rock a couple times. Again, trying to keep this one straight. For the ladies. 😎

More to come later.
 

Attachments

  • EB853589-FF72-482C-945A-601B5BF8B1E9.jpeg
    EB853589-FF72-482C-945A-601B5BF8B1E9.jpeg
    1.2 MB · Views: 39
  • 8F04BA4C-1F13-4ED5-8F4E-13ECDF532362.jpeg
    8F04BA4C-1F13-4ED5-8F4E-13ECDF532362.jpeg
    855 KB · Views: 34
  • F9FFA266-838F-49CA-AA80-4B1250990B98.png
    F9FFA266-838F-49CA-AA80-4B1250990B98.png
    5.4 MB · Views: 34
  • 32C4BADF-58C7-440F-A47E-AC74EB2A44CC.jpeg
    32C4BADF-58C7-440F-A47E-AC74EB2A44CC.jpeg
    122.3 KB · Views: 37
  • 27A89DDC-7F6F-4E1E-B14D-B6A10E52E7FF.jpeg
    27A89DDC-7F6F-4E1E-B14D-B6A10E52E7FF.jpeg
    65.9 KB · Views: 41
  • 485C98CD-F122-4A4A-86B9-34A0579C2C01.jpeg
    485C98CD-F122-4A4A-86B9-34A0579C2C01.jpeg
    94.7 KB · Views: 36
Fantastic build up.
Had a 78 Cherokee 32 years ago.
Built it up for wheeling
4” springs, 33” Buckshots, HO 4.0 liter.
Drove it HARD for 5 years
 
  • Like
Reactions: Oak
Thanks fellas, this has been a fun project.

Next up on the list is bumpers. I started with a swing out carrier to get the spare 37 out of the cargo area. And because they look cool.
 

Attachments

  • 9B5D9167-7342-480B-B154-11052CE1F00E.jpeg
    9B5D9167-7342-480B-B154-11052CE1F00E.jpeg
    419 KB · Views: 23
  • 9B74328E-DD39-4518-A7D1-5F30A99675D1.jpeg
    9B74328E-DD39-4518-A7D1-5F30A99675D1.jpeg
    1.5 MB · Views: 24
  • 5405B5D1-122B-4971-9F88-0F7DD64B8B13.jpeg
    5405B5D1-122B-4971-9F88-0F7DD64B8B13.jpeg
    1.3 MB · Views: 25
  • F3197512-62EC-4FDE-8F3A-5BCE93CA15F8.jpeg
    F3197512-62EC-4FDE-8F3A-5BCE93CA15F8.jpeg
    541.9 KB · Views: 24
  • 197E0922-DDDB-452E-992F-0C21AE416DF0.jpeg
    197E0922-DDDB-452E-992F-0C21AE416DF0.jpeg
    1.2 MB · Views: 25
Last edited:
How you liking the fi-tech?
I love that the old AMC starts on the first try every time and doesn’t sputter on hills or rocks! I’ve been running it around 4 years now and no issues so far.
 
Thats good to hear, seems like its hit or miss with the fi-tech, was tuning pretty simple?
 
Thats good to hear, seems like its hit or miss with the fi-tech, was tuning pretty simple?
I'm not particularly adept at engine tuning or performance, so i just plugged it in and started driving! I couldn't tell you if it's running optimally or if it drastically improved performance because I rebuilt the motor, made spark changes and other upgrades at the same time. Some day i'll play with it and get timing control set up to see if there are any gains, but it runs well on and off trail as-is.
 
Top Back Refresh